If you notice that the stopping distance of your car deviates from the norm, this means that the brake system is worn out and requires thorough attention. All thoughts should be focused on solving the question of how to change brake discs on a VAZ 21099 and check the pads. Let us remember that the brake disc is a metal structure made in the shape of a circle and installed on the front axle. The disc actively takes part in the braking process and tends to wear out after a certain period of time. If we talk specifically about VAZs, then most often they have only two brake discs on the front axle, but the rear of the car has drum brakes, other manipulations are carried out with them, the procedure is not the same as changing brake discs on a VAZ 21099. This factory equipment is well thought out initially, and in principle functions reliably.
VAZ 21099
When is a brake disc considered worn out?
Imagine the conditions under which a brake disc has to function. The part interacts with the brake pads and caliper; during movement, the disc heats up to 350 degrees Celsius. And if it is the summer period, driving in traffic jams, then the load on the brake system increases, as a result, rapid wear and tear and the urgency of the task of how to change brake discs on a VAZ 21099, the choice of a specialist to whom you will have to contact.
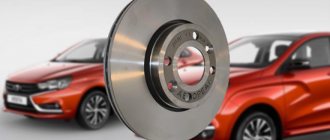
Brake disc VAZ 21099
After studying the technical documents, it becomes clear that brake discs with maximum operation can withstand 50,000 kilometers, and then you need to think about how to change the brake discs on a VAZ 21099 and check the entire system. Experienced drivers who have mastered the skill of smooth braking are lucky; they never use emergency braking, because their discs will last until the car’s mileage is 100,000 kilometers.
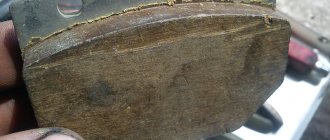
Measuring brake disc thickness
The moment of alarm for a part can be determined by visual inspection and measurements of the disk. If it turns out that its thickness is approaching 10 mm, then this parameter is already critical and requires action to be taken immediately, otherwise the task of how to change brake discs on a VAZ 21099 will have a difficult solution.
Replacing brake discs on a VAZ 2109
Brake discs provide braking to the front wheels when the vehicle is moving. The effectiveness of braking, and, consequently, safety on the road depends on their condition. Brake discs on a VAZ 2109 are replaced in the following cases:
- The thickness has reached the maximum permissible minimum value - 10.8 mm. At the same time, the thickness must be controlled in two places. If the wear is uneven, then replacement is carried out in any case.
- The disc has deep scratches or chips.
Such noticeable defects on the brake disc occur as a result of using low-quality brake pads or careless driving on uneven road surfaces.
Using such a brake disc will inevitably lead to its breakdown and sudden braking at speed, or, at best, to a deterioration in braking properties.
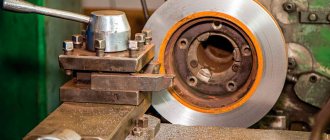
Small scratches on the brake disc can be removed using special equipment. However, not every driver can afford such devices. In this case, the brake disc must be replaced.
Procedure.
- Place the car on a completely flat surface and install wheel chocks under the rear wheels on the front and rear sides.
- Engage first gear and prevent any movement of the vehicle in the horizontal plane.
- Loosen the wheel bolts on the side where you plan to replace the brake disc and jack up the car.
- Completely unscrew the wheel bolts and remove the wheel. Mount your car on special supports to increase safety.
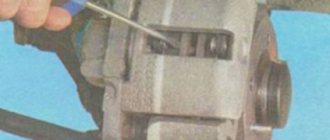
- Now unscrew the two bolts that secure the caliper to the steering knuckle and remove the brake caliper. To make the task easier, rock the caliper back and forth to loosen the pads. Attention! When dismantling the caliper, do not unscrew the brake hoses, as this can cause a very sharp leak of brake fluid.
- As soon as you remove the caliper, hang it with a wire on any suspension element so that it does not interfere with the work. This will also prevent possible damage to the brake hose.
- Using a dry cloth, wipe the brake disc to remove dirt and other debris.
- Use a lubricant such as WD-40 to treat the joint between the brake disc and hub, as well as the guides. Wait approximately 5 minutes and proceed to remove the brake disc.
- Unscrew the 2 guides from the brake disc and try to remove it by hand. If this fails, then take a rubber hammer and knock it off the hub with gentle blows along the entire circumference of the disk. Attention! Be careful not to hit too hard, as the disc may break and accidentally injure you from the fragments!
- Install the new brake disc, insert the guides and tighten them. They should be tightened evenly and equally so as not to spoil the threads and not to disrupt the uniform wear of the disk in the future.
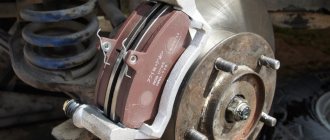
- Reinstall the caliper, replace the brake pads if possible and necessary, and screw the caliper to the steering knuckle.
- Install the wheel and tighten the wheel bolts.
- Remove the special supports and lower the vehicle.
- Don't forget to tighten the wheel bolts completely! Many novice drivers often forget this significant detail and get into an accident. Be extremely careful!
That's all! As you understand, replacing brake discs on a VAZ 2109 does not require special knowledge and skills. The most important thing is a minimum of knowledge and the availability of the necessary set of tools. Good luck on the roads!
lada-na-remont.ru
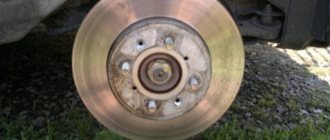
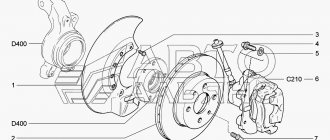
Front brake disc
If braking noticeably worsens while driving, it is recommended that you conduct a detailed inspection of the entire braking system. A knocking sound in the front suspension can also say a lot about the condition of the car. The cause of this type of problem can be worn brake discs.
As a rule, the degree of wear is checked only by visual assessment. Replacing the front brake disc of a VAZ 2109 is recommended when significant wear is monitored. It is noteworthy that replacing the front brake disc on a VAZ 2109 can be easily done on your own.
Replacing the front brake discs of a VAZ 2109
The thickness of the non-vented disc should be approximately 10.8 mm, while the thickness of the vented part should be a minimum of 17.8 mm. Change the brake pads and discs if the indicators are less than normal. It must be taken into account that the axial runout of the surface should be less than 0.15 mm.
DETAILS: Uneven pad wear: causes and solutions
Note! If the discs have scuffs and deep scratches, braking performance will be significantly reduced due to greater wear of the pads. In this case, an urgent replacement of the rear discs or a change in the front braking mechanisms will be required.
Now you can get qualified assistance in grinding discs at a service station. Specialists must take into account the permissible standards. The groove is performed to the same depth on both sides.
Helpful information
Replacing front brake discs on a VAZ 2109
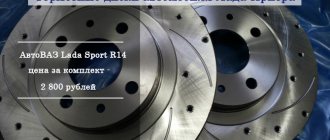
- The classic 16-valve package includes R14 brake discs.
- The 8-valve kit includes R13 brake discs.
- It is unacceptable to install R14 brake discs on machine discs of 13th radius.
To replace the front brake discs quickly and correctly, you need to be able to distinguish between the types of automotive elements in question. Thus, they distinguish:
- collapsible disks;
- elements with grooves and perforations;
- disks with special gas outlets;
- ventilated elements.
When is it time to replace the front brake discs?
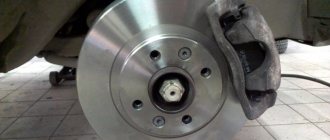
VAZ 2109 front brake discs
The front braking mechanisms on the VAZ 2109 are replaced in case of mechanical damage or when the working part of the disc wears out (thickness is less than the norm of 10.8 mm).
Note! Further use of a worn disc or element with cracks is strictly prohibited.
If there are minor scratches or abrasions on the functional surface, they can be removed by grinding the disc using specialized equipment in a workshop. If this is not possible, or the damage is so significant, you cannot do without replacing the part.
Brake system
Specifications
Common parameters
| System type | Two independent hydraulic circuits (front and rear). ABS on some models. Disc front and rear brakes. The pressure in the brake circuits is provided by the main hydraulic system (see Chapter Unified hydraulic system). The parking brake is cable driven on the front wheels. |
Front wheel brakes
| Type | Disc, ventilated, with 1-piston floating caliper |
| Brake disc diameter, mm | |
| All models except petrol ones with RFY series engine (16 valves) | 266.0 |
| Gasoline models equipped with an RFY series engine (16 valves) | 283.0 |
| Brake disc thickness, mm | |
| All models except petrol ones with RFY series engine (16 valves) | |
| • New disc | 20.4 |
| • Minimum allowed value | 18.5 |
| Gasoline models equipped with an RFY series engine (16 valves) | |
| • New disc | 22.0 |
| • Minimum allowed value | 20.0 |
| Maximum permissible difference in disk thickness, mm | 0.1 |
| Maximum permissible lateral runout, mm | 0.05 |
| Working surface of the friction lining, cm 2 | |
| All models except petrol ones with RFY series engine (16 valves) | 41 |
| Gasoline models equipped with an RFY series engine (16 valves) | 48 |
| Thickness of new friction linings, mm | |
| All models except petrol ones with RFY series engine (16 valves) | 12.0 |
| Gasoline models equipped with an RFY series engine (16 valves) | 11.0 |
| Minimum permissible thickness of friction linings, mm | |
| All models except petrol ones with RFY series engine (16 valves) | 3.0 |
| Gasoline models equipped with an RFY series engine (16 valves) | 2.0 |
| Friction lining material Non-asbestos ABEX | 949 |
Rear wheel brakes
| Type | Disc (solid disc), with 2-piston fixed caliper |
| Brake disc diameter, mm | 224.0 |
| Brake disc thickness, mm | |
| • New disc | 9.0 |
| • Minimum allowed value | 7.0 |
| Maximum permissible difference in disk thickness, mm | 0.1 |
| Maximum permissible lateral runout, mm | 0.05 |
| Working surface of the friction lining, cm 2 | 17 |
| Thickness of new friction linings, mm | 11.4 |
| Minimum permissible thickness of friction linings, mm | 2.0 |
| Friction lining material | Non-asbestos ABEX |
DETAILS: What to do if the handbrake pads are frozen
Tightening force of threaded connections, Nm
| Front brake caliper anchor bracket bolts | 105 |
| Front brake caliper guide bolt | 50 |
| Rear caliper mounting bolts | 47 |
| Bolts securing the brake pedal to the bulkhead | 15 |
| Control valve mounting bolts | 20 |
| Parking brake adjuster locknuts | 20 |
| Bolt and nut for securing the gear control rod | 17 |
| Brake pipe fittings | 8 |
| ABS hydraulic valve block fastening nuts | 22 |
| ABS wheel sensor mounting bolts/studs | 8 |
| Wheel bolts | 90 |
general information
All models are equipped with a 2-circuit brake system driven from the main hydraulic system of the vehicle (see Chapter
Single hydraulic system) through a control valve that plays the role of a master cylinder in conventional brake systems.
The front brake pressure is supplied directly from the main hydraulic system (via a pressure regulator). The brake circuit of the rear wheels is connected to the hydraulic path of the rear suspension. With this pressure distribution scheme, the main braking force falls on the front wheels of the car, while the force developed by the rear brake mechanisms depends on the degree of vehicle load.
Replacing brake discs
To replace brake discs with your own hands, you will need simple tools.
Having made it a priority to solve the problem of how to change brake discs on a VAZ 21099, at the same time think about when it is more profitable to take the time for repairs and go to the garage to resuscitate the brake system of a personal car. You will need:
- A standard set of reliable wrenches for removing the brake disc. They provide a reliable grip on the fasteners; with their help you can grab nuts of different sizes and unscrew them.
Set of wrenches - WD-40 lubricant is purchased, which helps in working with soured fasteners when the process of how to change brake discs on a VAZ 21099 is started, so work is carried out with tightly tightened nuts and bolts.
WD-40 lubricant - A metal ruler for taking measurements, because you shouldn’t judge the condition of the disc by eye. Let us remind you that the critical thickness of the part is 10 mm.
Metal ruler - Rubber hammer for dismantling the disk and placing it in place. Iron can also be used, but it can create a precedent, causing unwanted damage to the metal part.
Rubber hammer - You will also need 7 and 19 mm socket heads. It will not be superfluous to prepare a wrench and a ratchet to solve the issue of how to change brake discs on a VAZ 21099.
Socket heads
Recommendations for choosing replacement disks
From trusted sources, I happened to find out that the original moving parts used in the VAZ-21099 brake systems correspond to article number 2108-3501070. Their price barely exceeds 1100 rubles. But the non-ventilated feature of such disks leads to their frequent overheating. The intensity of machine stops is reduced. There may be a risk of brake fluid boiling and deformation of other parts of the brake system. Car owners often replace products with article number 2110-3501070. This eliminates the disadvantages of non-ventilated elements. However, in such cases, additional re-equipment of the mechanism responsible for braking is required. Nevertheless, this is completely justified, since ventilated consumables help to smoothly overcome long descents, and during emergency braking they do not allow the pads and discs to overheat. The originality of a brake disc does not mean the presence of undoubted quality and carries rather dubious technical characteristics. I would recommend installing analogues provided by third-party manufacturers. There are a great many of them, but after a lengthy selection, I chose the excellent alternative “Delphi”, which has article number BG2466. At various points of sale, its price ranges from 880 to 1000 rubles. The diameters and technical capabilities of the disks are completely the same.
Replacement procedure
The means at hand are ready - now you can move on to repair work. They include several sequential actions. After carefully reading them, I moved on to active work.
- The first thing we had to do was fix the car in a stationary state by installing special shoes on the rear of the car, turning on the handbrake and at the same time first gear.
- Further, it became possible to dismantle the front wheels, followed by unscrewing the fasteners and removing the calipers.
- Now we could proceed to the main part and unscrew the guide pins. Since further use of the replacement discs was not intended, they were removed with hammer blows. In order for removal to occur evenly and to avoid distortion, it was necessary to periodically rotate the rotating parts.
- When the removal was finally completed, I began installing new brake rotors. Having previously cleaned and treated the seat, I was fortunate enough to carry out sequential assembly in reverse order without difficulty.
All work is completed, and all that remains is to check the functionality of the replaced element. Installing a new brake disc requires some time until it gets used to the pads. Therefore, when, even after the repairs, the stopping intensity continued to remain reduced, I had to go to a professional auto repair shop and they explained to me in detail that during the break-in period this is considered the norm.