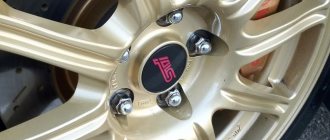
Hello, in this article you will learn how to replace brake discs on a VAZ 2108, 2109, 21099 and what their service life is. On average, you can drive 40-50 thousand kilometers without replacing brake discs, and if you have a calm driving style and have never had emergency braking, then the brake discs can last up to 100 thousand kilometers. The first signs of wear on the brake discs are the steering wheel wobbling during braking. Overheating can cause a brake disc to burst or become deformed, and it is not that difficult to overheat the disc; just a few sharp braking from high speeds is enough. In principle, the front brake pads do not need to be removed to replace the brake disc (just remember to slightly loosen the brake pads with a screwdriver, otherwise the thickness of the new brake disc is greater than the old one and the caliper will not fit so easily), you can remove the brake caliper by unscrewing 2 bolt securing it to the steering knuckle
Next, pull the brake caliper up and tie it to the spring. The main thing is that it does not hang on the brake hose
After this, unscrew the two studs that secure the brake disc and pull it towards you
If the brake disc does not want to come off, just gently tap it on the other side with a hammer or some other handy tool. Before installing a new brake disc, thoroughly clean the seating area. Replacing the second brake disc occurs in the same way. The whole job usually takes no more than an hour.
Source www.avtochanel.ru
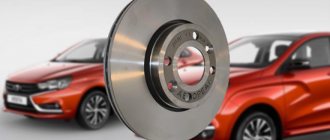
Brake discs provide braking to the front wheels when the vehicle is moving. The effectiveness of braking, and, consequently, safety on the road depends on their condition. Brake discs on a VAZ 2109 are replaced in the following cases:
- The thickness has reached the maximum permissible minimum value - 10.8 mm. At the same time, the thickness must be controlled in two places. If the wear is uneven, then replacement is carried out in any case.
- The disc has deep scratches or chips.
Such noticeable defects on the brake disc occur as a result of using low-quality brake pads or careless driving on uneven road surfaces.
Using such a brake disc will inevitably lead to its breakdown and sudden braking at speed, or, at best, to a deterioration in braking properties.
Small scratches on the brake disc can be removed using special equipment. However, not every driver can afford such devices. In this case, the brake disc must be replaced.
Procedure.
- Place the car on a completely flat surface and install wheel chocks under the rear wheels on the front and rear sides.
- Engage first gear and prevent any movement of the vehicle in the horizontal plane.
- Loosen the wheel bolts on the side where you plan to replace the brake disc and jack up the car.
- Completely unscrew the wheel bolts and remove the wheel. Mount your car on special supports to increase safety.
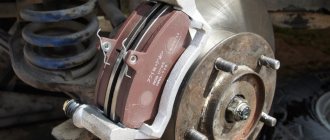
- Now unscrew the two bolts that secure the caliper to the steering knuckle and remove the brake caliper. To make the task easier, rock the caliper back and forth to loosen the pads. Attention! When dismantling the caliper, do not unscrew the brake hoses, as this can cause a very sharp leak of brake fluid.
- As soon as you remove the caliper, hang it with a wire on any suspension element so that it does not interfere with the work. This will also prevent possible damage to the brake hose.
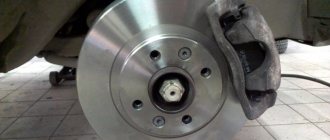
- Using a dry cloth, wipe the brake disc to remove dirt and other debris.
- Use a lubricant such as WD-40 to treat the joint between the brake disc and hub, as well as the guides. Wait approximately 5 minutes and proceed to remove the brake disc.
- Unscrew the 2 guides from the brake disc and try to remove it by hand. If this fails, then take a rubber hammer and knock it off the hub with gentle blows along the entire circumference of the disk. Attention! Be careful not to hit too hard, as the disc may break and accidentally injure you from the fragments!
- Install the new brake disc, insert the guides and tighten them. They should be tightened evenly and equally so as not to spoil the threads and not to disrupt the uniform wear of the disk in the future.
- Reinstall the caliper, replace the brake pads if possible and necessary, and screw the caliper to the steering knuckle.
- Install the wheel and tighten the wheel bolts.
- Remove the special supports and lower the vehicle.
- Don't forget to tighten the wheel bolts completely! Many novice drivers often forget this significant detail and get into an accident. Be extremely careful!
That's all! As you understand, replacing brake discs on a VAZ 2109 does not require special knowledge and skills. The most important thing is a minimum of knowledge and the availability of the necessary set of tools. Good luck on the roads!
Source lada-na-remont.ru
If braking noticeably worsens while driving, it is recommended that you conduct a detailed inspection of the entire braking system. Knocking noise in the front suspension can also tell a lot about the condition of the car. This type of problem can be caused by worn brake discs. As a rule, the degree of wear is checked only by visual assessment. Replacing the front brake disc of a VAZ 2109 is recommended when significant wear is observed. It is noteworthy that replacing the front brake disc on a VAZ 2109 can be easily done on your own. The presence of cracks and damage may also be the cause. Changing the front braking mechanism is not so difficult, so if you have competent instructions, the work will be completed successfully.
The thickness of the non-vented disc should be approximately 10.8 mm, while the thickness of the vented part should be a minimum of 17.8 mm. Change brake pads and discs if the indicators are less than normal. It must be taken into account that the axial runout of the surface should be less than 0.15 mm.
Note! If there are scuffs and deep scratches on the discs, braking efficiency will be significantly reduced due to greater wear of the pads. In this case, an urgent replacement of the rear discs or a change in the front braking mechanisms will be required.
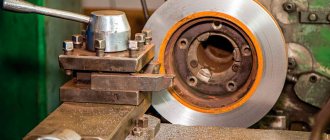
Now you can get qualified assistance in grinding discs at a service station. Experts must take into account acceptable standards. The groove is made to the same depth on both sides.
How to replace a brake disc on a VAZ 2108-VAZ 21099?
Removal: 1) To replace the disk, you will first need to remove the wheel from the car and place either wheel chocks or bricks under the rear wheels, or simply put the car on the handbrake so that it does not roll away anywhere. (For information on how to remove a wheel, see the article entitled: “Replacing wheels on a car”)
Note! When the wheel is removed, use a ruler to check the thickness of the disk; if it is below 10.8 mm, then the disk needs to be replaced, but if it is not much higher, for example, 12.0 mm, then in this case it is up to you to change or not change the disk you, but in such a situation it won’t take a very long time to reach the critical point! (Be sure to check the thickness of the disk in at least three places)
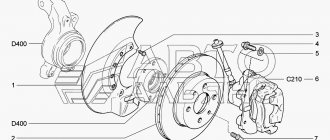
2) Now look under the caliper, at the back you will see (Indicated by arrows) two bolts that will attach it to the steering knuckle, so you will need to completely unscrew these bolts and thereby remove the brake caliper from the car, without removing it you can remove it yourself disk from the car.
Note! When the bolts that hold the caliper are unscrewed and the caliper itself is removed, the first thing you will see is that some kind of hose is connected to the caliper and thus you will not be able to completely remove the caliper, so you don’t need to unscrew this hose and completely remove the brake caliper from the car, you just find a rag or some kind of wire in your garage or car and use it to hook the caliper behind the telescopic strut spring, as shown in the small picture above!
3) After this operation, you will need to take WD-40 lubricant or something similar and apply it to the guide pins (Indicated by red arrows), and to the part where the disc itself connects to the hub (The place where the brake disc connects with hub, indicated by four blue arrows).
Note! This lubricant is applied only to unscrew the guide pins and it was much easier to remove the disc itself from the hub, because from time to time rust forms in all places in the car, especially what starts to rust first is what is below and has at least some kind of contact with road dirt, and what has contact (Especially in winter) with road dirt? Of course, this is the bottom of the car and the brake system, so you need to lubricate all these places with lubrication, which are indicated by arrows in the photo above!
4) So, when you lubricate the guide pins with grease, pick up a wrench or an extension with a socket head and completely unscrew both of these pins and then put them aside in some kind of box so that they don’t get lost, or put them in the car.
5) And at the end of the operation, grab the disc with both hands and try to pull it from the car, but essentially this method is pointless, so if you have a rubber hammer or something similar (In principle, a regular hammer will do, only for them you need to hit it more carefully without breaking the disc itself), take it in your hands and twist the brake disc in a circle, hit the hammer on the back side of the disc in different places so that it first comes off the hub a little in one part, then a little in another and so on, this is how you remove the disc from the car.
Note! There is no need to hammer with all your might just one place on the discs, it will be pointless, so be sure to twist it!
Installation: Install the new disk in its place in the reverse order of removal.
Note! If you reinstall the old disk, pay attention to the fact that a bead has formed on its edges; you will need to remove this bead with a file and thereby make the disk even!
Additional video: For more information on how to replace a disk on a car, see the video posted below:
Preparatory operations
You can dismantle the old disk and install a new one yourself, even in a garage. You will first need to buy wheels suitable for your specific car model. This must be done carefully, since sometimes even the year of manufacture of the same car affects the parts being installed.
It is worth choosing a specific manufacturer of these spare parts based on your driving style. The required characteristics for a driver who uses an active style with frequent use of the brake pedal or for a driver who spends most of his time on a country road will be different.
It is customary to divide TDs into classic (standard) and sports (reinforced):
- The classic design uses malleable cast iron, machined to the desired dimensions. Non-ventilated and ventilated specimens are available. In the first case, the basis is a single disc, next to which a caliper with brake pads is installed. In the second case, a dual system of disks separated by ribs is used. Due to the entry of air between them, the unit is ventilated. Popular brands that manufacture these parts are ATE, Zimmerman, Bosh.
- In the production of reinforced discs, more durable grades of cast iron or high-alloy stainless steel are used. These elements provide longer service life under increased loads while driving. Well-known brands in this area offer more expensive products. Most often in auto stores you can find brands such as Brembo, DBA, EBC.
Brake discs must be replaced in pairs on both sides of the axle.
This will ensure proper operation of the entire braking system. Even if one of the sides is in satisfactory condition after visual inspection, and the other is significantly worn, it is recommended to replace both disks. If dismantling work is carried out on one side, then the discrepancy will lead to loss of directional stability. The rule applies to both the front and rear axles.
To carry out installation and dismantling work you will need the following tools:
- car jack (mechanical, hydraulic, pneumatic);
- clamp;
- a hammer with a wooden handle (a rubber or wooden mallet is allowed), in some cases a reverse hammer is used;
- a set of wrenches and screwdrivers;
- rust treatment fluids (WD-40 or analogues);
- brake fluid, if bleeding of the brakes is required;
- clean rags and personal protective equipment (work gloves, safety glasses, etc.);
- metal brush or power tool with a special attachment;
- torque wrench.
If the operation is carried out on all wheels, then it is customary to change the disks one by one on each axle.
Helpful information
Replacing front brake discs on a VAZ 2109
So:
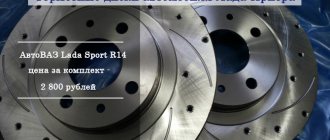
- The classic 16-valve package includes R14 brake discs.
- The 8-valve kit includes R13 brake discs.
- It is unacceptable to install R14 brake discs on machine discs of 13th radius.
To replace front brake discs quickly and correctly, you need to be able to distinguish between the types of automotive components in question. Thus, they distinguish:
- collapsible disks;
- elements with grooves and perforations;
- disks with special gas outlets;
- ventilated elements.
Article number and cost of good front brake discs for VAZ 2109 from third-party manufacturers
Original brake discs have mediocre performance characteristics, so many car owners believe that it is better to install analogues from third-party manufacturers. Good alternative options for native consumables, according to reviews from experienced drivers, are given below.
Table - Good analogues of the original front discs
| Manufacturer | vendor code | Approximate cost, ruble |
| Delphi | BG2466 | 880-1000 |
| Ferodo | DDF215 | 820-970 |
| TRW | DF1748 | 1200-1300 |
| Brembo | 08521110 | 850-930 |
| Road House | 608900 | 900-1050 |
Instructions for removing brake discs and video review
Before proceeding with routine repairs of the VAZ 2109, it is necessary to remove the caliper, but the brake hose does not need to be unscrewed, since this is not necessary. To see how this procedure is performed visually, below is a video clip that was created specifically to demonstrate the repair.
If you have any questions after reading the video instructions, ask your questions in the comments below and we’ll discuss it together. And there is one more important point that should not be overlooked.
After replacing the discs, be sure to install a set of new brake pads, since the old ones are worn out and can damage the disc in the very first kilometers of the car.
As for the price of these parts, the most affordable option from a domestic manufacturer can cost from 500 rubles per piece, respectively, a pair will cost 1000 rubles. If we consider higher quality components, for example AvtoVAZ, ATE or Ferodo, then such kits start at least 1500 per pair and reach 2500 rubles.
When is a brake disc considered worn out?
Imagine the conditions under which a brake disc has to function. The part interacts with the brake pads and caliper; during movement, the disc heats up to 350 degrees Celsius. And if it is the summer period, driving in traffic jams, then the load on the brake system increases, as a result, rapid wear and tear and the urgency of the task of how to change brake discs on a VAZ 21099, the choice of a specialist to whom you will have to contact.
Brake disc VAZ 21099
After studying the technical documents, it becomes clear that brake discs with maximum operation can withstand 50,000 kilometers, and then you need to think about how to change the brake discs on a VAZ 21099 and check the entire system. Experienced drivers who have mastered the skill of smooth braking are lucky; they never use emergency braking, because their discs will last until the car’s mileage is 100,000 kilometers.
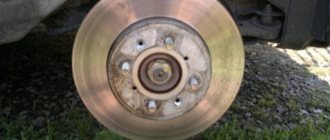
Measuring brake disc thickness
The moment of alarm for a part can be determined by visual inspection and measurements of the disk. If it turns out that its thickness is approaching 10 mm, then this parameter is already critical and requires action to be taken immediately, otherwise the task of how to change brake discs on a VAZ 21099 will have a difficult solution.
Required tools and materials for replacing front discs
In order for the replacement of front brake discs on a VAZ 2109 to be successful, you must first prepare the tools and materials from the list below.
Table - Tools and materials required to replace front discs
| Tools and materials | Note |
| Socket wrench | "at 17" |
| Spanner | "on 7", "on 17" |
| Hammer | Medium or large sizes for knocking the brake disc out of place |
| Spacer | Made from wood, durable plastic or soft metal |
| Wire brush | For cleaning work surfaces from dirt |
| Penetrating lubricant | Under the influence of temperature and the influence of an aggressive environment, sticking of the threaded connections of the brake mechanism occurs. Therefore, to replace the disk, it is necessary to generously spray the detachable connections with penetrating lubricant. |
| Balloon wrench | To remove the front wheels |
| Jack | To lift the car |
| Copper grease | To reduce the risk of the brake disc sticking to the hub and facilitate the subsequent replacement of consumables. Also performs minor anti-corrosion functions. |
Checking disc wear
Experienced technicians can determine by eye that the front brake disc on a VAZ 2114 needs to be replaced, but there are several points by which you can diagnose the problem yourself:
- The thickness of one of the disks is less than 10.8 mm;
- The part is deformed due to mechanical damage;
- Chips and grooves are visible on the working surface.
According to the manufacturer, the service life of the discs is 100,000 kilometers, but car enthusiasts say that they can rarely go more than 70,000 kilometers. Moreover, for such a service life, you have to change the brake pads on time and carry out independent diagnostics at least once every 3 months.
If you do not take precautions when operating a car, then due to poor performance of the brake mechanism, you can create an emergency situation on the road.
Review of rear brakes on the VAZ 2109
As standard, the rear axle of the VAZ 2109 has drum brakes. They do not use disks. Therefore, there are no original discs or their analogues for the original rear brake system of the VAZ 2109.
Wanting to improve braking efficiency and the aesthetic appearance of their car, owners independently install disc brakes on the rear axle. This action is illegal in most cases.
At the same time, due to improper installation, very often there is a deterioration in the car’s handling, lack of braking control, the car skidding or being thrown out of its lane. The main reasons not to replace drum brakes with disc brakes are:
- The need to adjust the braking forces. If they are distributed incorrectly, the rear wheels jam. Braking becomes uneven, the car constantly skids.
- Problems with technical inspection. Self-installation of discs on the rear axle is illegal to make design changes to the brake mechanisms. Therefore, MOT may be denied.
- Problems on the road. The traffic police do not particularly control the rear brake mechanisms, but if discs are found there, it is even possible to evacuate the car.
- Problems with the handbrake. Installing a disc mechanism requires removing the elements of the standard parking brake.
So, in what cases is the VAZ 2109 brake discs replaced:
- when the working part wears out, this is when its thickness is less than 10.8 millimeters, which can cause cracks to appear during emergency braking,
- when a beat is detected in the steering wheel, and vibration in the chassis during a stop. This causes uneven wear of the brake discs. Therefore, if you hear a beating when braking, we quickly buy new discs. The axial runout of the surface must be less than 0.14 mm,
- when the disk receives mechanical damage, this means the appearance of cracks, scratches, abrasions and scuffs on the working surface. This will cause the vehicle's brakes to become less effective.
So, to replace disks you will need a set of tools for the job and, in fact, the disks themselves. Experts recommend perforated discs. Let's start replacing disks:
1. Place the car on a flat surface, apply the hand brake, and place wheel chocks or bricks under the rear wheels to prevent it from rolling away.
2. To remove the wheels, unscrew the wheel bolts. We jack up the car and remove the wheels.
3. Now remove the brake pads. Using a screwdriver, “spread” the pads apart, and using pliers we pull out the cotter pins of the guide pins, knocking out the pins from the eyes of the brake cylinders. The main thing is not to lose the springs. We clean the surface of the brake mechanism from dirt using compressed air or a brush.
4. Next, remove the brake mechanism. It is attached to the front wheel hub on the reverse side with two bolts. Unscrew the bolts. Make sure that when installing, they are not mixed up. There should be a bolt with a head at the bottom, since it is the stop for the lower arm limiter. Without separating the brake hose, remove and tie the brake mechanism to the lever with wire.
5. Now we begin to remove the brake discs. The disc is held in place by two guide pins. We treat the surface of the disk and joints with WD-40 lubricant. This will help get rid of metal corrosion. We unscrew the pins, and tapping the disk with a hammer on the back side, carefully remove it from the hub.
Having cleaned the mating surface on the hub, we begin installing new discs. It is carried out in reverse order.
After replacing the brake discs, lower the car to the ground and press the brake pedal a couple of times to set the brake pads to the working position. Avoid emergency braking at first.
The minimum permissible brake disc thickness is 10.8 mm. If the thickness of the brake disc is less, the brake disc must be replaced. The axial runout of the brake disc surface should not exceed 0.15 mm. If there are burrs, deep scratches, etc. on the working surface of the brake disc, which increase wear on the brake pads and reduce braking efficiency, it is necessary to replace the brake disc. In specialized car repair shops, such a brake disc can be sharpened and ground. But at the same time, the thickness of the brake disc must be no less than the minimum permissible. The brake disc is grooved on both sides to the same depth. 1. Remove the corresponding wheel and brake pads.
2. Unscrew the two bolts securing the shoe guide to the steering knuckle and remove the brake mechanism assembly without disconnecting the brake hose from the wheel cylinder.
3. Hang the brake mechanism on a rope or wire to the front suspension spring. When doing this, make sure that the brake hose is not kinked or over-tightened. 4. Clean the brake disc from dirt. Apply WD-40 type fluid to the brake rotor/hub joint and the guide pins. Wait a moment to allow the rust to dissolve.
5. Unscrew the two guide pins and remove the brake disc. NOTE
If necessary, knock down the brake disc with a rubber or polymer hammer.
6. Install the brake disc on a VAZ 2108, VAZ 2109, VAZ 21099 car in the reverse order. If you are installing an old brake disc, use a file to remove the collars formed as a result of wear on the brake disc on both sides of the brake disc.
Replacing VAZ 2109 brake discs is indicated if their thickness is less than 1.08 cm. This value is considered the maximum permissible value at which it is permissible to operate the car. The axial runout of the disc plane normally does not exceed 0.015 cm. Since this VAZ model does not have a pad wear indicator, their condition is monitored visually. When the front pads wear out, the brake discs also begin to fail.
Discs are also replaced if scratches, burrs, or deep scratches are found on them. These defects cause rapid wear of the pads. In addition, there is a significant deterioration in braking efficiency. All this creates obstacles for safe movement on the road.
Removal and installation technology
- The car is placed on a level surface. Its stability is checked.
- The wheel is removed.
- The old pads are removed. To do this, use a pry bar to press out the piston.
- The brake frame is removed together with the mount. The brake hose remains in a fixed position. The frame is secured in such a way as to completely eliminate its sagging on the hose.
- The worn part is removed.
- Use a wire brush to remove dirt from the wheel hub. To make the work easier, you can use an alcohol solvent. In most cases, due to accumulated dirt, vibration appears and the brakes can be felt. A large amount of dirt on the hub is not a defect in the brake disc.
- To determine the hub runout, you need to use a special device. According to established standards, runout should be within 0-0.1 mm. If this value is much higher, the hub must be repaired before installing a new part.
- New systems are wiped with solvent before installation to remove the conservative coating.
- A new part is being installed.
- Before installing the wheel, you need to check the disc runout. When all work has been carried out carefully, the runout value will not reach 0.15 mm. If this value is much larger, vibration will appear during braking and the brake pedal travel will increase significantly.
- New parts are installed to replace worn brake pads. The installation sequence is the same as removal.
- The removed wheel is returned to its place.
Note! While the new pads are grinding into the disc, approximately 500 kilometers, sharp braking is prohibited. This can cause the appearance of local zones where severe overheating will occur. As a result, deformation of the new element will occur.
Advice from the experts
When dismantling VAZ 21099 brake discs, you need to handle the working surface very carefully. It is prohibited to oil it, there should not be the slightest damage. Any oil that accidentally gets in can be removed with a clean rag pre-moistened with thinner (white spirit).
Perforated parts are allowed to be installed in vehicles. They differ from standard ones by high heat removal from the working surface area. The result is stronger and more reliable braking.
What are the types and causes of disk failures?
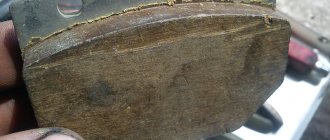
- Accelerated disc wear can occur when using low-quality brake pad linings. They may have more solids and other abnormalities.
- Active driving, accompanied by constant braking or acceleration, and frequent driving through puddles can cause deformation of the disc or the appearance of microcracks on it. The reason for this is the sharp cooling of the disk; when braking, it can heat up to a temperature of 450 degrees. If the disc is deformed, then vibrations occur during braking, microcracks appear, which, as they increase, will lead to destruction of the disc, and sometimes to jamming of the brake mechanism.
- When dirt or large inclusions get into the gap between the surfaces rubbing against each other, grooves appear in the discs and pad linings. New pads with damaged discs take longer to break in.
Tip: You can detect a low-quality pad that has hard inclusions by the characteristic squeak that comes from the discs at low speeds, and not in braking mode. This indicates the formation of a bead that touches the edge of the pad.
Repair or replacement of front brake discs on a VAZ 2112 is needed when:
- Deformations.
- Uneven disc thickness around the circumference.
- Formation of beads.
Signs of problems are:
- When braking, jerking, increased vibration and extraneous sounds appear.
- The slightest pressure on the pedal causes the brakes to lock.
- The thickness of the disc decreases below the permissible value.
- When braking, a metallic grinding noise appears. In this case, the metal base of the pad rubs against the shoulder of the outer surface of a heavily worn disc.
- Chips and cracks on the disk, which are clearly visible through the holes located in the wheel rims.
Diagnostics and repair of front brake discs
A caliper is used to determine element wear. Measurements are taken in the working area of the disk. So:
- The difference between extremely worn and new disks should be no more than three millimeters.
- The maximum permissible runout is 0.03 millimeters. It is measured using an indicator installed in a special device.
Tip: Measurements are usually taken on the car, but sometimes you need to remove the protective boot that limits access to the disc and measure the thickness.
The instructions of some brake disc manufacturers indicate that they cannot be repaired. But there is equipment that allows some defects that arise during operation to be eliminated. Then the cost of repairs done by yourself will be significantly reduced. So:
- Grooves and shoulders are removed by grooving, which can be done without dismantling the element or by removing it from the machine. This will reduce the time it takes to break in new pads and increase the overall efficiency of the braking system. When grooving, you need to remove a minimum layer of material from both sides of the disc at the same time. If the runout is higher than normal, the only thing done is to replace the VAZ 2112 front brake disc.
- Sometimes the bead can be removed using a regular file. It is pressed against a previously untwisted disk. The front-wheel drive car is hung on a lift, the engine is started and forward gear is engaged.
Measuring the thickness of the disk after grinding in on a VAZ 2112
Features of TC
Brake pads (TC) installed on the VAZ 2109 have their own features and characteristics, which you should know about before purchasing new parts.
- The base of the block is made of fairly durable metal.
- A friction lining is glued on top of the base using special glue under the influence of a temperature of 100 degrees Celsius.
- The rear brakes include 4 pads. The body and base are stamped from sheet metal and then welded.
- The roughness on the surface of the pads, necessary to speed up the grinding in of the brake pads, is achieved through special processing.
- Efficiency during control braking from 80 km/h - 320 Nm. The pressure inside the brake system is 40 bar. The pads are cold.
- All elements of the brake system are made in accordance with strict international standards and requirements.
- The service life of a vehicle directly depends on driving style, road conditions and a number of external factors.
The operating manual states that the service life of the TC on the VAZ 2109 is within 70-90 thousand kilometers. But in practice this period is somewhat shorter.
Rear TC kit
Golden rules
There are four golden rules that must be strictly adhered to when replacing front and rear TCs.
- When cleaning brakes, never use mineral solvents such as diesel fuel, gasoline, etc.
- When replacing pads at the rear or front, both should be changed at once.
- You cannot swap front and rear TCs, as well as left and right, and vice versa. Otherwise, braking will be uneven.
- If there is a maximum level of brake fluid in the reservoir (MAX mark), part of the brake fluid must be pumped out.
Taking into account all these rules, you can begin to replace the TC.
Repair of the brake system, instructions for replacing the disc and brake caliper of the Lada 2108 with your own hands, troubleshooting the rear brake mechanism of the VAZ 21099, VAZ 2108, VAZ 2109. Operation and repair of the brake system of the Lada 2108. Checking the brake drive of the Lada 2109. Maintenance of the front and rear brake mechanisms Lada 21099.
Warnings
Loosen and tighten the wheel bolts only on a Lada Samara car standing on the ground. The tightening torque of the bolts is 65–95 N m (6.5–9.5 kgf m).
The use of gasoline, diesel fuel or any other mineral solvents for cleaning brakes is unacceptable.
When installing old pads, replacing the front and rear pads with each other, as well as between the left and right wheels, is unacceptable. This may result in uneven braking.
Brake pad sets for VAZ 2109, VAZ 21099, VAZ 2108, Lada Samara must be replaced simultaneously on both sides of the car.
How to change brake discs on a VAZ 21099 yourself
If you notice that the stopping distance of your car deviates from the norm, this means that the brake system is worn out and requires thorough attention. All thoughts should be focused on solving the question of how to change brake discs on a VAZ 21099 and check the pads. Let us remember that the brake disc is a metal structure made in the shape of a circle and installed on the front axle. The disc actively takes part in the braking process and tends to wear out after a certain period of time. If we talk specifically about VAZs, then most often they have only two brake discs on the front axle, but the rear of the car has drum brakes, other manipulations are carried out with them, the procedure is not the same as changing brake discs on a VAZ 21099. This factory equipment is well thought out initially, and in principle functions reliably.
VAZ 21099
Advantages and disadvantages
If you decide to change from conventional drum mechanisms to disc brakes, be sure to take into account the positive and negative aspects of such a decision.
Advantages
Flaws
Braking distance is reduced
High cost of new disc brakes compared to traditional drums
Braking force is distributed evenly across all wheels
Requirements for precise adjustment and tuning, which not everyone can do with their own hands
Unsprung weight is reduced
If installation requirements are violated, the car skids, it brakes unevenly, and squeaks occur.
Provides more efficient heat dissipation and prevents brakes from overheating
Replacing drums with DT is illegal and not a certified action for VAZ
Increases the reliability of the braking system
There may be problems with the traffic police. People don’t often find fault with rear disc brakes, but if they catch you, you’ll have to competently “excuse yourself”
Replacement and maintenance of pads cause fewer problems and difficulties
There are problems with the handbrake that needs to be changed or improved
No need to regularly tighten the handbrake
In case of accidents, you will most likely be the culprit, since such design changes are unacceptable by law
Appearance noticeably changes for the better
Careful adjustment is required after replacement, which is best done at a service station
Disc brakes do not freeze during winter washing, which cannot be said about drums
If you make an error during assembly, the rear wheels may begin to brake more effectively than the front wheels, which will cause serious consequences and troubles.
Think carefully about the feasibility of carrying out such work. Please note that all responsibility falls on you.