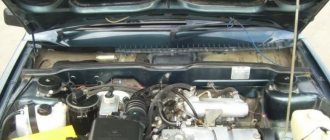
I think that many VAZ 2109-2108 car owners with injection engines know very well that on such models the fuel pump is not located under the hood, as is the case with carburetor cars, but directly in the fuel tank. And getting to it is a little more difficult, since you have to recline the back seat and perform some other steps. But we’ll talk about everything below in order.
So, first of all, it’s worth talking about the tool that we need to do this job:
- Phillips and flat head screwdriver
- 7 mm deep socket head
- Ratchet handle
- Extension
- Open-end wrench 17
Replacing a fuel pump on an injection engine
I think that many VAZ 2109-2108 car owners with injection engines know very well that on such models the fuel pump is not located under the hood, as is the case with carburetor cars, but directly in the fuel tank.
And getting to it is a little more difficult, since you have to recline the back seat and perform some other steps. But we’ll talk about everything below in order. So, first of all, it’s worth talking about the tool that we need to do this job:
The process of dismantling and installing the fuel pump of a VAZ 2109 or 2108 injection machine
First of all, I would like to give a more visual video instruction, which I made just a couple of weeks ago using the example of a dozen. But since there is not much difference, I decided to post it here too.
If suddenly the video clip does not load or other problems arise, then below you can consider everything in more detail, only in the form of a photo report.
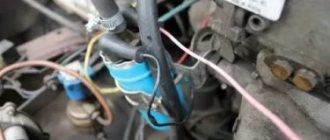
When the back seat is folded down, on the floor under the carpet you need to find the hatch under which this entire structure is located:
When the bolts have been unscrewed, lift the cover and disconnect the plug, having previously unscrewed the latches on it:
Then, using a 17mm wrench, we unscrew the fuel pipes, resulting in the following picture.
We take them to the side so that they do not interfere with further work. And you can unscrew all the nuts securing the pressure plate in a circle:
Then carefully lift the plate:
After that, prying up the rubber band with a flat screwdriver, we slowly try to remove the fuel pump out.
When it rises a little, then it will need to be tilted about 90 degrees so that the fuel level sensor does not interfere with removal:
The price of a new fuel pump for VAZ 2109-2108 injector cars is about 2800 rubles, so it is better to take care of this unit. And in order not to create unnecessary loads and idle work, make sure that there is always more than 5 liters of gasoline in the tank.
Source
ORDER CHIP TUNING OF YOUR CAR RIGHT NOW!
Leave an online request for the service and we will contact you to clarify details
Changing the fuel pump for a VAZ 2109 injector should only be done after removing the fuel tank. And so you removed the tank, what should you do next? You need a small set of keys and screwdrivers to remove the VAZ 2109 fuel pump.
Using a 17mm wrench, unscrew the nuts of the drain and supply fittings, then disconnect the hoses.
Remove the small rubber strip that usually protects the pipelines from rubbing against the edge of the body.
Now, using a size 7 wrench, unscrew the nuts securing the clamping ring. There are only eight of them.
Now you can carefully remove the fuel pump from the gas tank without damaging the fuel level sensor.
There is a rubber ring under the fuel pump for sealing.
Next you need to remove the fuel level sensor. For this purpose, use a Phillips screwdriver to unscrew two screws and disconnect the connector from the cover and from the pump.
Remove the cotter pin and remove the fuel pump from the guides.
Remove the hoses by first loosening the clamps.
Use a screwdriver to unclip the three latches and remove the cover and rubber bushing.
Using a screwdriver, carefully release the locking washer and remove the fuel pump filter.
Remove the fuel pump itself. Install a new one instead of the old one.
When assembling the fuel pump, spray the rubber bushings that center it in the body with WD-40.
Install the assembled fuel pump into the tank so that the arrow on its body points to the rear of the car.
The VAZ 2109 heater radiator is replaced after draining the antifreeze from the car engine. In this case, it is necessary that the heater valve is open to maximize the drainage of the remaining antifreeze or antifreeze from the heater radiator.
We remove and install the fuel pump (gasoline pump) VAZ 2108, 2109, 21099
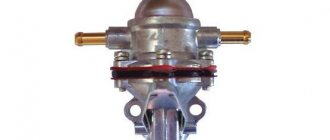
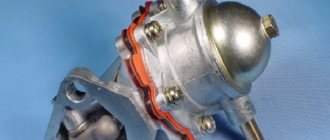
The power supply system for carburetor engines of VAZ 2108, 2109, 21099 vehicles uses a mechanically driven fuel pump (gasoline pump). It is mounted on the engine accessory housing on the battery side.
We remove the fuel pump to replace it, repair it, and adjust the drive. You can replace or clean the mesh filter in it or check the intake and exhaust valves without removing the fuel pump from the engine. When removing the fuel pump, you need to know some features of this work that will help you do everything quickly and correctly.
Necessary tools and equipment
— Phillips screwdriver for loosening the clamps
— Socket wrench (head) at “13” for loosening the fuel pump mounting nuts
Preparatory work
— Clean the fuel pump from dirt
— Place a rag under it to collect gasoline
The procedure for removing the fuel pump for VAZ 2108, 2109, 21099 cars with a carburetor engine
— Disconnect the fuel hoses from the fuel pump fittings
See photo above. There are only two hoses (for the inlet and outlet of the fuel pump) and they are attached to the fittings with clamps. Therefore, we loosen the clamps using a Phillips screwdriver. We move the hoses from the fittings. If the hoses are stuck and do not move, first turn them around the fittings, and then move them, helping yourself with a slotted screwdriver.
Some gasoline may leak from the hoses. To prevent this from interfering with work, you can plug the ends of the fuel hoses with M8 bolts and tighten them with clamps.
— Unscrew the fuel pump mounting nuts
We use a socket wrench or socket set to “13”.
- Remove the fuel pump
We slide it along the studs and remove it. If it doesn’t come off (it’s stuck), gently rock it from side to side (you can even tap it lightly) and then remove it.
We also remove the drive rod and its plastic spacer with gaskets. We do not change the gaskets, as they are of different thicknesses and must subsequently be installed as they were.
That's it, the fuel pump has been removed.
Features of installing a fuel pump on a carburetor engine of VAZ 2108, 2109, 21099 cars
— Defects of parts
Before installation, we decide that you need to change the fuel pump drive rod (if worn), gaskets (if worn or damaged), plastic spacer (if there are cracks).
— Installing a fuel pump on the engine
We install the gaskets, spacer and rod in the same way as they were when removed.
If old parts are replaced (rod, gaskets, spacers), it is necessary to adjust the fuel pump drive. Namely, the minimum amount of protrusion of the pusher (0.8 - 1.3 mm), see “Adjusting the fuel pump drive of VAZ 2108, 2109, 21099 cars.”
We install the fuel pump on the engine with the inlet connection to the battery and the outlet connection to the carburetor (arrow to the carburetor). This will ensure that the engine fuel system operates correctly.
Tighten the fuel pump mounting nuts.
We put the fuel hoses on its fittings and tighten them with clamps.
Use the manual pumping lever to pump fuel into the fuel pump and make sure there are no gasoline leaks.
We start the engine, let it run for a while, and make sure that there is no engine oil leakage from under the heat-insulating spacer and the fuel pump flange. If necessary, tighten the nuts securing it. The tightening torque of the fuel pump mounting nuts is 17-21 N.m.
Notes and additions
— The procedure for removing and installing a fuel pump on a carburetor engine of VAZ 2108, 2109, 21099 cars outlined above is applicable to gasoline pumps of different manufacturers and designs. For example, the DAAZ fuel pump and the Pekar fuel pump.
More articles on the fuel pump of the engine power supply system of VAZ 2108, 2109, 21099 cars
— Disassembly and assembly of the DAAZ fuel pump for VAZ 2108, 2109, 21099 cars
Source
Mechanical fuel pump repair
The functionality of a mechanical fuel pump can be restored by replacing its faulty elements. You can buy them at any automobile store. But it is better to buy not individual spare parts, but a repair kit. It includes all the elements that can fail:
Replacing valves
How to change apertures
To replace the diaphragms, you need to unscrew the nut by 10 in the upper part of the rod. Next, we remove the damaged elements, and in their place we install parts from the repair kit.
The kit includes three diaphragms: two working and one safety. The latter serves to prevent unauthorized fuel from entering the carburetor if the first two are damaged. It is installed at the very bottom of the rod immediately after the lower “plate”. We place spacers on top of it on the rod: first a small one, then a large one. We place the working membranes and the upper “plate” on them. We secure the resulting structure with a nut.
The mechanical fuel pump has 3 diaphragms
Replacing the pusher, thermal spacer and gaskets
The thermal spacer does not need to be replaced unless it is damaged. Inspect its mating surfaces, especially the outer one, to which the lower part of the pump housing is attached. It should be perfectly smooth. Otherwise, oil leakage may occur at the junction of parts during engine operation.
Replacing the pusher is carried out by removing the old one and installing a new rod in its place. There is no difference in which end where it will be installed.
Now about the gaskets. There are only three of them in the repair kit, and they have different thicknesses:
The first is intended for installation between the thermal spacer and the auxiliary drive housing, and the gaskets “B” and “C” are used to adjust the protrusion of the pusher above its mating surface.
The adjustment is made as follows:
Installation of gaskets and thermal spacer
The thinnest gasket is installed between the spacer and the accessory drive housing
The pusher should protrude 0.8–1.3 mm above the mating plane of the spacer
After the adjustment is completed, the fuel pump is installed in place and secured with nuts.
How to replace the fuel pump on a VAZ 2109 injector
Good day everyone. I decided to replace the mesh on the fuel pump (coarse filter) and see how much minced meat I had accumulated in the fuel.
Having bought the mesh in advance at the auto store, I proceeded to replace it.
The first step is to remove or raise the rear seat.
Remove upholstery and other fabric.
There we see a hatch, we unscrew it.
Under the hatch a large collective farm from the previous owners was waiting for me. Apparently they didn’t want to bother with beauty when they converted the carburetor into an injector and didn’t carefully cut a hole for the hatch, but simply tore the metal. From the outside it looks like an alien crawled out of the gas tank.
Now you need to first disconnect the chip. And start the engine. It will run for a couple of seconds and die. This is necessary in order to relieve pressure in the system and pump gasoline out of the lines. Now we unscrew the mass, fuel lines, and all the clamping bolts in a circle. (here you will need a key for 7).
Next, we move the highways to the sides as much as possible.
We first remove the pressure ring, and then the pump itself. CAREFULLY! There will be gasoline in the pump cup and in the pump itself. The pump will need to be pulled out slightly at an angle, as the float will get in the way. Do not fill the entire interior with gasoline.
We removed the pump. Drain the gasoline and sediment from the glass. (just not back to the tank)
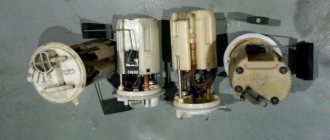
Now we need to remove the glass. This is done differently on different pumps. I have a pump. On it you need to turn the pump upside down and use a small screwdriver to pull out the two rubber clamps.
Now you can see what has accumulated in the glass and on the mesh.
Lada 2115 Queen NeFertiti › Logbook › Inspection of the gas tank and pump mesh... + AGAIN the air leak is buggy...(((
Hi all! Having gathered my strength, I decided to climb into the gas tank to inspect and establish the reasons for the strange behavior of the car... the reasons are here... Previously I wanted to compare the pressure before and after the replacement... BUT none of my friends had a device for measuring... pIchal... I thought about it and bought it for myself so that it would be ...maybe come in handy on the farm))) (600rub)
I took measurements before replacing the mesh... in the end we have...
This was followed by disassembly and removal of the module and mesh... in the tank I expected to see a worse picture, but what I saw was also not pleasing...
You scooped up all the gasoline from the tank with a glass... it turned out to be about 9 liters... I started again... (read about this below...)
I wiped off the residue in the tank with gauze...
I fill in 5 liters and again a little rust flows out of some cracks... We repeat the scooping and again the gauze is used...)))
The second time, nothing else seemed to float up (settle) at the bottom...
We fill up with gasoline (9 liters), rock the car and see that the tank is clean and so is the gasoline...
We put everything back together and connect it, start the car... I forgot to take a photo, but I’ll say this... The pressure at XX has not changed, but with the gas boost it reaches 3.0 and that’s it... the regulator resets the excess...))) cool)))) at least I achieved something after this procedures…)))
(previously it did not rise above 2.7)
By “+” I can note that the speed has stabilized, the car does not jerk when starting from a cold place, and it seems like dynamics have appeared...
Finally, to this part of the post, I’ll show you what the mesh on the pump looks like after 30,000 miles... I think it was the reason for the dullness when accelerating because the pump stupidly overheated and could not provide the required amount of fuel...
Now I’m wondering how long it will take to change it? it's not business to drive like that(((
Next we move on to the second part of the recording and to those mysterious 9 liters that I scooped out of the tank... and here’s the thing...
Before getting into the tank, I tried to look for gasoline as much as possible so that I had to scoop less... at the time of disassembling the system in the tank there was: -according to the BC 4.6 liters...
-according to the tidy, the needle was already at zero and lit up at 5 liters according to the BC
... strange... not true ? because as we know, the light bulb seems to light up when there are 6-7 liters of residue... Who will solve the riddle.
In fact, there were about 9 liters of fuel in the tank. neither one nor the other guessed or gave the necessary testimony...
After I filled and assembled everything in place, I filled the required amount of fuel into the BC... BUT the needle never came to life...(((
I think I should try filling the tank full and see... maybe it’s caught on something?
I look forward to your thoughts and comments...
Thank you for your attention! All the best, smooth roads and clean gasoline. )))
What is a fuel pump?
The fuel pump pumps fuel from the tank to the injector rail. On injection engines, the part is submersible, and its power supply is approximately 12 V. It provides high pressure in the rail, which is why fuel is sprayed from the injectors into the intake manifold.
The injectors on an injection engine are solenoid valves. The moment and time of valve opening is controlled by an electronic control unit. The valve is closed by the action of the return spring. If there is a breakdown, there will be no pressure in the transport system, and fuel will not flow into the combustion chamber.
Replacing the fuel pump
In the car, the part is installed on the fuel tank, rotary type, non-separable and two-stage. That is, if it breaks, it will need to be urgently replaced. Most often, the main causes of failure are a decrease in engine power, periodic howling of the pump, provided that other elements of the system are in good condition.
So, how is a fuel pump replaced in a vehicle?
Source
Removing and disassembling the fuel pump
The fuel supply mechanism in the Priora is located in the gas tank, so to get it you need to:
- Remove the rear passenger seat. The latches holding it in place are on the sides.
- There is a hatch in the bottom of the car, secured with two self-tapping screws. Having removed it, we gain access to the fuel pump, which is fixed in the fuel tank with a flat metal ring.
- Remove the ring, which is held in place by nuts screwed onto eight threaded pins spaced evenly around the hole in the gas tank.
- We remove the two fuel hoses and remove the retaining ring.
- We disconnect the electrical connector through which power is supplied to the pump located in the plastic casing.
- We take out the housing; this must be done carefully so as not to damage the float, thanks to which the filling level of the gasoline tank is shown on the instrument panel.
- The next step is to pull out the pump itself, bend the four latches located on the body, and take out the fuel pump, at the bottom of which there is a coarse mesh.
As a rule, the entire mesh looks quite dirty, and its central part is literally clogged with various debris. To remove the old mesh, you just need to grab it on all sides with your fingers and pull it towards you, or pry it with a flat-head screwdriver.
It comes out of its seat relatively easily. After this we install a new mesh. A mesh for the Lada Priora fuel pump can be bought in a specialized store or on the market. It costs about 50 rubles.
There is usually also a lot of debris at the bottom of the plastic cup in which the pump was located. It needs to be rinsed well and wiped with a dry cloth.
Then everything is put together in reverse order. After replacing the mesh, the engine picks up speed smoothly and runs stably. While driving on the highway, the car no longer jerks and accelerates normally.
Most of the units and components in cars of the Lada Samara model line can be changed with your own hands. To do this, just stock up on the necessary tools and purchase a new part. This material describes in detail how to replace a VAZ 2110 fuel pump and its filter element - a mesh. The work is quite simple, since installing a new product does not require an inspection hole or a lift. After studying this material, the reader will learn how to change the fuel pump, when it needs to be done and how to determine that the unit has failed. To make sure that the device has failed, you need to measure its pressure - the article contains several ways to perform this action.
VAZ 2109 fuel pump injector: do-it-yourself replacement and diagnostics
When considering the fuel system, you should definitely mention the VAZ 2109 injector fuel pump. The injection system consists of several components, which are basic. On our website you can also find information for newer VAZ models, for example, 2110. Nines are also equipped with electric fuel pumps that supply gasoline under a certain pressure to the ramp. Moreover, the pressure must be constant, otherwise the operation of the engine will be unstable. So, what is the injection nine fuel pump and how does it work.
Pump operating principle
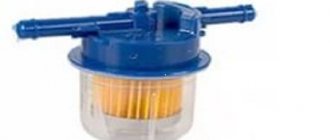
The VAZ 2109 fuel pump has a fairly simple design; the injector functions only thanks to it. It is based on two elements - an electric motor and a pump with a filter element. Please note that the “diaper” (as people call the filter for its similarity) needs to be changed on time - try not to let it work for more than 20 thousand km. Otherwise, it becomes saturated with metal shavings, dirt and other rubbish, which gets into the line and clogs the injectors.
The fuel rail contains a mixture of gasoline and air (also purified, by the way). The proportion is always the same - 14 parts of air and one part of gasoline. This is the ideal mixture for combustion to occur. But you need to pay attention to the fact that the VAZ 2109 fuel pump relay, which is controlled by an electronic unit, is involved in the operation. It is used to supply power to the pump motor. The pump's performance is high, so the engine does not run constantly, but intermittently (and depending on the operating mode of the engine, the pauses between starts may be different).
For control, there is a pressure regulator installed on the ramp. To drain excess gasoline - a check valve. With its help, all excess gasoline flows back into the tank. The VAZ 2109 fuel pump (injector) is removed if it is being repaired or replaced. The following tools will be useful:
But if the pump suddenly fails, you should first check the condition of other elements. Carefully inspect the fuse and relay of the VAZ 2109 fuel pump. If they are faulty, then the entire injector will not be able to work normally. As they say, we check the least expensive breakdowns first. If the reason is really in the fuel pump itself, then you can start dismantling it:
The main thing in this matter is accuracy, as there is a risk of damaging the fuel level sensor. And one more thing: before removing the VAZ 2109 fuel pump, you need to get rid of dirt and dust. Therefore, blow the installation area with compressed air or at least clean it with a brush.
To verify the serviceability (or malfunction) of the fuel injection pump of the VAZ 2109, just remove it and connect it directly to the battery. If it works normally, without any extraneous sounds (and air pressure is felt from the outlet), then there are no problems with it. But if it does not turn on even this way, you should think about replacing it. The price of a new one will be about 2000 rubles. Is it worth repairing an electric motor? It is unlikely that this will improve the situation for a long time, but as a temporary solution it is quite normal. But you can do this procedure only if you are confident in your abilities and have an understanding of how electric motors work.
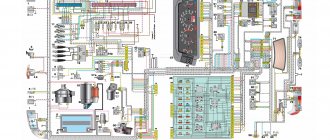
Pinout and diagram of a fuel pump with a VAZ relay
The fuel pump on a car is designed to supply fuel to the combustion chamber. Its operation is controlled using a relay. On a VAZ (depending on the model), the fuel supply unit can be electrical or mechanical - it all depends on the fuel supply system. On a fuel-injected car, the fuel pump is located in the tank. When the ignition is turned on, voltage is supplied to the terminals of the unit and it begins to pump fuel. If the required pressure is created in the system, the relay automatically turns off the fuel pump - the engine is ready to start.
When the ignition is turned on, the relay creates pressure in the fuel lines by turning on the fuel pump (BN) for a couple of seconds. After this, the BN will work either when the engine is cranked by the starter, or when the engine is running.
Sometimes this system needs repairs - there is nothing complicated here, and the editors of the 2Skhema.ru website will tell you how to do it yourself. Let's start with the BN pinout, then we will indicate it on the diagrams and at the end there will be instructions for replacing the fuel supply elements.
Pinout of fuel pump VAZ 2107
1 – radiator fan drive motor; 2 – mounting block block; 3 — idle speed sensor; 4 – engine ECU; 5 – potentiometer; 6 – set of spark plugs; 7 – ignition control unit; 8 – electronic crankshaft position sensor; 9 – electric fuel pump; 10 – indicator of the number of revolutions; 11 – lamp for monitoring the health of electronic systems and the brake system; 12 – ignition system control relay; 13 – speedometer sensor; 14 – special factory connector for reading errors using the BC; 15 – injector harness; 16 – adsorber solenoid valve; 17, 18, 19,20 – fuse box for repairing the mounting block that protects the injection system circuits; 21 – electronic fuel pump control relay; 22 – electronic relay for controlling the exhaust manifold heating system; 23 – exhaust manifold heating system; 24 – fuse protecting the heater circuit; 25 – electronic air sensor; 26 – coolant temperature control sensor; 27 – electronic air damper sensor; 28 – air temperature sensor; 29 – pressure control sensor and low oil pressure lamp.
You can check the fuel pump on a VAZ 2107 simply by checking the voltage at its connection block with a tester. The presence of voltage will indicate a malfunction of the electric motor. Instead of a tester (multimeter), you can use a test lamp to diagnose a malfunction.
In the absence of one, this can be done by disconnecting the connection block for the fuel pump and fuel level control and applying voltage with wires from the battery to the place where the gray wire is connected +12 and to the place where the black wire is connected - minus. A humming pump will indicate a faulty fuse, power circuit or ECU.
Pinout BN VAZ 2108, 2109, 21099
The fuel pump activation relay (2) is shown by an arrow.
Where is the fuel pump relay located?
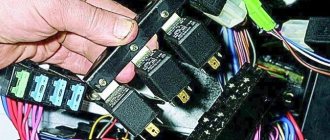
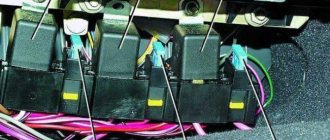
Where is the fuel pump relay located? The installation location of the relay varies depending on the make of the car. Most often, it is located under the hood, in the fuse and relay box.
The fuel pump relay is designed in the circuit to prevent accidental application of high voltage to the fuel pump winding. The relay is standard and consists of a plastic body and coils with contacts. It is located in the car interior near the console. To access it, you need to remove the protection cover.
In appearance, it is a small box that resembles a “plug” with an American type of output. Each terminal has a marking that indicates the following: 31 – mass; 30– +12V constant (regardless of ignition); 15– +12 with the ignition on; 50– +12 when the starter is running; TD – signal from the ignition system; TF – engine temperature signal from the injection control unit KE. Outputs: 87 – supplies power to the fuel pump; 87H – oxygen sensor heating; 87V – turns on the starting injector.
Connection diagram for electric fuel pump VAZ 21083, 21093, 21099 (injector)
On VAZ 21083, 21093, 21099 cars with a 2111 injection engine, an electric fuel pump is installed. It is located in the fuel module installed in the fuel tank.
For VAZ 21083, 21093, 21099 vehicles with ECM control unit (controller) January 5.1 (2111-1411020-61). Euro-2 toxicity standards (one oxygen sensor).
After turning on the ignition, the control unit supplies 12V to the fuel pump relay. The relay supplies voltage to the fuel pump. It turns on and builds up pressure in the engine fuel system. If there is no signal from the DPKV (the crankshaft does not rotate), the ECU turns off the relay and the pump. If the crankshaft rotates, the relay and the fuel pump work. All this work is accompanied by relay clicks and the buzzing of the electric fuel pump in the gas tank.
Notes and additions
— A similar connection diagram for the electric fuel pump (fuel pump) of VAZ 21083, 21093, 21099 cars with an injection engine 2111 and an ECM control unit M1.5.4N. The only difference is the color of the wires.
More articles on injection engines of VAZ 21083, 21093, 21099 cars
Connection diagram for electric fuel pump VAZ 21083, 21093, 21099 (injector): 1 comment
During the operation of any car, the need arises to replace parts and assemblies. If you intend to install a new injector on a VAZ 21099, then in recent years the automaker has been producing a unit with an M73 21114-1411020-12 Itelma controller, for which you will also have to replace the wiring.
Models of fuel pumps for VAZ 2114/2115 cars
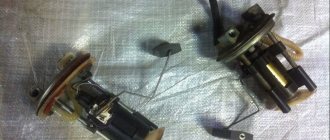
VAZ 2114/2115 cars are equipped with 1.5 cm3 and 1.6 cm3 gasoline engines with a distributed injection system. A submersible electric fuel pump is used to supply fuel. It is part of the fuel module installed at the top of the gas tank (under the rear seat). In addition to the pump, the module includes a fuel accumulator (cup), a coarse filter and a fuel level sensor with a float.
To supply fuel in VAZ 2114/2115 cars, a submersible electric fuel pump is used
The VAZ 2114/2115 fuel pump is a conventional DC electric motor in a sealed housing with a one-way valve at the outlet. An impeller of a special shape is located on the electric motor shaft. Its rotation ensures the fuel supply.
The fuel module includes a fuel pump, a fuel accumulator, a coarse filter and a fuel level sensor
The fuel pump is powered from the vehicle's on-board network. The electrical circuit of the pump, protected by a fuse, is closed using a separate relay.
Electric fuel pumps for VAZ cars are produced by both domestic (Utes, SAAZ, Pekar) and foreign companies. The latest modifications of the VAZ 2114/2115 are equipped with BOSH pumps, which are distinguished by their high reliability, long service life and relatively low price.
Design of the electric fuel pump VAZ 2114/2115
Catalog numbers of standard fuel pumps for VAZ 2114/2115:
- 2112–1139009–12 — for engines with a volume of 1.5 cm3;
- 2112–1139009–01 — for engines with a volume of 1.6 cm3;
- 580453453 (BOSH) - for engines with a volume of 1.5 and 1.6 cm3.
These models differ in operating pressure. The former are capable of creating a pressure of 2.8–3.2 kPa in the fuel system, the latter - 3.7–3.9 kPa. BOSH fuel pumps are rated at 3.5 kPa.
How does a fuel pump work?
There is nothing complicated about the fuel supply system. A conventional pump, which is driven by the rotor of an electric motor. To protect the entire fuel system from small particles, a filter is used. But this is not the end of the features, because it is worth noting that it is necessary to maintain the pressure in the ramp at the same level. And the VAZ 2109 fuel pump (the injector simply cannot work without it), provided that it constantly pumps gasoline, will begin to pump up the pressure higher and higher. And this will disrupt the operation of the system.
Therefore, it is necessary to adjust the pressure. For this, a special device is used, which is called a pressure regulator. It is installed in the fuel rail and connected to a pipeline that serves to dump excess gasoline into the tank. When the ignition is turned on, the rail pressure sensor is polled, after which the fuel pump drive is turned on. After the pressure in the rail has increased to the required value, the fuel pump is turned off. Therefore, it does not work all the time.
Fuel pump VAZ 2109 injector
>The fuel pump for the VAZ 2108 2109 21099 is installed with an electric injector. That is, it is turned on by supplying +12V voltage from the battery to it. It is located in the gas tank of the car. The task of the fuel pump is to supply fuel under pressure into the fuel rail, from where it is sprayed directly into the working cylinder using the injection system. Checking the performance of the fuel pump VAZ 2108 2109 21099: 1) When the ignition is turned on, the pump should start working. That is, the sound of its operation should be heard in the rear seat area. Therefore, the very first thing you need to do is check the fuse and the fuel pump relay. The assignments of the relays and fuses are labeled on the back of the mounting block cover. If the fuse is intact and the relay is working properly, then you need to remove the back seat of the car and measure the voltage at the fuel pump itself. This is done using a multimeter or wires with a 12V light bulb.
The injection VAZ 2109 has an electric fuel pump
If there is voltage at the pump, then everything is fine with the electrical part; you need to look at the fuel system. If voltage is not supplied to the fuel pump, you need to check the wire from the mounting block to the fuel pump; it may be damaged. 2) On the VAZ 2108 2109 21099 injector, it is not recommended to allow the fuel level in the tank to be less than 10 liters. Not the most convenient requirement, given that the car’s gas tank capacity is 45 liters. However, there is a reason for this: if the fuel level in the gas tank is low, the gas pump may catch air, which is unacceptable.
If you do not have a pressure gauge, the operation of the gas pump can be checked by the amount of fuel pumped per unit of time. Having unscrewed the spool, we connect a hose to the ramp, which we lower into the container for measurement. On Kalina and Grant, the pump should pump 35 liters per hour, or 0.5 liters. in a minute. At ten, the pump pumps 1 liter. in a minute. If much less fuel has leaked out, all filters must be checked. Under the bottom, next to the gas tank, there is a high-pressure filter. Another filter that needs to be checked is located in the tank itself on the fuel module. What to pay attention to: To remove the fuel pump from the car, you must remove the fuel tank. The VAZ 2108 2109 21099 fuel pump and injector cannot be removed directly from the passenger compartment, you can only check the voltage supply to it.
Checking the pump on the injection "nine"
The VAZ 2109 with an injection engine has an electric pump. It is powered by receiving voltage (12 V) from the battery. Its location is directly in the Lada gas tank. The mission of the electric pump is to deliver gasoline to the fuel rail under high pressure. Next, the fuel from the ramp enters the nozzles, which inject it into the combustion chamber.
If the injector on a VAZ 2109 does not pump the fuel pump, check the following elements:
A working fuel pump should start working when the engine starts. The sound of its operation should be heard under the rear seat. We begin the first stage of verification.
| Stages of work | Possible situations and your actions |
| We take a voltage indicator and check the serviceability of the relay and fuse, which are located in the mounting block. | If the electrical circuit connection diagram is in order, you need to check the voltage supply directly to the pump. To do this, we dismantle the rear seat of the Lada 2109 car. Under it there is the top cover of the pump and the connected wire connector from the mounting block, and the fuel line hose is also supplied here. We disconnect the contacts and unscrew the bolts on the cover. |
| Now you have direct access to the pump. We remove the fuel pump from the gas tank. | We measure the voltage at the fuel pump using a multimeter (tester) or a 12-volt light bulb. If the device shows that voltage is supplied to the VAZ 2109 fuel pump, the problem is not electrical. This means that the fuel system should be checked. Well, if there is no voltage, you don’t have to worry about the pump malfunctioning. Just check the integrity of the wire leading from the mounting block to the pump for damage. |
| On a fuel-injected "nine", the fuel level in the gas tank should be maintained at least 10 liters. This is done to ensure that the fuel pump does not suck in air under any circumstances. We check the serviceability of the pump by measuring the pressure in the fuel rail. | We connect the device to a special hole in the ramp. If the voltage is normal and the pressure gauge shows no pressure, the problem may be in the fuel filter. We check its integrity and throughput. If the filter is working properly, we check the fuel line leading from the gas tank to the ramp. |
Removing and replacing the fuel pump on VAZ 2108, 2109, 21099 (injector, carburetor)
Hello, in this article you will learn how to replace the fuel pump on injection and carburetor VAZ 2108, 2109, 21099. The fuel pump is usually changed if there is low pressure in the fuel system, or the pump does not pump fuel at all. First, let's look at replacing a fuel pump on a carburetor car. In fact, in the case of a mechanical fuel pump, such situations as pump leakage are possible, i.e. when it starts to drip, and if your fuel pump on a carburetor car starts leaking, under no circumstances drive it, gasoline will drip directly onto the hot outlet. Automotive stores sell repair kits for mechanical fuel pumps, but usually repairing a fuel pump has a short-term effect, so it is better to replace it with a new one. In order to remove the fuel pump, you need to unscrew the clamps on the fuel hoses and pull them off the pump (gasoline will flow from the hoses, so prepare some kind of container and plugs for the hoses in advance)
What are the signs of a fuel pump malfunction and the possibility of repairing it?
The first sign of a malfunction may be a lack of pressure in the fuel supply system. This is expressed by interruptions in the operation of the engine unit (it begins to “cough”), after which the car stalls. Such symptoms can occur both while driving and when the engine is idling.
However, even earlier, before the fuel pump fails, an attentive driver can diagnose problems. These include:
- high tone of the engine;
- having problems starting the engine;
- gradual loss of power while driving.
Thus, if you listen to the nature of the sounds while driving and monitor the dynamic performance of the car, you can timely repair or replace the fuel pump without waiting for it to break down.
For what reasons can fuel pumps fail?
It is important not only to know exactly how to determine wear and tear of a fuel pump, but also to take into account the reasons why the device may fail. The most common causes of breakdowns and incorrect operation of fuel pumps on VAZ 2108/2109 vehicles are:
The most common causes of breakdowns and incorrect operation of fuel pumps on VAZ 2108/2109 vehicles are:
- debris in the fuel tank;
- short circuit in the fuel system wiring;
- clogging in the fuel filter;
- pump overheating.
What to do if it leaks
Either fuel or lubricant (oil) may be leaking. If liquid leaks are found on the fuel pump body in a VAZ 2108/2109 car, it is recommended to take the following actions:
- tighten the clamps on the hoses of the device (at the “input” and “output”);
- check the integrity of hoses and connections;
- tighten the fuel pump cover bolt (or replace it if the thread has been stripped);
- replace the pump fitting.
What to do if fuel does not pump: repair
In cases where the device does not supply gasoline to the engine unit, you will need to establish the functionality of the gas pump itself. It is quite possible that it is functioning, but some element has failed.
Repairing a fuel pump is advisable only in cases where it is necessary to replace the smallest part of it. It is worth initially calculating the cost of materials, as well as taking into account the loss of time. It is quite possible that it is easier and cheaper to buy a new fuel pump.
Repair work to restore the functionality of the fuel pump, if it does not pump fuel from the tank, is carried out taking into account the following details:
- The fuel pump will need to be removed from the tank.
- Using the tool carefully, you will need to disassemble the device body.
- Inspect the pump components and find any damage.
Next proceed based on the existing problem:
- if one of the four springs bursts, you will need to replace it (as a rule, springs are inexpensive and are sold in almost all car stores);
- if the valve plate is seriously worn, this element will also need to be replaced, and the valve seat will need to be hammered into place with a blunt screwdriver;
- the pump drive rod has started to jam - you can straighten the surface of the rod to make it smoother;
- the surface of the fuel pump is dirty - you will need to clean the device with a soft, lint-free cloth
After troubleshooting, you should reinstall the fuel pump and check its functionality by starting the engine. If the ignition problems persist, most likely the problem lies in the fuel system itself, or your device will need to be replaced.
Fuel pump VAZ 2109: how the injector works. Replacement and inspection
You will need to consider the features that the VAZ 2109 fuel pump has. If the injector is in the fuel injection system, then the pump is of an electric type. Its use is due to the need to control the fuel supply to the combustion chambers. But, as you know, gasoline first enters a special ramp, in which it is mixed with air in a certain proportion (14 to 1). It maintains constant pressure, with the help of which the mixture is supplied to the combustion chamber through holes in the electromagnetic injectors. These are devices that transform the air-fuel mixture into very small droplets. Essentially, the mist in which the gasoline is suspended in the combustion chamber is ignited.
How does a fuel pump work?
There is nothing complicated about the fuel supply system. A conventional pump, which is driven by the rotor of an electric motor. To protect the entire fuel system from small particles, a filter is used. But this is not the end of the features, because it is worth noting that it is necessary to maintain the pressure in the ramp at the same level. And the VAZ 2109 fuel pump (the injector simply cannot work without it), provided that it constantly pumps gasoline, will begin to pump up the pressure higher and higher. And this will disrupt the operation of the system.
Therefore, it is necessary to adjust the pressure. For this, a special device is used, which is called a pressure regulator. It is installed in the fuel rail and connected to a pipeline that serves to dump excess gasoline into the tank. When the ignition is turned on, the rail pressure sensor is polled, after which the fuel pump drive is turned on. After the pressure in the rail has increased to the required value, the fuel pump is turned off. Therefore, it does not work all the time.
How to remove the fuel pump
The VAZ 2109 fuel pump is located under the rear seat. The injector implies its installation directly in the tank. The thing is that the pump is a submersible type. In the same unit there is a float-type fuel level sensor. It works due to the fact that the float moves the slider using variable resistance. At the same time, the current in the power circuit changes. The amount of gasoline remaining in the tank is determined by the magnitude of the change. To remove the pump you will need to use pliers, screwdrivers and an 8mm wrench.
It is quite possible that the reason that fuel is not supplied is a non-working VAZ 2109 fuel pump relay. The injector contains it, as well as a fuse, which could easily burn out. Before starting work, thoroughly clean the entire cover so that after removal no dust gets inside the tank. Then, using a screwdriver, loosen the clamps that secure the hoses. Remove them; if you can’t do it with your hands, try gently squeezing them with pliers and twisting them. After this, use a size 8 wrench to unscrew all the nuts that secure the lid to the tank body. Please note that there are washers there. Don't lose them. That's all, now the pump can be easily removed for replacement or repair.
Checking the pump's functionality
It is easy to check the VAZ 2109 fuel pump even without special instruments. The injector will not be able to operate without pressure in the fuel rail. Therefore, you need to keep the pump motor spinning. It’s easy to check; just connect its terminals to the battery. If you are afraid, then turn on an incandescent lamp in the gap of one wire. It will help determine the health of the motor winding. Please note that the filter must be as clean as possible. If it is clogged, be sure to change it. Otherwise, the pump will not be able to create the required pressure.
Basic fuel pump malfunctions
The fuel pump in the Prior may operate intermittently due to low-quality fuel. This is due to the fact that a fine fuel filter is installed here after the fuel pump.
At the inlet there is only a filter mesh that performs rough cleaning. The gasoline at some of our gas stations is so dirty that the mesh gets clogged quite quickly. The engine does not start well or stalls during operation.
The car jerks along the way and slowly picks up speed. If the filter mesh is partially clogged with debris, the optimal supply of gasoline to the engine is disrupted in different operating modes. When the pump is unable to maintain the required pressure in the fuel system of 3.7-4.0 atmospheres, improper mixing of air and fuel occurs. As a result, the car loses speed.
In addition, even a well-warmed-up engine after a short stop can then start only after prolonged operation of the starter.
Unstable operation of the power unit is most often a consequence of a faulty fuel pump. First of all, you need to check the pressure level in it.
If after stopping the engine the pressure in the pump drops too quickly, then there is obviously damage to the diaphragm, as well as the sealing gasket. In this case, the gasket should be replaced, and the diaphragm should be reinforced with a special film.
There may also be foreign bodies in the fuel system, in which case the fuel pump must be disassembled and thoroughly washed. To do this, use the following tool:
- flat screwdriver;
- pliers;
- set of open-end wrenches;
- Phillips screwdriver;
- set of heads.
You can do this type of repair yourself in your own garage. Before starting it, you should once again make sure that the fuel pump is not working as it should.
To do this, you need to start the car and pay attention to the idle speed.
If it floats, then this is already one of the arguments in favor of carrying out repair work. In addition, you can go out onto the highway and sharply press the gas at about 3000 rpm. If the car starts to twitch while accelerating, then there is a second argument for making repairs.
Checking the general condition of the fuel pump
First of all, let’s check whether the supply system of your VAZ 2109 is working at all. To do this, you need to take the following steps:
Intake Valve Check
Leak test
To check the tightness of the intake valve, you must:
In this situation, there are two options - look for the problem inside the fuel pump device, disassembling the pump, or change the entire unit.
The filter is clogged or damaged
To fix the situation, you need:
Pump diaphragm failure
You need to do the following for your fuel pump:
Be sure to simultaneously check the condition of the spring located under the diaphragm. To do this, you need to remove the upper part of the pump housing, remove the diaphragm rod and look at the current state of the spring. If it is broken, deformed or lacks elasticity, replace the element.
Node elements
Intake and exhaust valve malfunctions
If both valves raise doubts about their functionality, certain measures will have to be taken.
In the case of the Pekar pump, two valves are located in the cover, so to assess their condition, simply remove the cover from the fuel pump housing.