28.01.2020
| (No votes) |
Issues discussed in the material:
- Functions and design of the chain tensioner
- Chain tensioner malfunctions in Nissan
- Replacing the chain tensioner in Nissan
- What car enthusiasts say about replacing the chain tensioner in a Nissan.
Replacing a chain tensioner in a Nissan is not a rare situation. If the mileage is high or the tensioner has never been serviced, then extraneous sounds will begin to be heard from under the hood. In this phase, the matter almost always ends in replacing the part.
Of course, replacing the tensioner is an inevitable process, but this does not mean that you need to sit and wait for the characteristic rustling sound from the engine to appear. In order for the part to last longer, you need to know some of the nuances of tensioner maintenance. Our material will tell you about this, as well as about the functions and replacement of the chain tensioner.
Mechanism characteristics
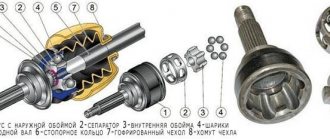
This element performs the function of adjusting the chain tension in the gas distribution mechanism drive. It is installed on all cars with this drive. The hydraulic chain tensioner compensates for low tension. Over time, the part wears out. When the motor is running, the chain constantly rotates and tends to stretch. It gets to the point where the part jumps one or more teeth. As a result, incorrect gas distribution occurs. As a result, late or early closing of the intake and exhaust valves occurs. Chain stretching is completely normal. Over its lifespan, it can stretch one to two centimeters. The hydraulic chain tensioner smoothes out this stretching.
What do users recommend?
Car enthusiasts give different advice on how to improve or select a chain tensioner. Mercedes and other foreign cars from well-known manufacturers are often equipped with a timing chain drive. As a rule, the device for tensioning the chain in modern cars is designed to be automatically adjusted. This makes it easier to maintain and repair the unit, ensuring its reliable operation.
In addition, when replacing the tensioner, users recommend setting the rod of the new device to the minimum position. This makes it possible to pump the working chamber as much as possible, avoiding jamming and unnecessary noise. This, in turn, contributes to the correct adjustment of the degree of chain tension.
How does it work?
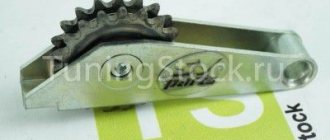
The principle of operation of the element is based on the operation of a spring. As oil from the line flows through the valve body, the plunger presses against the plastic tension shoe. Some engines use a lever with an asterisk. Thus, continuous contact of the surface of the working element is ensured. When engine speed changes, the element plunger moves back. The spring is compressed.
Damping of vibrations occurs due to the flow of lubricant through the plunger and body. The oil pressure is controlled by the hydraulic tensioner ball valve. When the chain is pulled, a plunger is pulled out of the housing. The retaining ring moves along the grooves to ensure proper tension. The unit also compensates for thermal expansion that occurs as the engine warms up.
Completion
Such a small but important part as the engine chain tensioner is a kind of fuse against the transmission element weakening and jumping off. Such things can lead to serious malfunctions of the power unit. If an older car model has a manual version, it is easy to upgrade it by replacing it with an automatic version.
It is more convenient in that it ensures tension of the chain without additional human intervention, eliminates jamming of the rod, and is easier to disassemble and install. According to their operating principle, all variations of timing chain tensioners have a similar sequence. The same applies to replacement and repair of parts.
How to check the hydraulic chain tensioner?
It is necessary to monitor the appearance of new knocks in the engine compartment. If impacts are detected at the cylinder head cover, this indicates a faulty tensioner. These sounds are clearly audible when the accelerator pedal is suddenly released.
What are the reasons why the hydraulic chain tensioner of the 406 engine has become unusable? This could be a jammed plunger or a hole in the ball valve, causing a discrepancy in oil pressure. The plastic shoe itself (or the sprocket, if any) and the damper also wear out.
Possible malfunctions and their causes
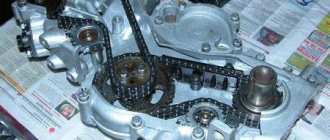
If an increase in noise during operation of the gas distribution unit is clearly noticeable, the chain tensioner of the ZMZ or another engine should be removed and checked. It is located on the right side of the power plant. A similar mechanism works using a spring and oil pressure in the housing, which depends on a similar indicator in the engine itself.
Reasons leading to the appearance of extraneous sounds during operation of the timing chain:
- poor quality purge of the plunger device;
- clogged ventilation holes;
- Excessive plunger wear;
- incorrect spring adjustment;
- failure of the ball valve.
Let's consider the procedure for disassembling and installing this device.
How to change?
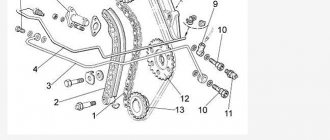
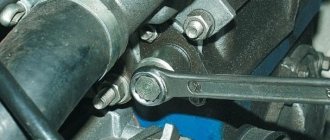
If the symptoms described above are observed, an urgent replacement of the hydraulic chain tensioner is necessary. To do this we need a new element, as well as a set of heads. Using a 10mm wrench, unscrew the fitting of the cylinder head cooling tube and move it upward.
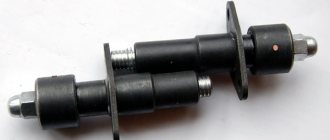
Next, we find two fastening nuts for the tensioner itself. We unscrew them with the same key. We take the protruding part of the mechanism with our hands and remove it from the seat. It is worth noting that the hydraulic chain tensioner has its own gasket, which also needs to be replaced. Before installing a new element, carefully coat the seats with silicone sealant. Install the gasket and tighten the bolts. By the way, before installation you need to remove the transport stopper. This element is needed to prevent the tensioner from discharging (so that the plunger does not come out of the body) during transportation. To “charge” the element and bring it into working condition, after assembly you need to press the negative screwdriver onto the part with great force. As a result, the hydraulic tensioner housing, under the action of the spring, will move into the cover until it stops.
The plunger itself will produce the proper chain tension through the sprocket or shoe (depending on the design features of the engine). Before “charging” you need to carefully tighten all the bolts. Otherwise, this will lead to premature wedging of the element. Don't forget to reinstall the fitting. After installation, start the engine and check it for extraneous sounds.
Suitability test
After removing the part, you need to check the element for clogging. Oil can carry small particles and other contaminants that can negatively affect the performance of the device in question. Their excessive accumulation causes unstable operation of the plunger rod and its jamming.
You can clean the tensioner yourself without much effort. Place the part in a tank of gasoline for several hours, rinse and dry it thoroughly. When inspecting the case, you need to pay attention to the presence of dents, cracks and scratches. The plunger mechanism is checked in the same way. If no visible damage is detected, check the functionality of the device.
The device is taken in one hand, and with the other we try to move the plunger rod in the frame. It should move freely without getting stuck. If movement is difficult, the washing process must be repeated. If this does not help, the part must be replaced. The element is installed in the reverse order of removal.
Is it possible to repair the old one?
An old hydraulic chain tensioner can be repaired in 60 percent of cases. But first you need to make sure that it is faulty. To do this, press the spherical end of the element with your finger. If it does not press, then the tensioner is jammed.
This occurs due to the skew of the locking ring. It has small burrs at the ends of the cut. They are the ones that interfere with the operation of the element. The disassembled tensioner must be thoroughly washed in kerosene and the locking ring replaced. Its outer diameter is 16.6 by 3 millimeters. The ring can be made from spring wire. It happens that the ball valve fails - it allows excess oil to pass through. To check its tightness, you need to remove the plunger and spring from the housing. Insert the latter with the end (spherical) part into the housing hole. Press the opposite end of the element with your finger. If there are large traces of oil leakage, the part must be replaced. From the factory, small discharges are allowed through two marks on the end of the tensioner housing. They serve to remove air from the inside of the mechanism. You can try to wash the element, thereby restoring it. But the result is not always effective. To do this, you need to wash the ball valve in gasoline or kerosene, pressing it with a thin wire through the oil hole. If flushing does not produce results and the element still leaks oil, it should be replaced.
Purpose
The mechanism in question ensures the normal operation of the chain and the entire drive. The unit is easy to maintain and simple in design. The tension is carried out under the influence of a spring or oil in the working rod of the device. The engine chain tensioner is a fairly reliable element and rarely fails. However, if extraneous noise is heard, it is necessary to check its condition and, if necessary, replace it.
Ignoring this problem leads to the chain weakening and jumping off, which can lead to more serious damage to the power unit. It is quite possible to clean and replace the part on your own. Next, we will consider the features and operating principle of these devices.
Manual chain tension
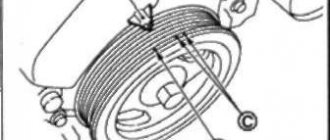
To eliminate the characteristic knocking sound of the chain drive in the valve cover area without changing the element itself, you can manually tighten the part. Let's look at how this procedure is performed using the example of a VAZ-2106 car. Here a sprocket is used in the tensioner.
So, first you need to remove the air filter with housing and casing. Next, unscrew the tensioner (not all the way) and make 2-3 revolutions of the crankshaft. This can be done with a regular key, setting it to the third position. After several rotations of the crankshaft, the chain drive is engaged. Next, check the level of its tension by pressing your finger on the links. It should not sag by two or more centimeters. When the chain is properly tensioned, the hydraulic tensioner is tightened and the attachment is assembled in the reverse order. This procedure must be repeated whenever knocking noises appear in the engine compartment.
Design features of tensioners on domestic cars
The VAZ chain tensioner of early modifications is a design with a spring. Modern models (after the seventh series) are equipped with hydraulic devices. The plunger rod is driven by the pressure created by the oil. This type is fully automatic, requiring no additional intervention to adjust the chain tension.
This part, like any other, is subject to wear and deformation. If damaged or clogged, the tensioner should be replaced or repaired. The device is removed according to the standard version. In early versions of the Zhiguli, it is additionally necessary to dismantle the oil supply tube located at the end of the unit body. To prevent liquid from leaking out during the operation, the hole must be blocked with a bolt of suitable diameter or a rag.
Device
A bicycle chain, unlike, for example, an anchor chain, has a slightly different structure. Its links are located approximately in the same plane, and not perpendicular to each other according to the “through one” principle. The design of a bicycle chain consists of collapsible links connected to each other by means of pins riveted (wedged) into the beginning and end of each link. So that the gaps into which the teeth of the sprockets go do not narrow, interfering with confident movement, but remain constant in the width of the gap, locking rings (“glasses”) are inserted into the links connected to each other one by one, or rather, they are put on each such pin.
As a result, one pair of links - internal and external (the first is threaded into the second) - forms a fragment from which a chain of almost unlimited length can be made. The half-link size - internal or external - is half an inch. For Half-Link format chains, one link fits into another on each pin in the same way. Each link is extended from one end to the other. Here the links are no longer replaced in pairs, but individually.
A conventional 108-link chain is used primarily in single-speed transmissions where excess chain length is not needed. In the assembled and ready-to-use chain transmission, the 108-link chain is firmly mounted on the front and rear sprockets and accurately transmits movement.
Mechanical shifting on most bicycles uses a much longer chain (110-126 links) to cover the largest sprockets front and rear, and a spring-loaded roller with the same teeth, representing an even smaller sprocket, tensions the chain, eliminating slack and allowing the cyclist to ride at any available speed. On high-speed bikes, the chain length is 114 or more links.
Reflector dampener
One of the simplest to make, but quite effective sedatives. It copes well with the main task - preventing the chain from falling off. At the same time, the chain holds perfectly during a quiet ride and during bumps and bumps.
To make a chain guide with your own hands you will need:
- an ordinary bicycle reflector (it is better if the diameter of the mounting ring matches the diameter of the seat tube);
- nuts;
- bolt;
- screwdriver;
- hacksaw for metal.
When you have found all the necessary tools and materials, you begin production. Take the reflector and unscrew the reflector. All you need is a foot. Mount it to the seat tube above the chain. It should not rub against the chain, but should be as close as possible, just a few millimeters. After this, saw off the excess length so that it does not interfere with pedaling. This type of stabilizer will perfectly hold the bike chain when jumping over curbs and during side landings.
Top Articles: Headliner Bikes
Chain stabilizer made of reflective material prevents the chain from falling off
You can screw an asterisk to the foot. You need to install such a tensioner on the pen with the asterisk down. This way you can tighten up the sagging lower part of the bike chain.
Removing the cylinder head cover
Place the machine on a pit or ramp.
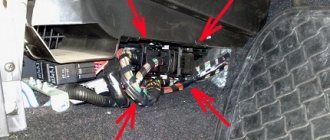
First, the holders of the brake booster pipe and the throttle valve drive cable should be disconnected from the cylinder head cover. They are mounted on special brackets on the left and right sides of the block.
Next, use a 10mm wrench to unscrew the bolt securing the air duct couplings. Move it aside. Next, using a screwdriver, slightly loosen the clamp of the crankcase ventilation pipe, which connects it to the air duct. Now use a 10mm socket to unscrew the bolts holding the cylinder head cover. The order is not important here.
OLYMPUS DIGITAL CAMERA
After that remove:
- brackets for the throttle cable and motor screen;
- lid pressure washers;
- ventilation and air hoses.
Next, all that remains is to remove the cylinder head cover.
Tips for choosing
To choose a suitable bicycle chain, rely on the characteristics indicated on the label. A correctly selected chain – specifically for your sprockets – is the key to running more than one thousand kilometers before significant wear of the parts is detected.
For children's bicycles, the length of the (half) link may not be 12.7 mm, but somewhat less - for example, 11.4 mm. From such a chain, you will only take pins and rings as spare parts, but the plates will no longer fit the sprockets of an “adult” bike. The fact is that by placing at least a few “children’s” links on an “adult” chain, you will quickly sharpen the sprockets. And shortening the chain by even 3 mm, like lengthening it, can kill all the parts in just 100-200 km, even when the transmission is cleaned and lubricated weekly.
But the choice of chains with anti-corrosion coating is not at all mandatory - it is rather a desire to impress those who do not yet have a bicycle. This coating can be successfully replaced with regular lubrication - even in rainy weather your chain will not rust. The fact is that machine oil (or its analogue in the form of a semi-liquid lubricant) is as good as spraying from another alloy and does not allow water to reach the steel. The coating itself will soon wear off, and you will come to the starting point - the need to regularly lubricate the chain.
Best articles: What is healthier: running or cycling?Avoid fakes. Chinese manufacturers and some swindlers who produce chains and bearings from aluminum alloys with a short resource and service life are guilty of this. It happens that they dilute steel with cheap additives, turning it into “plasticine” - as in the manufacture of low-quality hex keys, screwdrivers and bits. Violation of production technology did not lead to any good - numerous breakdowns can no longer be avoided.
Do not install a thicker chain on an 11-speed bike designed for, say, 7-speed cassettes. It's all about the number of cassette sprockets: the more there are, the narrower the gap between the planes, in each of which lie the tops (points) of the same sprocket. On the contrary, a narrower chain can be installed on a bike with fewer speeds.
As an example: the author of these lines used a 6-speed chain on a simple “road car” with one speed, where “Tyazhmash” products of greater thickness are used. At the same time, the bike was new, he found a bicycle chain with a broken link in the park - and, shortening it by 2 half-links, rode 9,000 km on it, riding within a radius of up to 25 km from his city on roads of dubious quality, before another link broke. . The “native” product was taken on every trip as a spare. Whether you need such difficulties is for each of you to decide personally.
Main types
Most often, the chain tensioner is present at the bottom of the derailleur. The tension can be adjusted with a special screw.
On singlespeed and planetary bikes, it is attached to the dropout, rear axle or hanger. The tension is adjusted by changing the angle of the lever or the reach (depending on the design).
On bicycles designed for extreme disciplines, the tensioner may be part of a stabilizer that is mounted between the frame and the system (frame mounting standards: ISCG, ISCG 05, BB).
Basic standards for chain tensioners.
ISCG
International Standard Chain Guide translated into Russian means “international chain guide standard.”
The damper does not tension the chain, but reduces the amplitude of vibration by limiting the free space. However, in the diagram of a row of dampers, there is a tension roller in the lower part.
The standard is designed to simplify fixation on the frame and adjust the seat angle. Before its appearance, the dampers were pressed against the frame by the cup of the carriage.
ISCG provides for fixation on the frame with 3 bolts (the distance between the holes is 46 mm).
ISCG 05
A few years after the introduction of the first ISCG standard, larger diameter carriages with external bearings began to appear more often on the market. Changes were required in the location of the mounting holes.
Thus, in 2005, ISCG 05 appeared (the distance between the holes is 56 mm). This international standard is an excellent example of successful cooperation between different players in the market, from which the consumer primarily benefits. The fastenings have become more convenient and reliable.
BB
The dampers with such a system are attached to the carriage with a locking ring - they are clamped between the frame and the system with the front sprocket.
But quick and accurate adjustment of the distance between the damper and the drive sprocket is impossible. To solve this problem, damper manufacturers included special adapters in the kit, which made the system heavier and, due to the large number of bolts, required frequent adjustments.
Signs that the procedure is necessary
On bicycles that are equipped with a planetary hub or that do not have speed derailleurs, it is not difficult to determine that the chain needs to be tightened. To check, you need to pull it down until it stops. If the distance it travels is more than 1-1.5 cm, then adjustment is required.
There are several methods to determine whether the chain on a speed bike needs to be tightened:
- The speed position is set so that the chain is located on the largest sprockets at the front and rear. Then you need to pull it down and towards the front wheel until the rear derailleur reaches the stop. If after this procedure there are no more than 2 free links left, then there is no need to adjust the chain length.
- The chain is set to the largest sprocket at the front and the smallest at the rear. In this case, the guide roller and the rear shift tensioner roller must be on the same axis, perpendicular to the ground. The required length on 2 suspensions is determined in this way: you should press on the pendulum until the front sprocket cassette moves to the greatest distance from the ratchet. This is the best position to measure the required chain length.
conclusions
Making a homemade tensioner is quite simple. To do this you need very few materials and tools. And, of course, your time, desire to do something. At the same time, you will not only save significantly, but also get a lot of pleasure from the manufacturing process itself.
If you do not want to spend money on expensive purchased models of kites for kitesurfing, then you can assemble this type of equipment yourself, following the advice in this article.
Why do you need a bicycle chain guard? During trips, foreign objects, sand, dirt can get into the bicycle chain - all this leads to deformation and wear. How to protect the chain from premature wear? We make chain protection with our own hands.
Not every athlete is able to afford to buy a complete windsurfing board. Let's learn how to make this projectile yourself at home.