Maybe I'm exaggerating, but it seems to me that every classic encountered such a problem. In the heat, when the car was moving (in my case it was a VAZ 2106), the car began to twitch or completely stall in the most inconvenient places (crossroads, on the highway, etc.). If you open the hood and look at the fuel filter at this time, you could notice that it is empty or there is very little gasoline there; when you try to manually pump gasoline from the fuel pump, you can understand that the fuel pump does not pump gasoline. Everyone solves this problem in their own way, I let the engines cool by 10-15 degrees, then moistened a rag, threw it on the gas pump, successfully started the engine and drove home. (I want to make a reservation right away, I always had a new fuel pump repair kit in the car, I have a DAAZ fuel pump. Pekar g * but there were two of them, the same problems with them.) In general, I removed the fuel pump, took it home, disassembled it, to my To my surprise, everything was fine with it, the diaphragms were not torn, the valves were normal, but since I had a repair kit, I replaced everything with a new one and installed it on the car. The problem has not gone away. Air jams still formed. Then I went to an auto store, bought a fuel pump pusher, it was 8.25 cm long, took off the old one, measured it, its length was 8.2, the difference in principle is not big, I installed a new pusher, drove it, and still the problem did not disappear. I no longer knew what the reason could be, I also went to the auto store, bought a rod with a pusher, removing the old rod with a pusher, I noticed that the rod was cracked, + in addition to all this, there is a 1mm thick gasket between the block and the rod, not order! There should be a gasket with a thickness of 0.27-0.3 mm... Next, installing a new rod + a new pusher that came with the rod, I adjusted the protrusion of the pusher to 1.1 mm (0.8-1.3 seems to be allowed). I installed a new fuel pump (because I had ruined the old one) and that was it, my problems disappeared. I still think that the problem was in the rod and an incorrectly installed gasket, but what’s most interesting is that we drove like this for almost 3 years, with an incorrectly installed gasket. But at the same time, every summer I had to buy a new fuel pump, because this only solved the problem of an air lock...
That's all, if someone solved this problem differently, please leave a comment, I will be very grateful to you
When operating the “seven”, one of the problematic components is the fuel pump. Sometimes its malfunctions have to be fixed urgently, “on the road”. Therefore, it will be useful for every owner of the “Seven” to know how the VAZ 2107 fuel pump (carburetor) works, what its main malfunctions are and how to repair it.
What fuel pumps were equipped with classic VAZ models?
Classic VAZs include all models of the Zhiguli family, produced from 1970 to 2012 and their modifications:
Depending on the year of manufacture, the engines of these vehicles were equipped with different fuel systems. In all the first Zhiguli models, the fuel mixture was injected into the cylinders using a carburetor, and the fuel was supplied by a mechanical fuel pump. The latest modifications of the VAZ 2104, 2105 and 2107 had an injection system and an electric fuel pump.
Carburetor cars of the Zhiguli family were equipped from the factory with mechanical fuel pumps of the diaphragm type DAAZ 2101 (catalog number 1106010) produced by the Dimitrovgrad Automotive Unit Plant. Thanks to their simple design, reliability and maintainability, they have proven themselves well not only on the “classics”, but also on cars of the Sputnik and Samara families, which were equipped with their modified versions.
Carburetor VAZ 2101–2107 were equipped with DAAZ mechanical fuel pumps
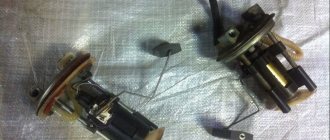
Injection Zhiguli models were equipped with domestically produced electric fuel pumps. They were produced by the Pekar and Utes enterprises under catalog number 21073–1139009. The latest modifications of the Zhiguli were equipped with products (catalog number 2112–1139009). The same devices were installed on all models of the Samara and Lada families.
Injection models of classic VAZs were equipped with electric fuel pumps “Pekar”, “Utes”, “Bosch”
Causes of misfire in injection engines
Since carburetors have a lot of shortcomings and unstable operation, injectors are mainly installed on modern cars. Stable operation, efficiency, frost resistance and environmental friendliness ensure the reliability of the motors and their durability. Injection engines are equipped with an ECU that regulates the composition of the combustible mixture and its supply.
When problems arise with fuel ignition, an error appears in the control unit, which helps to identify the faulty part of the unit.
When a breakdown is detected, it is necessary to conduct in-depth diagnostics to identify all faults. The most common reasons are the following.
Combustible mixture quality
If the air-fuel mixture has incorrect proportions, it will not ignite. Sometimes simply changing the gas station is enough, but in some cases major repairs may be needed. Low-quality fuel can clog injectors and filters. The reason for supplying the mixture in the wrong proportions may be a faulty fuel pump or pressure regulator. It is better to entrust complex diagnostics to authorized service stations, since independent examination of devices does not always allow you to detect an error.
Candles
Worn spark plugs can lead to misfires at idle and the engine constantly stalling. Sometimes you come across defective spark plugs that do not produce a spark. A change in the gap can also cause the fuel-air mixture to fail to ignite.
Armored wires
Faulty high-voltage wires do not cope with the task, which leads to misfires. Damage due to the mechanical impact of the armored wires or high resistance in them does not allow the mixture to ignite and can cause engine failure.
Cylinder deformation
If the gap between the piston and cylinder has changed, then significant changes appear in the operation of the engine. Although this reason is quite rare, it must be taken into account during a full diagnosis.
Incorrect compression
Uneven or low compression of the combustible mixture prevents it from igniting. The problem arises due to a violation of the integrity of the piston rings or wear of the CPG.
Malfunctions of the device can cause misfires on a cold engine. Due to the incorrect size of the device gaps or leaks in the hydraulic compensators, problems may arise when the mixture ignites.
There are many reasons for the omission, so it is necessary to carefully carry out a comprehensive diagnosis. Situations often occur in which several faults are considered (electronics and condition of the cylinders, fuel quality and condition of the timing belt, valve and spark plug).
Where is the fuel pump located on 2106, 2107 and other models
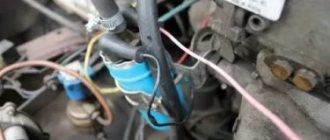
The location of the fuel pump on carburetor and injection classic VAZs is different. In the first, it is installed on the left (as viewed from the passenger compartment) on the engine cylinder block on a special boss, and is attached to it using studs through a heat-dissipating ebonite spacer. The mechanical fuel pump is driven from the engine intermediate shaft through an eccentric and a pusher (rod).
The mechanical fuel pump on the classic is mounted on a special boss on the engine cylinder block
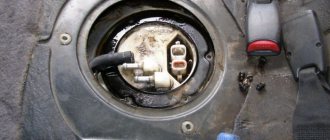
In injection Zhiguli cars, the pump is included in the design of the fuel module. It is located inside the gas tank. The design of an electric pump consists of a DC electric motor and a specially shaped impeller mounted on its shaft. The electric motor is powered from the vehicle's on-board network. The electrical circuit of the device is protected by a separate fuse and relay.
The electric fuel pump on injection classic models is installed in the gas tank
Checking, repairing and replacing a mechanical fuel pump
Methods for diagnosing fuel pumps for carburetor and injection engines of Zhiguli are also different. Checking a mechanical pump consists of determining its performance, as well as assessing the condition and performance of its component elements.
How to check the performance of a mechanical fuel pump
The productivity of the DAAZ mechanical pump is 1 liter per minute. To check the amount of pumped fuel you will need:
Remove the fuel hose from the outlet fitting
We estimate the amount of fuel pumped by the pump per minute
If the amount of gasoline is less than 1 liter, the fuel pump is faulty.
Assessment of the condition and performance of component parts
The following pump elements must be checked:
Design of the DAAZ fuel pump
Checking the valves consists of determining the air pressure at the outlet fitting and the vacuum at the intake
The mesh filter should not show signs of damage or deformation
If the pump diaphragms are damaged or deformed, they must be replaced.
Removing the pump thermal spacer
The length of the pusher should be 82.5 mm
Do-it-yourself repair of a mechanical fuel pump
It is not advisable to purchase faulty fuel pump parts separately. It is much more profitable to purchase a repair kit, which includes elements that may fail, namely:
Fuel pump repair kit
Repairing a fuel pump involves dismantling and disassembling it. They are produced according to the same algorithm that was described earlier in the diagnostics section. If, after disassembling the fuel pump body, you find that there is dirty deposits or debris on its walls or on the inner surfaces of the fittings, clean them with carburetor cleaning fluid and a piece of coarse cloth. When removing plaque, use a small wooden spatula and toothpicks. It is highly undesirable to use metal objects for these purposes.
Removal
1. Relieve the pressure in the power system (see “Relieving pressure in the power system”).
2. Disconnect the wire from the negative terminal of the battery (see “Battery - removal and installation”).
4. 7 mm
Unscrew the eight nuts securing the electric fuel pump to the fuel tank around the perimeter of the flange.
5. Lift the electric fuel pump and tilt it, removing the float of the fuel level indicator sensor from the hole.
6. To remove the receiving mesh filter, carefully pry it off with a screwdriver.
7. Remove the filter from the pump tip.
8. Wash the filter in acetone or a similar solvent, clean it with a hard brush and blow it with compressed air.
9. To replace the fuel level indicator sensor, use a screwdriver to release the clamp of the sensor and pump wire block. Disconnect the block.
10. Using a slotted screwdriver, press the wire clamp and remove it.
11. Mark the position of the wires in the block so as not to confuse them during assembly. Use an awl to press out the ends of the sensor wires and disconnect them from the block.
12. Using a slotted screwdriver, unscrew the screw securing the ground wire of the pump and the lower mounting of the sensor.
13. Using the same tool, unscrew the screw of the upper sensor mounting.
14. Remove the fuel level indicator sensor.
Diagnostics and replacement of the electric fuel pump on cars of the Zhiguli family
In injection engines of classic VAZs, the fuel pump may lose its functionality both due to problems with the power supply to it and due to a malfunction of its electric motor. In the first case, the situation can be corrected by diagnosing and repairing the electrical circuit of the device. But if the electric motor of the pump fails, only replacing it will help.
Checking the protection devices for the electrical circuit of the fuel pump on injection VAZs of the Zhiguli family
If there is a problem with the electrical equipment of the fuel pump circuit, it usually does not turn on at all. Turn on the car's ignition without starting the engine and listen. First, you should hear a click from the relay, and then a characteristic “squeal” emitted by the pump’s electric motor. If you don’t hear anything like this, start diagnosing with the electrical circuit of the device.
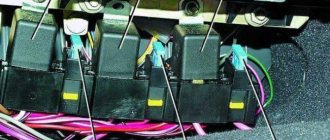
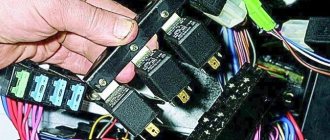
The pump circuit is connected to the on-board network via a separate relay, and its protection is provided by a fuse. Both of these devices are located in the vehicle's optional mounting block. You will find it under the glove box. It contains 3 relays and 3 fuses. The fuel pump relay (indicated R2 in the diagram) is located in the middle, and the fuse (F3) is to the left of it. We pull the fuse out of its seat and check it by “ringing” it with a tester. If a malfunction is detected, we replace it, not forgetting to comply with the rating (15 A).
You can check the functionality of the relay by installing a known working device in its place. Instead, replace it with the relay located to the right of the one being diagnosed, which is responsible for the radiator fan circuit. If this option does not suit you, turn on the ignition and measure the voltage between the pink wire going to the relay and the vehicle ground. The device should show 12 V. This means that the device is powered. After this, you need to connect the pink wire with the gray one at the relay terminals. So we will connect the fuel pump directly to the battery. If it works (that same “squealing” sound will be heard), simply replace the relay.
The fuel pump relay is located in the middle (R2), and the fuse is located to the left of it (F3)
Checking the fuel pressure in the system
The main indicator of the operation of a fuel pump is the pressure it creates in the system. If the device turns on, pumps fuel, but the engine runs intermittently, take the time to check the pressure. To do this, you will need a pressure gauge with a measuring range of 5–7, equipped with a gas-resistant hose and a threaded fitting (if there is no special one, you can use a regular tire pressure gauge). The sequence of actions is as follows:
Diagnostics
The very first thing when diagnosing, as noted above, listen when you turn on the ignition to see if there is any noise from the fuel pump. The absence of a characteristic buzzing may indicate that:
- VAZ 2107 fuel pump fuse is faulty;
- relay malfunction;
- open circuit of the fuel pump;
- motor malfunction;
- ECU malfunction.
Below is a simplified connection diagram for a VAZ 2107 injector fuel pump:
You can check the fuel pump on a VAZ 2107 injector simply by checking the voltage at its connection block with a tester. The presence of voltage will indicate a malfunction of the electric motor. Instead of a tester (multimeter), you can use a test lamp to diagnose a malfunction.
In the absence of one, this can be done by disconnecting the connection block for the fuel pump and fuel level control and applying voltage with wires from the battery to the place where the gray wire is connected +12 and to the place where the black wire is connected - minus. A humming pump will indicate a faulty fuse, power circuit or ECU.
Fuel pump VAZ 2107 injector
The injection “seven” has a number of fundamental differences from the carburetor version of the car. This difference relates primarily to the fuel supply system. In the design of the VAZ 2107, the injector does not have a carburetor, and the gas pump pumps fuel directly to the injectors: this is reminiscent of the supply system of diesel engines.
Purpose and device
An electric fuel pump, unlike a mechanical one, is responsible not only for delivering fuel from the tank to the combustion chamber, but also for creating high pressure in the fuel system. Fuel injection in injection systems is carried out using nozzles, and gasoline must be supplied to them under high pressure. Only an electric pump can cope with this task; a mechanical one is not suitable here.
The VAZ 2107 fuel pump injector is designed quite simply and thanks to this it has a long service life. Essentially, it is an electric motor with blades located on the front of the shaft, which pump gasoline into the system. The pump inlet pipe is equipped with a coarse fuel filter in the form of a mesh to retain large dirt particles. The design of the electric pump is complemented by a fuel level sensor, which transmits a signal to the instrument panel.
Operating principle
To better understand the principle of operation of the gas pump, you need to have an idea of the injection system as a whole. Such a system consists of:
The VAZ 2107 fuel pump injector starts working after the driver turns the ignition key. At this moment, the electric motor of the pump turns on, and the pressure in the system begins to rise. When the fuel system pressure reaches 2.8–3.2 bar (280–320 kPa), the engine starts. While the engine is running, the gas pump pumps fuel into the system, and the pressure is maintained at the required level. After the engine is turned off, the pressure drops within a few minutes.
Where is
The fuel pump of the VAZ 2107 car, the injector is located inside the fuel tank. If you open the trunk lid, the tank with the pump can be seen on the right. The advantage of this arrangement is the simplification of the fuel system, the disadvantage is difficult access to the fuel pump.
Which fuel pump is better
If we compare an electric and mechanical fuel pump, it should be said that:
What is the device
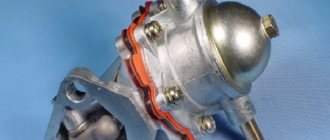
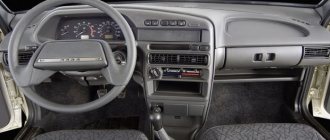
The gasoline pump is a cylindrical barrel measuring 20x15 cm, located under the hood of the car in the carburetor area. It has two tubes, one of them pumps gasoline, and the other supplies it to the carburetor. It also has a lever that is designed for manual pumping of fuel if the mechanical system is not functioning.
The design of the device includes:
- The chamber into which fuel flows from the tank.
- Fuel inlet and outlet valves.
- Diaphragm.
- The ghost lever operates the pumping mechanism.
- Return spring.
- Fist.
- Camshaft
- Sealing gasket.
The operating principle will tell you what each part does.
Operating principle
It works quite simply, just like regular water pumps. In order for the device to begin to function, a mechanical action is applied to it, carried out by the diaphragm. It moves up and down due to the effects of vacuum and pressure. During the downward stroke, a vacuum is created and fuel is sucked into the chamber. When the diaphragm moves upward, it creates pressure and the suction valve closes, and the discharge valve opens, through which fuel flows into the carburetor. The return spring performs the function of causing the movement of the diaphragm.
What are the causes of malfunctions?
The main problem that causes malfunction of the fuel pump of a VAZ-2107 car lies in the sealing gasket. It creates a sealed chamber where the phenomenon of rarefaction and pressure occurs. When this gasket wears out, the seal is broken and not only gasoline, but also air is sucked into the chamber. When the diaphragm moves back, fuel leaks out through a loose seal. Another reason for the pump not to function is clogging of the inlet valve channels. But, this problem was solved by installing a special filter element in front of the gas pump, which extends the service life of the fuel injection device much longer. Rupture of the internal membrane also poses a threat to the performance of the element. If such a problem occurs, it is very difficult to start the engine even when pumping fuel manually.
How to determine the malfunction?
For a VAZ-2107 car, it is easy to find out if the fuel pump is not working. To do this, you need to disconnect the tube from which gasoline enters the carburetor. Next, manual pumping is carried out and if liquid leakage is observed, then the cause of the malfunction is not in the fuel pump. If fuel does not come out of the tube, then the device is faulty, or rather, the problem most likely lies in the inlet valve. You can check this as follows:
- Remove the intake valve tube.
- Close the inlet port with your finger.
- Press the pump lever.
If you feel a vacuum on your finger, then the device is working properly and there is no point in disassembling it.
Fuel pump repair
The device for pumping fuel into the carburetor is subject to repair, unless, of course, the service life of the device is very long. Repair includes disassembling the device, cleaning and replacing worn parts. So, repairs are best carried out with the device removed from its seat, but there are also simple breakdowns that can be repaired without removal. Repairs are carried out in the following sequence:
- The main semicircular cover, which is secured with a bolt, is removed.
- After removing the cover, we carry out a visual inspection. The filter is removed and needs to be washed and blown out for cleaning.
- Further analysis of the device is underway. The six bolts are unscrewed using a screwdriver and the device is separated into two parts.
- The intake and exhaust valves are cleaned. You can wash it in gasoline or solvent and spray it with a stream of dense air.
- To remove the diaphragm, you need to rotate it 90 degrees and carefully remove it.
- Next, we repair the diaphragm, unscrew it and remove all the components.
- Only flexible membranes are damaged, so it is these that need to be replaced.
- When the replacement is made, it is important to assemble the diaphragm in the same sequence as originally.
- The device itself is assembled in the reverse order of removal.
- When installing the filter, it is necessary to ensure that the hole in it is located above the valve.
- By connecting the two parts, a gasket is installed, which can be additionally lubricated with sealant.
The repair is complete, all that remains is to install the fuel pump in its seat and check its functionality.
Replacing the device
If the fuel pump has outlived its usefulness, then it is better not to torture yourself and the car, but install a new part. Replacing a fuel pump on a VAZ-2107 is not difficult even for a beginner. First, disconnect the fuel hoses, then use a head to unscrew the two nuts securing the fuel pump. After this, disconnect the pump from the engine block. Before installing a new pump, clean its seat from dust and dirt. Initially, it is necessary to put a sealing gasket on the cleaned area, the thickness of which should be 0.7 mm or more.
Important! Next, a thermal insulation gasket is installed, which has a thickness of about 0.3 mm. The thickness of the two gaskets is necessary to achieve a minimum pusher exit clearance of at least 0.8 mm. Therefore, it is better to use new gaskets rather than suffer with old ones.
If the thickness is less, this may result in improper functioning of the fuel pump due to the incorrect position of the pusher. After this, the device is installed and tightened with nuts, two hoses are inserted and secured with clamps. All that remains is to check the functionality of the installed equipment.
Knowing not only how the replacement is carried out, but also the operating principle of the fuel pump of your VAZ-2107, you can easily carry out any repairs without using the help of specialists at a service station and thereby saving your money.
Unfortunately, it is possible that when you turn on your “Seven” you cannot hear the usual sound of the fuel pump, and this usually happens at the most crucial and inopportune moment. Of course, if such a problem arises, you can postpone your affairs until later and turn to a professional auto electrician for help, or you can go your own way, showing willpower and trying to fix the problem on your own.
Strange as it may seem, a fairly detailed power supply diagram for the VAZ 2107 (meaning as convenient as possible for use) is a certain rarity even on the Internet, and the option given below allows, to some extent, to facilitate the search for the cause of the failure of this important unit.
If we talk about practical implementation, then the most optimal version of the algorithm for troubleshooting the electrical power circuit of the VAZ 2107 fuel pump looks like this.
First of all, you should find a panel with three executive relays located in the glove compartment area and, for ease of operation, dismantle it and pull it towards you. Next, on the middle relay (it actually supplies power to the fuel pump), with the ignition on, we measure the presence of + 12V voltage on the thick pink wire. If voltage is present, then we bridge the indicated pink wire with a thick gray wire that goes directly to the fuel pump (on the relay these are contacts “30” and “87”).
If the operation of the unit is still not audible, we proceed to check the wiring, paying special attention to the connecting connectors in the trunk, one of which is black and slightly elongated, and the second (white) is located directly on the fuel pump cover. It is characteristic that, according to the “law of meanness,” the break is most often located in the second connector, and it will not be possible to get to it without removing the pump. By the way, if the contact is actually broken in the white connector, then in order to avoid problems during further operation, you can completely eliminate it by soldering the wires directly (the load in this circuit is significant, and the contacts simply burn out).
Don’t forget, also, to check the condition of the ground wire and the reliability of its connection (black wire, screwed with a self-tapping screw in the lower right part of the trunk).
Now let’s consider the option when, when the pink and gray wires are short-circuited, the pump starts working. In such a situation, you should check for the presence of +12V on contacts “85” and “86” of relay R2. In other words, when the ignition is turned on, a stable + 12V should appear on one of the contacts (relative to the “ground” of the car), and on the other contact this voltage should remain for several seconds (when connecting the “ground” from the ECU). The normal appearance of voltage on contacts “85” and “86” indicates that the electric fuel pump is in working condition and that relay F2 is most likely faulty. If the desired voltage is not present, then the situation becomes more complicated and the search will have to be continued. At this stage, it is necessary to determine what exactly is missing from the relay. If the positive comes, then we call a thin gray wire with a black stripe and if it is not damaged all the way from the relay to the ECU, the matter is bad and you cannot do without an experienced specialist. In the event of a complete absence of voltage, both at pin “85” and at pin “86”, fuses F1, F2, F3 are sequentially checked, as well as the wiring going to the main relay.
Among other things, when dealing with the problems of powering the fuel pump, we should not forget that modern security systems quite often provide for blocking this unit as additional protection against theft, and the malfunction can be explained by malfunctions in the car alarm.
The fuel systems of classic VAZ models, such as 2106 and 2107, differ in the type of supply of the combustible mixture to the cylinders. For some, the carburetor is responsible for this, for others, the injector. However, the coordinated operation of the power unit for both depends not on the design of the system, but on the serviceability of its elements, and primarily the fuel pump. Every car enthusiast should, if necessary, be able to repair and replace this element with his own hands.
Signs of a fuel pump malfunction
A faulty fuel pump can be determined by the following symptoms:
The fuel pump does not pump
If, after turning the ignition key of the injection “seven”, you do not hear the usual sound of the fuel pump running, you need to check the electrical power circuit, as well as the mechanical part of this unit.
Checking the relay and fuse
Troubleshooting begins with the relay and fuse box located in the cabin under the glove compartment. To make it more convenient to work, the block must be removed from the niche by pulling it towards you. The fuel pump fuse is located in the middle of the block (indicated by the number 4 in the figure), the fuel pump relay is located slightly to the right of the fuse (in the figure - 5).
From the connection diagram it can be seen that voltage is supplied to the fuel pump through the fuse and relay. Therefore, first of all, you need to check the integrity of the fuse: this can be done, for example, with a multimeter. If the fuse turns out to be blown, and after replacing it the car runs fine, then you have the easiest emergency of all. If the fuse is intact, then further actions are as follows:
Fuel pump drive
The VAZ 2107 mechanical fuel pump is driven by a pusher and an eccentric. Among drivers, it is customary to call the pusher a rod, although the rod is another part of the fuel pump. The eccentric is located on the intermediate shaft, which operates from the gas distribution mechanism.
The fuel pump drive includes (see figure):
Device and principle of operation
The operation of the mechanical fuel pump drive is not based on the fact that:
Drive faults
Problems with the mechanical fuel pump drive lead to interruptions in the operation of the fuel supply system. Actuator malfunctions are most often associated with deformation or excessive wear of the pushrod or cam.
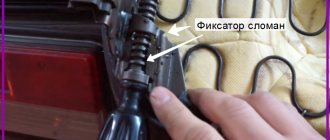
Fuel pump rod bends
The fuel pump pusher is often made of metal that is not strong enough. There are often cases when, after 2–3 thousand kilometers, such a pusher bends and flattens the constant impact of the cam. The length of the pusher should be 82.5 mm. If your fuel pump tappet does not meet this size and is flattened on the cam side, it will need to be replaced.
Fuel pump repair
To dismantle the electric fuel pump you will need:
Removing the electric fuel pump
Dismantling the electric fuel pump is performed in the following sequence:
If you need to replace or wash the coarse filter, you need to pry it off with a screwdriver and remove the old mesh. The new filter is installed by pressing tightly.
The fuel pump is installed in reverse order.