The throttle cable (gas cable) is the connecting link between the gas pedal and the throttle; when you press the pedal, you do not act on the cable, which in turn opens/closes the throttle valve. This way you regulate the flow of fuel to the cylinders, as well as the engine speed and vehicle speed.
A poor (untimely, delayed) response to pressing the gas pedal is most often a sign of problems with the throttle cable. The problem may lie in the fact that the throttle cable is incorrectly adjusted, its tension has weakened, in addition, the throttle cable may have stretched or completely failed and requires immediate replacement. If, when pressing the gas pedal, you feel resistance similar to friction, or pressing the pedal has become hard and not smooth, you need to lubricate the cable.
In this article I will talk about how to adjust the throttle cable, as well as how to lubricate the gas cable on a Lada Priora at home.
Attention! Before adjusting the throttle cable, make sure that the tight movement is not due to the carpet or other obstructions that may interfere with the free movement of the gas pedal. Very often, because of this banal “breakdown,” drivers make a lot of unnecessary movements and dismantle the engine almost to the ground in search of the reasons for the lack of engine power. As a result, it turns out that the new mat is simply bent or slipped somewhere and the pedal moves only half its travel.
Lubricating the throttle cable on a Priora at home
To work you will need:
- Flat screwdriver;
- Pliers;
- A syringe and a few drops of motor oil or WD-40.
Actually the work itself.
1. First you need to turn off the engine and let it cool.
2. Next, you need to open the hood and remove the decorative engine cover.
3. To remove the throttle cable, you need to remove it from the plastic bracket; to do this, pull the cable casing towards you and, pushing the rubber ring up, remove the cable.
4. Now you need to disconnect the cable from the throttle valve drive. To do this, remove the U-shaped metal bracket from the throttle actuator by prying off one edge using a flathead screwdriver.
5. We remove the cable from the hook, overcoming the force of the spring.
6. Now that nothing is in the way, you can begin to lubricate the throttle valve actuator; to do this, you need to slide the transparent cap and generously lubricate the cable with a few drops of engine oil or WD-40 penetrating fluid. In the case of oil, prepare a syringe.
Try to pour oil into the housing, then move the housing to lubricate the cable along its entire length. Repeat the procedure several times until the cable is completely lubricated.
Next, put the protective cap back in place and reinstall the cable to the place of further service.
Description and performance check of the VAZ 2110 throttle valve
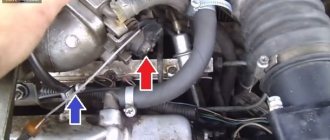
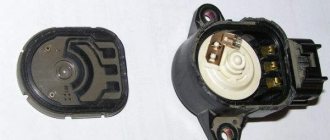
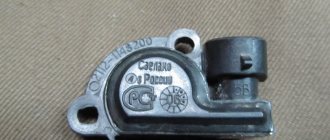
Let's look at the example of the throttle on a VAZ 2110 car. The position of the throttle valve on a VAZ 2110 is the engine compartment. The type of drive in this car will be mechanical, we discussed this earlier. The throttle position sensor itself on a VAZ 2110 car is located in the throttle assembly; it is popularly called the “right foot sensor”.
It is used to measure the amount of throttle opening and transmits information to the car's engine block. The sensor operates on the principle of a conventional resistor. A resistor is an element of an electrical circuit that has a certain or variable resistance. Sensors can be contact or non-contact. In the car it is located on the throttle pipe and connected to the damper. The main danger is that if it malfunctions, information regarding the throttle position will be distorted.
The VAZ 2110 throttle valve and injector are important components responsible for supplying air and fuel to the engine cylinders. Many owners of this car model have a desire to check the functionality of the VAZ 2110 throttle sensor. And more than once this situation has baffled drivers. Now we will tell you about this; with the ignition on, you need to use a voltmeter to check the “minus” and the contact of the voltage element.
How to adjust the throttle cable of a Lada Priora?
- The adjustment is carried out using a clamping bracket, which we previously removed. This bracket is a tensioner for the casing in which the cable moves.
- Remove the bracket and tighten the throttle cable so that it sags about 1-2 mm near the throttle drive.
- Now you need to install the fixing bracket into place in the casing. Make sure that the cable is tensioned optimally and that the throttle valve is not open when the gas pedal is at zero position. A cable that is too tight will cause the idle speed to be constantly elevated. Squeeze the gas pedal several times and check how everything works.
- Start the engine and make sure the throttle cable is adjusted correctly and the idle speed is normal.
NOTE Adjustment of the throttle valve drive is shown on the VAZ 21124 (1.6i) engine. Features of adjusting the throttle valve drive on the VAZ 2112 (1.5i) engine are indicated in the text.
RECOMMENDATION It is necessary to adjust the throttle valve drive after replacing the drive cable, after removing and installing the throttle assembly, and also after performing work related to dismantling the intake module. Throttle actuator adjustment may be necessary if the vehicle's engine may not be able to produce maximum power due to the throttle valve not being fully opened.
An assistant will be required to perform the adjustment work. Adjustment sequence
1. We prepare the car for work (see paragraph 2a Preparing the car for maintenance and repair).
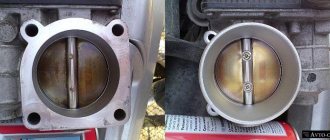
2. Remove the decorative trim of the engine (see Decorative trim of the engine - removal and installation). 3. After loosening the three clamps, remove the air supply hose to the throttle valve. 4. We control the position of the throttle valve: with the gas pedal pressed (all the way to the floor), the valve should be completely open,... .
and when the gas pedal is released, it is completely closed. 5. The position of the closed throttle valve is adjusted with a stop screw, rotating it with a slotted screwdriver with a thin blade. The throttle valve should close completely without sticking. The position of the open throttle valve is adjusted by changing the tension of its drive cable. WARNING When adjusting the open throttle valve, do not overtighten the cable, as this may damage the drive elements.
6. On the VAZ 2112 (1.5i) injection engine:
Using two 13 mm wrenches, rotating the adjusting nuts (1 and 2), we adjust the cable tension (small sagging of the cable is allowed in the area between the throttle valve drive sector and the end of the casing).
On the VAZ 21124 (l.6i) injection engine:
a) Use pliers to remove the locking plate of the cable sheath.
b) By moving the cable sheath in the rubber holder, we adjust the cable tension (in the area between the throttle valve drive sector and the end of the sheath, a slight slack in the cable is allowed). c) Install the locking plate in place. 7. Check the operation of the throttle valve drive. If necessary, repeat the adjustment. 8. Install all the removed parts on the car in the reverse order of removal.
Replacing and adjusting the throttle cable
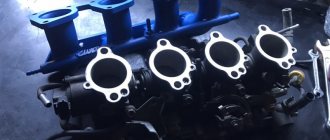
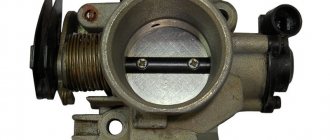
The throttle valve is a structural element of the intake system on gasoline internal combustion engines with fuel injection. Its purpose is to regulate the amount of air that enters the engine for the fuel-air mixture. It is located in the space from the air filter to the intake manifold.
In general, the throttle valve can be called an air valve. When it is open, the pressure in the intake system is equal to atmospheric pressure. Its closed position reduces the pressure to a vacuum state. This property of the damper is used to boost brakes (vacuum), as well as to bleed the adsorber in the gasoline vapor recovery system.
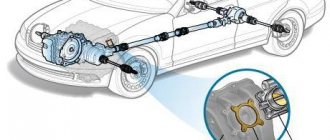
To understand the process, consider the principle of operation of the mechanism
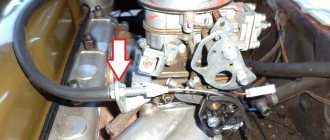
The photo shows a cable drive.
- Actually, the cable is in a protective sheath, the second side is connected to the pedal;
- Rotary sector-pulley connected to the damper axis.
When you press the gas pedal, the cable turns the sector-pulley to the desired angle. The movement is smooth, linear dependence. This allows you to accurately control the opening of the damper. The design of the pedal may differ from the “old-fashioned” floor pedal. It is suspended from the front panel, and moves in a similar way to the brake and clutch.
There are cable and even electronic throttle designs with a floor pedal, but these are more a tribute to tradition than a functional solution.
The only drawback of the cable is that it wears out and can break. True, replacing it is a fairly simple procedure.
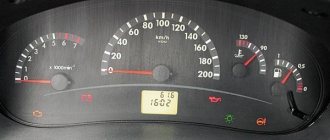
Pedal travel
This is where the whole process begins. The factory manual states that normal travel is about 13 centimeters. Nut and locknutBut over time, the parameter increases as the driven disc lining wears out.
This causes the pedal to rise slightly. Measuring the indicator is not difficult.
- Open the door leading to the driver's seat in the cabin.
- Squat down so you are close to the pedals.
- Place a regular ruler on the mat under the pedal, positioning it perpendicular to the clutch pedal.
- Measure the distance from the mat to the extreme point of the pedal, that is, the maximum distance.
- If the indicator is 16 centimeters or more, this indicates an urgent need for adjustment.
Clutch “diseases” and where they come from
There are a large number of malfunctions that the owner of a VAZ-2110 may encounter. Among the most common signs of a problem are the following:
Clutch slipping
The most common problem, which will be especially noticeable when trying to drive up some hill. You can even smell the friction linings in the cabin, which is also typical when brake pads break down.
In the vast majority of cases this is due to the following reasons:
- oiling of the linings, pressure plate or flywheel;
- excessive wear or burnout of friction linings;
- drive damage.
To eliminate this problem, you should thoroughly rinse the oily parts with gasoline or white alcohol, and then identify and eliminate the cause of excessive oiling.
If wear of the friction linings is detected, the only repair option will be a complete replacement of the HP assembly.
If you have a damaged drive, you should try to eliminate the reason why it is sticking, or replace it completely.
Jerks at start
This problem is characterized by sudden jerks when trying to move the car. Most often, this problem occurs due to the drive cable being stuck, which will require you to treat it with engine oil or replace it with a new one.
If the HP hub jams on the splines, they should be completely cleaned of dirt or any minor damage.
If there is excessive wear, always replace the input shaft or HP.
Also, replacement of the HP will be required if it is deformed and the linings are weakened.
There is a noise when the clutch is engaged
The main cause of this problem is significant settlement or malfunctions in the damper springs, as well as excessive wear of the spring windows. The only solution to the problem here would be to completely replace the HP.
In addition, in some cases, the cause of the malfunction is loosening of the FN fastening or deformation of the HP, which can be solved by replacing components.
There is increased noise
If there is a characteristic noise when trying to engage the clutch, check the bearing lubrication and wear. In any case, the most optimal solution to the problem would be to completely replace the bearing.
Clutch not fully disengaging
Another common problem, which is characterized by difficulty shifting gears and the presence of characteristic noise, although the gearbox seems to be in good working order. If the adjustment was performed incorrectly, this procedure should be repeated, and then replace the deformed fork.
If the cable gets stuck, it must be lubricated with engine oil or some other product. If this does not help, it is replaced.
If the HP is warped or the FN rivets are weakened, the only correct solution would be to completely replace the disk.