Fuses and relays VAZ 2109 and 21099
The VAZ 2109 fuse mounting block is made as a single unit.
There is no need to look for fusible links under the glove compartment or under the steering wheel. They can be found there in rare modifications or cars with a completely redone electrical circuit. From the factory, the panel was mounted on the interior bulkhead of the engine compartment on the driver's side. The shield box for modifying the carburetor and injector does not differ in appearance. The main difference in design is the year of manufacture. Until 1998 (version 17.3722), the power supply had soldered leads and fuse links. After updating the electrics (2114-3722010-60), modern fuses and relays began to be installed.
Checking status
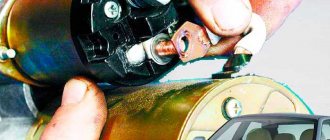
Before changing the relay, make sure that the problem with starting the engine is related to this component.
To do this, consider two situations that indicate its malfunction.
| Situation | Your actions |
| The relay makes clicks, but the armature does not spin | If there are clicks from the relay, check the condition of the armature. To do this, the terminals of the retractor relay are bridged with a large screwdriver or a piece of welding cable to the terminals at the ends. Taking a thin wire or a screwdriver can easily burn the terminals. When the armature is working, after closing the terminals, the armature will spin, which can be determined by the sound. Consequently, the solenoid relay itself has failed and requires repair. |
| The relay is completely silent | Even if there is silence after closing the terminals, the problem should be looked for in the starter. The relay no longer plays any role here. |
Having discovered that the relay has served its purpose, it must be replaced or repaired, if possible.
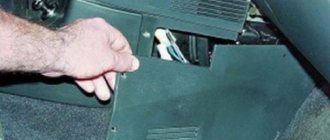
In the cabin
There is no installer inside the machine. Instead of the usual cabin module, it uses individual elements and relays scattered throughout the car. They can be found everywhere, under the dashboard, inside the doors, on the gearbox pipe. The reason for this decision was simple savings. The manufacturer considered that installing a separate module into the car would be too “kosher” and scattered fuses wherever possible.
Elements responsible for circuits of equipment not related to the engine are mounted here.
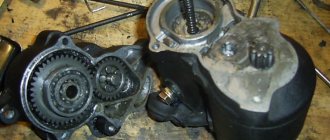
vtulka_0.jpg
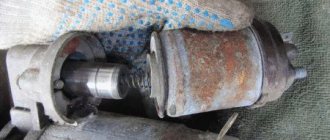
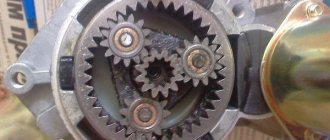
How can you get it out yourself? If you were able to notice that the starter sometimes cranks your power unit with tension when the battery is fully charged, then the culprit for the phenomenon is the armature, which touches the stator. A small problem is enough for the starter shaft to become slightly misaligned: the narrow gap disappears completely. But sometimes the reason lies in severe wear of the bearing (front). You can sleep peacefully for a day: this problem can be quickly solved. To eliminate it, you need to prepare a tap of suitable size, find a drill chuck, take a long bolt and an old bushing, a jar of nuts and a box of nails. Now it’s worth disconnecting the battery, the starter, and then removing it from the “coat,” that is, removing the wiring. Happened? Proceed to unscrew the lower bolt of the device and remove the remaining fasteners from the starter.
We take the sword and install it in the chuck of a hand drill: let's try to make a thread in the sleeve. Carefully! Carry out the following actions at low speeds. A marksman is like a girl: the object is fragile. Excessive force or slight misalignment can break it. God forbid this happens: you have to fork out money for a new product. Although you can carry out resuscitation using a long threaded bolt, turning out new grooves. Once they are ready, you need to insert the nails so that their tips protrude no more than a centimeter above the end.
It turned out to be a real masterpiece of futurism! We mount it into the bushing, perform manipulations, trying to pull out the fragment, while doing everything smoothly, without distortions. As soon as we succeed in cutting the revolutions, we pull out the tap, then insert a bolt of a suitable size and pull the sleeve out. This operation can be performed several times. The starter likes to be capricious due to the misalignment of the shaft, so after some time it will again be difficult to hold the bushing. What to do? Definitely don’t wipe the sweat from your face, finish repairing the VAZ 2109 starter, repeating monotonous actions. Get ready for a shopping trip. While you are enjoying the smell of iron, your significant other will buy a magazine where they will read an article about the history of the VAZ 2109 brand and regret that they purchased a non-domestic unit at a lower price.
Fuse box pinout
The installer's contact chips are divided into two parts. This is due to the fact that the abundance of terminals can complicate vehicle maintenance. The figure above shows both groups, where the pins are labeled as follows.
- Ш1-4 – connection to the instrument panel module.
- Ш5/6 – front wiring harness.
- Ш7/8 – left mudguard (a large number of electrical appliances are mounted here).
- Ш9/10 – rear part of the instruments.
- Ш11 – connection of the stove box, heating system.
The wires are connected the same way, regardless of whether the panel is installed low or high. The location of the chips and connectors is always identical.
Dismantling
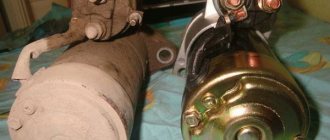
There should be no problems with the dismantling process. The main thing here is to remove the starter, since the required relay is held on it. Therefore, dismantling is carried out as an assembly.
- Turn on the handbrake, disconnect the battery by removing the negative terminal from it.
- A wire with a large cross-section goes from the battery to the contact of the relay. It can be turned off by unscrewing it using a 13 key.
- Remove the thin winding power wire from the solenoid relay.
- Using the same 13mm wrench, unscrew the three mounting nuts holding the starter to the clutch block.
- You can remove the device through the bottom or top. If you chose the top, then you need to slightly rotate the starter around its axis and remove it.
- The lower output is more difficult, since here you need to remove the crankcase protection. But if parallel work is carried out that requires similar manipulations, problems will not arise.
VAZ 2109 fuse box diagram
The photo above shows a schematic breakdown of the main electrical equipment, relevant for cars before 1998. Below is a complete table describing all the elements.
| Number | Purpose |
| 1 | Reserve |
| 2 | Turns, emergency lights, alarm control. |
| 3 | Stops, interior lighting |
| 4 | Heated rear windshield, cigarette lighter and auxiliary socket |
| 5 | Klaxon and its control button |
| 6 | Reserve |
| 7 | Heater fan drive, radiator fan, glove compartment lighting, rear window heating relay. |
| 8/9 | Reserve |
| 10/11 | Power supply for the left and right sides of the dimensions, respectively |
| 12/13 | Right and left side of head optics in low beam mode |
| 14/15 | Similarly for long-range lighting mode |
| 16 | Turn signals and hazard warning breaker relays, fuel gauges, controls on the dashboard, windshield wiper switch, oil pressure and antifreeze temperature lamps. |
The block also contains a set of relays.
| Number | Decoding |
| 1 | Front optics cleaners |
| 2 | Rear window washer |
| 3 | Turning lamps and light signals |
| 4 | Windshield wiper motor |
| 5 | Lighting lamps |
| 6 | Heated glass at the rear of the car |
| 8/9 | Headlight lamps in high/low beam mode |
| 11 | Power plant cooling fan. |
| 12 | Horn power supply |
| Number | Decoding |
| 1-3 | Reserve |
| 4 | Fan relay, heater switches. |
| 5 | Hazard lights, turns and their indicator lamps. |
| 6 | Stop lamp switch, interior lighting |
| 7 | Illumination of license plates, dimensions, glove compartment, tidy lighting. |
| 8 | Power to the horn and radiator fan switch. |
| 9 | Left side of dimensions |
| 10 | Right side dimensions, fog lights. |
| 11 | Direction indicators and emergency lights |
| 12 | Cigarette lighter, rear socket. |
| 13/14 | High beam head optics for starboard and left sides. |
| 15/16 | Same for low beam mode |
When do you need to change the starter relay?
There are some people who either don’t know the electrical part of their car well, or simply never look at this relay (They say it lasts forever and never breaks), we just want to say that many people, when they see that their car won’t start with the key, they immediately jump into the starter, they remove it at the beginning, then replace the parts on it, remember for the future, you should always start with small and easily accessible things and only then go to hard-to-reach things and check them and change them if a malfunction is detected.
Note! If the starter relay fails, as we have already said, the car will not start and thereby respond to turns of the key in the ignition switch, the same will happen if the battery is weakly charged, and therefore if you suspect it, either charge it or change it to a new one if it is already very worn out, in addition, exactly the same situation (the car will not start) can occur due to the ignition switch, namely because of its contact group, but on cars with a starter relay, this rarely happens, because that the relay also unloads the contacts at the ignition switch and thus the contacts are less likely to burn out, but you can still read about how to check the contact group of the lock in the article entitled: “Replacing the ignition switch and its contact group on a VAZ”!
Reasons for premature failure of fuses
- Moisture getting into electrical contacts. This can cause a short circuit and a voltage surge.
- Damage to on-board wiring or serviced mechanisms. In such cases, sharp surges and voltage fluctuations occur in the wiring section. As a result, the fuse blows.
- Setting the fuse element to a too low rating. Some users may mistakenly insert a fuse that is too weak into a loaded circuit. After activating the device, the insert will immediately fail.
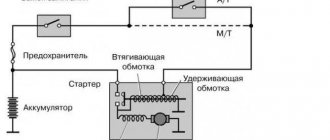
Principle of operation
It all works like this: when the engine is not running, the armature of the retractor relay is pulled out of the housing due to the action of the spring on it. The same spring holds the Bendix and gear through the fork in a position where there is no engagement.
When the ignition key is turned to the start position, the solenoid relay is first activated.
The electrical energy supplied to the coils of the solenoid relay ensures the appearance of a magnetic field inside the housing.
This field acts on the armature, and it, overcoming the force of the spring, enters the body, after which the retracting coil is turned off and ceases to create a magnetic field, but in the retracted position the armature is held by the holding coil with its magnetic field.
In this case, the armature pulls the fork, which in turn moves the bendix forward along the rotor shaft, and its gear engages with the flywheel ring.
Read more: Kamaz water pump repair
The armature, entering the housing, pushes the starter relay rod, and, moving, closes the contact plates of the positive terminals with each other.
Electricity from the battery is supplied to the brushes of the starter motor, and its rotor begins to rotate. And since the gear has already engaged, the rotor begins to rotate the flywheel.
After starting the power plant and turning the ignition key back, the power to the holding coil stops, its magnetic field disappears and the armature comes out of the housing under the influence of a spring.
At the same time, it disengages the bendix through the fork and stops acting on the relay rod. He, in turn, moving away, opens the contact plates, and the starter is completely turned off.
Where is the fuel filter located?
The fuel filter (TF) on the VAZ-21099i is designed to clean gasoline from debris, dirt and various impurities; it is a monolithic structure with a rigid metal body and a filter element inside. The frequency of its replacement is every 20-30 thousand km of the distance traveled, also if the car begins to move jerkily, and diagnostics showed that the fuel pump is clogged.
It’s easy to find out where the fuel filter is located; to do this, you need to install the car on an inspection hole or a car lift. The TF is located on the bottom of the body, next to the rear beam and the gas tank, and is secured with a special clamp, which is tightened with a bolt and nut.
Before you start changing the filter, you need to relieve the fuel pressure, otherwise when you unscrew the fuel fittings, gasoline will splash under high pressure. You can relieve pressure in the line using a special nipple located at the rear of the fuel rail. Before starting such an operation, it is necessary to prepare a plastic container into which gasoline should be poured, then unscrew the safety cap.
To release the pressure, you can use a standard flat-head screwdriver; when you press the nipple valve, gasoline will come out of the system.
After removing fuel from the line, we proceed to replacing the fuel pump.
Related articles:
- The influence of the fuel vapor recovery system on the operation of the Lada Kalina engine. Modern technologies are developing, equipment is becoming more complex and sophisticated, and progress does not bypass motor vehicles. Carburetor cars were very simple, and understanding them [...]
- Front spar of the VAZ-2109 - replacement, repair, cost of work The VAZ-2109 is a car that does not have a strong body; iron corrodes quite quickly, and almost all body parts rust. Replacement of the front side member is required […]
- Features of replacing the VAZ-2114 oxygen sensor, signs and causes of malfunction In connection with tightened environmental standards, all cars began to be equipped with additional systems that reduce the toxicity of exhaust gases, and on almost every car with […]