vtulka_0.jpg
How can you get it out yourself? If you were able to notice that the starter sometimes cranks your power unit with tension when the battery is fully charged, then the culprit for the phenomenon is the armature, which touches the stator. A small problem is enough for the starter shaft to become slightly misaligned: the narrow gap disappears completely. But sometimes the reason lies in severe wear of the bearing (front). You can sleep peacefully for a day: this problem can be quickly solved. To eliminate it, you need to prepare a tap of suitable size, find a drill chuck, take a long bolt and an old bushing, a jar of nuts and a box of nails. Now it’s worth disconnecting the battery, the starter, and then removing it from the “coat,” that is, removing the wiring. Happened? Proceed to unscrew the lower bolt of the device and remove the remaining fasteners from the starter.
We take the sword and install it in the chuck of a hand drill: let's try to make a thread in the sleeve. Carefully! Carry out the following actions at low speeds. A marksman is like a girl: the object is fragile. Excessive force or slight misalignment can break it. God forbid this happens: you have to fork out money for a new product. Although you can carry out resuscitation using a long threaded bolt, turning out new grooves. Once they are ready, you need to insert the nails so that their tips protrude no more than a centimeter above the end.
It turned out to be a real masterpiece of futurism! We mount it into the bushing, perform manipulations, trying to pull out the fragment, while doing everything smoothly, without distortions. As soon as we succeed in cutting the revolutions, we pull out the tap, then insert a bolt of a suitable size and pull the sleeve out. This operation can be performed several times. The starter likes to be capricious due to the misalignment of the shaft, so after some time it will again be difficult to hold the bushing. What to do? Definitely don’t wipe the sweat from your face, finish repairing the VAZ 2109 starter, repeating monotonous actions. Get ready for a shopping trip. While you are enjoying the smell of iron, your significant other will buy a magazine where they will read an article about the history of the VAZ 2109 brand and regret that they purchased a non-domestic unit at a lower price.
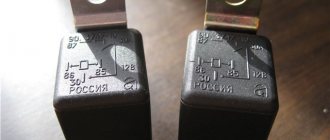
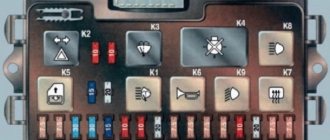
Old style mounting block
On carburetor VAZ 21099 with a high panel (until 1998), fuse blocks 17.3722 were installed, which looked like this:
Electrical circuit of the old-style block and its pinout:
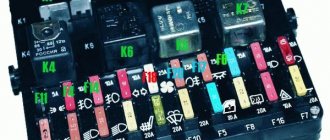
In order to find the response address of a specific wire in the harnesses, first determine which connector it is in, and then find its number in the block.
Designation of connectors and their contacts of block 17.3722. Designations of relays and fuses of mounting block 17.3722:
Fused circuits:
Relay (indicating factory markings):
Wiper and washer circuit
Despite the fact that fuse 5 of the mounting block is responsible for the wipers, the gear motor circuit has additional protection - a bimetallic thermal fuse (indicated by a red arrow in the figure below).
It is located directly on the trapezoid bracket of the wipers:
Dismantling
There should be no problems with the dismantling process. The main thing here is to remove the starter, since the required relay is held on it. Therefore, dismantling is carried out as an assembly.
- Turn on the handbrake, disconnect the battery by removing the negative terminal from it.
- A wire with a large cross-section goes from the battery to the contact of the relay. It can be turned off by unscrewing it using a 13 key.
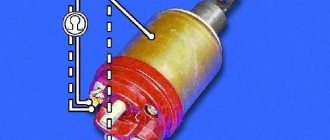
- Remove the thin winding power wire from the solenoid relay.
- Using the same 13mm wrench, unscrew the three mounting nuts holding the starter to the clutch block.
- You can remove the device through the bottom or top. If you chose the top, then you need to slightly rotate the starter around its axis and remove it.
- The lower output is more difficult, since here you need to remove the crankcase protection. But if parallel work is carried out that requires similar manipulations, problems will not arise.
Repair
Next, you have a choice to make: replace the entire relay or try to repair it.
Only a relay that has a collapsible design can be fully repaired. It is not uncommon for cars to have a relay with a non-separable body. Repairs there are also possible, but only partial.
- Unscrew the pair of bolts that hold the relay on the starter, disconnect the core shackle from the upper end of the drive lever;
- Install a new solenoid relay in its place, thereby completing the replacement.
But if you want to save money or just like to tinker with your car, you can try to bring a damaged relay back to life. To do this, we offer you detailed instructions.
If this measure does not help, we will disassemble the case and repair it.
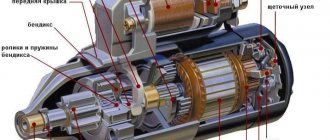
- The relay consists of a housing with a winding inside, a core with a return spring and contacts.
- The spring disconnects the starter rotor gears from the Bendix ring when the power to the relay winding is turned off.
- The back cover of the relay is fixed with screws to the body. Therefore, the first thing we do is remove this cover by unscrewing the corresponding fasteners.
- Both contact bolts have a nut, which you also unscrew.
- You will see washers under the nuts. Do not lose them so that you can return them to their place during reassembly.
- Unsolder both terminals of the winding using a soldering iron. Then remove the cover.
- If you find traces of carbon on the contacts, they can be removed with a small file.
- There is a rubber O-ring under the cover. Check it for elasticity and integrity. If the ring is damaged or worn, replace it with a new one.
- Remove the contact plate along with the rod.
- Use a flathead screwdriver to remove the return spring.
- If the spring is deformed or stretched too much, it will need to be replaced. Otherwise, a worn spring will not be able to guarantee the desired contact. As a result, the relay does not work properly.
- Disassemble the contact plate. To do this, you need to remove the retaining ring that insulates the washer. After this, the plate will fall out on its own due to the pressure created by the spring.
- Remove the contact bolts from the cover. Clean the surfaces of their contacts. Often, due to burning of the contact surfaces, the solenoid relay stops working normally.
- If the carbon deposits are too strong and cannot be removed with simple sandpaper, do not rush to buy new bolts. Just rotate them 180 degrees. So they will touch on the other side, where there is no carbon deposits.
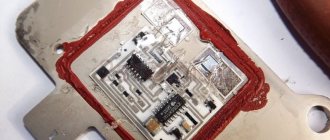
- The relay windings are located in a non-separable housing. If they are damaged, you will have no choice but to completely change the relay.
- Replace all damaged and worn elements of the switching relay, and then put everything back into the housing. Reinstall the solenoid relay and check if the ignition returns to normal.
Read more: What is antifreeze liquid for?
If the relay has a non-separable housing, many recommend replacing it. But if you wish, you can even repair such a unit. To do this, you need to flare the housing with pliers, then unsolder the contacts and remove the cover. Next, follow the instructions given above.
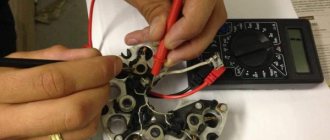
The last stage of replacement or repair is checking the winding resistance.
If the unit is working properly, the multimeter in ohmmeter mode will show you the following data.
Measuring area
The indicator is normal
Between blade contact and bottom relay bolt
The resistance in this area should be about 0.5 Ohm
Between blade contact and body
When checking this area, you need to get 0.7 Ohms with an acceptable small error
If there is a significant deviation from the norm, replace the repaired relay or check a new one. It could be defective or counterfeit.
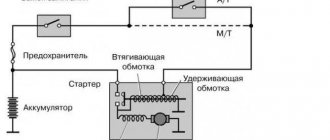
In this article we will tell you how to test the starter solenoid relay to identify faults and look at ways to eliminate them.
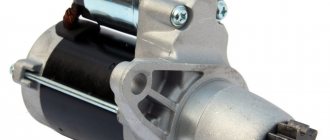
The car starter is a traction motor, which spins the crankshaft to further start the power plant.
Unwinding is carried out by means of a gear mounted on the starter rotor, which at the time of starting has a gear engagement with the flywheel ring.