Print this article Font size 16
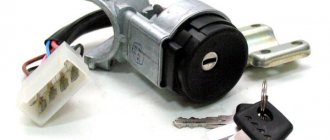
The switch, also known as the ignition switch, plays a huge role in the “starting” system of the VAZ 2114 car. It takes part in the operation of the starter, headlights, turn signals, power windows and other elements of electrical circuits. Today we will talk about the ignition switch of the VAZ 2114, the reasons for its replacement, the dismantling procedure and much more.
Egnition lock
Troubleshooting Methods
There are two methods for detecting faults:
- Visual;
- Diagnostic.
We suggest studying a visual method for determining a malfunction or breakdown of the contact elements of the ignition switch using the table.
| Action | The device is working properly | The device is faulty |
| Turn the key to the right position (ignition) | All electrical equipment turns on | All or part of the electrical equipment does not work |
| Turn the key to the second position | The starter is spinning | The starter does not work, the traction relay does not click under the hood |
But diagnostics allows you to get a more detailed answer. In addition, a visual inspection will not give you the opportunity to find all the reasons that could cause the ignition switch to break down.
To work, you will need a mini-tester and a multimeter in ohmmeter mode:
- Disconnect the power supply from the ignition switch. To do this, you need to remove the skin from the steering column;
- Switch your multimeter to an ohmmeter;
- On the block coming from the lock you need to find pins 7 and 4, which correspond to pins 15 and 30;
- Connect the multimeter probes to them;
- Turn the key to the “Ignition” position;
- On the block, find pins 7 and 3, corresponding to 50 and 30. Also connect a multimeter to them;
- Turn the key to the second position - Start the engine;
- If serviceability is present, the device will show zero resistance in both test cases.
Emergency, the starter does not turn (Solved)
2 months ago) was on a cold one. Who thinks what? Electrical?
Thoughts on the b-pump: I have an internal debate. On the one hand, it is impossible to drive with a non-working pump (there is no gasoline in the combustion chamber), but on the other hand, fuel may well come from the main line under the influence of a pressure difference! That is, it started from the pusher and then, by inertia, the engine itself pulls out of the line. Tell me I'm wrong =((
===========*=*============ Day 4. I went out to try, as a result, the first start with half a turn, I turned it off and that’s it, attempts to start it failed. I am leaning towards the retractor relay (because this is the only part that can work according to the principle that explains the situation as simply as possible, namely, the return spring has screwed up...
===========*=*============ Day 5. The situation has already begun to get out of control, namely: I leave work at 21:15 (the car was parked from 9:50, that is, idle time for almost 12 hours, everything that could reject it should have done it) and at least henna. Not only that, in the morning I was afraid to even go to a gas station - I poured
4 liters from a canister and was driving with the BC showing a decrease from 5 liters to 0 several times (yes, I have a problem with the fuel sensor, I haven’t gotten around to it yet) and thinking that stalling in the middle of the highway or in the left lane in the city would be very cool, don’t leave yet. Thanks to the man in the cruiser for being the only one standing in the parking lot at the gribanal. I even wanted to help push him manually out of a parking space. In general, I got home with 10 liters of gasoline, according to bk xD
Day 6. Finally I went to the electrician and found him 5 minutes before lunch. He was not happy with the fact that this was my fourth day with the starter. Service station "Quartet" in Gatchina - I recommend it! And here’s why: the man removed the starter from the car, together with me in his car he went to a friend’s modest workshop at the car wash for “starter repair”, etc., they quickly found brushes for me (so that I wouldn’t have to go shopping for another two days with a chance to buy a new starter ), because the old ones were almost completely erased (actually the basis of the problems!), they lubricated the rotor (the engine was dry as a rag in the trunk) and after checking, they loaded the electrics into the car. The guy went on business, dropping me off almost home. In the evening I calmly arrived at the designated time and everything was installed in 10 minutes. During the installation process, I found out exactly where the external temperature sensor is located (I want it to work, but my search in Murzilka was unsuccessful) and the belt whistle was eliminated! *The fact is that I did not have an adjusting “corner”. At Piter-lad they asked for 1000+ rubles for its installation and work (at that time I didn’t know what it was) and to leave the car until the morning, because they didn’t have the parts. Having politely refused, I decided to ride with an unpleasant, but free sound effect. * The electrician casually found a used “corner” lying around, got two bolts and nuts for it from a colleague and screwed it into its rightful place (I thought he would just hand it to me).
Result: with the starter 600 RUR starter repair 600 RUR starter brushes 200 RUR Belt adjustment as a gift!
Source
Why you may need to replace the ignition switch
VAZ 2114 injector ignition switch diagram: device connection features
There may be several reasons for this problem, the most common of which are:
- The lock is broken; after all, it is constantly subject to wear and tear.
- Lost keys.
- Damage caused by attempted theft.
- Malfunction of the connector with wires.
The malfunction can be easily determined when the engine is turned on, if the sound of the starter is not heard, the relay clicks, or the electrical equipment simply does not turn on. There are several ways to determine the source of the problem:
- diagnostic;
- visual.
First you need to check the car's reaction to different positions of the key in the lock. To begin with, the key must be set to position number one, which is also the ignition. If the module is in order, all the car's electrics should work. However, in the case when all or part of the electrical system does not work, we can conclude that the lock is damaged.
In position number two of the key, the engine starts, for which the starter is turned on. If, when you turn the key, you do not hear the sounds of the starter operating (rotation), as well as the sound of the relay clicking, then either the ignition switch or the starter itself is broken. In this case, you need to run a diagnostic to get other details about the problem.
In this case, you will need a multimeter set to ohmmeter mode. Also, before removing or installing the lock, you need to remove the steering column cover.
- +12V comes for the inserted key sensor microswitch;
- the mass comes when the driver's door is open;
- +12V goes to the starter (pin 50);
- +12V goes out after turning on the ignition (pin 15);
- +12V goes out when the key is inserted to pin 5 of the BSK;
- comes +12V to illuminate the lock cylinder;
- +12V comes from the battery (pin 30);
- not used.
- The first thing to do is disconnect the ignition switch power connector.
- After this, connect the multimeter to wires four and seven, and then do the same with wires fifteen and thirty, respectively.
- Turn the key in the lock to position number one. If during testing the node is not damaged, the multimeter should show a zero resistance value.
- Next you need to turn the key to position number two. The resistance on the multimeter screen, as in the case described above, should have a zero value.
In a situation where, after checking the lock with a multimeter, the resistance value in at least one of the cases was not equal to zero, it needs to be replaced. Otherwise, the lock is working properly and other components of the car should be checked for malfunctions. It is necessary to prepare spare parts and other equipment for work.
A new ignition switch will be needed. It is quite easy to find original parts and analogues on the Internet, but it is worth considering that it is advisable to purchase the lock “assembled”.
Catalog number of the original VAZ 2114 ignition switch: 21103704010. Approximate price: 500 rubles for a used part and 1200 for a new one.
As a replacement, you can use analogues with numbers: 09401, 24370407. Approximate price: 1000 rubles (new part). In addition to the lock itself, you will need the following tools:
- spanners;
- chisel;
- pliers;
- screwdriver.
Before you begin, you must also remove the steering column cover and steering column switches.
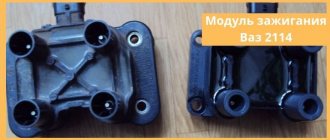
Fuse
There are fuses in the lighting circuit. The lamp is activated and voltage is supplied to the lighting lamp only if the fuse is working properly. In different years of model production, two different types of mounting blocks were installed on the car from the factory. Note the location of the dome light fuse on each of them. First, let's look at the location of the fuse in the mounting block of the new model. This element is also responsible for the operation of the brake light.
The power of the interior pre-illumination is 7.5 Amps. To quickly replace a blown element, it is recommended to carry with you a spare set of fuses of all capacities.
In the old-style mounting block, this element is located a little differently - it is the 7th in a row from left to right. The power of the element in this version of the block is 10 Amperes. In addition to interior lighting, a circuit to the brake light goes through this element. This may help when trying to diagnose a malfunctioning ceiling light.
If, after replacing a burnt-out part, the light in the interior of the VAZ 2114 does not come on, you should look for the reason in the wiring and the light bulb.
Replacing the ignition switch on a VAZ 2115, 2114
Ignition relay VAZ 2114: principle of operation, malfunctions and replacement
Replacing the ignition switch of a VAZ 2114, VAZ 2115 may be necessary in the event of a malfunction of the contact group, jamming of the mechanism, or simply wear.
The procedure is not complicated, so let's get started.
Before the replacement itself, it is necessary to purchase bolts with break-away heads. It is not recommended to replace them with regular ones with M6 thread, because... In addition to you, car thieves can easily remove the lock.
Before replacing the lock, turn the key to the “I” position so that the latch locking the steering shaft mechanism can enter the lock body.
- It is necessary to disconnect the battery by removing the wire from the “—” terminal
- Next, remove the steering wheel. To do this, remove the decorative trim on the steering wheel and unscrew the horn cover.
- Then, having unscrewed the steering wheel fastening nut not completely, we knock the steering wheel off the splines. After this, finally unscrew the nut.
- Remove the plastic covers from the steering column.
- Disconnect the block with the ignition switch wires.
- Use a chisel to knock the heads off the old bolts holding the ignition switch in place.
- Remove the old lock and install a new one in its place. Before installation, press the locking tab into the new ignition switch.
- Check that the steering shaft is locked correctly.
- Once you have completed adjusting the position and checking the functionality of the locking mechanism, tighten the bolts until the heads are completely free. Do this using the 10 key.
- Connect the wiring harness of the new ignition switch.
- Start the engine, make sure that the ignition switch is working correctly and that there are no problems with starting. If everything is in order, then we can conclude: the replacement of the ignition switch of the VAZ 2114, 2115 was carried out successfully!
Previous posts from the category: VAZ 2114
If engine oil or coolant appears around the perimeter of the connection of the cylinder head with the cylinder block itself, it is necessary to replace the cylinder head gasket of the VAZ 2114, VAZ 2115. A leak can also occur due to a change in the shape of the cylinder head after the engine overheats.
After prolonged use of a VAZ-2114, VAZ 2115, for no particular reason, an extraneous sound may arise from the front axle area in the form of a whistle.
Typical malfunctions of VAZ 2114, 2115 injectors: -difficulty starting the engine; — unstable engine operation; — the engine stalls at idle; — increased crankshaft rotation speed at idle; — the engine does not develop full power; — jerks and dips in engine operation when the car is moving; — increased fuel consumption; - increased content of CO and CH
The clutch briefly disconnects the engine and transmission and then smoothly connects it to start moving and change gears.
Replacing the stove fan of a VAZ 2114, 2115 may be necessary if it completely fails, or if it constantly operates only at 3rd speed.
*Add article to bookmarks:
Source
https://remontysvoimirukami.ru/remont-vaz-svoimi-rukami/remont-zamka-zazhiganija-vaz-2115-svoimi-rukami.html
Wiring damage
The last and most undesirable cause of a malfunction is a broken switch wiring. In the absence of visible damage to the wiring, it is difficult to find the location of the break without checking. If you can find a break, you should completely replace the wire, and not try to glue it with electrical tape, because shortening the wires leads to a change in resistance.
Another reason for incorrect operation is oxidation of the contacts inside the light housing. It is enough to clean and return all the plates to the factory position. To replace the wiring of the lighting assembly, you will need a wiring diagram for the interior light. Below we present the diagram in detail.
To fully analyze the circuit, let’s look at the notation:
- X1 – lighting lamp;
- SW1 - factory backlight mode switch;
- SW2-SW5 – limit switches in the doors;
- F – fuse.
Checking the malfunction should be done by examining the fuse and light bulbs. Only after this should you look for the cause of the problem in the limit switches and wiring.
Using the ignition switch, you not only start the engine, but also turn on power to other components in the on-board network. In this article we will look at replacing the ignition switch for VAZ 2113, 2114, 2115, tools for work, and also talk about how to determine if the lock is faulty.
How to check the ignition switch of a VAZ 2114
Diagram and how to correctly connect the ignition switch on a VAZ-2106
There are several ways to determine the source of the problem:
- diagnostic;
- visual.
First you need to check the car's reaction to different positions of the key in the lock. To begin with, the key must be set to position number one, which is also the ignition. If the module is in order, all the car's electrics should work. However, in the case when all or part of the electrical system does not work, we can conclude that the lock is damaged.
In position number two of the key, the engine starts, for which the starter is turned on. If, when you turn the key, you do not hear the sounds of the starter operating (rotation), as well as the sound of the relay clicking, then either the ignition switch or the starter itself is broken. In this case, you need to run a diagnostic to get other details about the problem. In this case, you will need a multimeter set to ohmmeter mode. Also, before removing or installing the lock, you need to remove the steering column cover.
Pinout of the ignition switch VAZ-2114:
- +12V comes for the inserted key sensor microswitch;
- the mass comes when the driver's door is open;
- +12V goes to the starter (pin 50);
- +12V goes out after turning on the ignition (pin 15);
- +12V goes out when the key is inserted to pin 5 of the BSK;
- comes +12V to illuminate the lock cylinder;
- +12V comes from the battery (pin 30);
- not used.
- The first thing to do is disconnect the ignition switch power connector.
- After this, connect the multimeter to wires four and seven, and then do the same with wires fifteen and thirty, respectively.
- Turn the key in the lock to position number one. If during testing the node is not damaged, the multimeter should show a zero resistance value.
- Next you need to turn the key to position number two. The resistance on the multimeter screen, as in the case described above, should have a zero value.
In a situation where, after checking the lock with a multimeter, the resistance value in at least one of the cases was not equal to zero, it needs to be replaced. Otherwise, the lock is working properly and other components of the car should be checked for malfunctions.
Bulb
The principle of triggering the light elements in the cabin is simple. There are limit switches on the body pillars on all sides.
When the door is opened, this small part causes the contact to open, which gives a signal to turn on the lighting. When you open the door on 2114, only the main lamp turns on. Frequent opening of the door and constant activation of the light bulb leads to its gradual wear.
As soon as the life of the light bulb runs out, it burns out. You can check the integrity of the light bulb yourself. It is enough to lift the plastic cover of the main light source and the insides of the illuminator will be before your eyes.
It's a little more difficult to change. It is necessary to use a screwdriver to pry off the body of the fisheye, and then remove the wire block. Next, press the latches on both sides of the case and remove the r5w base.
If after the replacement procedure the interior lighting of the VAZ 2114 does not work, check the wiring.
Principle of operation
The lock works as follows. When the key is placed in the hole, its locking mechanism is deactivated. This happens due to the reverse movement of a special rod.
By turning the key to the first position, you will power the “15” and “30” contacts. This will alert (but not enable) the following items:
- ignition system;
- headlight bulbs;
- external light alarm;
- electrical equipment of the dashboard;
- windshield wipers and washer;
- cigarette lighter;
- rear window defroster;
- generator excitation winding.
If in a VAZ-2114 car the ignition switch is moved to the second position, in addition to the listed equipment, the starter will start. As you can see, a lot depends on the serviceability of the device in question. What are the symptoms of a failed ignition switch? Let's start with the fact that its malfunction can be either mechanical or electrical in nature. In the first case it is:
- lock jamming in one of the positions;
- inability to unlock the steering shaft;
- turning on the ignition with a non-original key or other object.
If the lock has an electrical problem, you may notice the following symptoms:
- the warning lights on the instrument panel do not light up or light up and go out periodically;
- the starter does not start;
- Some or all electrical appliances, the circuit of which is powered through the ignition switch, do not work (cigarette lighter, headlights, washer, wipers, etc.).
Problem with engine starting and dashboard 2115
Hi all.
I continue the stories of malfunctions and breakdowns in my little spot. So, without having time to eliminate the engine knocking (axial runout of the camshaft), another malfunction appeared.
I'll start with some background. Yesterday I drove it, came home, parked it for the night, everything was as usual. In the morning I had to go on business, it was lightly frosty outside (-7), the car was covered in snow, I decided this time to completely clean it first and then warm it up. So, I cleaned it, sat down, started it without problems, and literally a second later it stalled and no matter how much I tried to start it, nothing worked.
2. I heard somewhere that it may not start due to a broken timing belt. I took off the cover, looked, everything is in order.
3. I looked at the spark plugs and didn’t see anything criminal either.
4. I have the last option left, this is a fuel pump, since lately the fuel level has been either Max or Min. I decided to listen to see if it works. I reclined the seat, put the key in the ignition, turned it over and nothing, no sounds... I disconnected the chip, looked, the contacts are normal. I thought, well, that’s it, screw it, the fuel pump is in trouble and needs to be replaced. And then I remembered one more moment...
5. On the passenger side, in the legs, under the dashboard, there are some relays and fuses, I began to study. I took out the topmost 15 amp fuse, I looked, and it had blown. I reached under the hood and took the turn signal fuse (15 amp), installed it, turned the key, the engine tried to catch, but it wouldn’t start and the starter just started turning again. I looked at the fuse and it was blown again. (Photo 1)
I began to study this problem on the Internet and found one piece of advice that you can disconnect the chip from the fuel pump and try to start it. If the fuse survives, then the fuel pump is damaged; if it is blown, then the problem is somewhere in the wiring. I ended up with the second option. I went to check the wires under the dashboard, and there were a lot of them there for me, I felt them, moved them, looked and decided to start it again, and lo and behold, it started.
But! The story doesn't end there. It starts up fine, but for some reason the dashboard stopped working. There is a backlight, but there is no data: no temperature, no revolutions, no speed, not even mileage, empty! (Photo 2)
It was already late and dark, I left this matter until tomorrow, I really hope that another fuse blew and replacing it solved this problem.
The problem with the dashboard is solved :) I forgot to mention that when I pulled out the turn signal fuse (F16), I didn't get it back, so it didn't work.
Source
Ignition switch 2114 and the procedure for replacing it yourself
In what cases is replacement required?
There are several situations when replacement of the seal is necessary:
- malfunction of the unit itself;
- loss of keys;
- mechanical damage to the protection during theft;
- contact group malfunction.
3Z device diagram
A unit malfunction can be detected when the engine starts. When the starter does not spin, the solenoid relay does not click, and electrical equipment does not work. Failures can be mechanical or electrical.
How to determine the malfunction?
The visual method is to check the behavior of the machine at different key positions. First, the key is set to the right position - “ignition”. If the unit is working properly, then all electrical equipment works. If there are any problems with the electrical system, either all or part of the electrical equipment does not work.
Turning the key in the lock
In the second position of the key, the starter should start. If it does not spin and you cannot hear the click of the retractor relay under the hood, then it is possible that either the starter or the starter is faulty. More specific information can be obtained using diagnostics. This is done with a multimeter set to ohmmeter mode. To carry out diagnostics, you need to remove the steering column cover.
Next you need to do the following:
- Disconnect power from the 3Z.
- Next, find pins 4 and 7 coming from the node. They correspond to pins “30” and “15”, and connect the multimeter terminals to them.
- Then the key in the 3Z turns to the first position. If the unit is working properly, the resistance should be zero.
- Then the operation of the unit is checked when the key is turned to position II. Likewise, the multimeter should show zero resistance if the circuit breaker is working properly.
Once you are convinced that the protection device is faulty, it must be replaced (the author of the video is Region 4253).
Preparation
First of all, you should prepare for the replacement procedure by preparing an electrical circuit diagram and the necessary materials and tools:
- new node;
- 4 assembly mounting screws;
- chisel;
- a set of keys;
- Phillips screwdriver;
- hammer;
- pliers.
ZZ for a VAZ car
For ease of operation, remove the cover from the steering column and switches.
Dismantling the casing is carried out step by step:
- First of all, the car is de-energized by disconnecting the negative terminal from the battery.
- Use a Phillips screwdriver to unscrew the screws securing the casing.
- Then the self-tapping screw is unscrewed, with which the housing is secured.
- Now you need to remove the screws holding the lower part of the housing to the steering column.
- At the next stage, the lever is lowered down, with the help of which the steering column is fixed at the angle, and the steering wheel.
- Next, the lower casing is dismantled.
- After disconnecting the power supply, you can remove the upper part of the casing.
- To remove the steering column switches, press the locking elements and remove the elements from their standard places.
- The switches should also be disconnected from the power supply.
Removing a faulty device
Having opened access to the protection zone, you can dismantle it. The difficulty of dismantling is that there are no heads on the 4 bolts that secure the ignition switch to the steering column on the VAZ 2114. The absence of heads prevents criminals from stealing a car without a key.
Dismantling with hammer and chisel
Dismantling of the protection zone is carried out as follows:
- you need to loosen the bolts using a hammer and chisel;
- then the loosened bolts are removed with pliers;
- then the bracket is removed from the steering column;
- the power supply is turned off;
- Now you can dismantle the unit.
The node connection diagram is simple. If it is purchased assembled, then it is not difficult to understand the diagram in order to connect the wires correctly.
Installing a new lock
The procedure for installing the ignition switch on a VAZ consists of the following steps:
- first you need to install the key in the new unit in position “I”, then the latch, thanks to which the steering wheel is locked, will hide;
- then the protection is mounted and the actions are performed in the reverse order of removal;
- After tightening the 4 bolts, you need to tighten them a little.
After installing the new unit, you need to check the steering lock. To do this, remove the key from the lock and turn the steering wheel to a small angle. If the steering wheel does not lock, you must install the unit correctly: the latch must fit into the groove located on the steering column. If the locking function works, all you have to do is tighten all the breakaway bolts until they stop. You need to tighten them until the heads are broken.
Sorry, there are no surveys available at this time.
Preparation
At the preparation stage, you will need to collect the necessary tools near you, which will be useful in the process of dismantling and installing a new ignition switch. You will also have to remove the steering cover and steering column shifters. Doing this is quite difficult, but we will tell you step by step about all the nuances of these preparatory activities. So you can easily figure out for yourself how to remove the ignition switch on a VAZ 2114.
Tools you will need:
- Phillips strong screwdriver;
- Open-end wrench 10 millimeters;
- Chisel;
- Hammer;
- Pliers or pliers;
- New ignition switch assembly;
- Lock mounting screws (4 pieces).
Now let's move on to the casing and switches. For more convenient work, many advise removing the steering column switches and the steering wheel itself. Dismantling the casing is performed in the following sequence:
- Disconnect the negative cable from the battery. Nobody has yet canceled the requirements for personal safety and protection against electric shocks;
- Unscrew the three screws securing the two parts of the casing. A screwdriver is useful for this;
- Unscrew the screw that connects the housing to the connector of the steering column switches;
- Remove the two screws that hold the lower housing to the steering column;
- The lever that fixes the column at the corner leads down;
- The steering wheel also goes down;
- The lower casing is then removed;
- The power supply from the emergency lights must be disconnected;
- Now you can remove the top casing;
- To dismantle the steering column switches, you need to act one by one;
- Simultaneously press both latches and thereby remove the elements from their seats;
- Disconnect them from the power supply.
Repair of ignition switch VAZ 2101
In any case, in order to understand the exact cause of the breakdown of the ignition switch, and also to decide whether it is worth repairing or immediately replacing, the device must be dismantled and disassembled. We'll talk about this next.
Removing the ignition switch VAZ 2101
To dismantle the lock, we will need the following tools:
- wrench 10;
- a screwdriver with a Phillips blade (preferably a short one);
- small slotted screwdriver;
- nippers or scissors;
- awl.
The work order is as follows:
- We park the car on a level surface and put it in gear.
- Using a 10mm wrench, unscrew and disconnect the “-” terminal from the battery.
- Let's go to the salon. Using a Phillips-head screwdriver, remove the four screws securing the two halves of the steering column housing.
- Using the same tool, unscrew the self-tapping screw securing the casing to the steering column switch
- We remove the hazard warning light switch button from its seat.
- We remove the lower half of the casing and use wire cutters or scissors to cut the plastic clamp securing the wires.
- Remove the lower half of the casing.
- Use a thin slotted screwdriver to pry off the sealing ring of the ignition switch. Remove the seal.
- Disconnect the upper half of the steering casing.
- Using your hand, carefully disconnect the connector with the wires from the ignition switch.
- Insert the ignition key into the well
- We set the key to position “0”, shaking the steering wheel so that it unlocks.
- Using a Phillips screwdriver, remove the two screws securing the lock to the bracket on the steering shaft.
- Using an awl, we recess the locking rod through the side hole in the bracket.
- Remove the ignition switch from the bracket.
Disassembling the lock
To disassemble the ignition switch, you only need a thin slotted screwdriver. The disassembly procedure is as follows:
- Using a screwdriver, pry up the retaining ring located in the groove of the device body.
- We remove the ring.
- We remove the contact group from the lock body.
We'll talk about how to remove the larva a little later.
When is repair appropriate?
After disassembling the lock, it is worth carefully inspecting the well, the locking mechanism, and the contacts
Depending on the signs of a device malfunction, special attention should be paid to the particular unit to which it relates. If the key in the ignition switch does not turn due to a broken cylinder, you are unlikely to be able to repair it
But it can be replaced. Fortunately, they are on sale and inexpensive.
If the cause of the lock malfunction is wear or oxidation of the contacts, you can try to restore them using special anti-corrosion agents such as WD-40 and a dry, rough rag. It is undesirable to use abrasives for these purposes, since deep scratches on the contact surfaces will provoke their further burning. In case of critical damage to the contacts, you can buy the contact group itself.
But, if the locking rod breaks, you will have to buy an assembled lock, since one body is not sold. The lock is replaced in the reverse order given in the instructions for removing it.
Table: approximate price for the ignition switch, cylinder and contact group for VAZ 21201
| the name of detail | Catalog number | Approximate price, rub. |
| Ignition switch assembly | 2101–3704000 | 500–700 |
| Ignition lock cylinder | 2101–6100045 | 50–100 |
| contact Group | 2101–3704100 | 100–180 |
Replacing the contact group
To replace the group of contacts of the VAZ 2101 ignition switch, no tools are needed. It is enough to insert it into the body of the disassembled device, comparing the sizes of the cutouts on the body and the protrusions on the contact part. After this, you need to secure it with a locking ring, installing it in the groove.
Replacing the larva
But with the larva you will have to tinker a little. Some of the tools that will be useful here are:
- electric drill with a drill with a diameter of 0.8–1 mm;
- a pin of the same diameter, 8–10 mm long;
- awl;
- thin slotted screwdriver;
- liquid like WD-40;
- small hammer.
The order of work is as follows:
- Use a slotted screwdriver to pry up the cylinder cover from below and remove it.
- We find a pin on the lock body that secures the cylinder.
- We drill out the pin using an electric drill, being careful not to damage the lock body.
- Using an awl, remove the remaining pin from the hole.
- We remove the larva from the body.
- We treat the working parts of the new larva with WD-40 liquid.
- We install a new cylinder into the body.
- We fix it with a new pin.
- We recess the pin completely using a small hammer.
- We install the cover in place.
Installing a new part
The removal and assembly algorithm is the same, although the instructions for installing the cylinder mechanism have its own nuances. Before inserting a new cylinder into the core, the part is lubricated with a silicone substance and only then inserted into the handle. Further algorithm of actions:
- The return spring is inserted next to the cylinder.
- The functionality of the key is checked. It should turn easily in all positions.
- A pin is installed on the tip of the rotary rod. Connection is being made.
- The inner and outer panels are screwed on, the handles are fixed, and the plug is returned to its place.
- The main three screws are tightened from the inside.
- autorn.ru
- www.drive2.ru
- etlib.ru
- infokuzov.ru
Step-by-step replacement of the ignition switch of a VAZ 2114
The operation involves creating open access to the installation site of the “starting” lock. The preparatory group includes the following activities:
- dismantling the steering casing;
- removal of steering column switches from seats.
To make the operation easier, you can remove the steering column switch connector and the steering wheel.
The following technique will help you carefully remove the steering casing:
- disconnect the ground from the battery;
- Using a Phillips screwdriver, remove the 3 screws holding the two parts of the steering casing (access from the lower housing, one screw on the left, two on the right);
- remove the self-tapping screw securing the housing to the connector of the steering column switches;
- Unscrew the two self-tapping screws securing the lower housing relative to the steering column;
- move down the lever that locks the steering column “at the corner”;
- lower the steering wheel down;
- remove the lower casing;
- disconnect the power supply from the emergency gang;
- remove the top casing.
When replacing a faulty ignition switch on a VAZ 2114, the steering column switches are removed one by one. First, they are removed from their seats by simultaneously pressing both latches, then they are disconnected from the power supply block.
Basics of the substitution operation
Having opened access to the lock body, it is easy to notice that the four bolts securing the lock relative to the steering column are missing heads. This fact is part of the concept of the standard anti-theft system, making it difficult to start the engine without a key.
Removing the ignition switch is done as follows:
- loosen the bolts using a chisel and hammer;
- Unscrew the loosened bolts with pliers;
- remove the bracket from the steering column;
- disconnect the power supply;
- remove the ignition switch.
Installation of a new unit is carried out in the following sequence:
- install the key in the new lock and turn it to the first position (in this position the latch blocking the steering shaft will hide);
- install the lock on the steering column;
- tighten the four fastening bolts and lightly tighten.
After installing a new lock, you need to test the steering lock. After removing the key from the lock, turn the steering wheel at a slight angle:
- if there is no locking: adjust the position of the unit - the lock latch should fit into the groove on the steering shaft;
- If the locking is functioning properly: tighten the 4 breakaway bolts until the breakaway heads break off.
For your information. Some owners prefer to use ordinary twenty-millimeter bolts with M6 threads, thus facilitating the subsequent dismantling of the unit. However, this should be done with a sufficiently high level of anti-theft protection (for example, an alarm, GPS tracker, etc.).
Having finally installed the new lock on the steering shaft, you should connect the power supply and check the operation of the unit by activating the engine.
Briefly about shift technology
The principles for replacing the ignition switch on a VAZ 2114 car, which is relevant in case of failure of contact elements, loss of keys, or intentional breakdown, are as follows:
- open access to the ignition switch by removing the steering casing, two steering column switches and, if necessary, the steering wheel and steering column switch connector;
- loosen the 4 screws that secure the ignition activator housing to the steering shaft through the bracket;
- disconnect the power supply;
- remove the defective lock;
- insert the key into the new device and turn it to position I;
- install the housing of the new unit on the steering shaft and secure it with 4 bolts;
- After checking the functioning of the steering lock, tighten the 4 bolts until their heads come off;
- Carry out further assembly in reverse order.
Sources
- mashinapro.ru/1241-zamok-2114.html
- labavto.com/vaz/2114/zamena-zamka-zazhiganiya/
- drive2.ru/l/6759775/
- luxvaz.ru/vaz-2114/126-zamena-zamka-zazhiganiya.html
Steering lock testing
Testing the steering wheel
If you do not check the operation of the steering wheel lock, you may encounter certain problems in the future. Therefore, do not waste your time on this event. It consists of removing the key from the ignition and turning the steering wheel at a slight angle.
- If there is no lock, you will need to slightly adjust the position of the lock. Make sure it fits into the groove located on the steering shaft.
- If the locking is effective, you will only need to tighten the four installed breakaway bolts until they stop. Twist until the heads break.
It is worth noting one very important nuance. Some people don't find it necessary to use breakaway bolts. Instead, the most common fixing bolts with a length of 20 millimeters and an M6 thread are used. On the one hand, this will make it easier to remove the device in the future, if such an event is required again. On the other hand, in the absence of a reliable anti-theft system, voluntarily giving attackers access to your car is not the best idea.
When the lock installation is completed and the test has passed, do not forget to connect the device to power and start the engine. If it starts, all systems dependent on the ignition switch are working, you can fully begin reassembly. Follow the reverse instructions for removing the casing and steering column switches. It would not be amiss to check the condition of certain nodes along the way. It is quite possible that some of them also need replacement or a little preventive maintenance.
Loading …
Purpose and principle of operation
The ignition switch is an electrical device responsible for both starting the engine and turning on the power in the on-board network. It has 3 different sector switch positions controlled by the ignition key.
Each of them is responsible for its own separate function, namely:
- Position “Off 0” - power is supplied to contacts 30 - all equipment is turned off.
- Position “Ignition 1” - power is supplied to contacts 30-15 - current goes to the ignition system, instruments, headlights, windshield wipers, stove, cigarette lighter, glass heater, turn signals.
- Position “Starter 2” - power is supplied to contacts 30-15 and 30-50 - all the same circuits are energized as in position “1”, as well as the starter.
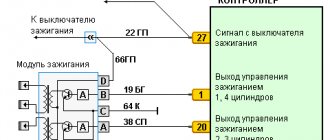
Ignition switch pinout
In turn, the pinout of the VAZ 2114 ignition switch looks like this (the legs of the lock connector are indicated):
- 1 - +12 volts for the key sensor;
- 2 - to ground (if the driver's door is open);
- 3 - +12 volts to the starter (aka contact 50);
- 4 - +12 volts with the ignition on (aka - pin 15);
- 5 - +12 volts with the key inside the lock;
- 6 - +12 volts for lock illumination;
- 7 - +12 volts from the battery (aka - pin 30);
- 8 - not applicable.
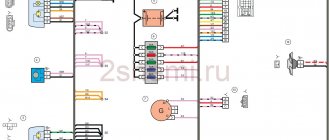
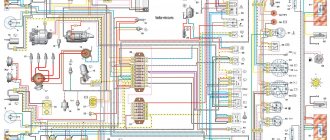
The VAZ 2114 ignition circuit, according to which the lock is connected to the on-board network in accordance with the pinout presented above, looks like this:
This is interesting: Which generator is better to install an injector on a VAZ-2114 - photo, video