Replacing the clutch with your own hands on a viburnum 119 1.4 16V (with air conditioner). You will need: 1-New clutch (from VAZ 2110 (starter with 2 bolts) and with them a basket, disc, release bearing. (for 8v clutch from 2108-09 starter with 3 bolts)) 2-Assistant (preferably 2) 3- Garage (pit/lift) 4-Tool: keys-8,10,13,15,17,19,30.screwdriver. sledgehammer (optional) It is better to use a set of sockets
The process itself. 1-We drive the car into the pit (in my case) 2-Let it cool. 3-Remove the air filter 4-Disconnect the battery 5-Disconnect all the connectors that prevent the filter from being removed from the engine compartment 6-Disconnect the starter terminals 7-Release the braid, which runs at the junction of the gearbox and the engine 8-Unscrew the 2 bolts from above that secure the gearbox to the engine 19 9-Remove the engine and gearbox protection (at the bottom of the car) keys 8-10 9.1-Disconnect the connectors from the gearbox and the clutch cable fastening 10-Unscrew the external grenades from the hubs (left and right) with a 30mm wrench (preferably a head and a good wrench+ pipe) is more convenient to do when the car is on wheels (put it in gear, an assistant presses the brake in the cabin) 11.1-Raise the car, remove the LEFT wheel (it is better to put the car on a support, block, etc.) 11-Disconnect the LEFT strut (crab, stabilizer , lever) 17,19,13 12-Pull out the LEFT drive from the hub 13-Unscrew the lower gearbox mounting bolt and nut 19 in the area of the muffler pants. 14-Place the gearbox jack on a support (to unload the cushions) 15-Unscrew the 2nd gearbox cushions 15,17,19 16-Disconnect the gear selection mechanism from the gearbox (backstage) 13 16.1-Remove the flywheel protection with the key 10 17-Now lower the gearbox( you can safely lower it, the engine rolls normally) 18-In my case, a 2nd assistant came in handy to direct the right drive so that it doesn’t get stuck. 19-There was a board across the hole, I put the gearbox on it along with the drives. 20-Unscrew the basket with the key set to 8 21-Insert a new basket and clutch disc, having previously centered the disc inside the basket. Preferably with a blank similar in diameter to the input shaft 22-Tighten it evenly, without distortions, turning the flywheel. 23-Assemble in reverse order.
The car was produced in 2008 (model year 2009 according to the VIN code) 1.4 16 valves with air conditioning (blue block), mileage 56,000, had a LUK clutch (from the factory) I installed VIS. The oil was not drained because the drive was not removed from the gearbox. everything took about 4-5 hours (amateurs in this matter, so to speak)
Greetings to the readers. Yesterday I had a significant event. Remember this blog post? This story finally has a resolution. Every time I pressed the clutch pedal, I felt that something was wrong, and my intuition told me that it was necessary to intervene as soon as possible, because the “patience” of my beloved car is not unlimited. I thought for a long time about how to carry out the repair. By yourself, or at the station/private owner. I found a compromise. There is a service station in the city where you can rent a lift and tools and carry out the repairs yourself. Just what you need!
Clutch cable repair
The most important element of the clutch is the sensor. Its purpose is to promptly send an impulse to the motor controller about the need to turn it on and off. He is also responsible for the discharge and supply of gas.
There are several problems associated with the sensor. Firstly, this is an incorrect adjustment in relation to the pedal, as a result of which fuel consumption increases noticeably. Secondly, contacts burn, which leads to sensor failure.
The Lada clutch cable is the most important mechanism through which the clutch process is carried out. Its breakdown can lead to serious problems in the car, including loss of the ability to move.
Let's study the main stages of clutch cable repair.
- It is necessary to inspect the cable along its entire length, starting from the clutch block.
- Now you should disconnect the cable from the gearbox, and then from the clutch pedal.
- Remember: in the glove compartment of your car you should definitely have a spare cable and some essential parts. If the problem occurs suddenly, it will not lead to catastrophic consequences. Armed with a new cable, replace the old one.
- The cable is adjusted using the adjusting nut.
- Check the adjustment by pressing the pedal twice.
- Finally, you need to tighten the locknut.
What will tell you about the need for repairs?
Each car has its own “diseases”. A common problem with the Lada Kalina car is that the clutch system does not always work correctly over time. True, this disease is not chronic and is quite rare. In most cases, this is due to the release bearing or indicates that the clutch disc needs to be replaced. If we consider the top faults of the Lada Kalina, then this one confidently takes 8th position.
It is not recommended to replace the disc and bearing separately; they can only be replaced as an assembly. In order not to remove the gearbox every time, it is highly advisable to change the clutch in one set. Before making a decision about the need to replace the clutch kit, let’s figure out what characteristic malfunctions appear and whether it is possible to carry out adjustments, thereby postponing expensive repairs for some time.
The machine itself will “tell” and “show” that problems have arisen in the operation of the mechanism. The main thing is not to miss the moment and make do with minor repairs or adjustment of the clutch cable, without waiting for the fault to manifest itself on the track and the repairs will cost a lot of money.
Before solving the problem of replacing the clutch, let's consider what can be done in terms of adjustments.
Lada Kalina cars are equipped with a single-plate dry clutch with a central spring and connected to the pedal via a clutch cable, which are self-adjusting via a ratchet mechanism.
Malfunctions when the cable needs to be replaced or adjusted:
- the clutch pedal clicks;
- the pedal sticks;
- its stroke is increased;
- the clutch “led”, and only an autopsy will reveal the answer;
- speeds turn on, but with problems;
- it may slip;
- you can smell something burning in the cabin;
- strong vibration;
- Speeds don't turn on at all.
In any case, there may be more problems, and the clutch disc will need to be replaced, and with it the entire set. You'll have to dig deeper into the belly of your iron friend.
Clutch design and functionality
The unit belongs to a cohort of mechanisms whose functioning is based on dry friction. The clutch mechanism in this model is single-disc and requires a pressure spring, which is structurally designed as an integral part of the basket. The cable is used to release the clutch. This action is activated when the advising pedal assembly is pressed. The cable transmission has a ratcheting device that allows it to autonomously change its length in accordance with the level of wear of the driven disk linings. This solution allows for a tight fit of the release bearing to the spring petals. Inside the basket there is a driven disk, through which rotation is directly transmitted from the flywheel to the input shaft of the transmission unit.
Pressing the designated pedal causes the cable to tighten, causing the special fork to rotate. Its lower bushing is integrated into the clutch housing. The upper element of the part, which is also presented in the form of a sleeve, is removable. During rotation, the fork, through the clutch and release bearing, acts directly on the petals of the pressure spring, which in turn opens the driven disk from the flywheel. In this way, the process of disengaging the clutch is implemented, which is necessary to ensure the ability to change gear in a mechanical transmission unit.
If the pedal is fully released, the disk tightly adjacent to the flywheel transmits torque to the input transmission shaft to its full extent.
In some cases, deviations from the correct functioning of the clutch assembly are observed. Among the signs characterizing this negative phenomenon are the following:
- Increasing pedal travel when its value exceeds the regulated 146 mm.
- Engaging the gearbox with the clutch pedal fully depressed is accompanied by characteristic grinding sounds of the shafts in the transmission, which indicates incomplete disengagement of the clutch.
- Starting and subsequent operation of the Lada Kalina engine is accompanied by a howling sound coming from the clutch housing (release bearing wear).
- The beginning of movement is characterized by jerks and insufficient clarity of gear switching.
- Moving at 3-4 speeds, the owner presses the accelerator and observes the following picture: the speed of the power plant increases vigorously, and acceleration is accompanied by sluggishness. This indicates clutch “slippage,” that is, a loose fit of the disc to the flywheel, caused by increased wear of the linings or excessive cable tension.
All these signs overwhelmingly hint to the owner that it is necessary to adjust the cable drive. How to adjust the clutch? You should also be inclined to such a procedure after replacing the clutch mechanism, the compensator loses its functionality (lack of the ability to autonomously adjust the length) or the Lada Kalina car has been idle for a long time.
What you need for work
The work is done both from above (access under the hood) and under the car, that is, we either drive it onto an overpass or use an inspection hole in the garage. You will also need:
- clutch kit;
- a set of keys;
- engine support (can be hung on a hoist in the garage);
- vessel for draining oil from the gearbox.
We perform the following actions:
- Remove the air filter and corrugation.
- We disconnect all the wiring and terminals from the battery and remove it too.
- Unscrew the starter power wires.
- We separate the cable and wiring from the gearbox.
- Remove the engine crankcase protection.
- We clean the entire space where the gearbox connects to the engine and unscrew it.
- We remove the engine mount, either place a jack under it, or hang it on a hoist.
- We unscrew the drive shafts from the gearbox, the “crab” attached to the box.
- All that remains is to disconnect the gearbox from the engine and begin replacement.
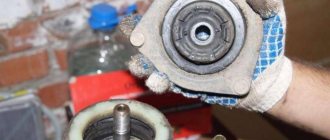
- The bolts securing the release disc housing to the flywheel are unscrewed. Clamp the flywheel with a screwdriver. The bolts are unscrewed sequentially in half a turn, moving in a circle.
- Remove the clutch discs. Even if there is no visible damage to them, we put it off. Check the flywheel for chips and scratches.
- We begin installing everything removed and disassembled into its place. When installing the basket, center the disk inside it.
- First we install the driven disk, then the pressure disk housing.
- The bolts must be tightened evenly in a circle.
- We screw the gearbox to the engine.
- We combine the gearbox with wiring and cable.
- We adjust the cable - now this is necessary for the correct functioning of the system, you already know how to do this.
Even if the clutch pedal in your car clicks, don’t put it off for a long time. Fixing a minor fault is always much easier, faster and cheaper. You can do almost any locksmith work on repairing the Lada Kalina yourself, without resorting to the help of a car repair shop, and, having completed the repair, experience the incomparable pleasure when the car starts up and drives.
back Which is better to choose - Grant or Kalina?
Next Diagnostics of the Lada Kalina fuel pressure regulator
Tags: replacement, adjustment, clutch
3.1.2 Clutch repair / VAZ 2110
Recommendation
A mandrel for centering the driven disk can be made to fit the dimensions of the input shaft or use an old input shaft instead.
1. Remove the gearbox from the car (see subsection 3.2.2).
2. Install the mandrel into the pressure plate hole.
3. Remove the six bolts securing the clutch housing. At the same time, use a screwdriver to hold the flywheel from turning, having first screwed in one of the gearbox mounting bolts. Remove the clutch housing assembly with the pressure plate and driven disc installed inside the housing. Hold the driven disk while doing this, otherwise it may fall out.
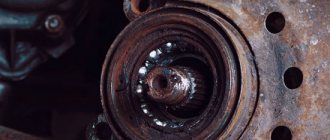
4. Cracks on the driven disk parts are not allowed. Check the wear of friction linings 1. If the heads of the rivets 2 are recessed to a distance of less than 0.2 mm, the surface of the friction linings is oily or the rivet joints are loose, then the driven disk must be replaced. Check the reliability of the damper springs 3 in the sockets of the driven disk hub; if the springs are broken, the disk must be replaced.
5. Check the runout of the driven disk if warping is detected during a visual inspection. If the runout value exceeds 0.5 mm, replace the disc.
6
Inspect the working friction surfaces of the flywheel and pressure plate, paying attention to the absence of deep marks, scuffs, nicks, obvious signs of wear and overheating. Replace defective components.
7
If the rivet connections 1 of the casing parts and the pressure disk are loosened, replace the casing with the pressure disk assembly. Using an external inspection, evaluate the condition of the diaphragm spring 2 of the pressure plate. Cracks on the diaphragm spring are not allowed. The contact points of the spring petals with the clutch release bearing must be in the same plane and have no obvious signs of wear (the amount of wear should not exceed 0.8 mm). Otherwise, replace the housing and pressure plate assembly.
8. Using an external inspection, evaluate the condition of the support rings of the pressure spring. The rings should not have cracks or signs of wear. Otherwise, replace the housing and pressure plate assembly.
9. In the workshop you can check the condition of the clutch drive part. To do this, secure the pressure disk 3 assembled with the pressure spring 1 and casing 2 to a device with an intermediate ring 4 with a thickness of B = (8.3 ± 0.04) mm. This device replaces the flywheel with a driven disk. Disengage the clutch three times with a release stroke of 8–9 mm, applying a load to the petals of pressure spring 1 at a diameter of C = 34 mm. In this case: – check that the shutdown stroke (8.0±0.1) mm corresponds to the pressure plate stroke of at least 1.4 mm; – the difference in the withdrawal values of the pressure plate 3 is no more than 0.25 mm; – size A must be within (29–31) mm; – the load on the petals of pressure spring 1 at diameter C with a stroke of (8.0±0.1) mm should be no more than 1100 N (1350 N for the VAZ-2112 clutch), the peak release load should not be more than 1300 N (1500 N for the clutch VAZ-2112).
10. Before installing the clutch, check that the driven disk moves easily along the splines of the transmission input shaft. If necessary, eliminate the causes of jamming or replace defective parts.
11. Please note that when installing the driven disk into the pressure plate housing, the more protruding part of the hub should be directed towards the pressure spring.
12. Insert the centering mandrel into the splines of the driven disk from the pressure spring side.
13. Install the clutch onto the flywheel along the three centering pins (shown by arrows) and tighten the six bolts securing the clutch to the flywheel evenly diagonally, holding the flywheel from turning. After this, remove the centering mandrel and install the gearbox.
VAZ 2110 REPLACEMENT OF CLUTCH without removing the box and draining the oil Repair with your own hands!
Replacing the clutch of a VAZ 2112
Replacing the clutch on a VAZ 2110 2004 1.5 16cl Lada 2110 LADA
REPLACEMENT OF CLUTCH VAZ 2110 2111 2112
Replacing the VAZ-2108, 2109, VAZ-2110 clutch without removing the gearbox and axle shafts.
Gearbox lever jammed
In any case, it is necessary to remove the last fastener after the bolt nut securing the left suspension arm has been unscrewed to the body bracket.
Repairing a box cushion is not complete without many of the steps described above.
After this, all that remains is to remove the lever. Another rather important element is the gearbox fork; its condition must also be monitored.
You will need to drain all the remaining oil into the container. A complete gearbox repair also involves removing such parts as the wheel drive from the gears of the differential axle shafts. The plugs are placed in the place where the gears used to be. After the gearbox adjustment is completed, they usually proceed to installing the left suspension support and brackets for the rear of the car.
Any such work, including repair of the secondary shaft, must take into account the general design of the gearbox and the basic principle of its operation. It contains a book on repairing the box. The same applies to the functionality of the component elements, otherwise the gearshift lever support cannot be replaced, like other parts.
Replacing the release bearing Kalina 2, 1118, Cross, Sport
To make a replacement you will need to put your car on a pit or a lift. Repairs are also possible if you have reliable supports and a jack. It is worth noting that without a pit or lift, the replacement method without removing the box, which is described at the end of the article, is suitable.
Important to know: For work, it is best to use a set of sockets with a ratchet. When directly dismantling the manual transmission, ask someone to help you “pull” it off
To replace the VP without removing the box, you will need two studs with a diameter of 10 mm and a length of 30-35 mm.
How to remove the gearbox and release bearing on Kalina 2 (1.4-1.6 8kl) with your own hands
Replacing the release bearing on a Lada Kalina begins with dismantling the gearbox; this process is described in detail in step-by-step instructions with photos/videos. Perform the operations in order.
- Open the hood of the car and immediately remove the battery.
- Next, remove the air filter by unscrewing the clamp and disconnecting the fastenings to the body.
- The clutch cable is located behind the battery; you need to unscrew the nut and disconnect the cable from the fastener.
- Now disconnect the plug of the speed sensor wire, it is located behind the “engine”, in the area of the pipes.
- Next, find the upper bolts securing the gearbox to the engine and unscrew them.
- The last operations on top of the gearbox are unscrewing the starter and its terminals, as well as disconnecting the clutch cable and electrical wiring.
- Remove the front wheels and tighten the hub nuts. We disconnect the protection (mud flaps) under the wing.
- Immediately disconnect the terminal of the reversing lights wire.
- Nearby there is a suspension beam, first twist the rear nut with a 24mm wrench.
- Now we move on to the ball joints, loosen the nuts and remove them on both sides.
- On the same side of the manual transmission we find the oil drain plug, unscrew it and drain it into any container.
- Between the manual transmission and the engine there is a clutch protective cover. To remove it, unscrew the nuts around the perimeter.
- Let's move on to dismantling the gearshift mechanism. First, unscrew the two bolts and remove the cover.
- Then unscrew the screw that secures the linkage connection.
- The next step is to remove the wheel drive shafts from the gearbox on both sides.
How to check the release bearing on Kalina and how malfunctions manifest themselves (noisy or buzzing)
To understand whether your Kalina needs to replace the clutch, you must first respond in time to signs of failure and diagnose the unit.
Signs of a malfunctioning Kalina release bearing:
- Noise or hum when pressing the pedal (damaged, insufficient lubrication or jammed);
- Difficulty pressing the pedal occurs when the coupling ear is broken, as well as the spring is deformed;
- These videos clearly show when the Kalina release bearing is faulty (noise, buzzing, knocking, creaking), as well as how to check the release bearing.
Example of noise during a fault:
Clutch noise when pressed:
The VP fell apart - sounds:
How to check the release lever without removing the gearbox:
What happens if the VP jams:
Clutch problems and solutions:
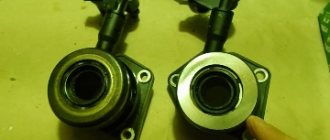
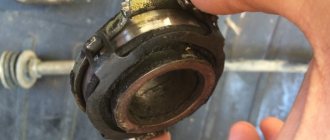
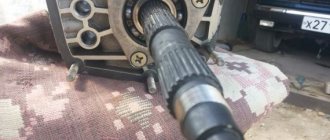
How to remove the release bearing from a Lada Kalina - location of the part and gearbox mounting diagram
As mentioned at the beginning of the article, to correctly replace the VP and dismantle it, you will need to remove the gearbox. Below is a photo of the transmission from below.
To dismantle the manual transmission, you will need to disconnect all the components under the hood that are attached to it. Next, the wheel drives and front suspension elements are removed. Then the manual transmission is unscrewed from the “engine” and removed. Inside the “head” of the clutch housing is the release bearing itself.
The structure of the manual transmission-2181 and the location of the release bearing in the cable box
Methods for checking the technical condition of a friction clutch
When the pedal is released, torque should be transmitted from the motor to the transmission without loss. Smooth inclusion and absence of jerking indicates normal operation of the unit. Before replacing a faulty clutch on Kalina, you should perform the following measures:
- Check the clutch pedal travel.
- Press the pedal and make sure there are no jams or extraneous noises.
- Measure the distance from the floor to the outer surface of the pedal (factory size – 146 mm).
- Check gear engagement with the engine running.
- Check for smooth operation, absence of slipping and burning smell.
The presence of any of the following deficiencies may indicate a malfunction:
- release bearing;
- drive cable;
- pressure plate;
- driven disk.
When troubleshooting breakdowns, experienced motorists advise changing all parts at the same time. Even if, say, the problem was in the driven disk, then it would be correct to install a new basket and release bearing at the same time, and not wait for the next breakdown and disassemble the assembly again.
Symptoms of a problem
The main symptoms of a malfunction are:
- Hum, whistle and other unnecessary sounds when pressing or releasing the pedal;
- “Push” even if the working moment was caught on time.
If there is a suspicion that the clutch is faulty, then diagnostics can be done using traditional methods, without disassembling the engine compartment internals.
Slip check
We fix the car with the handbrake, engage third or fourth gear, slowly (slower than usual!) depress the leftmost pedal and press the gas at operating torque. If everything is fine with the handbrake, then the test will be true. The car has stalled, which means it’s time to change the pressure plate.
Replacing the clutch and release bearing of a VAZ 2114 without removing the box
Replacing the clutch and release bearing of a VAZ 2114 (VAZ 2108, 2109) without removing the box, drives (grenades) and draining.
It is noteworthy that when installing new parts, the length of the lower threaded part of the cable tip is usually not enough to restore its original position.
Therefore, it is necessary to restore the wear compensation mechanism to its original position. To do this, size L must be installed between the leash and the clutch release fork lever.
The clutch pedal should be raised all the way up. Replacing the VAZ 2110 clutch without removing the box. Replacing the LADA Priora clutch with and without removal. Then the spring will automatically return the slider to its original position. After this, all that remains is to check the result of the work and, if necessary, adjust the clutch
Reference!
Clutch - thanks to this mechanism, torque is transmitted from the transmission to the engine. The transmission itself is carried out thanks to the presence of a clutch cable, which connects the mechanism to the gearbox, due to which the start, braking and gear shifting take place.
READ How to adjust wipers on a VAZ 2107
Which bearing is better
Many car owners try to replace it with a “original” part from the car manufacturer. But, for example, domestic spare parts from Lada cannot be characterized as the most durable and durable. Popular models are from the German company Sachs or the official supplier for our AvtoVAZ - the Italian bearing Coram. The price leader is Sachs; this is an inexpensive and acceptable quality alternative to replacing a faulty part. You can also choose EXEDY and SASSONE from more inexpensive models.
Replacing Clutch Kalina 1.6 8 Valves ~ VESKO-TRANS.RU
clutch mechanism
on Lada Kalina on your own
Just like what remains to be done for our client “basins”, Kalina is not at all ideal. Over its very ten-year history, the model has been refined more than once, but it was not even possible to get rid of some problems.
Among the “Kalinovodov” it is recognized that the torque transmission mechanism, due to its own design features, is the weak link of the car.
Regardless of what remains to be done for our client to modernize in this direction, car owners sometimes have to adjust the clutch.
Features of the VAZ 2112 clutch
The machine is equipped with a dry-type single-disc friction clutch with a central pressure spring. Every motorist, how to adjust the clutch on Kalina, must take into account that the control pedal is connected to the disc by means of a cable with a special ratcheting mechanism.
As a result of intense use, the friction linings of the disc wear out evenly.
The ratcheting mechanism integrated into the design of the drive allows for a certain period of time to compensate for wear - it gradually tightens the cable.
The purpose of this design is to facilitate the maintenance process. According to the plans of VAZ engineers, the mechanism should free the owner from the need to make adjustments without the help of others. But this remains for our client only at a theoretical level, but in reality it turns out that it will not be possible without the clutch option.
When should adjustments be made?
Before adjusting the clutch
on a Kalina car, you need to find the moment when the auto-locking of the cable no longer works. This is not difficult, especially since the machine itself talks about problems:
- Loss of traction, friction clutch does not provide a reliable connection between the flywheel and the disk. The consequence of such a deficiency will be the loss of a significant part of the torque.
- The clutch control pedal does not return to its original position, which, in fact, is a consequence of the first point.
- Bad clutch disengagement - the pedal is not pressed fully, which makes changing gears difficult.
Lada Kalina. clutch replacement
My channel subscribe friends.
The symptoms, in general, are similar to those when clutch adjustment is needed on a VAZ 2107, so car owners with experience have options to skip the myth block and proceed directly to the check.
How to check the clutch?
To ensure that the mechanism needs to be adjusted, you should perform a number of simple checks:
- Press the pedal a couple of times and release - any extraneous sounds are unacceptable. For better control, there is an option to press with your hand, this way you can feel the pedal stroke more.
- Check the pedal for jamming; if it turns with tangible twitching, then adjustment will be necessary.
- Check the full travel of the pedal using rulers (also called tape measures). Press and release the pedal a couple of times, then measure the distance of its outer edge to the floor; if it is not just 146 mm, then the mechanism needs to be adjusted.
- Check the movement of the cable guide relative to the clutch release fork; the largest distance between these elements is 27 mm.
- If the runout of the driven disk linings is more than 0.5 mm, adjustment is also required.
When performing checks, it is important that the car engine is turned off.
It is necessary to start work no earlier than the engine has cooled down one hundred percent. The setup method is simple and does not require a visit to a car service center, because our client can do what remains to be done himself. The step-by-step scheme for performing the work is as follows:
- Before adjusting the clutch drive on Kalina, you should open the hood of the engine compartment and remove the air filter.
- Visually assess the condition of the cable casing and replace it if the passage is damaged.
- Pull the tip towards you personally so that the cable takes full tension. Later, check the distance between the fork and the leash with a caliper.
- If the measurements show more than 27 mm, then the distance is adjusted by rotating the driver along the thread of the tip.
- Press and release the clutch pedal a couple of times and repeat the measurements.
- If you need to repeat the adjustment until the required standards are obtained.
What malfunctions can happen to the clutch?
Although this list is small, if problems arise it can cause quite a few problems:
Undoubtedly, the Lada Kalina is a fairly popular car among domestic car enthusiasts. Moreover, the fact that it has quite a large number of flaws and shortcomings does not at all affect the high popularity of this particular model from the Lada family. The clutch on the viburnum has always been problematic. If you look at the design of the clutch itself, it’s hard to believe that the Lada has problems there and requires fairly frequent adjustment of the clutch on the viburnum.
The Lada Kalina is equipped with a dry clutch type, which has a single disc and a central pressure spring. The fret design has a ratcheting mechanism for adjusting the length of the cable. The work process is accompanied by constant wear of the friction linings of the disk, and as a result the cable changes its tension, and here the ratcheting mechanism comes into play, which compensates for this wear. The working process of the ratchet mechanism is as follows:
- The tension of the cable turns the release fork, thereby forcing the spring to compress;
- Compression of the spring causes compression of the clamps, which are located on the toothed tip of the cable;
- The tip is released and the cable is tensioned.
Replacement instructions
The clutch transmits torque from the transmission to the engine. The transmission is carried out thanks to the clutch cable, which connects the power unit to the gearbox and ensures starting the car, shifting gears and braking. Thanks to the lever mechanism, the car is set in motion.
Which clutch should you choose?
There are several types of clutch, differing:
- principle of operation: electrical, mechanical and combined;
- working medium: air and oil bath;
- mechanism: closed and alternately closed groups of mechanisms;
- number of disks: single-, double- and multi-disc;
- number of springs: with one or several;
- two-stream.
The clutch is a complex mechanism, so before replacing it on your Lada Kalina yourself, you should carefully study the design and features of the mechanism.
Lada Kalina clutch
On VAZ 1117, 1118 and 1119 clutches of 190 and 200 mm are installed. The diameter can be determined by the number of starter mounting bolts. For 190 mm there are 3 of them, and for 200 mm – 2. The clutch kit includes a clutch disc, basket and release bearing. The most popular brands are: Valeo, Sachs, Luk, VIS, Kraft.
When using a drive from other models, you need to pay attention to the flywheel, the type of which is determined by the number of starter pins. There are two of them in the Lada Kalina, three in the VAZ 2108
The clutch resource depends on the components and operating conditions. A high-quality drive can last for 100 thousand kilometers.
If troubles occur with the clutch on the road, it is better to call a tow truck or have the car towed by another vehicle, otherwise this may lead to gearbox failure.
Tools
To replace the clutch, the car must be raised, since some of the work is performed from below. To do this, you can use a lift, overpass or inspection pit. From the tools and materials for the replacement procedure with your own hands, you need to prepare:
- new kit;
- set of tools;
- engine support;
- container for draining oil;
- clean rags.
New clutch kit
When removing the gearbox, the oil must be drained. If you carry out the work yourself, then you need to drain all the lubricant. If you have an assistant, you can drain some of the liquid from the wires so that oil does not leak when they are disconnected.
Stages
To carry out the replacement yourself, you need to place the car on an overpass or provide access to the bottom of the car in another way. Replacing the clutch on a Lada Kalina consists of:
- Initially, work is carried out from above. To do this, open the hood.
Engine compartment of Lada Kalina
Next, the air filter is removed along with the corrugation. The next step is to remove the battery. The terminals and all the wires that go to it are disconnected, and then the battery itself is removed. Next, the wires from the starter are disconnected. At the junction of the gearbox and the power unit, remove all wires and unscrew the bolts securing the gearbox to the engine. After the top work we will move under the car. First of all, the protection is removed from the crankcase. Then you need to pull out the wires from the gearbox and remove the cable fastening. Next, the drive shafts are removed and the “crab” attached to the box is unscrewed. Then you need to remove the gearshift driveshaft. Next, remove the support. Before removing the box, place a support under the engine. We remove the gearbox and proceed to the clutch. First you need to unscrew the 6 bolts that secure the release plate housing to the flywheel. To prevent the flywheel from turning, it must be held with a screwdriver. The bolts should be loosened slowly, one turn at a time, moving in turn from one to another along the diameter. Carefully removing the discs, you need to inspect them. There should be no cracks or scratches on the pressure plate and flywheel. You also need to check how worn the friction linings are. If necessary, new parts must be supplied.
Driven disk
You also need to evaluate the condition of the pressure and diaphragm springs; they should not be damaged or scuffed. If there are any, they must be replaced. If there are defects on the diaphragm spring, the casing with the pressure disk is replaced. Next, you should check the movement of the discs, it should be smooth. If there is jamming, it is necessary to determine the cause and eliminate it. Having completed all the replacements, you can begin reassembly. When installing the basket, you should center the disc inside it.
Basket
The driven disk is installed first, and then the pressure disk housing. In this case, the bolts must be tightened evenly over the entire diameter. Next, the gearbox is installed. Then you need to attach the clutch drive to the gearbox and install the cable in its original place.
We choose what we will put on the replacement car
On the Lada Kalina, the manufacturer can install one of two types of clutch: with a diameter of 190 mm and 200 mm. It is easy to calculate which type is installed on your car: we count the bolts that secure the starter: 2 - 200 mm, 3 - 190 mm. Which kit to purchase depends on your desire and financial capabilities.
This may be the official supplier of the manufacturer’s conveyor, or there may be companies specializing in the production of similar products. It is believed that imported ones work more softly - these are Valeo and Sachs. How long it takes, as stated above, depends on the operation of the car. An average clutch kit lasts up to 100,000 km.
Replacement instructions
The clutch transmits torque from the transmission to the engine. The transmission is carried out thanks to the clutch cable, which connects the power unit to the gearbox and ensures starting the car, shifting gears and braking. Thanks to the lever mechanism, the car is set in motion.
There are several types of clutch, differing:
- principle of operation: electrical, mechanical and combined;
- working medium: air and oil bath;
- mechanism: closed and alternately closed groups of mechanisms;
- number of disks: single-, double- and multi-disc;
- number of springs: with one or several;
- two-stream.
The clutch is a complex mechanism, so before replacing it on your Lada Kalina yourself, you should carefully study the design and features of the mechanism.
Lada Kalina clutch
On VAZ 1117, 1118 and 1119 clutches of 190 and 200 mm are installed. The diameter can be determined by the number of starter mounting bolts. For 190 mm there are 3 of them, and for 200 mm – 2. The clutch kit includes a clutch disc, basket and release bearing. The most popular brands are: Valeo, Sachs, Luk, VIS, Kraft.
When using a drive from other models, you need to pay attention to the flywheel, the type of which is determined by the number of starter pins. There are two of them in the Lada Kalina, three in the VAZ 2108
The clutch resource depends on the components and operating conditions. A high-quality drive can last for 100 thousand kilometers.
If troubles occur with the clutch on the road, it is better to call a tow truck or have the car towed by another vehicle, otherwise this may lead to gearbox failure.
Tools
To replace the clutch, the car must be raised, since some of the work is performed from below. To do this, you can use a lift, overpass or inspection pit. From the tools and materials for the replacement procedure with your own hands, you need to prepare:
- new kit;
- set of tools;
- engine support;
- container for draining oil;
- clean rags.
New clutch kit
To carry out the replacement yourself, you need to place the car on an overpass or provide access to the bottom of the car in another way. Replacing the clutch on a Lada Kalina consists of:
- Initially, work is carried out from above. To do this, open the hood.
Engine compartment of Lada Kalina
Next, the air filter is removed along with the corrugation. The next step is to remove the battery. The terminals and all the wires that go to it are disconnected, and then the battery itself is removed. Next, the wires from the starter are disconnected. At the junction of the gearbox and the power unit, remove all wires and unscrew the bolts securing the gearbox to the engine. After the top work we will move under the car. First of all, the protection is removed from the crankcase. Then you need to pull out the wires from the gearbox and remove the cable fastening. Next, the drive shafts are removed and the “crab” attached to the box is unscrewed. Then you need to remove the gearshift driveshaft. Next, remove the support. Before removing the box, place a support under the engine. We remove the gearbox and proceed to the clutch. First you need to unscrew the 6 bolts that secure the release plate housing to the flywheel. To prevent the flywheel from turning, it must be held with a screwdriver. The bolts should be loosened slowly, one turn at a time, moving in turn from one to another along the diameter. Carefully removing the discs, you need to inspect them. There should be no cracks or scratches on the pressure plate and flywheel. You also need to check how worn the friction linings are. If necessary, new parts must be supplied. Driven disk You also need to evaluate the condition of the pressure and diaphragm springs; they should not be damaged or scuffed. If there are any, they must be replaced. If there are defects on the diaphragm spring, the casing with the pressure disk is replaced. Next, you should check the movement of the discs, it should be smooth. If there is jamming, it is necessary to determine the cause and eliminate it. Having completed all the replacements, you can begin reassembly. When installing the basket, you should center the disc inside it. Basket The driven disk is installed first, and then the pressure disk housing. In this case, the bolts must be tightened evenly over the entire diameter. Next, the gearbox is mounted. Then you need to attach the clutch drive to the gearbox and install the cable in its original place. After installation, the drive and cable length should be adjusted. The lower end of the cable must be moved forward until it stops. The distance between the guide arm and the fork should be 27 mm. Adjustable leash size.
Thus, replacing the clutch on a Lada Kalina can be done with your own hands without the help of specialists from a car service center.
Removal and installation of the gearbox
Servicing the gearbox assumes that the mechanism will have to be removed and its position changed. Before doing this, you need to install the vehicle itself on the lift. The ignition must be turned off completely and the parking brake must be used.
How to repair a gearbox? To do this, disconnect the minus terminal from the battery. The hood must be opened completely. Any manual on gearbox repairs writes about this.
The oil filler cap is also removed. It is necessary to install the previous item after the screen is removed. The gearbox requires loosening the clamp responsible for fixing it. The inlet pipe hose must be disconnected from the corresponding sensor. Gearbox lever play requires the same actions in practice. Then you need to unscrew the air intake nut.
Gearbox Lada Kalina after dismantling and disassembly.
The gearbox can be installed in its original place after the 1st speed repair is completed. SHRUS-4 lubricant is applied to the outer surface of the corresponding bushing in the clutch in a very thin layer. This will also help if the gearbox is loose. The pin fixing bolts are removed from the steering knuckles.
Types and purpose of clutch
Kit for Kalina 2
A clutch is a device designed to transmit torque. The clutch cable connects the transmission and the power unit, provides starting, switching gears in the transmission and braking. From the clutch pedal comes a lever mechanism that sets the car in motion.
The author of this invention is the legendary Karl Benz, the founder of the largest automobile industry, who received not only honorary awards for his development, but also worldwide fame as a brave, talented innovative engineer.
There are several types of clutch that differ in a certain set of parameters:
- mechanical, electrical or combined;
- operating in air or in an oil bath;
- constantly and alternately closed;
- 1-, 2- or multi-disc;
- with a central spring or several;
- two-stream.
Repair, features and technical specifications
Inside a VAZ 21118 car, like any other, there is always a gearbox. For a model such as Kalina 1118, this device is a mechanical type design, which is equipped with one reverse stage, as well as 5 forward stages.
Gearbox from Lada Kalina.
In Lada Kalina, the gearbox is structurally combined with a differential, the main gear. Transmission differential repair should also take this into account.
The mechanism body of the VAZ Kalina car is presented in the form of three aluminum copper crankcases:
Special sealants are applied between them when assembling and repairing the gearbox.
Description of design
The front suspension is independent, with telescopic swivel struts, wishbones, longitudinal bracing arms and a torsion bar anti-roll bar. The suspension strut consists of a housing in which a hydraulic telescopic coil spring shock absorber and an upper support are installed. A bracket for attaching the steering knuckle, a swing arm and a lower spring support cup are welded to the outside of the strut body. Depending on the vehicle configuration, the strut may have a barrel-shaped or conical spring. The spring's lower coil rests against the lower support cup, and its upper coil rests against the upper support cup mounted on the shock absorber rod. Also installed on the shock absorber rod is the upper support of the strut, consisting of a housing, a rubber cushion and a bearing. The support body is attached to the car body with three studs and nuts. The bearing allows the shock absorber rod to rotate in the support when the strut is turned, and the rubber buffer prevents the transfer of vibrations to the car body. The shock absorber rod is protected from dirt and dust by a plastic casing. In the event of a suspension breakdown, the stroke of the rod is limited by the compression stroke buffer. The strut pivot arm is connected to the steering rod through a ball pin. Changing the length of the rod using its connecting coupling allows you to adjust the toe-in of the front wheels. Tie rod adjusting sleeve: 1 – tie rod end; 2 – adjusting sleeve; 3 — steering rod The steering knuckle is attached to the strut bracket with two bolts and nuts. The upper hole of the bracket is made oval, and the bolt installed in it has an eccentric collar and an eccentric washer. When this bolt rotates, the steering knuckle moves relative to the strut, turning on the lower mounting bolt as if on an axle. Thanks to this, the angle between the strut and the fist changes, which in turn allows you to adjust the camber of the front wheel. A double-row ball bearing is pressed into the hole of the steering knuckle and secured with two retaining rings. The wheel hub is pressed into the inner ring of the bearing. At the bottom, the steering knuckle is connected to the wishbone of the suspension using a ball joint. The transverse lever is kept from moving by a stretcher, which is attached with its rear end through a rubber-metal hinge to the lever, and with its front end through a cushion to a bracket fixed to the car body. By changing the number of washers in the front and rear brace mounts, you can change the position of the lever, thereby adjusting the longitudinal inclination of the wheel axis. Attaching the steering knuckle to the rack: 1 - bracket for mounting the steering knuckle; 2 — rack body; 3 – bolt (eccentric) of the upper fastening of the steering knuckle; 4 — bolt of the lower fastening of the steering knuckle; 5 — steering knuckle Attaching the longitudinal brace to the transverse arm: 1 — rear end of the longitudinal brace; 2 — adjusting washers; 3 - thrust washer; 4 — rubber-metal hinge; 5 - wishbone of the suspension The ends of the anti-roll bar are connected to the wishbones of the front suspension of the car using struts. The central part of the stabilizer is secured through rubber cushions to the body with brackets. The movement of one of the levers is transmitted through the stabilizer to the second. This allows you to partially synchronize the operation of both sides of the suspension and thereby reduce the sway of the car on uneven roads and roll in corners. Front suspension: 1 — stabilizer bar; 2 — bracket for fastening the stabilizer bar; 3 — transverse arm bracket; 4 - wishbone; 5 — stabilizer strut; 6 — telescopic stand; 7 — ball joint; 8 — steering knuckle; 9 — longitudinal stretch; 10 — extension bracket After repairing any suspension or steering elements, be sure to check the alignment angles of the front wheels. It is possible to properly check and adjust the alignment angles of the front wheels only in a service company that has a special stand for performing adjustment work.
We correct the operation of the mechanism
All of these factors that cause deviations in the effective operation of the clutch mechanism require immediate adjustment of the position of the cable drive in the Lada Kalina 2. Adjusting the clutch involves performing such a series of manipulations.
- We dismantle the air filter housing to provide access to the adjustment mechanism.
- Holding the tip, pull the cable to the maximum possible length.
- We use a caliper to measure the distance between the tip and the previously designated fork. The norm assumes a value of 27 mm.
- If a discrepancy is detected with the indicated gap value, then proceed as follows: turn the driver along the thread until the previously specified distance value is reached.
- Let go of the cable end and make sure that it is pressed tightly against the fork.
- Press the clutch pedal several times to activate the automatic length adjustment unit.
- Now we resort to measuring the indicated gap. If a deviation is detected again, then we perform these manipulations again. This completes the clutch cable adjustment.
When the clutch adjustment is completed, the clutch assembly in the Lada Kalina is sometimes able to remind itself of squeaks or noises. This can be caused by the leader rubbing against the surface of the fork. A lubricant that should be applied to the contact between the cable lug nut and the fork will help eliminate the annoying sound effect. Among other reasons, there may be a creaking of the pedal assembly bushing, as well as the deterioration of the sensor located there.
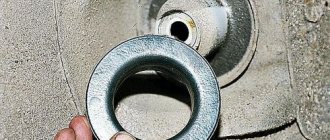
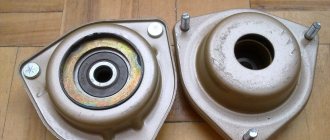
Lada Kalina - front strut support bearing: choice, price, characteristics
If you do change the support bearing individually by installing it in the old support, then you should buy from trusted manufacturers, a summary table of which and photographs are presented below.
Catalog number (article) - 1118-2902840.
Table of recommended manufacturers
| No. | Manufacturer | Manufacturer's code | Price 2022, rub. | Equipment | ||
| Peculiarities | Retaining rings | Protective cap | ||||
| 1 | VBF Russia Analogue | 1118-2902840-01 | 700 | — Clip made of hardened steel; — Manufactured according to GOST; — Increased service life; — High-quality lubricant. | — | — |
| 2 | NPP "System Technologies" Russia Analogue | SS10113/11180-2902840-00 | 900 | — Silence; — Vibration damping; — Work at low temperatures; — Protection from dirt and dust. | — | — |
| 3 | AvtoVAZ Russia Original | 1118-2902840 | 750 | — Original product; — 1 year warranty; - Durability. | — | — |
Advice: When installing ss20 support bearings on a viburnum, it is recommended to install new “Vibration and Noise Insulators” for springs made of synthetic rubber; they soften the load on the suspension and shock absorbers so that a crack does not appear on the support of the Kalina’s strut, and this also prevents other malfunctions.
Important to know: Inside the plastic support bearing housing from VBF there is a single-row thrust ball bearing, marked according to GOST - 8112Н, according to ISO (51112).
Table of bearing sizes 8112Н and technical characteristics
| Characteristic | Unit | Value according to GOST (TU) |
| Inner diameter of the tight ring, d | mm | 60 |
| Outer diameter of the tight ring, d1 | mm | 85 |
| Free ring inner diameter, D1 | mm | 62 |
| External diameter of free ring, D | mm | 80 |
| Installation height | mm | 17 |
| Dynamic load capacity | kH | 41,5 |
| Static load capacity | kH | 95,0 |
| Nominal speed | rpm | 3600 |
| Axial clearance | mm | — |
| Steel type | — | SHH-15 |
| Hardness of steel and rollers | H.R.C. | 61-65 |
| Contact angle | hail | — |
| Torque | kN*M | 220 |
| Ring roughness | Ra | 0.32 |
| Number of balls | PC. | 24 |
| Ball diameter | mm | 8,731 |
| Mounting chamfer radius, r | mm | 1,5 |
| Weight | G. | 295 |
Important to know: Inside the topmost support there is a closed-type thrust ball bearing, marked according to GOST - 348702K2. Bearing dimensions are presented in the article "".