The function of the steering rod in the Logan design is to connect the steering wheel with the rotary arms: it is thanks to this transfer of force from one unit to another that the wheel turns. The end of the mechanism is equipped with hinges, which are also responsible for the angle of rotation .
Most often, the rubber joint liners become unusable , but even because of this seemingly minor element, it becomes more difficult to control the Renault Logan. In addition, the assembly may not work due to contamination of the boot .
The rods themselves fail due to mechanical shocks or after driving into a deep pothole.
How to determine that Renault Logan steering rods need to be replaced, in what sequence to change the unit, what nuances to take into account - we have collected answers to all these questions in our material.
Signs that replacement is needed
Only a visual inspection can tell for sure about the condition of the steering rod. The ideal option is to perform a complete disassembly to inspect the part for damage and play. Naturally, it will be inconvenient to disassemble it just to check the condition of the unit, so be sure to focus on a number of characteristic symptoms that will indicate the imminent death of the steering rods:
- The appearance of a dull knock when passing small potholes. Appears when there is a lot of play, when metal hits metal, creating these knocking sounds.
- Steering wheel vibration or stiffness.
- The car lost directional stability. Wear on one of the steering rods will cause the car to start to pull to the side when driving in a straight line.
Of course, the appearance of extraneous noise in the suspension area may indicate another problem. To be completely sure that the tie rod is faulty, you can perform several garage tests.
How to recognize the failure of the shock absorber strut and springs?
Shock absorber struts are a device that stabilizes the smoothness of the ride when the vehicle is moving. Together with the springs, the struts take on the load, eliminating excessive body sway and increasing ground clearance. A photo of the shock absorber strut (without spring) is shown below.
A faulty shock absorber strut can be recognized by the following symptoms:
- The appearance of an oil leak.
- Increased car sway when hitting a pothole on the road.
- Vibrations or knocking noises when driving on a flat road.
- Deterioration of car controllability, decreased sensitivity.
- Shocks and “breakdowns” when hitting uneven surfaces.
No less important devices are springs that work together with the struts. Malfunctions of these Renault units are recognized by a number of symptoms:
- Reduced clearance.
- Deterioration in smooth movement.
- The appearance of swaying or jolting in the event of hitting an obstacle.
- Tilt of the body in one direction or another without movement (when the car is static).
Symptoms of a problem
The easiest and most accessible way to identify problems with tie rod ends is to observe deviations in the behavior of the car. Experienced drivers do not have problems with this, because they notice the appearance of any extraneous noise or knocking. A breakdown in the rod or specifically in the tips is indicated by the following:
- vibration of the gas pedal when accelerating;
- noticeable play in the steering wheel;
- the appearance of extraneous sounds (creaks, crackles, etc. when driving on uneven roads);
- squeaks and difficulties when turning the steering wheel;
- uneven or accelerated wear of tires, increased fuel consumption - side effects of impaired alignment when tips break;
- violation of directional stability when the car pulls to the side;
- knocking noises when braking.
These signs may also indicate a breakdown of another kind, but almost 100% it will be related to the car’s suspension. You can replace the tips yourself and see if the symptoms go away. In this case, it is best to go to a service center for diagnostics. If auto mechanics confirm that the tips are faulty, you can safely change them yourself.
If you have a partner, you can do a little “garage test”. The car must be placed on the inspection hole, put on the handbrake and turn off the ignition. The first person must turn the steering wheel from one side to the other
The second one at this time should be near the tip and carefully use your hand or visually determine the presence of play. If it is present, even minor, then it’s time to replace it
This test only determines the condition of the tips. If squeaks and control problems are caused by other problems with the chassis, you will still have to contact specialists for diagnostics.
Replacement procedure
You can remove the old steering rods and install new ones according to the following instructions:
- With the car on a jack or lift, remove the wheel from the side with the faulty traction. For ease of access, you can turn the steering wheel all the way to the side.
- Using a 16mm wrench, unscrew the tip fixing nut.
- Loosen the locknut using a 22mm wrench. After this, you can knock the tip out of the caliper.
- When you twist the tip, be sure to count the number of rotations. This will be needed when installing a new part.
- Next, you can install a new rod on the seat.
- Using rubber clamps, secure the rubber casing.
- The steering end should be screwed on to a pre-calculated number of rotations.
- Reinstall the locknut and press the tip into place.
- Replace the wheel. If you need to change the second tie rod, then do the above steps on the other side.
The procedure is not over yet. Whenever any intervention is made to the vehicle's suspension, a wheel alignment must be performed. You won’t be able to do this without the help of a car service. Only after this can you conduct a quality test drive and check the operation of the steering rods. Make sure that the knocking noise has disappeared, the steering wheel begins to turn normally, and deviations from the straight trajectory no longer occur.
If extraneous noise remains in the suspension, then the problem is not in the steering rods. To save your time and effort, we recommend going to a specialized service station and finding out exactly what is the source of the problem. When the broken part is found, then you will have to choose whether to do the repair yourself or entrust the work to auto mechanics.
Tip replacement work
For ease of work, we will need to jack up the front wheels and remove them, not forgetting about the sliding shoes for the rear wheels and the safety net for the body.
Photo of the jack:
Plus, before work, raise the brake handle all the way.
Along the way, I demonstrate on video (see at the end of the article) the entire necessary set of tools that I always take with me on the road. These are various wrenches, sockets, various screwdrivers, a set of probes, clamps, etc., everything that can be useful on the road when repairing a car with your own hands.
Let's get back to work...
We unscrew the central part of the cap to get to the bolts and use a wheel wrench to loosen the wheel bolts.
Selection of tie rod ends
Buying new tips is a difficult task. There are two ways: buy original products or analogues. The first option involves installing the same tips that were installed from the factory. The branded Renault Logan tie rod end will be guaranteed to be compatible with the car’s design and will also be of high quality. However, there are a number of problems. Firstly, not all drivers are satisfied with the service life of factory parts, so they prefer to try analogues. Secondly, the price of such products is usually 1.5-2 times higher than that of analogues.
If you decide to take the original, then study the catalog numbers
- 6001550442 and 6001550443 - for cars of the 1st and 2nd generation (2 at the end is left, and 3 is right);
- 485200410R and 485202867R – for cars from 2014 (right and left, respectively).
If the price tag is too much, you can find a lot of cheaper analogues for each tip:
| Catalog number of the original | |||
| 6001550442 | 6001550443 | 485200410R | 485202867R |
| Catalog number analogs | |||
| ASAM 30138 or 30666 | ASAM 30139 or 30665 | FRANCECAR FCR211163 | FRANCECAR FCR211162 |
| DELPHI TA2329 | DELPHI TA2330 | NK 5033986 | NK 5033985 |
| FENOX SP30040 | FENOX SP30041 | SASIC 7674019 | SASIC 7674018 |
| RTS 91-02401-2 | RTS 91-02401-1 | MONROE L25131 | MONROE L25132 |
| SASIC 4006158 | SASIC 4006157 | SWAG 60 92 9624 | SWAG 60 92 9623 |
| TRW JTE1136 | TRW JTE1135 | LEMFORDER 30937 01 | LEMFORDER 30936 01 |
| LEMFORDER 30936 | LEMFORDER 30937 | TALOSA 42-06384 | TALOSA 42-06383 |
| FLENNOR FL0150-B | FLENNOR FL0159-B | FEBI 29624 | FEBI 29623 |
| TEKNOROT DC302 | TEKNOROT DC301 | RUVILLE 919700 | RUVILLE 919701 |
As you can see, in most cases the difference between the left and right tips in the catalog number is only one digit. This will greatly simplify your search when choosing
Also pay attention to the packaging of the product. For example, some manufacturers offer to purchase only a pair
Auto mechanics strongly recommend that if one tip fails, replace both with new ones. This will eliminate handling problems. Plus, you won't have to worry about the old tip breaking for a long time.
Most drivers have a choice between LEMFORDER and TRW. You will find many reviews from drivers online, but you can draw your own conclusion only after purchasing and using the selected tie rod ends.
Methods for self-diagnosis
In most cases, it is possible to identify a problem with the steering rod even without qualified assistance from specialists. To do this you will need a friend and a pit (overpass). Raise the front of the car. The first person should rock the wheel in a horizontal plane. The second one needs to feel under the car the point under the boot where the finger connects to the ball. If the latter wobbles in the outer race, then the problem is with the steering rod.
Also note a few other important details:
- the maximum permissible range of deflection of the tips along the axis of the fingers is 1.5 millimeters;
- there should be no play on the balls;
- The hinge cover must be free of cracks and other visible defects.
The hole in the boots can be easily identified by the grease being squeezed out, so pay attention to drips. This is the basic information on how to check the steering linkage on a Renault Logan.
Such a simple inspection in most cases allows you to determine the breakdown of the balls. If everything looks intact, but the knocking invariably remains, then head for diagnostics. In many cases, the breakdown can only be identified after complete dismantling of the part.
Video lesson
Having bought the car a little over a year ago, I immediately went through diagnostics at Renault Service on Chicherin - there were no complaints about the chassis, except for the recommendation to replace the left wheel bearing, which was done almost immediately. The tie rods with ends had no play. But the year did not pass without a trace - I began to notice an unpleasant thud on our Belgorod side streets, broken during the winter... I did not feel any noise on the highway.
I decided to make diagnostics routine and it so happened that I did it three times over the last 2 months in different services - no, not on purpose, checking and comparing the quality of diagnostics, but mainly as a bonus, during scheduled visits to the service. I concluded, as a novice car enthusiast, that going to a service center specifically for chassis diagnostics is not financially profitable, so the first diagnosis, which I came specifically for, cost me 400 rubles. It’s better not to rush into this matter and ask the technician to check the chassis during a visit to the service center, solving other issues - for example, when replacing the brake fluid, the technician diagnosed the chassis for me for free, and when replacing the clutch cable, the diagnostics cost me 100 rubles .
So, the verdict of three independent services was the same - a slight play in the steering rods with tips, hence the noise from the front suspension on uneven surfaces. True, where I gave 4 hundred, the diagnosis was more scrupulous, versatile ones were rejected - one rod and one tip, but it was decided to change everything completely, especially since wheel alignment is required. As for replacing the levers right away, my ardor was cooled by the master at “Cruise” - good is better than new!
I didn’t have to worry about choosing a manufacturer for a long time - I took the proven Lemforder in Exist (1000+1000/900+900).
At the same time, the Sasic anthers, which forced the master to tinker, fit with difficulty from the side of the steering rack, but this is not bad - they will fit more tightly. They were tightened with plastic clamps.
Result: the noise of the suspension when driving over bumps and small potholes has disappeared - the suspension works smoothly without thumping, the positive result is obvious. So, I present a photo report...
Removing the old tips turned out to be not so easy - I had to resort to a gas torch.
Same thing on the second side...
Price: 5,900 ₽ Mileage: 80,900 km
Good day to all good people. In this article we will figure out how to replace a Logan tie rod end with your own hands without outside help. The average time to complete the job is from 60 to 90 minutes, depending on the driver’s experience.
The weak link of the tie rod is the tip. The average period of operation of the element does not exceed 30-40 thousand kilometers. Heavy use of the car and bad roads will bring the replacement period closer.
In the article you can find a video of replacing the Logan tie rod end, which will help the driver. It will complement the text material and help you understand the nuances of replacing the tip yourself.
Recommendations
Comments 16
I installed SASIK and drove about 10t.km and fell apart to hell
Installed Phoenix, drove only 25t.km.
The tip of the trv has passed almost 50 thousand and is still alive. Check for yourself first whether what the service said is really broken
Put forward, 25-30 thousand go.
In my opinion this is a bad indicator
For 400 rubles, ok
It’s better to pay once and go than to change something every time. The camber also costs money, and the time spent is priceless. A normal tip of 50 thousand should be taken care of on average roads.
I tried different ones, but they don’t go more than 30-35 thousand. So it's a better question!
It’s better to pay once and go than to change something every time. The camber also costs money, and the time spent is priceless. A normal tip of 50 thousand should be taken care of on average roads.
It’s just that everyone’s roads are different, this is the one I take to work)))
It’s better to pay once and go than to change something every time. The camber also costs money, and the time spent is priceless. A normal tip of 50 thousand should be taken care of on average roads.
Agree. With a mileage of 234,500, I still have my family and others intact, and this is far from being on good roads. This is how the original can be placed.
Maybe Renault Repair on YouTube will help, the kids there tell you how to change parts, well, and tell you which ones are better to replace. I think they have plenty of experience in these matters. Personally, I get information there, plus forums, where would we be without them.
Thanks, I looked. Now I'm leaning towards Sasik
My Sasiks have been running for a year (30 thousand), one has completely died, the second is about to do the same) I installed a Lemferder, let’s see what happens)
Thanks, I looked. Now I'm leaning towards Sasik
There are 2 Logans in the family. I only bet Sasik. Some rollnaki traveled 30 thousand km and were sold with an excellent car. condition. Sasik installed rulnaki on my mother’s car 2 years ago. More than 45 t.km. without adding lubricant. Everything is good! On my current Logan, Rulnaki Sasik a year ago and about 15 t.km - not an indicator, but everything is normal. I'm thinking of changing the ball joints. I'll take the sasik. Good luck on the roads!
There are 2 Logans in the family. I only bet Sasik. Some rollnaki traveled 30 thousand km and were sold with an excellent car. condition. Sasik installed rulnaki on my mother’s car 2 years ago. More than 45 t.km. without adding lubricant. Everything is good! On my current Logan, Rulnaki Sasik a year ago and about 15 t.km - not an indicator, but everything is normal. I'm thinking of changing the ball joints. I'll take the sasik. Good luck on the roads!
More than 40 tons. Sasik went through, although over time the anthers from Taz08 were replaced and ShRB-4 lubricant was added, now you can completely forget about them for a long time, thanks to a promotion in Avtodok that year, Sasik was also bought as a reserve, and they are still lying around. So Sasik price-quality, if not counterfeit.
All tie rod ends used on Renault cars look almost the same - they are screwed onto the tie rod. Additionally, the tip is secured with a counter-nut. The counter side is always equipped with a hinge connected to the steering knuckle lever. We will only talk about the Logan family. Let's consider which steering ends for Renault Logan would be better to buy, so that you don't regret the purchase later. We will compare all products according to several criteria, but let the buyer make the choice.
The following video shows how the tip on the left is replaced.
Features of steering rack faults
According to the manufacturer's instructions, the service life of the steering rack without quality complaints is 180–200 thousand km, subject to regular preventive inspection. The main reasons for node failure and malfunctions include:
- Poor quality of the road surface, which significantly increases the load on the steering elements.
- Dust and dirt particles settle on the rubber seals, which leads to corrosion on the rack components.
- Driving style is too active.
- Natural wear and tear over time.
Diagnosis of the malfunction is revealed by a simple inspection and careful attention to the behavior of the car on the road. The following signs will indicate that a repair is imminent:
- Extraneous noise.
- A knocking sound occurs when turning the steering wheel.
- The suspension rattles unusually when driving on poor surfaces.
- Driving is accompanied by vibration.
- There was play when turning the steering wheel.
Sometimes the situation can be corrected if the part is adjusted, but this is not always possible. Often, adjusting the steering rack does not eliminate the problem, and then it is necessary to make a replacement: remove the old element and install a new device. Among the main malfunctions of the steering rack, the most common are:
- Damage to the bushings of the worm pair. It manifests itself as knocking noises when turning the steering wheel. It can be eliminated by removing the faulty part or replacing the bushing will help.
- Corrosion and damage to seals. This is indicated by the absence or leakage of fluid in the tank. New parts should be installed or the existing ones should be cleaned of corrosion, and the power steering fluid should be replaced.
- The teeth of the worm pair of the distributor rod have worn out. This is indicated by play in the steering wheel. Faulty parts are replaced.
- Corrosion processes in the steering rack mechanism contribute to tight steering. It will be necessary to disassemble the part, clean it, and repair the rod.
The weak link of the steering rack is the bearings and thrust bushings, which most often cause ineffective operation. The block diagram of the steering control is shown in the figure.
The numbers indicated in the drawing are:
- 1 and 7 — right and left tie rod ends;
- 2 — the steering rod itself;
- 3 — boot;
- 4 - crankcase;
- 5 — power steering tubes;
- 6 - drive gear.
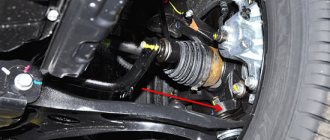
Visual inspection
How to check this element with your own hands? It will be very difficult to do this on site, since the element is hidden behind the drive wheel. First you need to gain access to the bottom. To do this, we drive the car onto a pit or a lift. Next we get to the tip itself. It comes right out of the rail and looks like the photo below.
First, we wipe it from dirt and other deposits. To do this, you need to use universal lubricant VD-40 or its equivalent (it costs less, but the effect is the same). Then wipe everything dry with a soft cloth.
Pay attention to the fastening points. This is where the problem most often lies.
The boot also becomes unusable. Its deformation and cracks are unacceptable. Backlash is not allowed either. Ask an assistant to turn the steering wheel left and right. At this moment, we carefully monitor the movement of the rod. If it plays, it means that the left Renault Logan tie rod end (or right) needs to be replaced. It is better to change these elements in pairs. Because in a couple of thousand the next one will definitely fail. The element must be replaced even with minimal play (from 1.5 millimeters). At the same time, you can check the status of other elements:
- Inner and outer CV joint boot.
- Reiki boot.
- Ball joints (upper and lower).
- Anti-roll bar bushings.
Which steering tips to choose: original and analogues for Renault Logan
The catalog of original spare parts for different René models contains parts with numbers 6001550442 and 6001550443. They are sold in pairs, the last digit in this case is the designation of the side. “Two” is for the left tip, “three” corresponds to the right side.
It is better to replace such parts as a set. If the tip is faulty, the steering column wears unevenly on one side. If you choose from analogue spare parts, the classification of a suitable replacement will be as follows.
Possible analogues:
| For left side: | For the right side: |
| ASAM 30138 (30666). | ASAM 30139 (30665). |
| DELPHI TA2329. | DELPHI TA2330. |
| FENOX SP30040. | FENOX SP30041. |
| RTS 91-02401-2. | RTS 91-02401-1. |
| PROFIT 2302-0474. | PROFIT 2302-0475. |
| SASIC 4006158. | SASIC 4006157. |
| MAPCO 49192. | MAPCO 49193. |
| TRW JTE1136. | TRW JTE1135. |
| SWAG 60 92 9623. | SWAG 60 92 9624. |
The best compatibility with Rene Logan can be boasted by tips produced under the TRW brand. Inexpensive steering parts can be purchased from the SASIC range. An excellent option would be to purchase LEMFORDER products. In terms of technical characteristics, they are superior to all possible analogues, but the main disadvantage here is the cost.
Which is the best brand to choose?
To make the correct choice of the required part, you need to use a special article, thanks to which the exact selection of the necessary spare parts for the repair kit is carried out.
To find out the correct article number, you need to look at this number on the part. Thanks to this article, you can also select spare parts for Logan, such as a repair kit for the rack. We recommend using the original part number and purchasing strictly genuine Renault spare parts.
Of course, there are many brands with their own spare parts numbers, but the quality of production of these parts, alas, leaves much to be desired.
What are tie rod ends
The principle of operation of such elements is extremely simple: they provide a hinged connection that transmits the steering movement to the steering axis. Any malfunction in this system leads to difficulties in driving the vehicle and can cause a fatal accident.
The structure of the tips includes:
- Curved body with axle shaft.
- Threaded ball pin.
- Finger nut.
- Insert for fixation.
- Protection (cover and case).
The main malfunction of this unit is the appearance of axial play. The steering end is an element of the steering rod that connects it to the rack shaft. You can determine the malfunction yourself by raising the car on jacks or above an inspection hole. When the wheels move, the balls rock or tap. This manual method is currently practically the only one that allows you to accurately diagnose the need to replace tie rod ends.
What to buy
If the steering rod is faulty, it must be replaced. Here the question arises about buying a new part. It is recommended to buy original products. In the technical manual for the car or from the official dealer, you can find out the catalog number of the steering linkage for your particular Renault Logan. A popular model is TRW catalog number JAR 1031. Its cost is 1000-1200 rubles. We also recommend taking a closer look at the products of the following brands:
- ABS (Netherlands);
- ASMETAL;
- Autolog (Germany);
- DELPHI;
- MONROE;
- PROFIT;
- Sasic (France);
- SWAG.
The cost of the most expensive models reaches 5 thousand rubles, but whether it is worth overpaying for the brand is up to you to decide.
Service life and causes of breakdowns
The problem is that no one gives specific figures regarding service life. If we talk about the rods themselves, they have an almost unlimited resource, since they are made of high-strength metal. Most often it is the tips that suffer, but even here everything depends on many factors. Some drivers do not monitor the condition and drive the car until the suspension literally crumbles. The advantage of this solution is that you will know exactly when to change the tips. Naturally, the suspension can fly at the most inopportune moment - and this is the main disadvantage.
Auto mechanics and experienced drivers strongly do not recommend bringing traction to a critical state. On average, their service life is 60-100 thousand kilometers. However, it all depends on a number of factors:
- Quality of roads. With regular off-road driving or surfaces with numerous holes and potholes, the tips will be subjected to heavy loads, which will ultimately accelerate the wear of the part and the formation of backlash.
- Driving style. Not all drivers slow down in front of speed bumps or large puddles that may contain a large hole. It’s in vain, because the slightest careless “flying” into such a hole can put an end to many suspension elements.
- Environment. The most dangerous to the design of the tips are dirt and water. If it rains regularly in your region and there is no asphalt surface, then the tie rod ends will quickly break.
- Product quality. Some drivers are unlucky. They complain about the poor quality of factory parts. Sometimes buying cheap tips will also cause them to fail quickly.
Avoiding unexpected breakdowns is quite simple - every 10-20 thousand kilometers, carry out diagnostics or at least inspect the condition of the anthers. Yes, they play a decisive role in protecting the tips themselves, so if you find breaks or other defects, replace them immediately. You won’t even notice how, after a couple of trips, large volumes of dirt and water will literally seep through the damaged boot.
It is quite difficult to check the design of the tips themselves in a garage environment, since you will have to disassemble everything. Here you can contact a specialized service station or wait for characteristic symptoms of a malfunction to appear.
Brief description of the steering device
Before starting any actions to service the machine, it’s a good idea to get to know its main components and how they work. The bulk of French brand cars are equipped with a hydraulic booster control system
.
It includes
:
- steering column;
- rod ends;
- steering knuckles with hub;
- hydraulic booster and injection lines;
- fluid pressure sensor.
For ease of assembly, each tip has a right one - I, a left one - II. The design is made according to the “gear-rack” scheme. The mechanism connection is located in a special housing and is regulated by a special plug when the product is assembled at the factory. In the future, the gap between the parts cannot be changed.
Let's start the renovation
To be able to carry out repair work, you will need an appropriate tool that allows you to dismantle the rod, its tip or boot. A lift will also greatly simplify the task.
- If an annoying play is detected in one of the tips, then we replace it according to the given algorithm and, not forgetting to check the article data.
- We remove the wheel from the corresponding side.
- We unscrew the nut that secures the ball pin of the tip in the eye of the steering knuckle.
- To release the conical part of the pin from the eyelet, we apply a lateral impact load to it (with a hammer) or, which is more civilized, use a puller.
- Lubricate the threaded part of the pin on the new tip with an appropriate lubricant, after which we screw the tip onto the rod. Tighten the locknut. To ensure a minimum error in wheel alignment, we ensure that the number of turns matches when dismantling and screwing the tip onto the rod.
- We head to the service center to monitor and adjust wheel alignment.
- During installation, we take “care” of the boot so as not to damage its rubber texture.
- The replacement algorithm is identical for both sides of the suspension.
- A failed rod should also be unconditionally replaced since it falls into the category of parts that cannot be repaired.
- Having dismantled the clamps (2 pieces), remove the boot from the rod and put it aside for a while.
- Armed with a special device that allows you to unscrew the rod, we will implement this action.
- We install a new analogue and put on the boot, securing its extreme sections with clamps.
- If it is not possible to remove the boot through the tip, we dismantle the latter. After assembling the unit, a wheel alignment is required.
- Now let's begin the process of replacing the rack, which can be done in several steps.
- First, drain the fluid from the power steering circuit.
- We disconnect the steering shaft from the seat on the rack gearbox.
- We unscrew several bolts that hold the rack assembly to the subframe. In the Renault Logan modification, 2 pcs.
- To ensure the correct angle of installation of the wheels, we first make the appropriate markings. The shaft is marked with only one mark.
- We disconnect the tips from both sides of the Renault Logan car.
- Now we take out the assembly assembly.
- We prepare a new unit and install it on the car in the reverse order of the dismantling procedure.
If the owner is faced with the need to replace the rack in a Renault Logan car, the equipment of which does not include power steering, then the technology is completely identical to the sequence of manipulations given here. The exception is that there is no need to drain the liquid.
Necessary tool
Keys and accessories:
- Rozhkovy on “16”.
- Hammer.
- Wooden beam.
- Balloon wrench.
If you have a little experience in carrying out such work, then you can replace the tips on Renault Logan yourself. To do this, you should only adhere to the rules listed below.
Let's start replacing (preparatory work)
To replace the tips, you need to put the car on supports. Then you should remove the front wheels. In this case, it is recommended to turn on the handbrake and place wheel chocks under the rear wheels to ensure the stability of the car.
Stages of work
Before repairing, all elements of the steering mounts must be sprayed with WD-40. You can also use water if liquid is not available. You should pour it over the bolts and wait a while until they are saturated with moisture. This will make it easier to unscrew the bolts.
The rod on the car has a lock nut. It must be loosened and left in this position.
The nut on the steering knuckle is loosened. The finger is kept from turning by the hexagon.
You can also use pullers to remove ball joints.
After unscrewing the nut, the finger is removed from the socket. After this, the car is reassembled in the reverse order with the new part installed.
A finger is inserted into the socket and the nut is screwed in until it stops. You can use a hydraulic jack.
When installing the steering rod, it is necessary to turn it to the number of revolutions by which it was unscrewed (to get to the wheel alignment). All elements must be carefully tightened
In this case, you should also work carefully so as not to strip the thread.
After completing this work, you should contact a specialized service station to set the wheel angle (wheel alignment).
Adviсe
It is recommended to lift the car on the side on which the part will be replaced. When carrying out work, the car must be on the parking brake. To clean dirt from the steering column, you can use a metal brush. In the event that you do not have a puller at hand to press out the finger, you can use a wooden block and a hammer
Using a hammer through the beam, you need to hit the mounting hole of the finger, freeing it. It is important to remember that the steering wheel tip on the right has a left-hand thread, and the one on the left has a right-hand thread (that’s why the part numbers are different, they are lower).
Preparatory work
Replacing a Logan steering rod requires a pit or a lift. Some of the work will have to be carried out in the area of the wheel arches. Naturally, doing this lying down will be extremely problematic. Also prepare the following tool:
- a set of keys;
- a puller for pushing the ball pin out of the steering knuckle can be found in stores under catalog number 0000130501;
- bright lighting;
- set of heads;
- hammer;
- WD-40 composition, with which you can more easily remove rusty fasteners.
For added safety, use wheel chocks. Please note that the tie rods do not have to be replaced as a pair. If the problem is observed on the unit on the right side, and the left one is completely intact, then it is enough to replace only the part on one side.
Repair technology
To replace the steering tip, no matter whether it is right or left, you should not only have a repair kit, but also a special tool, otherwise it is unlikely that you will be able to remove the rods. In addition, there must be a pit or a lifting mechanism for ease of operation.
How to change? Replacement of a worn-out part is carried out when there is play in one of the tips, meaning left and right. Before replacing, be sure to check the part numbers.
To get to the faulty element, you will have to remove the front wheel and only then will you be able to unscrew the ball mechanism nut. To disconnect the tip part, make several blows with a heavy tool (hammer) on it from below.
After this, unscrew the fixing nut and remove the entire steering tip. Before installing a new part, when purchasing which you must not forget about the article number, it is better to lubricate the threaded part with lubricant. The part is installed according to the same scheme in which the worn part was installed. Then the ball mechanism nut and the nut that controls the position of the steering rod are tightened.
Replacement is carried out according to the same scheme for both the left and right tips.
During the repair process of Renault Logan, special attention should be paid to the integrity of the boot. If it is damaged, the knocking will soon resume
- If play appears in the steering rod and a knock is heard, then this malfunction can only be eliminated by replacing the parts with new ones. The fact is that these elements cannot be repaired.
- To replace the rod, the boot is removed. But before that, you will have to remove two clamps, which are located on the inside and outside of the rod.
- After releasing the rod, remove the anthers by pulling them out and to the side. Using a special tool, the rod is dismantled and a new part is installed in its place. Assembly of the traction mechanism is carried out in the reverse order.
- How to change the boot? To replace the steering boot, you will have to disassemble the traction mechanism and the steering tip, and only after that the worn part is replaced with a functional one. After installing the working part, the traction mechanism is assembled in the reverse order. As a rule, after such actions it is necessary to adjust the wheel alignment.
- If necessary, replace the power steering rack. To replace it, you need to carry out several steps, which are described below.
- First of all, the fluid is drained from the power steering, and then the shaft is disconnected from the rack drive.
- At the next stage, the bolts are unscrewed, which secure the rack to the car subframe. Renault Logan has two similar bolts.
- To properly reassemble the mechanism, you need to take care of the markings, otherwise the angle of rotation of the steering wheel will be disrupted.
- Since the shaft moves only in one plane, it is enough to mark it with one point.
- Having disconnected the right and left steering tip itself, the part is carefully removed.
- Having prepared the working part, it is also carefully installed in place of the worn one. When purchasing a new item, do not forget about the article number.
- All assembly and adjustment steps are carried out in reverse order.
Replacing a rack without power steering is carried out in the same manner as with power steering, with the exception of the operation of draining the fluid.
Step-by-step instruction
1. Jack up and remove the wheel.
2. Turn the steering wheel out for easy replacement.
3. Clean the threaded part of the steering tip mount and spray it with penetrating lubricant.
4. Unscrew the nut securing the tip pin.
If the finger rotates when unscrewing the nut, you can hold it with a six-point hex. On top of the finger there is a hole for a hexagon.
The nut can be for sixteen or seventeen keys. The sixteen comes with the original tip, the seventeen already has a changed one.
5. Now we tear off the locknut. It goes under open-end wrenches of twenty-one or twenty-two.
We tear off the nut clockwise. I repeat, we don’t unscrew it, we just tear it off and leave it in that position.
6. Remove the tip finger from the fist. To do this, you need to use a puller for the steering tips.
If you don’t have a puller, you can use a little collective farm method. Use a hammer to hit your fist at the place where your finger is inserted. After a few hits the finger will pop out.
7. Unscrew the tip by hand. The locknut remains in place, which means the toe-in size will not change much. But this does not change the fact that after replacing the tip you need to go to the wheel alignment.
8. After removing the tie rod, check the condition of the tie rod. The steering linkage on Renault Logan should move rigidly and not fall under its own weight. Also slightly swing the rod towards yourself, if there is any play, replace it. If you notice such symptoms, be sure to change the steering linkage without delay.
9. Screw on the new steering tip by hand until it reaches the locknut.
Before screwing on the end, I recommend spraying penetrating lubricant onto the tie rod threads.
10. Remove the transport cap from the tip finger and insert it into the fist.
11. Tighten the pin mounting nut. When twisting, keep your finger from turning. A six-socket hex will most likely not be suitable for holding. The new steering end from the manufacturer Lemforder already has a hole for Torx T30.
12. While holding the tip from turning, tighten the locknut. It often happens when the locknut is tightened without holding the tip, this leads to bad consequences.
The procedure for visual inspection of tie rod ends:
- The steering rod elements are cleaned of dirt.
- The boot is inspected for damage to its integrity. If it is torn, it is replaced.
- The play is checked. One person turns the steering wheel, and the second from below watches the work of the tips. Movement along the length of the finger axis of more than 1.5-2 millimeters is a deviation from the norm.
- Deformed tip surface and obvious damage.
Timely maintenance of the car and its periodic inspection allows you to quickly detect faults and take measures to eliminate them.
We seem to have sorted out the consumables, now on to the running gear. I took up the task of replacing the tie rod ends. Although they didn’t bother me at all, I didn’t notice any play or knocking, so I decided to get it diagnosed.
With your own hand, naturally. In the absence of experience in such matters, we turn to the book for dummies).
On the left side, the free movement of the hinge was felt. Things were better on the right. I didn’t bother with the choice of tips; following the example of many, I chose Lemforder.
Everything changes easily. He took off the wheel and here he is.
First, I loosened the locknut.
Then unscrew the nut on the hinge. Everything lends itself easily, I only poured a little VD-hoy on it. You may have to hold the finger itself from turning with a Torx T-30 wrench.
Then we carefully knock out the hinge pin and unscrew the tip, while counting the number of turns so that we can then screw the new tip into the same position. But not all the way, otherwise you won’t get to the wheel alignment and the car will be torn apart) Here are the old and new tips for comparison. There are two marks on the left one.
There's one on the right.
The finger and the base of the boot are slightly different, but they fit like family. On the old ones, the hinge moved freely, you could easily move it with your finger. The new ones are very tight, dense, no play at all.
Install in reverse order. Here are the new ones.
After all the procedures, I went to the wheel alignment. Price 500 rub. Well, this is just convergence.
Well, now about the sad thing. I drove for a decent amount of time with an incomprehensible creaking noise that seemed to me to be coming from the steering column. Although at first I thought it was the same steering wheel boots that were creaking that many people were complaining about.
It didn’t bother me much, I even started to get used to it. But relying on the new tips, I hoped that the creaking would disappear, but no. I removed the steering wheel, disassembled almost completely the steering column, but all the bearings on top were completely pressed in.
I climbed up from below and immediately swept away the crosspiece, because the first thing I thought about was it, but the creaking went higher. Somehow I contrived and, using a mirror, looked deep into the steering column tube. I saw such a picture there.
I managed to take a photo as close as possible.
Inside there is some kind of plastic ring that has completely split, the pieces are not the same, so it shouldn’t be like that. In addition, some kind of shavings fell from there, only very small, more like metal dust. I poured WD-40 inside; there was no way to get oil or other lubricant into it.
The creaking completely disappeared, not a single sound. It didn't make it any easier, though. There is a leak in the steering column.
As I understand it, it is not collapsible, and can only be changed as a whole. I couldn't find anything on the Internet about this.
I would like to know what the consequences of further operation of the car in this condition are. Price tag: 2,250 ₽ Mileage: 80,000 km.
Repair of steering rack with power steering. Lada Largus
Finding and eliminating knocking in the steering rack
Lada Largus.
The steering rack is an integral part of any modern car, including Renault Logan. It is included in the design of the steering mechanism and ensures the transmission of force from the steering wheel to the steering rod of each wheel. If a malfunction is suspected and adjustment is impossible, the steering rack should be replaced as soon as possible. The procedure is not difficult and can be done with your own hands if you have a repair kit and know the repair rules.
On Renault Logan, depending on the version, steering racks of various types were installed - mechanical and hydraulic.
Cars of the first generation - phase 1 (2004, 2005, 2006, 2007, 2008, 2009) with a 1.4 engine in two offered trim levels were equipped with a mechanical steering rack, and cars with a 1.6 l engine were equipped with a hydraulic one.
Restyled models (2009, 2010, 2011, 2012, 2013, 2014, 2015) and second-generation versions (2014, 2015, 2016, 2022) in the simplest configurations are offered without power steering (hydraulic booster), which is ordered separately .
A little theory
The steering linkage performs the most important function - it transmits forces from the steering wheel directly to the wheels, and also provides different angles of inclination when cornering. As you know, the outside wheel travels a longer distance than the one that is closer to the inside of the turn. Structurally, on one side, the hub is movably mounted in the steering mechanism, and on the other, the element has a special ball joint that serves as a connecting element with the knuckle. Thus, the steering rod is an intermediate link in the system, transmitting forces further to the steering knuckles and the hub.
Naturally, malfunctions or wear of this unit will affect the control of the car. In the most critical situations, the deformation from the impact can be so great that the car will not be able to turn in one direction. Now imagine that you flew into a hole at speed, and the steering rod was in a dying state. There is an extremely high probability that the outcome of this situation will be a traffic accident. Be sure to monitor the condition of each rod and replace it if necessary.