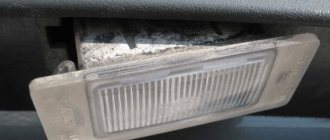
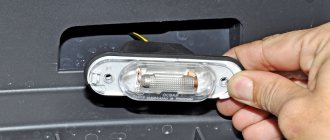
If you notice that the rear license plate light on your VAZ 2110-2112 has begun to glow dimly, then most likely the light bulb in one of the lampshades has burned out. If the lighting completely disappears, then both lamps may have failed. The location of these lampshades is clearly shown in the photo below.
Now, using a Phillips screwdriver, you need to unscrew two screws:
And moving the glass of the lampshade to the side, freeing it from the latch, you need to remove it:
And now access to the light bulb is gained and it can be easily removed and replaced.
Installation of the lamp takes place in the reverse order, after which this entire structure is assembled and put in place. Everything is quite simple and will not take you more than 5 minutes of time. The price of one such light bulb does not exceed 30 rubles, although in most cases it costs even less.
LED number plate illumination
The lamp for illuminating the license plate on the VAZ 2110 can be installed both at the front and at the rear. It is necessary so that the car is visible from afar at night. By the way, during the day these lights are almost invisible, even if they are on. But at night the car becomes very impressive and beautiful. The backlight can be of different colors. Replacing a light bulb on a VAZ 2110 with your own hands is not at all difficult.
Lamp for illuminating the license plate on a VAZ 2110 and its installation
LED license plate illumination
The lamp for license plate illumination on the VAZ 2110 can be installed both at the front and at the rear. It is necessary so that the car is visible from afar at night. By the way, during the day these lights are almost invisible, even if they are on. But at night the car becomes very impressive and beautiful. The backlight can be of different colors. Replacing a light bulb on a VAZ 2110 with your own hands is not at all difficult.
Alternative
Today, for example, LED low beam lamps cost 12 - 13 dollars each.
- first of all, LED devices last much longer than Kirzhach (twenty times);
- they consume very little energy, again - compared to halogen ones, thus also saving gasoline;
- These are not the LED lights that many people put on the dashboard, making angel eyes out of them, etc., but specially designed to replace the usual ones;
- they come with two types of base; they can be used for both low beam and PTF, since they have high “piercing” ability;
- they showed themselves especially well on the VAZ 2110, in which a regular halogen Avtosvet lamp often first blinks, then burns out, and the relay “flies” with it;
- LED lamps with a total brightness of 195 lumens will help make the low beam better. One W is equal to approximately 11 L;
- as practice shows, relays do not suffer from this, but last even longer;
- give a light angle of 320 degrees. They have adjustments just like regular ones.
Although it would seem very tempting to replace the standard ones with LED ones, many fear that there may be problems with the traffic police. Still, such lights for the VAZ 2110 have not yet been legalized.
But, judging by the reviews of motorists, LEDs make the dipped beam better, but not blinding, closer to daylight, they do not cause complaints from the traffic police.
But it’s up to you to decide what’s best for you, the main thing is that you’ve made a decision: the replacement should make the backlight better. And we will tell you how to do it according to the rules.
Rear number plate illumination
Replacing a VAZ 2110 lamp
To install the backlight on the rear license plate, you can do it in two ways:
- Or replace the standard incandescent lamps that are used for lighting with LEDs.
- Or install additional lighting.
The first option is much simpler than the second. To implement it, all you need is:
- Unscrew the lampshade.
- Replace the light bulb with an LED.
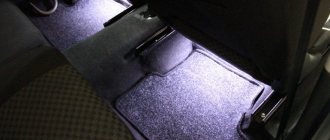
Note: The choice of LED color affects what color the backlight will be. Blue or red looks most impressive.
- For illumination, you can also use an LED strip, which law enforcement agencies do not like. And in general, because of it you can get a rather large fine.
Replace light bulbs on VAZ 2110
The second option is not implemented as easily as we would like. However, at the end there will be a beautiful backlighting of the rear license plate:
- Take a piece of plexiglass with a thickness of 3 mm.
- Build about 8 LEDs into it.
- Cover the back with foil.
- LEDs should be ground down to such an extent that they are flush with the plexiglass.
- The diodes need to be distributed in the corners and secured with sealant, due to which moisture will not get here.
Note: do not pay attention to the fact that too many wires come out during operation. In the end, there will still only be two of them left.
- Connect the wires either to the standard license plate illumination or to a separate button.
Choosing a light bulb for illumination
Replace a light bulb on a VAZ 2110
Typically, dozens of owners complain that the light bulbs used to illuminate the license plates only function for a few months. However, the reason for this is that the bulbs were selected incorrectly. When choosing light bulbs, you need to pay attention to the following details:
- They shouldn't be too bright. The fact is that due to the increased brightness, the light bulbs quickly fail, since the system may fail due to a drop in energy.
- It is also not worth using expensive light bulbs for this purpose, since the backlight will be too noticeable, because expensive light bulbs are often more powerful than cheap ones.
By the way, the reason light bulbs burn out is not always due to their poor quality. Quite often, light bulbs stop working because there is a failure in the system, as the voltage “jumps.” Therefore, you need to see if the wiring is intact, since problems can arise due to various defects present on it, check the fuses (see VAZ 2110: how to replace fuses). If necessary, it can be insulated.
Options and methods for installing LEDs for license plate lighting
Many car owners install additional lighting on their license plates. And for good reason.
Firstly, LED lighting has a long service life and low electrical energy consumption.
And secondly, such lighting is an excellent car tuning, allowing you to make it more aesthetically pleasing for little money.
It is important to know that installing additional lighting is only allowed on the rear license plate!
There are two ways to install LEDs as car license plate illumination.
The first option is to simply replace conventional light bulbs with diode elements.
The second option involves installing additional LED devices.
Of course, you can contact a service station for these services. However, this problem can be solved with your own hands, which will allow you to save a lot of money.
For tuning, diode strip is mainly used.
It can be installed in two ways:
- Fastening the tape to the car body. To do this, you need to buy a diode strip (ideally three-matrix), which can be directly connected to the on-board network. Then measure the required length of the tape and cut a piece. Solder the wires and wrap the soldering points with insulating tape to protect them from moisture. Next, you should attach the lighting elements directly to the body using clamps or glue. Now all that remains is to connect the wires, not forgetting the polarity.
- The introduction of an LED strip into the lampshade to illuminate the room. To do this, you need to prepare a piece of LED strip in the same way as described in the first option. Then you need to dismantle the lampshade and remove all the contents from it. Attach the LED strip to previously prepared pieces of plastic, or, in extreme cases, to protective glass. After installing the tape, you can connect the wires to the standard wiring, remembering to insulate all connection points. All that remains is to check the functionality of the structure and screw the lampshade into place.
The methods described are the most common in modern practice, but there is another option.
It consists of installing an additional lantern made of organic glass and foil. The wires are attached to the LED strip in the same way as in the first option. Then the tape should be attached to pre-selected plexiglass, 3-4 mm thick. The foil will act as a reflector in this design. The edges should be treated with silicone sealant and the wires should be connected directly or routed to a separate switch.
How to replace bulbs on license plate lights
Replacing a light bulb in a VAZ 2110
In order to replace the diodes, you only need a flathead screwdriver. No other tools are required. The work must be performed in the following sequence:
- First of all, you need to pry off the lampshade using a screwdriver.
- Then, with a gentle movement, disconnect the wires on the lampshade.
Note: They can come off very easily, which is not advisable. Otherwise, you will have to carry out additional manipulations. That is why you need to act as carefully as possible.
- Disconnect all contacts.
- Remove the rubber cover that serves as a protective function for the lampshade.
- Now very carefully bend the contact to the side. Without this, it will be impossible to get the lamp.
- Then you can easily remove the light bulb from the lampshade.
- Insert the new lamp in place of the old one.
- Unbend the contact so that it returns to its original position.
Note: Frequently replacing the bulb may cause this contact to break.
- Put the rubber cover back on. Without it, the lampshade will quickly crack, as it is very delicate.
- Put all contacts back.
- Connect all wires back.
- Insert the lamp into the luggage compartment lid. Snap on the left side of the lampshade so that it holds better.
- After that, you just need to check if the backlight works. If everything is done correctly, then there should be no problems with its operation. Otherwise, you should repeat the entire process from the beginning.
After replacement the indicator lights up
Many people encounter a problem when, after replacing light bulbs, the indicator lights up, as if signaling that the light bulb has burned out.
- Indeed, the light bulb has burned out. This happens when new light bulbs immediately burn out. This shouldn't be surprising. However, you should check that all the bulbs are working as they should.
- After replacing the lamp, the resistance changes. Usually it decreases. This is why the lamp monitoring relay thinks that the lamp is burnt out, although it is still functioning normally. There are two ways to solve this problem: either buy a new relay or resolder the resistors.
Note: if you have no experience with soldering, then you need to entrust this to someone else, otherwise you can only damage the relay.
Changing lamps
Remember: when working with electrical appliances, first of all we disconnect the battery. Even if we just change a light bulb in a headlight or PTF. It is better to protect yourself from discharge.
- remove the casing from the engine compartment;
- disconnect the wire block;
- remove the spring that secures the light bulb;
- rotate the holder and remove the light bulb;
- This is followed by replacing it with a new one, and putting everything back together in the reverse order. If it is halogen, you should not handle it with bare hands - it will burn much faster. Use gloves. If you do touch the flask, wipe it with alcohol.
Possible fine
It is impossible for additional lighting to be installed in front of the license plate. There is even an article that talks about this. That's right, the article indicates exactly the front number. Therefore, traffic police officers do not have the right to fine people for having a backlight installed on the rear license plate. Bulbs for room illumination can be easily installed right at home and with your own hands. Just before you do this, you need to think about everything, since there is a chance of getting a fine, the price of which can be several times higher than the price of the light bulbs themselves. If, nevertheless, it was decided that light bulbs need to be installed, then it is worth reviewing various photos and videos. If you come across instructions on a given topic along the way, you shouldn’t discard it.
Ideas for tuning and modifying the shield
As for tuning, you have several options for improving the shield:
- The easiest option is to put a new trim on top of the tidy. This method is the easiest to implement, but it will improve the external part of the tidy, because you just glue the trim on top. If the existing trim is worn out and has damage, it can be re-sheathed.
- New scales can be installed on the sensors - speedometer, tachometer, fuel and antifreeze. You can purchase such overlays either in a store or download them from the Internet. If you want the scales to be original, you can make them yourself using a graphic editor. Tuning is more complicated, since you will need to not only dismantle the device itself, but also partially disassemble it and disconnect the arrows from the indicators. Moreover, subsequently the arrows themselves must be installed correctly, otherwise the sensors may not work correctly.
- You can also install an instrument panel from a Lada Priora car in the “Ten”. In general, these devices are suitable for installation in the “Ten”, but depending on the design features of the car, it may be necessary to redo some connectors. If you decide to connect an electronic device, you may have to additionally reflash the control unit.
- One of the most effective and simple improvement options is to install LED lamps in a combination. To do this, you will need to remove the standard lighting sources and simply install LEDs instead. To make the tidy shine more brightly, you can install an LED strip instead of light bulbs, in which case it will have to be soldered to the combination. If the lamp burns out, it will be enough to replace it. In the case of tape, everything is more complicated - it will have to be desoldered and soldered again, although it usually has a long service life.
- Additionally, when installing diode light sources, instrument scales can be painted with fluorescent paint. You can also paint the controller arrows. The essence of this tuning is that by combining LED lighting with the coloring of the hands and scales, you can achieve a fairly colorful and effective result. Especially if you combine the colors correctly. For example, white and blue LED lighting combines perfectly with bright green or red instrument scales.
Wiring harness for rear license plate illumination VAZ 2110-2115
Dear customers, in order to avoid errors when sending the wiring harness of the license plate 2110-3724214 to the VAZ 2110, VAZ 2111, VAZ 2112, Lada “Ten”, Lada Samara / VAZ 2113, VAZ 2114, VAZ 2115, indicate the model of your car in the “Comment” line , year of issue.
Basically, the wiring of all cars is divided into three main parts. This is the engine wiring harness or is also called the front wiring harness.
The rear harness is the harness for the interior of the car. And the dashboard harness. Additional harnesses include door wiring harnesses and other harnesses. Depending on the current strength, wires in bundles of different sections are used. The strongest wires are at the connection between the battery and the starter and generator. The ignition system uses special high voltage wires that can withstand voltages of up to 40,000 volts.
When repairing the electrical equipment of a VAZ 2110, VAZ 2111, VAZ 2112, Lada “Ten”, Lada Samara / VAZ 2113, VAZ 2114, VAZ 2115, sometimes you have to check all the wiring. To do this, you need to imagine how it passes through the body. All wiring is mostly hidden under the sheathing and under the cladding panels.
Scheme for switching on side lights of VAZ-2110, 2111 and 2112
1 - side light lamps in the headlights, 2 - mounting block, 3 - external lighting switch, 4 - ignition switch, 5 - external lighting indicator lamp in the instrument cluster, 6 - side light lamps in the external rear lights, 7 - stop lamps - signal in the inner rear lights, 8 — license plate lights, 9 — instrument lighting switch, 10 — reverse light switch, 11 — brake light switch, 12 — on-board control system unit, 13 — reverse light lamps in the inner rear lamps, K1 - lamp health monitoring relay (contact jumpers are shown inside the relay, which should be installed in the absence of a relay), A - to power supplies, B - to instrument lighting lamps
Any VAZ 2110, VAZ 2111, VAZ 2112, Lada “Ten” (be it a sedan, hatchback or station wagon) must be equipped with illuminated rear license plates. AvtoVAZ installs two lamps on the lower side of the car trunk saber.
Sooner or later, the rear license plate lamps burn out. Some car enthusiasts decide to leave everything as is and do not change the light bulbs. This is fundamentally wrong behavior, because it has not the most pleasant consequences.
The fact is that any traffic police officer has every right to fine a person who is driving a VAZ 2110, VAZ 2111, VAZ 2112, Lada “Ten” with unlit license plates. In addition, the basis for a fine is not only the lack of license plate lighting, but also the incorrect installation of the lights.
The rear license plate light wiring harness 2110-3724214 consists of wires with terminals, blocks and rubber seals for the lights.
If the inspector cannot clearly identify the license plate of a VAZ 2110, VAZ 2111, VAZ 2112, Lada “Ten” from a distance of twenty meters from the car, then he imposes a fine for illuminating the license plate. Of course, you can convince the traffic cop that the license plate illumination malfunctioned during the trip and you simply did not notice the problem, but in most cases this does not help. It is much better to try to avoid such situations and simply monitor the serviceability of the license plate illumination of the VAZ 2110, VAZ 2111, VAZ 2112, Lada “Ten”.
On VAZ 2112 with a hatchback body and VAZ 2110 with a sedan body, the license plate lights are installed in the rear bumper niche.
On a VAZ 2111 station wagon, the license plate lights are installed under the decorative trim of the trunk door.
When installing or checking electrical connections, be sure to pay attention to the connection of the ground wire. In many cases, due to contact oxidation, one or another electrical malfunction occurs.
The entire operation of this system depends on the quality of the harness. This harness has excellent quality, increased strength and wear resistance, and is installed on the assembly line when assembling a production car.
Dear customers, if you did not find the marking of your harness in the list, then when placing an order in the “Basket” in the “Order Comments” field, you can indicate the number of the desired harness.
The easiest way is to look at the markings of the old harness and order the same one. We have all.
If this is not possible, you need to provide the following data: make, year of manufacture of the car.
Other article numbers of the product and its analogues in catalogues: 21100372421400.
Lada Samara / Lada Samara / VAZ 2113, VAZ 2114, VAZ 2115, VAZ 2110, VAZ 2111, VAZ 2112.
Any breakdown is not the end of the world, but a completely solvable problem!
How to independently replace the rear license plate light wiring harness on a car of the Ten family.
With the AvtoAzbuka online store, repair costs will be minimal.
Just COMPARE and BE SURE.
Don’t forget to share the information you find with your friends and acquaintances, as they may also need it - just click one of the social networking buttons located above
How to make light at a VAZ
Before we start looking at the various instructions for restoring lighting, one important note. The new light bulb must be removed from the packaging and installed, holding it with your fingers exclusively by the metal part. The glass bulb must not be touched, otherwise the new light will not last long!
However, if it is not possible to grasp the base, if there is no other way to insert the lighting element, then it is better to put rubber gloves on your hands before grasping the glass part.
Now let's talk about Ladas. First of all, let's see how to fix the sign lighting on a VAZ 2114. We will only need a flat-head screwdriver. Also read about replacing the windshield washer pump and replacing the rear window of a VAZ 2110.
- First of all, turn off the lighting and open the trunk. Using a screwdriver, we pull out the lampshade towards us.
- Disconnect the wiring plug.
- Having pulled out the rubber seal, we replace the lighting element.
- We collect everything on the way back.
As you can see, this is a fairly simple operation. It is much more difficult to do, for example, replacing the backlight of the VAZ 2114 stove controls - there you will have to dismantle the plastic panel.
Next, let's turn to Kalina. To change a burnt-out lamp from Kalina, we will also take a flat-head screwdriver.
- We use a screwdriver to pry the lamp off from one side, and then pry that side out.
- We also snap out the second side.
- Having taken out the lampshade, disconnect the electrical wiring from it.
- We are reinstalling the lighting element.
- We do the assembly in reverse order.
It turns out that this process also does not cause problems. Here, by the way, it would also be much more difficult to replace the extinguished light bulb of Kalina’s instrument lighting. There it is also necessary to first completely dismantle the instrument panel.
Well, let's discuss the procedure on the Priora hatchback. On a sedan, you just need to open the trunk and pull out the dome light. To replace the license plate light on a Priora hatchback, take the same screwdriver.
- By snapping off the pistons, we dismantle the fifth door trim.
- Carefully disconnect the wiring terminal.
- Turning the base 90 degrees, we take out the lighting element.
- After installing the new part, we assemble everything as it was.
Well, obviously, this operation is not much more complicated than the procedures that were given above.
How to make lights on foreign cars
Next we will figure out how the procedure under study is done on popular foreign cars. For example, let’s look at the technology for changing a light bulb in a Hyundai Solaris. For work we will need gloves. Here's what you need to do here.
- Having opened the trunk, we tear off the lid trim in the right place.
- After turning the cartridge clockwise until it stops, remove it.
- We are reinstalling the lighting element.
Although the technology is elementary, to be sure, you can also watch on the Internet any available video on replacing the license plate light bulb on a Hyundai Solaris.
Our next episode is replacing the license plate light bulb on a Nissan Qashqai. This minor repair requires that we have a flat-head screwdriver.
In this case, we do this.
- Using a screwdriver, pry it from the side and remove the light block from the rear door.
- Disconnect the wiring.
- We reinstall the consumable element.
- Let's put everything back together in reverse order.
It should be noted here that replacing light bulbs on a Ford Focus 2 is easy to do using exactly the same instructions.
And here’s how to reinstall the lighting “consumables” for Renault Logan. We only take a screwdriver. What are we doing?
- Use a screwdriver to press the lock on the side, then remove the lighting unit from the rear bumper.
- Having disconnected the plug, turn off the electrical wiring.
- Pressing the clamps, remove the diffuser.
- We are reinstalling the light bulb.
- We carry out the assembly by moving in the opposite direction.
It is clear here that the scenario is much simpler than, say, the procedure for replacing the stove light bulb in the same Renault Logan. In the latter case, you will have to dismantle the facing panel.
But the procedure for replacing the license plate light bulb on a Kia Sid is unlikely to scare any car enthusiasts. On a hatchback, you just need to press the latch on the side with a flat screwdriver, then pull the lamp out.
VAZ 2110 license plate light does not light up
Both lights on the room illuminator do not light up. All other electrical components seem to be working normally. Can you tell me where to start looking for the problem?
There can be several malfunctions: 1. Bulbs have burned out (it’s unlikely that two at once, but it’s possible) 2. Lack of voltage on the wires going to the bulbs (no positive) This happens due to a blown fuse or poor contact But since everything else works, it means it’s not a fuse And because of a break in the wire going to the lamps. 3. Absence of a minus (poor contact (for example due to shaking or rust))
15 years on the forum
Car: VAZ-21113 2000 & Opel Astra H Caravan Cosmo 1.8AT 2009
What is the fine if the license plate light does not light up?
A common malfunction of vehicle exterior lighting devices is the failure of the rear license plate illumination. There are many reasons for this:
- burnout of lamps or damage to their filaments due to vibration and shaking. The simultaneous burnout of all backlight lamps, if there are more than one of them, as on most cars, may be indirect evidence of incorrect operation of the generator - increased voltage in the on-board network. It is recommended to compare it with the normal one for a given car model. But we must take into account that the relatively high voltage in the on-board network (14.6-14.7 V), characteristic of many car brands, is not a malfunction, but significantly reduces the life of low-quality incandescent lamps, and they can often burn out;
- miscalculations in the aerodynamics of the car, leading to heavy contamination of the installation area of the license plate lights. Liquid will sooner or later begin to leak through the lampshade seals, leading to corrosion of the contacts. Such defects for many car models, for example, the VW Transporter T5, are so frequent that the structures can be transferred from the status of “childhood diseases” to “chronic”;
- The license plate backlight does not light up due to a break in the wires at the point where they are bent when the body element on which the license plate is attached, the trunk lid, the fifth door, etc., moves. As a rule, this malfunction is typical of fairly old cars with hardened wiring insulation, which is more prone to fractures. Both the power wire and the ground wire (ground) can be damaged;
- If there is a short circuit in any circuit powered by the license plate illumination through one fuse, the absolutely serviceable lamp will go out. You will have to look for a fault in this direction if all of the above reasons do not appear. On vehicles equipped with a towbar, you should pay attention to the contact group of the socket and the condition of the wiring of the trailer itself.
Fuse and relay box
The fuse and relay box is located on the left, lower part of the instrument panel. It is accessible by pressing the button and folding the lid down. To remove fuses, there are special non-conductive pliers in the upper left part of the mounting block.
1 - K5 - high beam relay . If the high beams in two headlights do not work, check this relay. If one of the high beam headlights does not work, check fuses F3 and F13, as well as the lamps and the high beam switch.
2 - K4 - low beam relay . If the low beam in both headlights does not work, check this relay. If only one low beam headlight does not work, check fuses F2 and F12, as well as the lamps themselves and the light switch.
3 - K1 - lamp health control relay.
4 - non-conductive tweezers for removing fuses.
5 - power window relay . If your power windows stop working, check this relay. It could also be in fuse F5, or in the window lift drive system itself. To get to the mechanism, you need to remove the door trim. Check the electric motor, the appearance of the gears and the absence of binding of the mechanism.
6 - K3 - turn signal and hazard warning relay . If your turn signals or hazard lights do not work, check this relay and fuse F16, as well as the turn signal lamps themselves and their switch.
7 - starter relay . If the car does not start and the starter does not turn, check this relay. It could also be a dead battery, as well as the starter mechanism itself.
8 - backup fuses.
9 - fog lamp relay . If the fog lights do not work, check this relay and fuses F4 and F14. Also check their connection diagram, the serviceability of the wiring and connectors, as well as the lamps in the headlights and the power button.
10 - K2 - windshield wiper and washer relay . If your windshield wipers or windshield washer are not working, check this relay. Also check the wiper motor, washer pump and washer fluid level in the washer reservoir.
11 - K7 - rear window heating relay . If the heating does not work and the rear window fogs up, check this relay and fuses F8 and F9. Also check the connection contacts to the terminal points of the heating elements (at the edges of the glass at the rear pillars). If everything is in order, but the heating does not work, the issue may be in the wiring (the wires are frayed or something else).
12 - K6 - add. relay, ignition relay . If your ignition does not turn on or is having problems with it, check this relay. This relay protects the ignition switch contacts from burning. Also check the ignition switch itself and the contact group.
Penalty for faulty license plate lighting
The first regulatory act to which you should refer is paragraph 2.3.1 of the Road Traffic Regulations. According to it, traveling to a repair site with a faulty license plate backlight is possible if the driver cannot fix the fault on the spot. This is not an offense, since such a malfunction is not directly indicated as a prerequisite for prohibiting operation.
However, when driving in the dark or in conditions of insufficient visibility, regardless of the reason why the license plate illumination does not light up, the absence of illumination of the state registration plate (state registration plate) clearly turns the rear license plate into “unreadable” according to the interpretation of the law. In this case, the Code of Administrative Offenses, as amended on December 29, 2015, comes into force, stating:
". Article 12.2. Driving a vehicle in violation of the rules for installing state registration plates on it
1. Driving a vehicle with unreadable, non-standard or installed state registration plates in violation of the requirements of the state standard, except for the cases provided for in Part 2 of this article, shall entail a warning or the imposition of an administrative fine in the amount of five hundred rubles. »
Thus, driving with the rear license plate illumination completely inoperative during daylight hours for a traffic police officer can only be grounds for warning the driver about this malfunction, while in the dark this is already a reason for drawing up a protocol on an administrative offense.
Important! We can talk about the license plate being unreadable only if all the license plate illumination lamps are not lit. If one of them is on, the traffic police officer does not have the right to bring the driver to administrative responsibility. The interpretation of the law also includes severe contamination of license plate lamps.
Messages 10
1 Topic by drummer04 2015-09-12 14:17:30
- drummer04
- New member
- Inactive
- From: St. Petersburg
- Registration: 2015-01-03
- Messages: 78 Thanks : 5
- Car: VAZ 2110 8 valves (2004)
Topic: Resolved: License plate lights do not light up, fuse is intact
The license plate light bulbs do not light up, I took out the old light bulbs, they were black, I replaced them with new ones, they still do not light up, I checked the fuse, it is working. So I guess there is no mass? Where to look for it?
2 Reply from drummer04 2015-09-12 15:03:06
- drummer04
- New member
- Inactive
- From: St. Petersburg
- Registration: 2015-01-03
- Messages: 78 Thanks : 5
- Car: VAZ 2110 8 valves (2004)
Re: Resolved: License plate lights do not light up, fuse is intact
and looked at fuses f1 and f10
3 Reply from Anton 2015-09-12 15:24:07
- Anton
- Local
- Inactive
- Registration: 2014-02-20
- Messages: 2,207 Thanks : 255
Re: Resolved: License plate lights do not light up, fuse is intact
if you are guilty of mass, try feeding the mass directly
4 Reply from Serg 2015-09-12 20:50:47
- Serg
- Lada2111.rf fan
- Inactive
- Registration: 2013-07-29
- Messages: 830 Thanks : 363
- Car: 2111 dwg 2114 year 2008
Re: Resolved: License plate lights do not light up, fuse is intact
Car control helps a lot, I recommend it
5 Reply from sergo9531 2015-09-12 20:58:15
- sergo9531
- Local
- Inactive
- From: Domodedovo
- Registration: 2014-01-12
- Messages: 578 Thanks : 208
- Auto: 21114
Re: Resolved: License plate lights do not light up, fuse is intact
drummer04 , there should be a plug on the right under the trunk trim, once my “dad” flew out there and the number stopped lighting up. Poke it with a tester or control, if there is +12, then the problem is in the trunk (the wire is broken or something else)
Debugg
Of the possible malfunctions listed above, the average motorist cannot eliminate all of them. It is unlikely that in the middle of the road you can replace a rotten lampshade with something. Not everyone can repair a damaged wiring harness. Therefore, we will not consider such cases in this article.
Having discovered a malfunction of the backlight, let's start by removing the lampshade. It is fastened either with self-tapping screws, or with plastic latches, or with a “screw + latch” combination. All these methods have both pros and cons - plastic latches are easy to break, but a soured self-tapping screw with rolled-up slots is by no means a gift.
Important! Do not apply much force to the plastic shade in the cold, otherwise it will inevitably crack.
On a number of cars, you can unscrew the lamp socket from the lampshade from the inside of the trunk lid, for example, on a Priora. This is often preferable to trying to press the plastic clips of the backlight from the outside, although it is less convenient.
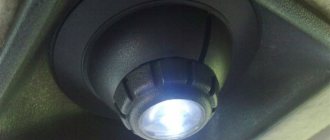
After removing the courtesy light or the backlight bulb socket, first inspect it. A dark bulb or visible damage to the lamp filament is a clear indication for replacement. As a rule, W5W (pictured below) or C5W lamps are used to illuminate the license plate. They do not take up much space in the car, and it is advisable to have them with you just in case.
Panel device
A lot of car interior lighting is located in the dashboard. The process of replacing it is one of the most difficult. To carry out work on the dashboard, you must:
Note: the full operating instructions for the VAZ 2110 car indicate the need to completely disassemble the dashboard in order to remove it. After the dashboard is disassembled, you can replace the faulty elements yourself.
- To carry out work with electrical wiring, you should be safe and disconnect the negative terminal from the battery.
- The steering column covers are decorative. They need to be separated from the dashboard.
- The car steering wheel is removed. The horn plate remains unchanged.
- The switches that are located under the steering wheel must be separated from the vehicle.
- When disconnecting them, you will need to disconnect the wires and their connection element.
- The headlight range control has a regulator (a specific position switch). It needs to be dismantled.
- The next step is to unscrew the nut, which is located under this regulator.
- The mounting block is opened.
- This opens access to the location of the fuses (they can blow out, and therefore it is necessary to check their serviceability) and the relay block. It may be enough to replace them. Here you need to unscrew the screw securing the bracket. It is located on the left side.
- The wiring block is disconnected from the ignition system. It is also necessary to unscrew the screw that secures the bracket.
- The tips, two in number, are disconnected from the brake signal switch.
- The console trim has two screws. You need to remove them from the car.
- The console bracket is released.
- The screw securing the instrument panel and air duct must be unscrewed.
Note: All wires located under the instrument panel must be disconnected. For the convenience of the upcoming assembly of these mechanisms, it is necessary to mark them, since their number is large.
- The panel wire mount is disconnected from the rest of the power supply system.
- The immobilizer sensor must be disconnected, namely its wires.
- Similar actions occur on the right side of the panel.
- The nut securing the bracket is removed.
- The wires coming from the cigarette lighter are disconnected.
- The same operation must be done with the fog lamp wires.
- The glove box has a bolt at the top. It must be removed from the connector.
- Both screws of the lower fastening of the instrument panel are unscrewed.
- The seal is removed from the front left pillar.
- Plastic holders are dismantled.
- The same technology is applied to the right pillar.
- The ventilation grilles are removed.
- There are two bolts underneath that need to be unscrewed and removed.
- The dashboard extends slightly, about 10 centimeters, into the interior.
- Once the instrument panel remains in the cabin, you need to disconnect the remaining wires near the left door pillar and next to the steering column.
Diagram and location of fuses VAZ 2110, 2111, 2112
1 — ignition module 2 — speed, air flow, heating sensors 3 — fuel relays, pump, injectors 4 — fan fuse 5 — fuel pump fuse 6 — ignition fuse
Share the link with your friends:
For this article are no comments yet. Be the first to comment.
- Diagram and location of fuses VAZ 2113, 2114, 2115
- Lada Kalina fuse box diagram
- Diagram and location of the fuse box on the Ford Focus 2
VAZ 2110 license plate backlight
21 customers chose this product
The original license plate light for VAZ 2110, 2111, 2112, 2113, 2114, 2115, Lada Granta, Chevrolet Niva, is intended to replace the failed standard one.
Weight, kg: 0.05 Dimensions, cm: 10 x 5 x 3 Volume, m3: 0.00015
Product delivery options
Note! Below are the shipping methods available specifically for this product. Payment options may vary depending on the shipping method. Detailed information can be found on the “Delivery and Payment” page.
Parcel by Russian Post
Available payment methods:
Using cards Sberbank, VTB, Post Bank, Tinkoff
Shipping throughout Russia. Delivery time is from 5 to 12 days.
Parcel by Russian Post 1st class
Available payment methods:
- Cash on delivery (payment upon receipt)
- Using cards Sberbank, VTB, Post Bank, Tinkoff
- Yandex money
- QIWI
- ROBOKASSA
Shipping throughout Russia. Delivery time is from 2 to 5 days. More expensive than regular delivery by Russian Post, approximately 50%. Parcel weight up to 2.5 kg
Express Parcel EMS
Available payment methods:
- Cash on delivery (payment upon receipt)
- Using cards Sberbank, VTB, Post Bank, Tinkoff
- Yandex money
- QIWI
- ROBOKASSA
Shipping throughout Russia. Delivery time is from 3 to 7 days. More expensive than regular delivery by Russian Post, approximately 100%.
Transport companies
Available payment methods:
- Using cards Sberbank, VTB, Post Bank, Tinkoff
- Yandex money
- QIWI
- ROBOKASSA
Delivery is possible to any locality where there is a representative office of the transport company. Delivery time is from 2 to 10 days. Sending large parcels is approximately 50% more profitable than by Russian Post.
Courier delivery in Togliatti
Available payment methods:
- Cash upon receipt
- Using cards Sberbank, VTB, Post Bank, Tinkoff
- Yandex money
- QIWI
- ROBOKASSA
Delivery time from 1 to 12 hours.