- home
- Car muffler
- …
There are really a lot of reasons why a bolt may not unscrew. In one case, this is physical damage (for example, there was a blow), in another case, it is “sticking” from high temperatures (found in hot parts of the car - muffler, manifold, catalyst), and the last is oxidation (such problems occur with parts that come into contact with water - calipers, silent blocks). Yes, and it happens that it is difficult to unscrew the wheel because the “rubber” has not been changed for a very long time, say the car was parked in the winter and there is rust, which stops the removal process. In general, we need to fight this; there are many ways, from special means to rather radical methods. Today we’ll talk about this in detail...
Personally, in my practice, I have encountered almost every one of the listed problems, but the most difficult thing is to unscrew the bolts on the muffler or manifold, because they really get stuck at high temperatures! By the way, something similar can happen with the calipers, because they heat up quite strongly during braking, and then cool down sharply (driving into a puddle). Methods can be divided into chemical and physical.
How to unscrew a hairpin: 25 effective ways and techniques
How to unscrew the pin?
Let's consider several methods, taking into account the condition of the stud and the available tool. How to unscrew a stud by its threaded part
If the stud is long enough and a threaded part for 2 or more nuts is available, then we use one of the following methods:
- screw on the nut, screw the second one all the way into the first one (it is advisable to use tall nuts), then unscrew the stud with a mechanic’s tool (wrench or other);
- use a special tool - a hairpin driver, suitable for the size of a hairpin or a universal one.
An eccentric pin driver is convenient and effective - the greater the force applied to it, the stronger it clamps the pin with the eccentric notch.
How to unscrew a stud if there is only thread available for 1 nut? In this case, at least 4 methods are available:
- cut the nut on one side with a hacksaw (the direction of the cut is along the axis of the threaded part), screw it onto the stud, clamp it with a pipe wrench so tightly that the threaded part, choosing a gap in the cut, tightly grips the stud, direct the force in the direction of unscrewing;
- screw the nut onto the thread, weld it to the stud (for example, with a semi-automatic welding machine) and unscrew it with a wrench (or a head with a knob);
- screw the nut onto the thread, drill a recess in the end of the stud (approximately half the diameter of the stud), drive a TORX socket (E-profile, or another similar one with longitudinal ribs) into this recess and unscrew it by the shank of the socket (you can use your second hand to help with this) with an open-end or socket wrench applying force to the nut in addition to the main force on the torx);
- Using a hacksaw for metal, make a cut at the end for a flat screwdriver, with which you can remove the pin.
In the screwdriver method, a large version or a power version with a T-handle is better suited for this purpose.
How to unscrew a hairpin by its smooth cylindrical part
If only the smooth part of the stud is accessible (for example, the threaded part is broken), then the following techniques are applicable;
- clamp the cylindrical part in a suitable tool (pliers, a pipe wrench, a small vice, a clamp, or the like) and apply force in the direction of unscrewing;
- weld a metal rod to the broken end by welding as a T-shaped handle;
- put on a nut of a slightly larger diameter, weld it to the stud in a circle and unscrew it with a wrench;
- use a square washer as thick as a nut or more, with an internal diameter the same size as the diameter of the cylindrical part of the stud (ideally, if the washer fits on the cylindrical part of the stud with interference), cut it on one side in the same way as the nut in the previous subsection, put it on the stud, clamp pipe wrench and unscrew;
- use a die (the one used for cutting threads), turning the end of the pin to a square of the desired size;
- use a pin driver;
- Using a hacksaw for metal, make a cut at the end for a flat screwdriver, with which you can remove the pin.
In some cases, if possible, to enhance the impact, simultaneously with applying force to a screwdriver or wrench, you can use a second tool (pipe wrench, pliers, etc.), clamping them on the smooth side surface and acting in the direction of unscrewing.
How to unscrew a broken hairpin
If the pin is broken and there is no part protruding above the surface, then you can unscrew it in the following ways:
- using a semi-automatic welding machine, gradually and carefully “build up” a couple of centimeters (if the end of the stud is within the reach of the welding wire) and then unscrew the “build up” using a clamping tool;
- use a special tool - an extractor (looks like a tap, the working part is conical, the thread direction is opposite to the thread of the stud): align the protruding end of the stud with a file (or saw off evenly with a hacksaw), tap exactly in the center, drill a hole of the required diameter along the axis of the stud and depth (approximately 2/3 of the length of the working part of the extractor), insert the extractor and rotate with force until the pin is unscrewed;
- preparation with drilling as in the previous method, only use a tap on the left thread of the stud (if the stud is in the right direction) - when the tap, cutting the thread, rests on the bottom of the drilled recess in the body of the stud, the fragment is often unscrewed;
- drill out the center of the stud, choosing the diameter in such a way as not to touch the threaded part of the socket, and then remove the remaining metal of the stud;
- Drill out the broken part of the stud and the threaded socket on a drilling machine or with a hand drill with a drill of a larger diameter for the repair stud.
Using the method of drilling a recess and driving a Torx tip into it carries the risk of strengthening the wedge in the threaded socket due to the expanding deformation of the stud walls. Taking into account possible complications, we will not recommend it in this situation, despite the fact that it can be used in a limited manner, with certain conditions.
Replacing the intake manifold gasket VAZ-2114 injector: video
Replacing the intake manifold gasket on a VAZ-2114 car, as well as replacing the exhaust manifold gasket, is a very complex procedure and requires certain knowledge and experience. Of course, you will have to do a colossal amount of work and spend a lot of time, but this will save 4-5 thousand rubles on replacement at a car service center.
Below he will talk about replacing the receiver and manifold. During the replacement process, the intake manifold gasket is also changed:
The material will tell you how to properly replace the intake manifold gasket, and will also tell you about some of the subtleties and nuances of the process.
Gasket replacement process
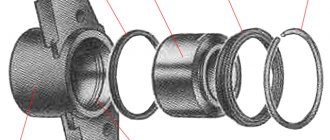
Design diagram of the intake and exhaust manifolds
Since the gasket is located on the manifold studs, to replace it the unit will have to be completely dismantled. Of course, this operation will take a lot of time and effort.
Before the car enthusiast proceeds directly to the replacement process, it is necessary to collect the tools that will be needed. So, the tools without which replacement is impossible: ratchet and sockets for 17, 19; screwdrivers with flat and Phillips tips; a set of keys and the gasket itself.
The tools are assembled, now you can go directly to performing all kinds of operations. Before removing the manifold, you need to spray the bolts with WD-40, which will remove corrosion and allow you to remove the part without any problems.
Step-by-step instructions for replacing the intake manifold gasket (with photo)
Let's look at step-by-step instructions for replacing the gasket:
- Remove the negative terminal from the battery.
- We remove the throttle cable.
- We are dismantling the fuel pipes. More precisely, they need to be disconnected and taken to the side. Remove the fuel pipes shown in the photo
- Disconnect the throttle position sensor connector.
- Disconnect the idle air control wire connector.
- Unscrew the crankcase ventilation pipes and brake booster. Unscrew the pipes shown in the photo
- We are dismantling the receiver.
- Remove the wires of the injection control unit (injectors).
- We dismantle the fuel rail without dismantling the injectors.
- Remove the thermal shield from the manifold.
- Disconnect the exhaust pipe. This is the quality of nuts installed at the factory. We dismantle the exhaust pipe.
- Remove the exhaust manifold. Unscrew the fastening nuts and remove the exhaust manifold Removing the exhaust manifold
- After unscrewing the fastening nuts, remove the intake manifold. Removing the intake manifold
- We are replacing the gasket. We are replacing the gasket
- We carry out the assembly in the reverse order.
As you can see, the replacement of the intake and exhaust manifold gaskets takes place simultaneously and, by and large, is the same gasket material.
Part selection
21083-1008081 – original catalog number of the gasket for the intake and exhaust manifold. It consists of two parts or, on newer models, one. This part is produced at the AvtoVAZ plant. The average cost is 250 rubles per piece (if there are two of them) or 450 rubles (for a whole one).
One-piece manifold gasket A gasket that consists of two parts A one-piece gasket and one that consists of two parts together
In addition to the fact that there is an original part, you can also find a number of analogues that are recommended for installation. Let's consider which gaskets can be installed under the VAZ-2114 manifolds:
- Trialli GZ 102 0013 is a well-known Russian manufacturer that produces a wide range of analog parts for domestically produced cars. The cost of the gasket is 200 rubles per piece.
- AJUSA 13065200 is another domestic manufacturer that has won consumers over the quality of its products. The cost of the product is 450 rubles.
- Ukrainian also produces and supplies this gasket. But, if you look at it, the quality of the product leaves much to be desired, since the resource is designed for only 20,000 km.
Causes of malfunction
After we have considered the process of replacing and selecting a part, it is necessary to consider the main reasons for the failure of the spare part:
Wear
During operation, the car emits hot gases that destroy the surface of the gasket, as a result of which it can tear or delaminate. Since there is only one gasket for the intake and exhaust manifolds, gasoline entering through the first channel can get on the gasket, which also affects the integrity and structure of the material from which it is made.
The quality of the part is not always high, even original, so when choosing, you should pay special attention to this. Bent valves due to irregular valve timing do not threaten the 8-valve valve
WD-40 and other penetrating agents
It’s really a very effective thing, I recommend it to everyone. Especially if your bolts or nuts are not subject to temperature stress, and water has entered the threads. This is a very good penetrating substance, just treat the area and wait half an hour. A bolt or nut will yield in 80% of cases.
The disadvantages of this method include the price of the final drug, which is quite high. Although there are now a lot of different analogues, they do not completely repeat the final formula. By the way, you can make a pretty good analogue of WD-40 with your own hands , according to my recipe. Watch a short video, it's useful.
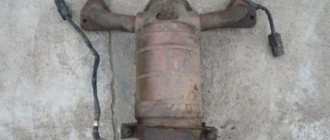
Removing and installing the exhaust manifold on LADA
When servicing the vehicle, it may be necessary to remove the muffler exhaust pipe with the neutralizer assembly (exhaust manifold or catalytic converter). The process of replacing this element of the exhaust system with your own hands is not difficult, but it has a number of features that it is better to know about in advance.
The following instructions use the example of Lada Vesta and Lada XRAY cars. On other modern LADA cars (Largus, Priora, Granta, Kalina, Lada 4×4) all actions are performed similarly. You will find examples of work on other LADA models under the spoiler at the end of the article.
Required
: remove the engine mudguard (for Lada Vesta, for Lada XRAY), raise the car to a height convenient for work. Prepare the tool (flat screwdriver, wrench “10”, interchangeable head “10” and “13”, extension cord and ratchet wrench).
- Disconnect the connectors with the sensor wires (Fig. 8-1, No. 12 and 13) from the brackets on the power unit and from the ignition system wiring harness connectors.
- Unscrew the three nuts (Fig. 8-2, No. 3) of the studs securing the additional muffler (No. 2) to the exhaust pipe with the neutralizer assembly (No. 5). To do this, you must first unlock the washers (No. 1).
- Remove the heat-protective screen of the exhaust pipe of the muffler with the neutralizer assembly. To do this, unscrew the bolt (Fig. 8-3, No. 1), two bolts (No. 2), two bolts (Fig. 8-4, No. 1) with washers.
- Unscrew the M8 nut securing the bracket for the water pump supply pipe, remove the washer.
- Loosen the nut securing the muffler exhaust pipe to the mounting stud of the water pump supply pipe bracket.
- Remove the exhaust pipe of the muffler with the neutralizer assembly. To do this, unscrew the seven nuts (Fig. 8-1, No. 14) and remove the washers (No. 5).
- Remove the gas pipeline gasket (Fig. 8-1, No. 2) and the muffler flange gasket (No. 9).
- Unscrew the oxygen concentration sensors (Fig. 8-1, No. 12 and 13) from the exhaust pipe of the muffler with the neutralizer assembly (No. 1).
- Disconnect the oxygen concentration sensor harness connectors (Fig. 8-1, No. 12 and 13) from the brackets on the power unit and from the ignition system wiring harness connectors.
- Use new nuts for the studs securing the exhaust pipe to the cylinder head (Fig. 8-1, No. 14). The tightening torque of the nuts is 21...25 N.m (2.1...2.5 kgf.m).
- Use a new gas pipeline gasket (Fig. 8-1, No. 2).
- The tightening torque of the sensors is 40...60 N.m (4.0...6.0 kgf.m).
- The tightening torque of the M8 nut is 21...25 N.m (2.1...2.5 kgf.m).
- The tightening torque of the bolts securing the thermal protective screen of the exhaust pipe of the M6 muffler is 7...9 N.m (0.7...0.9 kgf.m); M8 – 18…24 N.m (1.8…2.4 kgf.m).
- The tightening torque of the three nuts securing the additional muffler to the exhaust pipe (Fig. 8-2, No. 3) is 21…25 N.m (2.1…2.5 kgf.m).
You will find other repair instructions in the collection of technological instructions (see TI for Lada Vesta and TI for Lada XRAY).
Source
Acids
This is also an effective method, however, it is not as safe. For example, if a bolt or nut is located next to rubber products, it is better not to use it, because the acid can destroy soft materials.
Usually high concentrations of sulfuric acid are used; if the bolt is simply oxidized and not stuck, then just drop it on the thread - the oxides will come off and after a few hours everything will unscrew perfectly. If you need to unscrew a “difficult case,” then a plasticine rim is made around the cap and a few drops of acid are added there, to enhance the effect, a piece of zinc is also placed (a galvanic couple is created). After 12 - 24 hours, almost any bolt, even a stuck one, can be unscrewed. However, it is not always possible to make such a side from plasticine.
Replacing the intake manifold on a Prior
Welcome! Intake manifold - someone calls this part an intake manifold and someone calls it a receiver, but if you read the terminology of these two words, these are completely different things, for example, a receiver is needed only to smooth out the pulsations of air that goes into the cylinders of a car engine, but the manifold is already needed in order to distribute this air to the necessary cylinders and the fuel-air mixture is also mixed in it, so these are two different things, but since people call them with the same words, you can assume that they are one and the same thing yes and besides, the can itself at the intake manifold can essentially be called a receiver, since it contains only air and has a fairly large volume, and if you remember the terminology, it says, the receiver is the thing in which the smoothing of air pulsations occurs (The car is moving in this case, more smoothly) and it has a size 50-70% larger than the car’s cylinders, so the receiver and intake manifold can be considered a single whole, but this no longer applies to carburetor cars.
Note! To replace the intake manifold on a car, you will need to stock up on: A set of wrenches and to all this, a socket wrench of size “8” will also come in handy; in addition to this wrench, you will also need various kinds of screwdrivers, wire cutters, or instead of them, you can also stock up on a knife (Knife By the way, it will even be more comfortable)!
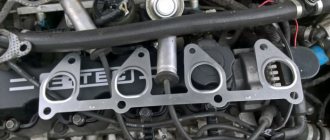
Where is the intake manifold located? In all sixteen valve engines, even though this is even a sixteen valve engine that was installed on cars of the tenth family (It’s just that the 16 valve engine of the VAZ 2110 car is slightly different from the Priorov’s), the intake manifold is in the same place and they have an absolutely identical shape and design made of plastic, so for clarity, the collector in the photo is indicated by an arrow, but the car as you see is a VAZ 2110, but on the Priors it will be visually the same.
Note! To fully see the collector, you will also have to remove the engine screen, the screen is a thing that reduces the noise from the engine a little and covers it from dirt getting on it. When carrying out a lot of work, you will have to remove this screen because it covers almost the entire part of the engine and itself Moreover, you will not see the collector without removing the screen from the car; for more details on how to remove this screen, read the article: “Replacing the engine screen on cars”!
When should you replace the intake manifold? Since the collector on Priors is made of plastic, it is not so difficult to bend it or pierce it with anything, dropping it, for example, on a sharp stone from a height, besides this, the collector is no longer necessary to be replaced in any case (with the exception of replacing it with some be it sports), but the manifold also needs to be removed in the following cases, firstly, when carrying out any work due to which the manifold interferes, and secondly, the manifold has its own gaskets (the intake manifold has only five of them, one of them is located between throttle valve and manifold, and the other four at the end of the pipe are installed, how to replace them as you read the article, you will find out) when they wear out, the air begins to come out, and if the air is simply released (that is, comes out), then the car will drive worse and its consumption will increase , since you will have to press your foot harder on the gas pedal.
Heat
Heating is very effective in such difficult areas as, say, a manifold, muffler or catalyst . The bolts really stick there due to high temperatures. You won't be able to unscrew them with WD-40, and it's difficult to use acid under the car. Therefore, here you need to act using the “wedge-wedge” method. That is, if it’s stuck due to heating, then you need to unscrew it through it.
If the mount is small, then it can be heated with a regular soldering iron and held for about 10 - 15 minutes. However, if the case is severe, this will not help. An open flame burner works great here - special cans are sold. The bolt heats up almost to a red color, the metal expands (the “sticking” effect is weakened), now it needs to be cooled sharply (preferably with a penetrating compound like WD-40), it turns out like a mini blow, you can safely unscrew it.
Replacing the ramp on a VAZ 2110
The ramp is always removed together with the fuel pressure regulator:
- Disconnect the vacuum hose from the regulator.
- When unscrewing the fitting on the fuel supply pipe, use an open-end wrench size 17.
- Remove the ramp voltage connector.
- Also unscrew the screw securing the gasoline supply pipes and then disconnect it.
- Then, using a hexagon, unscrew several screws from the ramp mounting.
- The ramp is removed along the direction axis of the nozzle and removed from its usual place.
- Then the substitute is removed, you need to unscrew the fastening on the left side of the intake manifold and slightly loosen the lower bolt.
- Remove the bracket itself.
- Now you should remove the right bracket in the same way.
- Unscrew several eye nuts from the stud.
Electric heating
An open fire is of course good, but again there is a chance of burning something! Therefore, it is better to use electric heating; here we are not talking about a “soldering iron”; rather, this is the principle of a welding machine, but with low voltage.
We take a transformer from a microwave, wind a thick copper cable onto the secondary winding - this gives us a voltage of 1.5 Volts, but the current is simply off scale. Two probes, preferably made of thick sheets of copper, are attached to the ends of this wire and sharpened. These two feeler gauges need to be installed at the beginning and end of the bolt (or nut and bolt). Thus, a strong heating will occur, then everything is as with an open source of fire, cool with a penetrating agent and unscrew it. Let's watch a useful video of this method.
What is strictly forbidden to do (use of force)?
The main mistake of many beginners is a thoughtless approach to twisting and the use of “force” methods.
Remember, in order to unscrew a stuck element, it is important to be patient and not rush. Solving the problem requires a consistent and measured approach
Haste in resolving an issue can cause many problems.
Thus, car owners often rush to unscrew a rusty bolt and tear off its upper part.
The result is drilling out the broken product, which will take a lot more time.
In addition, the result of haste may be damage to nearby nodes with the key, which will lead to the need for additional investments.
Before starting work, draw up an action plan, and then begin to implement it.
If you work in a hurry, the total cost of time and money may be higher. Moreover, there are enough methods to quickly unscrew a rusted nut or bolt. We will talk about them below.
Physical methods
Actually, there are only two of them, but be careful, you can break the edges and make it even worse, so:
- Tapping - we take an ordinary hammer and simply tap the nut or bolt (not too hard, so as not to dent it), often this is enough, oxides, rust or even “sticking” comes off and the connection can give way. If this does not happen, try to concentrate the blow, take an “impact screwdriver” and direct the force on the nut or bolt head. THERE IS NO NEED TO HIT THE THREAD, IF YOU BRING IT, IT WILL BE EVEN WORSE, then just cut it off.
- Lever or shoulder. Often it is not possible to unscrew it with a key; there is simply not enough lever force. It is enough to lengthen the handle, take a longer “knob” or put a metal pipe on the key, the connection can unscrew. However, be careful, the edges can be torn off!
Gasket replacement process
Design diagram of the intake and exhaust manifolds
Since the gasket is located on the manifold studs, to replace it the unit will have to be completely dismantled. Of course, this operation will take a lot of time and effort.
Before the car enthusiast proceeds directly to the replacement process, it is necessary to collect the tools that will be needed. So, the tools without which replacement is impossible: ratchet and sockets for 17, 19; screwdrivers with flat and Phillips tips; a set of keys and the gasket itself.
The tools are assembled, now you can go directly to performing all kinds of operations. Before removing the manifold, you need to spray the bolts with WD-40, which will remove corrosion and allow you to remove the part without any problems.
Step-by-step instructions for replacing the intake manifold gasket (with photo)
Let's look at step-by-step instructions for replacing the gasket:
- Remove the negative terminal from the battery.
- We remove the throttle cable.
- We are dismantling the fuel pipes. More precisely, they need to be disconnected and taken to the side.
- Disconnect the throttle position sensor connector.
- Disconnect the idle air control wire connector.
- Unscrew the crankcase ventilation pipes and brake booster.
- We are dismantling the receiver.
- Remove the wires of the injection control unit (injectors).
- We dismantle the fuel rail without dismantling the injectors.
- Remove the thermal shield from the manifold.
- Disconnect the exhaust pipe.
- Remove the exhaust manifold.
- After unscrewing the fastening nuts, remove the intake manifold.
- We are replacing the gasket.
- We carry out the assembly in the reverse order.
As you can see, the replacement of the intake and exhaust manifold gaskets takes place simultaneously and, by and large, is the same gasket material.
Part selection
21083-1008081 – original catalog number of the gasket for the intake and exhaust manifold. It consists of two parts or, on newer models, one. This part is produced at the AvtoVAZ plant. The average cost is 250 rubles per piece (if there are two of them) or 450 rubles (for a whole one).
In addition to the fact that there is an original part, you can also find a number of analogues that are recommended for installation. Let's consider which gaskets can be installed under the VAZ-2114 manifolds:
- Trialli GZ 102 0013 is a well-known Russian manufacturer that produces a wide range of analog parts for domestically produced cars. The cost of the gasket is 200 rubles per piece.
- AJUSA 13065200 is another domestic manufacturer that has won consumers over the quality of its products. The cost of the product is 450 rubles.
- Ukrainian also produces and supplies this gasket. But, if you look at it, the quality of the product leaves much to be desired, since the resource is designed for only 20,000 km.
Causes of malfunction
After we have considered the process of replacing and selecting a part, it is necessary to consider the main reasons for the failure of the spare part:
Wear
During operation, the car emits hot gases that destroy the surface of the gasket, as a result of which it can tear or delaminate. Since there is only one gasket for the intake and exhaust manifolds, gasoline entering through the first channel can get on the gasket, which also affects the integrity and structure of the material from which it is made.
The quality of the part is not always high, even original, so when choosing, you should pay special attention to this
Grinder or cut
Perhaps the very last thing, if all else fails, and even if the edges are torn off, then the only thing to do is “cut”! This is usually done with a grinder; you can use a hacksaw if you can’t get to it with a grinder (or it’s dangerous). There’s really nothing to comment on here, we cut it off, remove the remains, and install a new bolt (nut).
I’ll finish here, I would like to note that in 80% of cases WD-40 (or the analogue that I showed you) helps. In other cases (catalyst, manifold, catalytic converter), heating helps. Tested – 100%!
Read our AUTOBLOG, subscribe to updates, it will be interesting.
(
8 votes, average: 4.75 out of 5)
Similar news
Removing the catalyst. Pros and cons, consumption, firmware - revealed.
Water in the muffler. Reasons, how to get rid of it and whether it can be drilled
Catalyst service life. When should it be changed?
Add a comment Cancel reply
The weak link of the system and signs of its failure
Symptoms that the exhaust manifold gasket has burnt out can be identified as follows: exhaust gases begin to flow into the car interior or you can smell them; the car engine begins to start poorly; Strange sounds appear in the engine compartment. If these ailments are detected, you should begin to inspect the exhaust system. The collector itself is made of high-strength austenitic steel.
In this regard, burnout and replacement of the collector is quite rare. The main reason for the breakdown of the collector itself is drops of water falling on its hot surface, which leads to the formation of cracks in it.
The weak link of this durable and reliable element is the gaskets. Wear of the manifold gasket occurs mainly due to: poor quality of the material or very long operation under increased loads.
Cases when it is difficult to unscrew a bolt
Threaded connections have the unpleasant property of losing their mobility over time. To avoid this, the fasteners to be connected are made of different metals, for example, steel and brass. Or the mating pair is made of stainless steel. But that rarely happens.
Basically, steel fasteners are used in mechanisms, units and metal structures. If it is in a humid environment, then over time corrosion processes begin, significantly complicating dismantling when the need arises. There may be several reasons why hardware (metal products) do not want to unscrew.
Edges torn off
During assembly, each fastener must be tightened with a certain force - sufficient to ensure the strength of the connection. By applying excessive force, you can break the threads of small-sized products - from M3 to M12.
This is no longer a problem for larger fasteners, so many men tighten the bolts and nuts with maximum force. This is bad for any hardware. When the time comes to disassemble the connection, parts damaged during assembly can greatly complicate the task: a screw or screw with a twisted spline, a bolt or nut with torn edges.
Most often, a hexagon turns an open-end wrench, which has only two working planes. Therefore, if possible, you should always use a spanner, socket or special tool.
But if the edges have already been “licked”, they do not always help. The tool rotates, but the fasteners remain in place.
Rusted nut
Corrosion processes always lead to the appearance of rust, which tends to swell and increase in size. As a result, the thread jams. Unscrewing a rusty nut becomes problematic. Auto mechanics, mechanics, and craftsmen working at home face this problem.
In addition, the nut can rust not only in the thread area, but also in the area where it contacts the product. Sometimes even the puck doesn't help. The connection becomes monolithic over time. It takes a lot of work to take it apart.
The bolt has become stuck over time
There is often a situation where fasteners on mechanisms last for years before disassembly. During this time, it manages to stick so strongly to the body of the structure that the strength of the connection can be compared with a welded one. The most difficult to unscrew in these situations are the hardware that is exposed to heat.
Car enthusiasts and car service mechanics know how difficult it is to unscrew the exhaust tract fasteners on a muffler or resonator. Sometimes any means of moving a stuck bolt are powerless. All that remains is to destroy the connection using one of the mechanical methods.
Prevention of the problem
If the bolts rust and cause a lot of inconvenience when unscrewing, you should put an end to this problem. Professionals advise:
- Be sure to coat all fastening points of parts with special silicone grease before tightening them. Thanks to this, metal fasteners are protected from corrosion for a long time.
- It is advisable to carry out preventive inspections of car parts or plumbing from time to time. You should not start the process if you notice slight rust on one of the fasteners. It is always easier to replace fasteners and parts at the initial stage of corrosion than to fight rust when it has completely corroded the metal.
- Fasteners should be tightened in accordance with the tightening degree of similar threaded connections.
If you use high-quality fasteners, their service life will be long.
If, having previously selected the necessary tools, you use one or several of the methods listed, then the rusted bolt will definitely give in. But it is better not to reach extreme situations and carry out periodic technical inspections.
Previous entry Fasteners used when installing and assembling a toilet Next entry Fastenings for navigators in a car
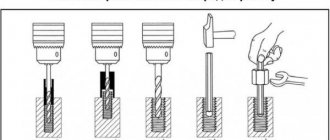
Unscrew the broken bolt
In order to remove the broken bolt with an extractor, you will need to use a drill. You also need to take drills, dies for taps, and a strong core. In the broken “culprit” it is necessary to make a hole, the diameter of which should not exceed the diameter of the thread of the broken bolt.
The extractor has a reverse thread.
An extractor is screwed into the hole. When you screw the extractor, or rather its reverse thread, into the broken bolt, you remove it along with the latter.
If the bolt breaks off and it is possible to reach it, then you need to restore the geometry of what is left of it. Use a file or coarse sandpaper. Then you need to carefully paint the surface. Otherwise, the drill will always walk along the rest of the bolt and it will not be possible to make a hole strictly in the center. It is also necessary to maintain alignment. The hole should be drilled as close to the center of the bolt as possible.
It is necessary to start drilling with a small diameter drill and clearly position the hole in the center. The centered hole can be expanded very easily. The diameter of the extractor must be taken 1 mm larger than the diameter of the hole
It is important not to drill through the hole so that the extractor has something to grab onto.
The extractor must be screwed into the recess of the bolt surface. Then the extractor must be installed in the recess and struck with a hammer, trying to hammer into the hole like a nail. After this, it should remain in the recess.
It is necessary to clamp its head with a die and rotate it in the direction of unscrewing the bolt itself. You need to rotate the die slowly and as carefully as possible. By crashing into the bolt, the extractor tightens it as much as possible and transfers its torque to the broken “culprit”. In turn, the torque will unscrew the broken bolt.
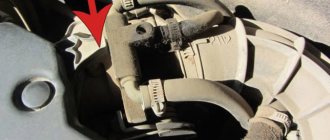
How to unscrew a stuck nut on a wheel
Before starting this difficult work, you need to prepare:
- 6-sided spanner,
- hammer,
- chisel,
- liquid for dissolving rust (WD-40, kerosene, diesel fuel, hydrogen peroxide and others).
You can unscrew the nut only if you damage the joint (sticking) of both parts with rust. The “blurred” rust will allow the cutting to be affected and the nut will turn. Let's look at several ways to unscrew a nut without cutting:
You can unscrew the nut only if you damage the joint (sticking) of both parts with rust
Method 1 - moisten the fasteners with WD-40 or any other preparation that has a high property of fluidity and dissolution of the formed oxide. After waiting 20 minutes for the liquid to “work”, tap with a hammer along the entire perimeter of the nut. Using a hexagon, start unscrewing it back and forth. Method 2 - try tightening the wetted nut first
In this case, the softened layers of rust will crumble, carefully swing the nut in a back-and-forth motion and begin to unscrew. Method 3 - if the nut does not give way, you can try the tapping method, in which the resulting homogeneous layer of rust is destroyed. Using a hammer, apply sharp but gentle blows to the side edges of the nut, being careful not to bend the bolt.
Repeat the process several times. Make sure the fasteners are loose. After the next wetting with the preparation, the nut can be safely unscrewed.
Method 4 - if the previous manipulations did not bring the expected result, you will have to destroy the stubborn knot: the nut can be cut to the ground. To do this, in the direction of unscrewing the nut, apply strong blows with a hammer to a chisel placed at an angle to the side edge of the nut; if the nut is accessible, you can saw it along the axis with a hacksaw or grinder; if sawing is impossible (there is not enough room for access), try drilling out the nut, using a drill, if it is impossible to work with a drill, then use a well-sharpened chisel to cut grooves up to 1 mm deep on the edges of the nut. Gradually go deeper into the body of the nut along the grooves. A deformed nut can be easily unscrewed, but you will have to use a new one during the restoration process.
Method 5 - There is another very unpopular method, since careless handling can damage the paintwork of the car. It is known that metals expand when heated and can “drop” their oxide
This work must be done carefully and quickly, so as not to heat the bolt or the entire connection, but only the nut. For heating, you can use available means - from a match to a blowtorch and boiling water. You can apply this method to the entire threaded connection. To do this, you need to heat the threaded connection several times to +230C and cool it. A change in temperature will contribute to the destruction of oxide in the threads. Lubricate with any penetrating lubricant (kerosene, diesel fuel, etc.). Unscrew the nut.
How to unscrew a stuck bolt
Car repairs are often made more difficult due to corrosion and oxidation of fasteners. For example, during assembly at the factory, the master did not treat the threads with lubricants, and during operation water got in there. As a result, the bolt seemed to be stuck tightly, but such a nuisance can be dealt with in several ways.
Unscrew a rusty bolt or nut by tapping
When you tap, rust and scale come off the bolt, making it easier to unscrew. The operation is carried out with a hammer, turning with a special tool to create torque.
Be careful, as you can damage the product and have to drill it out. After removing the fastener, it is cleaned of rust and treated with graphite lubricant
If available, place a boot on the connection.
Using solvents
In the arsenal of any experienced car enthusiast there is always a set of liquids to combat rust and other deposits. They mainly use WD-40 with good penetrating ability into micro-gaps, the cost of which starts from 100 rubles. Along with it, brake fluid, white spirit, kerosene, and Coca-Cola are used. Unlike WD-40, other liquids have a weaker effect, and it is better to pour them into a container and place the stuck compound in it for greater effect.
If the bolt is stuck on the front pillar, the solvent can be carefully poured into the “glass”. The main thing is not to damage the rubber bands on the racks, otherwise you will have to change them.
Moisten a rag with any product, wrap it around the nut and leave it for a while. Then they tap the bolt to destroy the softened rust and begin to unscrew it.
Thermal method
When the solvent does not cope with the task, you can try exposure to fire and cold. Any large auto or hardware store sells a gas torch; it is used to heat the bolt until it turns bright orange. Then they cool it with machine oil and try to weaken it. If the attempt fails, the process is repeated again.
This method does not always help, and if it is close to the paintwork or fuel tank it is very dangerous. When working with a gas burner, you must follow fire safety rules and do not use it if you do not have a fire extinguisher at hand.
Use freezing sprays to preserve the bolt for later use. But such reagents are used mainly by professionals, since in domestic conditions this is a costly and unprofitable matter.