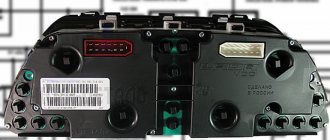
1) On the back of the dashboard, unscrew the 4 screws (asterisk). 2) Remove the glass from the instrument panel.
3) Place molar tape on the pad and mark the position of the arrows with marks. All instrument panels are calibrated, this procedure will help us accurately set the position of the needles during assembly.
4) Remove the arrows. The arrows must be pulled perpendicularly upward, while simultaneously scrolling them against the direction of travel.5) Remove the standard lens
6) Remove the metal screen holder. On the back of the instrument panel, we unsnap the metal latches of the screen.
We separate the white plastic from the green base and get the following.
9) In order for our scale to glow with the color we need, it is necessary to erase the green filter from it; this is done using cotton swabs, solvent or alcohol (do not use acetone). If desired, the red divisions can be left. After this procedure we get a clean pad.
10) A similar procedure must be done with the screen diffuser.
11) It is necessary to enlarge (drill out) the holes in the plastic light diffuser and paint their inner edges black (a black marker is suitable for this), this is necessary in order to install wells for illuminating the arrows. The light of the arrows will thus not illuminate the main scale.
Wells are made from any plastic tube (syringe), adjusted in diameter as shown in the photo, or thick paper folded in several layers and wrapped in black tape.
13) We begin to install the boards themselves, to do this we solder the wires according to the following diagram: a) In the version without soft ignition, you need to solder 2 wires: GND from the backlight board to 19 (ground) contact of the instrument panel, IG from the backlight board to 18 (light control ) instrument panel contact.
b) In the version with soft ignition, it is necessary to solder 3 wires: GND from the backlight board to 19 (ground) contact of the instrument panel, IG from the backlight board to 21 (ignition) contact of the instrument panel and ILL from the backlight board to 7 (dimensions) contact of the instrument panel .
IMPORTANT: When soldering wires, DO NOT use soldering acid or other active fluxes! I recommend using rosin, SKF, LTI-120. After work, soldering areas must be washed with alcohol or solvent 646
If you installed a version without soft ignition, then there is always the opportunity to modify the board by installing a soft ignition unit on it.
When the negative wire is connected to the -CH1 pad, the screen will light up simultaneously with the arrows; when the negative wire is connected to the -CH2 pad, the screen will light up along with the scales (applies to boards with a soft ignition unit installed).
What kind of lighting do you prefer?
Built-in Chandelier
On the reverse side we glue the adjustment buttons of the smooth ignition unit onto double-sided tape.
14) We install our wells, fixing them if necessary with a drop of glue, and install the standard light diffuser in place.
Expert opinion
It-Technology, Electrical power and electronics specialist
Ask questions to the “Specialist for modernization of energy generation systems”
LED illumination of Kalina panel | Car Hobby Some craftsmen make the needle illuminated in such a way that it can change color depending on changes in the speedometer readings. Ask, I'm in touch!
Preparing to replace lamps
Replacing light bulbs in the dashboard of a Lada Kalina is a simple process, so even a driver without experience can cope with such an undertaking. The most difficult thing in this work is to get to the lighting fixtures; this event is carried out not only to replace failed light bulbs, but also if the car owner wants to replace a regular lamp with LED ones.
We recommend: How to check the compression in a car engine with your own hands?
First of all, you should go through the preparatory process, the essence of which is to remove the car panel. After the torpedo is removed, you will need to prepare the following tools:
It is best to change light bulbs in a garage that will be well lit.
- After which you can start replacing the burnt-out backlight bulbs; they are located on the back side and can be removed quite easily even by hand, but if problems arise during removal, you can use pliers. Install new light bulbs in reverse order.
The main difficulty lies not so much in replacing the lamps itself, but in dismantling the center console itself, since on Kalina it is not very convenient to remove, but if you don’t have any nerves, then you won’t waste much time.
High beam - Type of lamps used - AKG12-55-2 (H1), 55w
Turn signal lamp - A12-21-4 (PY21W), 21w Side and fog lamp - P21/4W, 21w,4w
Interior lamp - AC12-10-1(C10W), 10w (41 mm)
Glove box light bulb-AS12-5-1(C5W), 5w Length 36 mm
Instrument cluster illumination lamp with socket, cigarette lighter, backlight - A12-1.2 (W1.2W), 1w, 2w
I plan to finish this post, so if you have something to share, write in the comments. It’s also interesting who tried to install LEDs instead of incandescent lamps where.
Hello, what kind of light bulbs are used in the dashboard of the Lada Kalina?
Expert opinion
It-Technology, Electrical power and electronics specialist
Ask questions to the “Specialist for modernization of energy generation systems”
Dashboard lighting with LEDs. Subject At the moment, there are a variety of products on the lighting market that can be used to illuminate any brand of car. Ask, I'm in touch!
Installing a sports steering wheel and sports seats
The appearance of the Lada Kalina car can be changed by tuning the Lada Kalina interior.
It's definitely worth installing a sports steering wheel. It will increase the ease of driving and improve the appearance of the interior. Next, when tuning the interior of the Lada Kalina, you should install new seats or upholster the old ones.
The sports seats look impressive. They have a fixed fit, which will be beneficial for the spine. But a comfortable seat for the driver helps better concentration, as well as health.
Tidying up the “second Kalina” and multi-color lighting, video
For those who have experience working with plastic, the following tuning option is recommended.
In the instrument panel, under any of the two scales, you can cut out a window in which a standard indicator is fixed. We are talking about a digital indicator consisting of two or three separate segments.
The plane of the tidy is cut through, an indicator is attached to the window
When the modification is completed, the dashboard looks like this:
If there are glares, use a simple solution: cover the inside of the glass with a matte tint film. Good luck.
Expert opinion
It-Technology, Electrical power and electronics specialist
Ask questions to the “Specialist for modernization of energy generation systems”
Constant illumination of the dashboard Kalina 2 | Tricks of Life In general, this is a CP from the norm until firmware 076, then they changed the wiring a little, and I cannot say that nothing has changed in this place. Ask, I'm in touch!
Economical tuning option - interior trim
A more economical option for tuning the interior of the Lada Kalina will be interior trim. For this, various materials are used, such as tweed, velor, leather. Leather is the most durable and durable material, however, it is also the most expensive. It is important to choose the right color; usually it matches the color of the car body.
Proper, contrasting lighting will improve both the appearance and provide better visibility. Old lamps are replaced with LED or neon ones. You can also equip new lighting, for example, in the glove compartment.
Rework by replacement
This option seems obvious: the speedometer and tachometer can be left in place, and the computer display can be replaced. In reality, such a replacement is difficult to perform. The on-board computer in Kalina-2 is integrated into the tidy circuit, so you cannot get rid of it. The instrument cluster unit is usually replaced as an assembly, and third-party companies have been able to provide several suitable solutions.
You can install a more “complicated” dashboard than in Kalina, produced by ITELMA. This company is a supplier of electronics for all VAZ cars. We will leave the choice to the owner. Happy tuning!
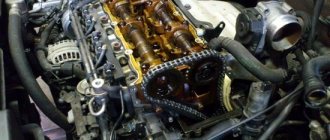
Today we will change the standard backlight lamps for the front panel of the Lada Kalina dashboard to LED ones. Those. the same light bulbs that illuminate the stove control knobs. To get to them you will have to completely remove the front panel. You can read about how best to do this here. After the panel is removed and the light bulbs are dismantled, you can begin to replace them.
The panel backlight lamp is very unique - it consists of 2 electrodes placed in a plastic case. I wasn’t able to buy a new light bulb like this along with the housing, I just couldn’t find them. If you were able to find them, then there is no point in reading this article further, just put them in place of the old ones and you're done. Well, if not, then move on to the next paragraph.
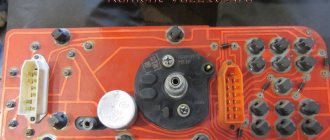
First we need to remove the lamp from the housing. To do this, press a thin screwdriver (or anything else you have) onto the base of the lock, as shown by the arrow in the picture above, and push one side down. We do the same on the other side. Alternately pushing both sides out, completely pull the light bulb out of the housing.
As you can see, the lamp itself is soldered to the terminals. To make it easier to solder a new light bulb, do not completely tear off the legs of the old one from the terminals. It is best to bite them off at the very base of the lamp and solder a new one to them.
I decided not to solder in regular lamps, but to install LED ones. I found ready-made diodes on the market, along with resistors. This is what they look like:
I put heat shrink on one of the legs so that nothing would accidentally short out and soldered it to the terminals.
Now all that remains is to push it all into the case and install it back into the panel. I did the same work with the second lamp.
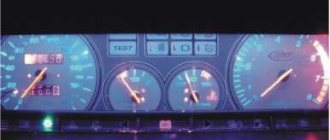
These are the LED illumination lamps for the Kalina panel that I received in the end. The result was worth the work done - the white, bright backlight of the panel looks much more impressive than the standard one.
Expert opinion
It-Technology, Electrical power and electronics specialist
Ask questions to the “Specialist for modernization of energy generation systems”
Completion by replacement Additional lighting of the dashboard created with the help of such diodes allows them to be built into almost any part of the board. Ask, I'm in touch!
How to change the color of the instrument cluster illumination
1. Use SMD of the desired color. For example, use white LEDs to illuminate one part of the panel, and blue LEDs for the other.
2. Use a light filter (electrical tape or film of different colors) together with white LEDs. We stick it on the desired area, as a result of which we get the illumination of the desired color. To change the color, you do not need to use a soldering iron, just disassemble the instrument panel and stick a film of a different color.
It is worth noting that the hands have an orange coating. To change the illumination of the hands, wipe off the varnish with nail polish remover and, if necessary, apply a new varnish of a suitable color. Another option is to use LEDs for the arrows of the desired color.
Lighting
The Kalina's interior lighting leaves much to be desired. Only the front part of the machine is equipped with a lamp. The back row does not have any lighting devices. An LED strip will help fill the back row with light. It can be powered from the front lamp, and the wiring can be laid under the ceiling card. For convenience, you can install a separate switch in the rear row area so that passengers can turn it on themselves.
Tuning the Lada Kalina with your own hands will take a little time, but by doing so you will reduce the cost of its implementation. By making changes to problematic parts of the car, you thereby improve the impression of the entire car as a whole.
Changing the color of the shield
Original design of the Kalina panel
Not all Kalina owners like the Lada dashboard. Some car enthusiasts are unhappy that it is gradually losing its prestigious appearance. Others believe that the cheapness of the plastic spoils the interior. Still others are simply tired of plain cladding and want to complement it with bright inserts of a different color. All of the above problems can be solved by simply repainting the dashboard. The shield needs to be repainted in darker colors, otherwise its alteration will be very noticeable.
How the “non-ITELMA” dashboard works, video example
The interior of a car is a place where the driver and his passengers spend a lot of time. Modern cars have become not just a means of transportation, but also a place where you can escape from the bustle of the city. And if in expensive cars engineers have calculated and installed a standard set of options that will suit a large number of people, then in budget classes you need to independently select and install those improvements that suit your preferences.
Installation of additional sound insulation
When tuning the interior of the Lada Kalina, additional sound insulation should be installed. As you know, the comfort of a car is commensurate with the noise level of the car. For sound insulation, materials such as bombs, vibroplast and modelin are used. After applying soundproofing materials, you need to leave them for a while so that they are well strengthened.
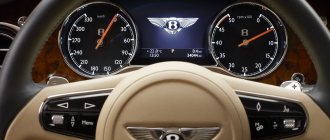
The dashboard of Granta or Kalina can be called modern. This can be confirmed not only by its appearance, but also by the use of LEDs, rather than lamps, to highlight readings and indicators. Let's look at how you can change the standard green color of the instrument panel backlight.
Armchairs
The seats in a car are the first thing everyone who gets into it pays attention to. And tuning the interior of the Lada Kalina will be incomplete if the seats are not modernized or replaced. A short bottom cushion and lack of lateral support are the main disadvantages of the seats installed in Kalina. To correct these shortcomings, you can contact a specialized studio and reshape the existing seats or select a suitable option from another car. The latter option is more acceptable due to the amount of funds spent on its implementation. Specialized studios charge a lot of money for their services, and if you are lucky enough to find chairs that suit you, you can redo the fastenings yourself.