03/04/2022 10,931 VAZ 2105
Author: Ivan Baranov
The dashboard informs the driver about the current state of the car. The article discusses the instrument panel of the VAZ 2105, its typical faults, and provides instructions for removing and repairing, as well as tuning the device.
[Hide]
Description of the torpedo on the VAZ 2105
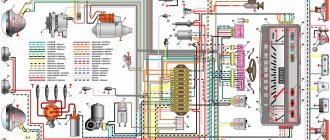
The front panel is a metal frame covered with polyurethane foam and a special film, mounted in the front part of the cabin. The product contains an instrument cluster, radio panel, glove box and shelf, air ducts, levers and switches.
What kind of front panel can be installed instead of the standard one?
The torpedo of the VAZ “five” today does not look very beautiful: angular shapes, minimal instrumentation, black and not very high-quality finishing material, which cracks and warps over time. For this reason, many owners seek to improve the interior and functionality of their car by installing panels from other cars. On the VAZ 2105, with some modifications, you can install a torpedo from the following cars:
- VAZ 2105–07;
- VAZ 2108–09;
- VAZ 2110;
- BMW 325;
- Ford Sierra;
- Opel Kadett E;
- Opel Vectra A.
Before installing a particular front panel, you should evaluate whether it is suitable in size, what modifications are required, and how to make the connection.
How to remove a torpedo
The need to dismantle the panel may be due to various reasons:
The tools you will need are a Phillips and slotted screwdriver, as well as a 10mm wrench or socket. The dismantling process is performed as follows:
- We de-energize the on-board network.
- Unscrew the screws securing the plastic steering shaft linings and remove them.
- We dismantle the instrument panel.
- Unscrew the fasteners and remove the shelf.
Dashboard
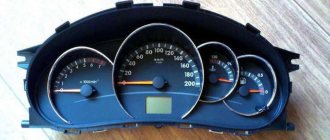
The dashboard of the VAZ Five, as in any other car, is an integral part, since it contains devices for monitoring the technical condition of the car while driving. The device is installed on the left side of the dashboard opposite the steering wheel, which makes it easy to read information. The device is equipped with the following elements:
- 4 pointers;
- 6 indicator lights;
- 1 digital indicator (odometer).
The instrument panel uses the following devices:
- speedometer;
- signal light block;
- car odometer;
- voltmeter;
- coolant temperature sensor;
- fuel level sensor in the tank.
What kind of dashboard can be installed
The “five” dashboard can be improved in several ways:
- perform tuning using new lighting elements, scales and instrument needles;
- introduce an instrument cluster from another car;
- do the tidy yourself by installing the necessary indicators.
It is possible to modify the shield by replacement, but only with careful selection and adjustment of the device to the standard torpedo, as well as after preliminary development of the connection diagram.
From another VAZ model
Some owners install a panel from Kalina on the fifth model of Zhiguli. The product looks modern, and the information from the instruments is much better readable. The essence of the modification comes down to installing a new shield into the standard case, for which it needs to be filed, trimmed, and assembled with the new mechanism. After completing the mechanical work, it is necessary to connect the new instrument panel with the wiring, checking the functionality of all gauges and indicators.
From "Gazelle"
If you like the instrument cluster from the Gazelle, then you can install it. At the same time, you need to understand that you will have to redo the wiring by making adapters due to mismatched connectors, and then install the product in a standard case with the accompanying stages of adjustment and modification.
From a foreign car
Many owners of classic Zhiguli cars, in the process of tuning their car, install a dashboard from foreign cars. Basically, products from cars manufactured in the late 1980s - early 1990s are suitable for these purposes. One of these is the BMW E30, Audi 80.
Interior fan
The interior heater of the model in question, like other “classics,” adequately copes with the functions assigned to it, if you do not take into account the high noise level. However, in the summer it is not very comfortable to be in the cabin, since there is no airflow
In this case, some modifications need to be made. To do this, you will need a ventilation device from the “seven”, which is built into the torpedo instead of the heater control levers. Additionally, the part is equipped with computer fans, thereby providing forced ventilation.
The fans are installed in a deflector, and the casing is made of tin
The fans are turned on via a button located in an easily accessible place for control. As for the heater levers, they can be moved to the ashtray.
Heater control levers can be moved to the ashtray
The VAZ 2105 today is an inconspicuous car. If the goal is to make this car comfortable and attractive, you will have to spend a lot of money on various improvements and modifications to the interior elements and the interior as a whole. With a competent approach to the work carried out, you can get an end result that will bring only positive emotions.
Malfunctions of the VAZ 2105 dashboard
The dashboard of the car in question uses a minimal set of indicators, but they can also work intermittently at times. Therefore, you need to know about possible malfunctions and be able to eliminate them, especially since this does not require special tools.
Removing the instrument panel
To dismantle the device in question, you will need a slotted and Phillips screwdriver, and the procedure itself consists of the following steps:
- We de-energize the on-board network.
- Use a screwdriver to pry off the screw caps.
Replacing backlight bulbs
One of the common malfunctions of the tidy is the burnout of the backlight bulbs. Their replacement consists of the following steps:
- We remove the dashboard.
- We remove the faulty light bulb from the device along with the socket.
Video: replacing instrument panel backlight lamps on a VAZ 2105
Diagnostics and replacement of individual devices
Since each of the indicators on the dashboard displays the status of a particular vehicle system, the occurrence of problems causes inconvenience during operation. Therefore, it is advisable to eliminate any malfunctions as quickly as possible.
Fuel level indicator
The “five” uses a BM-150 fuel sensor located in the fuel tank. Structurally, the device consists of a variable resistor, the resistance of which changes depending on the moving lever with a float. Also on the lever there is a contact that turns on a lamp on the tidy, signaling a low amount of fuel in the tank (4–6.5 l). There is a dial indicator on the dashboard that displays the gasoline level.
If there is a suspicion that the fuel sensor is not working correctly (the tank is constantly full or empty), then you need to check its resistance:
- when the tank is empty, the resistance should be in the range of 315–345 Ohms;
- when half filled - 108–128 Ohms;
- at full - 7 Ohms.
If you need to replace the sensor, just remove the wires, unscrew the fasteners and remove it from the gas tank. There are practically no problems with the pointer indicator.
Voltmeter
The voltmeter monitors the voltage at the battery terminals when the engine is not running, and while it is running it shows the voltage produced by the generator. When the arrow is in the green zone, this means that the on-board voltage is normal. When the pointer moves into the red zone, this indicates a weak alternator belt tension or a malfunction. The white zone of the indicator indicates an unsteady charge-discharge mode. Problems with voltmeter readings are usually caused by a break in the wiring. Therefore, you need to check the power supply circuit to the device using a multimeter.
Temperature indicator
The VAZ 2105 is equipped with a TM-106 temperature sensor, which is screwed into the cylinder head on the left side. The sensor consists of a resistor, the resistance of which varies depending on the temperature of the antifreeze. The readings are displayed by the temperature indicator on the dashboard.
If the device does not work or there are suspicions about the correctness of the readings, you need to diagnose the sensor. To do this, turn on the ignition, pull the conductor off the sensor and short it to ground. If the arrow deviates to the right, the element being checked is considered inoperative. If there are no indicator deviations, it means there is a break in the wiring, which will require testing with a multimeter. If there are problems with the sensor, we replace it as follows:
- Remove the negative terminal from the battery.
- Drain the coolant from the engine.
- Pull off the rubber cap from the sensor and disconnect the wire.
Instrument panel and key switches
1 - external lighting switch. The three-position switch has three fixed positions. In the first, the external lighting is turned off; in the second, the side lights and instrument lighting are turned on; in the third - the low beam headlights are additionally turned on;
2 - warning lamp for insufficient oil pressure. When the ignition is turned on, it lights up red and goes out after the engine starts. If the lamp continues to light after starting the engine, this indicates low pressure in the lubrication system. To avoid engine failure, it should be turned off and the cause of the malfunction eliminated;
3 — liquid temperature indicator in the cooling system. The transition of the indicator arrow to the red sector of the scale indicates engine overheating. You should stop and eliminate the cause of overheating;
4 - battery charge indicator lamp. When the ignition is turned on, it lights up red and goes out after the engine starts. If the lamp continues to light after starting the engine, this indicates insufficient tension of the generator drive belt, a malfunction of the generator or the warning lamp circuit;
— activation of the parking brake (lights up red when the ignition is on and the parking brake lever is raised);
— covering the carburetor air damper (lights up in orange when the ignition is on and the air damper control handle is extended);
— emergency condition of the working brake system (lights up red when the fluid level in the hydraulic brake reservoir drops below the permissible level and the ignition is on);
— unfastened seat belts (lights up red when the ignition is turned on, if the driver’s seat belt is not fastened; installed on parts of cars);
— turning on the fog light in the rear lights (lights up in orange when you press the corresponding key switch when the headlights are on);
— turning on the heated rear window (lights up in orange when the heated rear window is turned on and the ignition is on);
6 — speedometer (vehicle speed indicator);
7 — odometer (trip meter);
8 — rear window heating switch. The heated rear window is activated by pressing the button when the ignition is on;
9 — plug for screws securing the instrument panel;
10 — heater fan operating mode switch. The switch provides two fan speeds - low and high;
11 — control lamp for turning on the high beam headlights. Lights up blue when the high beam headlights are turned on;
12 - indicator lamp for direction indicators and hazard warning lights. Lights up with a flashing green light when the direction indicator switch is moved to the lower (left turn) or up (right turn) position, as well as when the hazard warning lights are on;
13 - control lamp for turning on external lighting. Lights up green when the exterior lighting is turned on;
14 - voltmeter. When the ignition is on and the engine is not running, it shows the voltage at the battery terminals, and when the engine is running, it shows the voltage supplied by the generator. The voltmeter needle in the green zone indicates normal voltage in the on-board network. If the voltmeter needle is in the red zone of the scale while the engine is running, this indicates a weak tension of the generator belt or a malfunction of the generator itself, and in the white zone it indicates an unsteady charge-discharge mode;
15 — fuel level indicator;
16 - fuel reserve warning lamp. Lights up yellow if there is less than 6.5-4 liters of fuel left in the fuel tank;
17 - fog light switch in the rear lights. The fog light is turned on by pressing the button when the headlights are on.
Source
Description and location of indicators and instruments on the panel
In order to fully use the information that the dashboard provides, you need to know the location and purpose of its instruments and indicators, and their characteristics. The instruction manual provides a description of the device. A standard panel consists of a set of measuring and control instruments, as well as alarms.
Instrument panel VAZ 2105
The dashboard typically contains the following components:
- speedometer – speed indicator with trip meter;
- coolant temperature and fuel level indicators;
- indicator lights for battery charge, oil level, fuel reserve;
- control lamps, turning on side lights, high beams, direction indicators;
- voltmeter;
- signaling unit;
- switches for heated rear window, rear fog lights;
- switches for exterior lighting and electric heater fan.
When installing an on-board computer, it becomes possible to monitor more than 20 parameters that allow you to control the operation of components and systems of the machine. The information is reflected on the display (the author of the video is RusLan 404).
Select the part of the VAZ 2107 car you are interested in:
| VAZ 2107 engine Materials for repairing the VAZ 2107 engine. Video of DIY repair manual. In this section you will find all the necessary information on repair and maintenance of the VAZ 2107 engine. You can assemble, replace, adjust the VAZ 2107 engine yourself. We will answer any of your questions about the VAZ 2107 engine. Go to articles on repair and tuning of the VAZ 2107 engine |
| Suspension VAZ 2107 Materials for repairing VAZ 2107 suspension. Video of DIY repair manual. In this section you will find all the necessary information on repair and maintenance of the VAZ 2107 suspension. You can independently assemble, replace, adjust your suspension on the VAZ 2107. We will answer any questions you have about the VAZ 2107 suspension. Go to articles on VAZ 2107 suspension repair |
| Gearbox VAZ 2107 Materials for repairing the VAZ 2107 gearbox. Video of DIY repair manual. In this section you will find all the necessary information on the repair and maintenance of the VAZ 2107 gearbox. Replacing the clutch, removing the gearbox and replacing it with a new one. Many different articles on repairing a VAZ 2107 manual transmission. Go to articles on VAZ 2107 gearbox repair |
| VAZ 2107 body Materials for body repair of VAZ 2107. Video of DIY repair manual. In this section you will find all the necessary information on the repair and maintenance of the VAZ 2107 body. Replacing old body elements, welding the bottom, replacing thresholds, replacing wings, installing a bumper, replacing a windshield and much more. Go to articles on VAZ 2107 body repair |
| Salon VAZ 2107 Materials for repairing the interior of the VAZ 2107. Video of the DIY repair manual. In this section you will find all the necessary information on repair and maintenance of the VAZ 2107 interior. Replacing the interior trim, repairing the glove compartment, adjusting the deflectors, replacing the car interior lighting. We will tell you how to remodel the interior of a VAZ 2107 with your own hands. Go to articles on repairing the interior of the VAZ 2107 |
| Brake system VAZ 2107 Materials for repairing VAZ 2107 brakes. Video of DIY repair manual. In this section you will find all the necessary information on the repair and maintenance of the brake system of the VAZ 2107. Replacing front and rear pads. Installing disc brakes on a VAZ 2107. We will show you how to properly bleed the brakes on a VAZ 2107. Go to articles on VAZ 2107 brake repair |
| Electronics VAZ 2107 Materials for repairing and replacing VAZ 2107 headlights. Video of DIY repair manual. In this section you will find all the necessary information on repair and maintenance of VAZ 2107 electrics. Replacing low and high beam lamps. Replacement and repair of front and rear headlights. Replacing fuses. Adjusting the headlights. And much more. Go to articles on VAZ 2107 electronics repair |
| Books VAZ 2107 Materials for repair and maintenance of VAZ 2107. Video of DIY repair manual. In this section you will find the necessary literature on repairing the VAZ 2107. Books on the maintenance and repair of the VAZ 2107. You can download the books you need for free. Any necessary literature on repairing a VAZ Semerka car. Go to books on repairing VAZ 2107 |
VAZ-2107
is a beautiful car that won the European Car of the Year competition back in 1967. This is a rear-wheel drive sedan with four doors. This car was produced from 1966 to 2012. The last Lada-2107 car was manufactured in April 2012.
This car is called differently - VAZ-2107
, Lada 2107, seven, and this car was exported with such names as LadaNova, LadaRiva, Lada 1500. For its excellent qualities and beautiful appearance during the Soviet Union, this car was often popularly called the “Russian Mercedes”.
This car was made using the entire base of the VAZ-2105
. Nothing significant was changed in this car compared to the Lada-2105, but only a little transformed and cosmetic repairs were made. The VAZ-2107 car received a chrome radiator grille, plastic bumpers, the interior of the car was slightly transformed and a dashboard appeared.
Lada-2107 is an excellent family car. It has a fairly large trunk that can accommodate a large number of things. This car was simply irreplaceable for various types of trips, both for large and small families.
The VAZ-2107 is a comfortable and unpretentious car that still deserves respect to this day. Author Zhukov R.O.
Possible faults
Dismantling and repair of the device may be required for the following malfunctions:
- The control panel backlight does not light up. You should check the condition of the wiring, contacts, and the serviceability of fuses.
- Not a single sensor or indicator works, and the warning lights do not light up. First of all, you should check the fuse in the mounting block and replace it if it is burned out.
- If the indicator arrows jerk in different directions, the cause is most often poor ground contact.
- Malfunctions may be related to the operation of the dashboard itself. It is necessary to dismantle the shield and carry out diagnostics.
- Sometimes the functionality of the device is caused by a malfunction of the cigarette lighter. The instrument panel does not work or does not function correctly.
- The functionality of the control panel sometimes disappears after tuning.
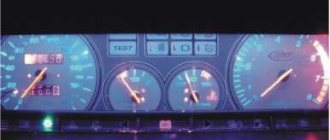
Tuning with LED lighting
Features of the connection diagram of the device in question
The connection diagram has the following features:
Two relays are required for each lift. When choosing a relay, you should pay attention that it is recommended to choose a five-pin version. This is due to the fact that two winding power contacts and three switching contacts are needed.
The device can be powered from various systems. It is important to note that it is quite important to provide power to the window regulator when the ignition is turned off, since to close or open the window you will have to constantly resort to the ignition
The device can be powered from various systems
It is important to note that it is quite important to provide power to the window regulator when the ignition is turned off, since to close or open the window you will have to constantly resort to the ignition
Installation and repair instructions
Dismantling the control panel may be required for repairs, tuning the panel, replacing sensors, etc. The procedure is simple and can be performed at home.
Tools and materials
To disassemble and repair the dashboard, you must prepare the following tools and materials:
- a set of keys;
- Screwdriver Set;
- diagnostic tester;
- new sensors and parts needed for replacement;
- elements for tuning.
It is better to buy originals to avoid fakes.
Algorithm of actions
To dismantle the tidy, you need to perform the following steps:
- Turn off the power supply to the machine by disconnecting the negative terminal from the battery.
- After unscrewing the mounting bolts, you need to remove the casing from the steering column.
- By removing the plugs and unscrewing two screws, the instrument panel is removed.
- Next, the wire plugs are disconnected.
- After opening the glove compartment, you need to unscrew the mounting bolts. The bolts securing the shelf for things are unscrewed in the same way.
- By pulling the handle of the hydraulic light corrector, you need to remove it. Then, using a socket wrench, unscrew the mounting nut and push it in.
- In the glove compartment, disconnect the power cord for the backlight lamp.
- After unscrewing the two bolts, you need to move the heater control unit.
- Next, you should dismantle the air duct.
- The next step is to unscrew all the console fasteners.
- When the last two fastening nuts in the center are unscrewed, you need to carefully remove the panel from the studs and remove it from the interior.
Next, the necessary repairs, tuning, replacement of sensors are performed, and backlighting is installed. After completing all the manipulations, the assembly of the device is carried out in the reverse order of disassembly.
To make assembly easier, during disassembly you should mark the wires and sort the devices and sensors.
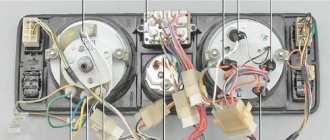
Disconnecting connectors with wires
Headlight modification
The most popular way to tune a VAZ-2105 at home is to install LED lamps. As experts say, using LEDs instead of halogens is much more economical, and they provide better quality light. The main advantages of installing LEDs in VAZ headlights:
- The cost-effectiveness of such lighting allows you to significantly relieve the on-board network of the machine.
- Such lamps provide an even and diffused light, which will provide excellent visibility and will not dazzle drivers driving in the oncoming lane.
- LED lights are considered reliable and have a long service life.
- Tuning of this type looks really attractive in appearance.
Instead of LED lighting, it is quite possible to install xenon lamps, because they will shine many times brighter. But xenon can blind oncoming drivers, which is a big drawback.
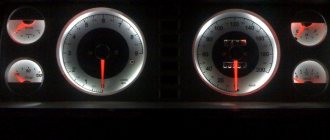
Tuning ideas
The VAZ 2105 was little modernized, mainly in the engine. Owners of “fives”, like UAZ cars, often resort to tuning the instrument panel to give it a modern look and increase functionality.
On the VAZ 2105, tuning is possible in the following options:
- purchase a ready-made kit, which includes dials for sensors, instrument panels, parts for lighting, wiring and terminals for connections;
- A budget option is to illuminate devices with LEDs of different colors;
- More technically difficult is the texture and color change of the console.
With the help of LED lighting, you can change the design of the control panel, make it stylish and give it a personal look.
Photo gallery
The photo gallery shows the VAZ 2105 - photos of various options for tuning the control panel.
1. Illumination of the VAZ 2105 tidy
2. Red console trim
3. Five shield with tachometer
Loading …
How to update the instrument panel on a VAZ 2105
The dashboard of a VAZ 2105, like any other, is an inseparable part of the car. Without it, it is impossible to imagine the possibility of driving a vehicle or monitoring its technical condition at the moment. It contains indicators and instruments designed to signal the state of the car’s “organism”, the amount of fuel in the tank and speed, as well as mileage meters, a car engine speed indicator, etc.
From the first release until 2010 (the last release), the interior of the VAZ 2105 was not modernized. Only the engine volume changed (in modification 21053 it was 1500 cm3). Modern owners of VAZ-made “fives” and “sixes” often resort to car improvements, tuning the interior and dashboard using modern lighting or accessories. This allows you to modernize the car, give it zest and functionality. The description of a modern control console has three main functions: ease of use, information content and aesthetic appeal.
Introduction
Tuning the VAZ-2105 stove cannot be done without a certain amount of technical knowledge. However, those who want to understand the principle of operation of the car’s heating system should start with simpler and more accessible models, which are considered to be all cars of the VAZ concern
The fact is that the vehicles of this manufacturer are distinguished by a simple exterior, spartan equipment and, most importantly, a very simple and affordable device. A car owner who has a VAZ-2105 at his disposal can modernize the car as much as he likes, improving its properties and technical features with every step. In the article below we will consider a method for modifying and modifying the standard stove of a car
In the article below we will consider a method for modifying and modifying the standard stove of a car.
Construction of standard car panels
Basically, the panel instruments are located on the left side, opposite the driver, so that information can be easily and quickly read. The usual standardized set of panels, including those on the VAZ 2106 or 2105, consists of the main control and measuring instruments of the car. They are designed to clearly and immediately notify the driver about car malfunctions or the working condition of the leading components and systems of the car, the current speed, the fullness of the fuel tank and other indicators.
The average “tidy” model assumes the presence of the following devices:
- speedometer, which reports speed;
- lamps-controllers for the operating state of car components;
- car mileage counters - daily and total;
- temperature sensor in the cooling system;
- fuel level sensor in the tank;
- engine speed indicator - tachometer (absent in the “five”).
The control and measuring devices of most vehicles are equipped with light bulbs that signal problems by lighting up in bright red. Problems can lead to an emergency. Therefore, in this case, it is better to stop moving and find out the degree of deviation from the norm.
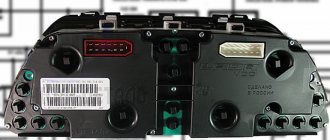
The instrument panel of a VAZ 2105 car consists of electronic, light and mechanical devices (which are gradually being replaced by electronics). If there is a problem with its operation, urgent repairs or complete replacement are necessary.
A little history
- Predictable behavior of the motor controlled by an electronic system.
- Higher power density.
- Quick response when pressing the gas pedal.
- Low toxicity.
- Quick diagnosis of engine problems.
- No need for frequent system adjustments.
At the same time, during operation, certain weak points of such an engine were identified, which caused certain inconvenience to car owners.
It should be noted that similar problems arise in the Lada Niva car, because the engine of this car with a slightly larger volume also received electronic injection.
Repair or replacement of the instrument console
The VAZ 2105 instrument console is dismantled to completely replace it or due to the failure of any of the sensors. In order to disassemble and remove the console, you need the following.
- Disconnect the negative terminal from the battery, turning off the power to the car.
- Remove the instrument console and radio.
- After opening the lid of the storage box, unscrew the housing mounting bolts.
- Do the same with the shelf for things located under the drawer.
- Remove the hydraulic light corrector handle by pulling the handle. Next, use a socket wrench to unscrew the fastening nut and push it inward.
- Disconnect the wiring that powers the backlight in the storage compartment drawer.
- After unscrewing both screws, move away the control unit for the interior heater.
- Remove the central air duct from the compartment.
- Then unscrew: four screws securing the edge of the console to the body from below, three fastening screws from its upper edge, fastening nuts on the left and right sides from above using the socket head of a wrench.
- Lastly, unscrew the two securing nuts in the center, very carefully remove the panel from the studs and remove it from the interior.
Then the necessary manipulations are carried out: repair or replacement of sensors, tuning, lighting is installed, and the torpedo is modernized. When disassembling and dismantling the sensors, they must be sorted so that later, during assembly, there is no mistake. When disconnecting the wires, a mark of ownership is made on each of them. This also simplifies the subsequent assembly of the console.
When installing a repaired or replaced “tidy”, all actions performed occur in the reverse order. You should connect the electrical part carefully and carefully; the marks on the wires will come in handy here.
Improved and updated console design
The dashboard is a car control part that is constantly in sight of the driver and passengers. First of all, the owners of the VAZ “five” strive to change the design of it, since it is simple, budgetary and visual. Tuning can be different: this includes installed lighting for the instrument console, and overlays on the instruments, and a modified dashboard as a whole. It all depends on the imagination and financial capabilities of the owner.
Sources:
https://bumper.guru/klassicheskie-modeli-vaz/elektrooborudovanie/panel-priborov/panel-priborov-vaz-2105.html https://avtozam.com/vaz/2105/kak-modernizirovat-panel-priborov/ https ://expertvaz.ru/2105/panel-priborov-opisanie.html
What can be changed in the Six
If you have a Six, tuning can be done in various ways - it all depends on how much money, effort and time you are willing to spend on it. One of the simplest and most accessible means is airbrushing - many people do tuning of the VAZ 2106 using a creative approach and brighter colors. Tuning a VAZ 2106 is done by changing the design of the car's hood, installing a new plastic body kit, and choosing alternative optics instead of standard ones.
There are very interesting and unusual solutions in this regard.
Tuning a VAZ 2106 car
The upholstery of a car can completely copy that of a limousine - for this, some owners choose velor or velvet.
The dashboard is designed in the same spirit - it looks unusual and vintage. It even has a small TV with a kinescope built into it. The sound system speakers are located above the driver.
We talked above about how optics can be improved - in the video you can see how it looks on the “Six”
https://youtube.com/watch?v=OFylBdxtahI