Thermostat is an element of the engine cooling system designed to regulate the direction of coolant flow. This mechanical device reacts to coolant temperature and directs it either bypassing the radiator or through the radiator. This is necessary so that a cold engine heats up faster after starting.
If the thermostat malfunctions, the thermal regime of the power unit is disrupted, leading to its overheating or slow warming up. And if in the latter case the malfunction does not promise serious problems, then overheating of the car’s power unit can completely disable it.
In this article we will talk about how to replace a VAZ-2110 thermostat equipped with an injection engine. But before that, let's figure out what this device is, as well as how to determine its malfunction.
Why is a thermostat needed?
Its basis is a heat-sensitive element that is immersed in coolant. Under the influence of temperature, deformation of the bimetallic plate occurs. As a result, the valve opens and the fluid flow in the system changes direction. In fact, a VAZ-2110 thermostat is needed for one purpose - supplying hot liquid to the cooling radiator.
On older cars, the thermostat was connected to the engine block using a short rubber pipe. In newer versions, the device is secured using two studs. Between the engine block and the thermostat there is only a paronite gasket, which can be treated with silicone sealant. But this procedure is not always necessary. The outputs are connected to the pipes going to the stove, expansion tank and radiator.
Replacing the thermostat on a VAZ 2114 (2110, 2109, Kalina) 8 valves
Replacing the thermostat on VAZ 2114, Kalina, etc. cars, in my opinion, is an average, difficult job and can be done at home with your own hands. To make it easier for you to cope with it, I decided to fully describe the whole process using my own example with pictures.
When and in what cases should you change the thermostat?
Basically, the thermostat needs to be changed when it stops performing its function (this is logical) - namely, it jams or just starts to jam in one of the positions. It has only 2 positions - open and closed. Initially, while the engine is still cold, the thermostat is in the closed position, i.e. The coolant circulates only in a small circle (cooling jacket of the engine block). Upon reaching a certain temperature (80-90 degrees), the thermostat opens and allows antifreeze (antifreeze) to circulate in a large circle (through the cooling radiator).
If the thermostat is stuck in the closed position, hot fluid will not enter the radiator and the engine will overheat. If it is open, on the contrary, the liquid will constantly circulate in a large circle and the engine will be very strong! It takes a long time to warm up, which is also not very good.
Based on this, we can conclude that a stuck thermostat needs to be replaced.
How to change the thermostat on a VAZ 2114
As you already understood, I will show replacing the thermostat using the example of a VAZ 2114, 2110, Kalina, etc. with 8 valve engines.
To make the work easier, you will need to remove the air filter and its corrugation.
The first thing to do is drain the antifreeze (antifreeze) from the engine block. To do this, there is a good way to quickly drain antifreeze (antifreeze). You need to remove one of the throttle valve heating pipes and direct its end into some container.
Next, you need to remove the overflow hose from the expansion tank and plug the holes on the hose itself and the tank fitting with something.
Now, in order to force the liquid to flow into the substituted container, you also need to clog the fitting of the removed hose from the throttle valve with something, for example, with your finger, and blow into the expansion tank with your mouth (you can use a compressor, but for this you need another tank cap with an embedded fitting for the compressor).
If everything is done correctly, the liquid will begin to flow. You need to drain until it stops leaking (in my case it came out to about 3.5 liters).
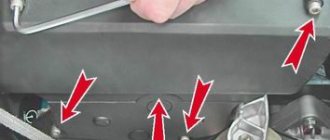
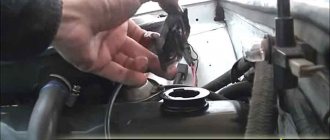
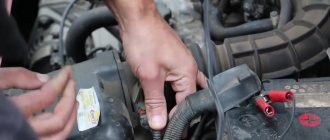
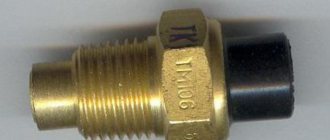
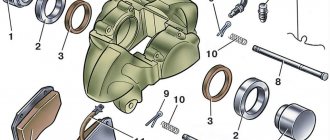
After draining the liquid, you can begin to remove the thermostat itself. The first thing you need to do is remove all the incoming and outgoing pipes and hoses (5 pieces in total). Also remove the terminal from the coolant temperature sensor.
The thermostat on the VAZ is secured with 2 nuts diagonally. It's time to unscrew them. The mass from the battery is also screwed to the top stud.
The thermostat installation site must be cleaned of dirt and adhered parts of the old gasket.
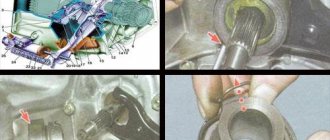
The VAZ 2114 (Kalina) thermostat itself consists of 2 parts. We will change the upper part, since this is where the valve is installed. It is secured with 3 hex bolts.
Please note that PRAMO thermostats cannot be installed instead of thermostats from AvtoVAZ, since the PRAMO thermostats have a crescent-shaped side that will prevent this from happening. But the side can be cut down and then everything is installed as expected
Before replacing the thermostat, do not forget to install a new rubber O-ring, it should be included in the kit.
We connect the two halves of the thermostat together and tighten the bolts well. You need to connect in the same way (same side) as it was, since otherwise you will not be able to connect the pipes (the fittings will “look” in other directions).
Instead of the old gasket, naturally, you need to install a new one; it is better to choose a paranite gasket rather than a paper one. In my case, there will only be sealant, since I did not buy a gasket :( Therefore, I cleaned the surface of the thermostat and the surface of the thermostat mounting on the engine, applied a thin layer of white sealant - the gasket, waited 20 minutes (following the instructions) and installed the thermostat in place.
How does a thermostat work? VAZ-2110
If we consider all types of devices, we can distinguish two main components - a sealed housing and a valve on a temperature-sensitive element. But there is a slight difference. With a carburetor power system, a non-separable thermostat (VAZ-2110) is used. The injector allows you to disassemble the structure and replace only the failed elements.
Of course, the second option is much better, since the cost of individual elements is much less. But in some cases, the VAZ-2110 thermostat valve (for injection engines) can also have a high cost - everything directly depends on the manufacturer. Preference should be given to companies that supply AvtoVAZ conveyors. Remember one thing: AvtoVAZ produces cars, not spare parts. Therefore, when you see a product on which an automaker is listed as the manufacturer, think about the quality of the product. It's hardly worthy.
How the cooling system works
Inside an internal combustion engine (ICE), there are various parts and systems that produce thermal energy that must be removed. In addition, effective ignition of fuel is possible only in a narrow temperature range, and underheating, as well as overheating, changes its combustion rate and also negatively affects the condition of rubbing surfaces. To remove heat, channels for the movement of coolant (coolant), antifreeze or antifreeze are made in the cylinder block, which is both the engine body and the cylinder head (cylinder head).
On all cars produced by AvtoVAZ, the coolant movement is provided by a pump, which is driven through a belt by the crankshaft pulley (crankshaft), due to which the speed of coolant movement in the system directly depends on engine speed. The liquid that has removed excess heat from the cylinder block and cylinder head passes through the thermostat, which acts as a temperature-sensitive valve. As long as the liquid temperature is below the temperature at which the thermostat in a VAZ 2115 or any other model is activated, at the outlet of this device the coolant flows only in a small circle, that is, through the heater radiator.
When the temperature reaches the set value, the thermostat (valve) opens a channel for the movement of liquid in a large circle that includes the engine radiator. Therefore, it is not difficult to check the VAZ 2110 8-valve thermostat with an injector without removing it from the car; just feel the pipes going to the main radiator (it is located in the front of the car) at temperatures of 70–80 and 85–95 degrees. If at the first temperature the pipes are cold, and at the second they quickly heat up or are hot, the part is in good condition. If the pipes begin to heat up already at a temperature of 70–80 degrees, the part requires replacement, because it does not ensure the operation of the valve.
The thermostat also requires replacement, if even after reaching the upper temperature the pipes of the main radiator remain cold, this indicates that the thermostat of the part has failed and is no longer fulfilling its task. If it is faulty, then the engine is in serious danger because the heater core does not work constantly and is designed to heat the cabin, not cool the power unit. Overheating of the internal combustion engine leads to loss of compression and other unpleasant consequences, including deformation of the cylinder head, so its temperature must be constantly monitored; if the thermometer needle approaches the red zone, it is dangerous to drive further and you can destroy the engine.
How to remove an old-style thermostat?
In this case, everything is simple, the main thing is to let the engine cool. You will have to drain the liquid from the system, and it is at a very high temperature, so it can cause severe burns. When the temperature drops to 40-50 degrees, you can begin to drain the liquid. For this purpose, there are two holes - in the lower part of the radiator and in the cooling jacket of the internal combustion engine.
There is a plug in the first hole; it must be unscrewed by hand. If that doesn't work, you can use pliers. A bronze plug is screwed into the engine block. It is most convenient to unscrew it with a 13mm socket wrench. After draining the liquid (do not forget to unscrew the cap on the tank), you can remove the thermostat on the VAZ-2110. It is enough to loosen all the clamps that secure the pipes to it.
Installation
In addition to the thermostat, you need to purchase a new pipe through which the coolant can return to the pump. Among motorists it is called a “saxophone”. You can find it by number: 2110-1303055-10. The following tools and materials should also be on hand:
- Clamps 15-28 mm (it is better to take about 7 pieces).
- New gasket.
- Replacement hoses.
- Screwdriver Set.
- Special hose puller (needed for old-style cars).
- Rags.
- Antifreeze.
There are two installation options: standard and alternative. In the first case, the 6-hole thermostat opens for additional cooling. In other words, it monitors the temperature coming out of the engine, not the temperature of the already cooled antifreeze. An alternative option is to check the temperature lower than the motor reading. The installation proceeds according to the following scheme:
- Part of the coolant must be drained; to do this, you need to unscrew the plug from the drain hole;
Thermostat replacement diagram
- The negative terminal must be removed from the battery, after which the clamps securing the pipes to the thermostat body should be loosened;
- By disconnecting them, the device can be removed;
- The next step is to add a new tube; for this it is best to take the VAZ 2110 operation and maintenance manual;
- After this, you can install the 6-hole unit and secure it with new clamps;
- The last step is to add coolant to the expansion tank. Done, replacement complete.
Removing a new sample element
If we draw an analogy with the previous guide, then you will need to perform almost the same steps. Drain all the liquid from the cooling system; for this purpose there are similar plugs in the block and radiator. The only difference is that not only will you have to remove the pipes, but you will also have to unscrew the two nuts that secure the thermostat (VAZ-2110 is the model in question) to the engine block. Just try not to damage the gasket. But if it is still torn (and this happens in almost 90% of cases), then be sure to install a new one during assembly.
Its cost is very low. And if you wish, you can even cut it out from paronite yourself (if you have one). To improve sealing, clean all adjacent surfaces. After this, degrease the metal and apply a thin layer of sealant to the gasket on both sides. When installing, it is necessary not to tighten the nuts to the end; give the sealant a little time to settle, then the connection will be more reliable. After 20-30 minutes you can tighten the nuts. It is recommended to fill the system with liquid after 1-2 hours.
Installing a thermostat on a VAZ 2109
Installing a thermostat is not a complicated process that even a beginner can do.
But there are some nuances that are important to know
- Before installing a working device, you should clean the place where the device will be located from dirt and rust.
- A thin, uniform layer of neutral sealant must be applied to the surface that has been degreased. The main condition is that no chemical reaction occurs with the coolant.
- After applying the sealant, you must wait a period of time equal to 10 minutes for the sealant to dry.
- After this procedure, you can install a new node.
- When the thermostat is installed, pour the required amount of coolant into the system, making sure that no air lock occurs.
- To check the functioning of the normal mode, start the engine and inspect all places for fluid leaks.
- If liquid leaks are detected, liquidation work is carried out by tightening the fastening clamps.
- In most situations, after replacing the old thermostat with a new one, all unpleasant symptoms associated with a malfunction of the thermostat unit go away for a short period of time.
Signs of a bad thermostat
If the thermostat on a VAZ-2110 is faulty, an increase in engine temperature will be observed. Unfortunately, if the sensing element breaks down, the valve switches to a position that corresponds to a small cooling circle. Consequently, liquid from the engine jacket does not enter the radiator. What to do in this case? Open the stove tap and turn on the fan at the highest speed. Even if it’s hot outside, this method should not be avoided - it will help save the engine from overheating.
Stories from our readers
“Fucking basin. "
Hi all! My name is Mikhail, now I’ll tell you a story about how I managed to exchange my two-wheeler for a 2010 Camry. It all started with the fact that I began to be wildly irritated by the breakdowns of the two-wheeler, it seemed like nothing serious was broken, but damn it, there were so many little things that really started to irritate me. This is where the idea arose that it was time to change the car to a foreign car. The choice fell on the melting Camry of the tenth years.
Yes, I had matured morally, but financially I just couldn’t handle it. I’ll say right away that I am against loans and taking a car, especially not a new one, on credit is unreasonable. My salary is 24k a month, so collecting 600-700 thousand is almost impossible for me. I started looking for different ways to make money on the Internet. You can’t imagine how many scams there are, what I haven’t tried: sports betting, network marketing, and even the volcano casino, where I successfully lost about 10 thousand ((The only direction in which it seemed to me that I could make money was currency trading on the stock exchange, they call it Forex. But when I started delving into it, I realized that it was very difficult for me. I continued to dig further and came across binary options. The essence is the same as in Forex, but it’s much easier to understand. I started reading forums, studying trading strategies. I tried it on a demo account, then opened a real account. To be honest, I didn’t manage to start earning money right away, until I understood all the mechanics of options, I lost about 3,000 rubles, but as it turned out, it was a precious experience. Now I earn 5-7 thousand rubles a day. I managed to get the car buy after half a year, but in my opinion this is a good result, and it’s not about the car, my life has changed, I naturally quit my job, I have more free time for myself and my family. You’ll laugh, but I work directly on the phone)) If If you want to change your life like me, then here’s what I advise you to do right now: 1. Register on the site 2. Practice on a Demo account (it’s free). 3. As soon as you get something on the Demo account, top up your REAL ACCOUNT and go to REAL MONEY! I also advise you to download the application to your phone, it’s much more convenient to work from your phone. Download here.
They are warmer not because a sixth fitting has appeared there, but because the bypass channel has been reduced. And the new fitting serves to get rid of the constantly leaking stove return tee.
| Comparison of bypass channels of a 6-hole thermostat - 11mm (left) and 5-hole - 16mm (right) |
What does bypass affect? Through the bypass channel, the coolant circulates in a small circle. And the smaller the diameter of the bypass channel, the more coolant flows through the heater. Because additional resistance is created when coolant flows in a small circle, bypassing the stove. That is, by reducing the diameter of the bypass you increase the flow through the stove, that is, the car interior will be warmer.
Reducing the bypass channel for a 5-hole thermostat:
I would like to note right away that when the bypass channel in a 5-hole thermostat (TC) is narrowed, problems may arise: Problems associated with washing the thermoelement . That is, if in a 6-hole thermocouple the bypass coolant and coolant of the outlet (cold) pipe of the stove are washed, then in a 5-hole thermocouple only the bypass coolant is washed.
In order to reduce the bypass to the required value, you can cut a plate out of an aluminum plate . The plate should fit exactly inside, as shown in the figure. Next, the plate needs to be secured ; for this you can use cold welding or rivets. Make sure that the rivets do not interfere with the closure of the small circle. Then we drill a new hole in the plate .
5 or 6 hole thermostat
#1 SoulBeam
Offline
- Registered
- 28 messages
- Gender: Man
- City: St. Petersburg
It is necessary to replace the collapsible thermos assembly (the lid is cracked). Subject: there are 5-hole ones on sale, but in the cold (far out in the cold) or 6-hole ones, but on the counter in front of your nose. Consultants are of no use (beep).
After reading various sources, it turned out that many people plug the heater return into the 6th hole, getting rid of the crosspiece and plugging the hole on the “saxophone”. I'm somehow confused as to how the heater will even work. I have something like this https://www.autoprosp. /ris-09-1-2.jpg, only everything in one case. I found such a diagram from VAZ-21114 and VAZ-21124 https://www.autoprosp. /25-2041-02.jpg here the tank goes into a thermos, but where does the return return go? If it's "saxophone" then it seems true...
Help me, good people, it’s not Webasto, it’s just an ordinary thermos, but I can’t figure out where to plug it in.
#2 Serg_x
Offline
5 hole thermos
6 hole thermos
Connection diagram for 5-hole
Connection diagram for 6-hole
* It’s hard to see in the diagram - the stove return goes into the fitting on the pump pipe
Modified connection diagram for 6-hole
pipes for heating the throttle: In the 5-hole circuit: No. 27, No. 28 In the 6-hole circuit - shown with a dotted line to the throttle. In the modified 6-hole circuit, they are plugged. The throttle is connected to the radiator steam outlet!
As a result: 89 degrees in winter and summer, with and without a stove, day and night. When the stove is turned on, the opening temperature of the large circle increases, and when it is turned off, it decreases. That is, the engine is automatically colder in summer and hotter in winter. Well, an eternal problem especially for dozens, especially for 16 valve engines - much hotter air from the stove when operating at idle.
#3 SoulBeam
Offline
- Gender: Man
- City: St. Petersburg
Those. Is it the throttle heating that is suppressed in the modified version? Whose steam outlet do you use, a heater radiator or a large circle radiator?
The new hole, as I understand it, comes after the bypass? Then it becomes clearer, otherwise I thought that since it’s on the body and not on the lid, it’s up to the bypass and won’t pull))
Ps what's the best way to mute it? For now, I’m thinking about cutting off the hose, screwing in the bolt and tightening it with a clamp)) In winter it’s Tashkent, but in summer it’s colder - that’s interesting.
Post edited by SoulBeam: February 10, 2012 - 15:19:04
#4 Serg_x
Offline
SoulBeam (February 10, 2012 - 15:17:17) wrote: SoulBeam (February 10, 2012 - 15:17:17) wrote:
In principle, I don’t care. It’s more convenient to take it from the heater at stock; for me it’s closer from the radiator.
SoulBeam (10 February 2012 - 15:17:17) wrote:
Yes. If you buy a thermostat, you’ll understand everything right away.
SoulBeam (10 February 2012 - 15:17:17) wrote:
#5 SoulBeam
Offline
- Gender: Man
- City: St. Petersburg
Oh thank you!! It’s just like they inserted a new brain, all the gears came together and woohoo!!
Thank you for chewing it, I’ll collect the water supply today.
Thermostat design
Structurally, the “tens” thermostat consists of an aluminum housing with pipes for connecting hoses and a working mechanism (thermoelement) located inside. The latter is a brass or copper cylinder filled with wax with a built-in pusher - a pin, at the end of which there is a valve.
When the coolant is heated to a certain temperature (80-82 o C), the wax melts and expands, pushing this pin, which, in turn, moves the valve, opening it. As the wax cools, it hardens and shrinks in size, and the valve spring forces it back into the closed position.
Signs of a faulty thermostat
If your car's engine takes more than seven minutes to warm up to operating temperature, this is a sure sign that the thermostat valve is stuck open. In this case, the coolant will constantly move in a large circle. With such a malfunction in winter, the engine may not warm up even to 80 degrees.
If, on the contrary, the engine heats up very quickly and there is constant overheating, which can be determined by the readings of the temperature sensor and the frequent turning on of the radiator fan, this is a sure sign that the valve does not open and does not allow coolant into the radiator for cooling.
How to identify a malfunction
You can determine whether the VAZ-2110 thermostat needs to be replaced on your own.
To do this, start and warm up the car engine to operating temperature at idle speed. Next, in the engine compartment, find the radiator pipes. Touch them. If the device is working, they should both be hot. This is evidence that the coolant circulates freely in the system.
If one of them turns out to be cold, it means that the valve did not open and the thermostat did not work. But this does not mean that it needs to be changed immediately. For the VAZ-2110, replacement of the thermostat will be required only if its entire structure turns out to be unsuitable for further operation. In other cases, you can get by with repairing it.
Removing the thermostat
To remove the device, you need to completely or partially drain the coolant. After this, it is necessary to dismantle the air filter housing and disconnect the hoses from the thermostat pipes. Next, you should unscrew the three bolts that secure the device body to the cylinder head.
When the unit is dismantled, unscrew the screws securing the thermostat cover and remove the thermocouple.
Installing a thermostat on a VAZ 2109
Installing a thermostat is not a complicated process that even a beginner can do.
But there are some nuances that are important to know
- Before installing a working device, you should clean the place where the device will be located from dirt and rust.
- A thin, uniform layer of neutral sealant must be applied to the surface that has been degreased. The main condition is that no chemical reaction occurs with the coolant.
- After applying the sealant, you must wait a period of time equal to 10 minutes for the sealant to dry.
- After this procedure, you can install a new node.
- When the thermostat is installed, pour the required amount of coolant into the system, making sure that no air lock occurs.
- To check the functioning of the normal mode, start the engine and inspect all places for fluid leaks.
- If liquid leaks are detected, liquidation work is carried out by tightening the fastening clamps.
- In most situations, after replacing the old thermostat with a new one, all unpleasant symptoms associated with a malfunction of the thermostat unit go away for a short period of time.
Checking the thermoelement
To check, we need a container of clean water, a liquid thermometer and a gas (electric) stove or boiler. To test the thermocouple for functionality, place it in a container of cold water and start heating it. When the liquid is heated to 80.5-82 o C for a working device, the pusher should move forward. If this does not happen, then replacing the thermostat for your VAZ-2110 is a necessity.
Additionally, inspect the device body and its pipes. If everything is in order with them, you can only get by by purchasing a thermoelement.
VAZ-2110: replacing the thermostat
After purchasing a new element, do not forget to check its serviceability using the method described above. Once you are sure it is working, install it in the housing and screw on the cover. The thermostat assembly can now be reinstalled.
To do this, secure it with three bolts to the cylinder head. Connect the cooling system pipes and fill the reservoir with antifreeze or antifreeze to the required level.
Start the engine and warm it up. Check the operation of the thermostat by touching the radiator pipes. If they are both hot, the device is working normally, and our work was not in vain.