Spare parts for replacing the thermostat in Kalina
So, what you will need for work:
— a new thermostat itself, preferably previously tested for operation with boiling water, so as not to have to do all the work again if it becomes defective;
— 1 liter of coolant of the same brand that is poured into the system; see here
— an empty, clean container of at least 5 liters;
- silicone sealant; for example, like this
- a set of plumbing tools - screwdrivers, pliers, socket wrench - internal hexagon "5".
- desire, minimal plumbing skills and a couple of hours of free time.
It is highly advisable to wash the engine first. You don’t have to work in a garage, you don’t need a hole and you don’t have to crawl under the car. So, let's begin.
Checking the Thermostat
The problems described above can appear at any time. To avoid engine overheating and damage, you need to know how to check the thermostat directly on the car and after dismantling it at home.
It is important to know that after starting the engine, the thermostat is still closed and the coolant flows through a small circuit (through the cooling jacket and the stove). This allows the power unit to quickly reach the desired temperature
As soon as the required level is reached, the valve opens and coolant flows through the main radiator.
Understanding this principle is very important when checking the thermostat. Therefore, we invite you to familiarize yourself with the diagram
Therefore, we invite you to familiarize yourself with the diagram.
Let's consider two diagnostic options.
Without dismantling
The easiest way is not to remove the unit, but to check it directly on the car. The main condition is a cold engine.
The diagnostic process begins with starting the power unit and warming it up for 2-3 minutes at idle.
This time is not enough for the engine to warm up and the coolant to circulate in a large circle, so the radiator is not yet connected to the general cooling system.
To check that the system is working correctly, touch the pipe that goes to the top of the main radiator with your hand.
The pipe should be cold, which signals the passage of coolant in a small circle (only through the engine and stove).
Therefore, the valve of the device under test is in the closed position (as it should be at this stage).
Continue to monitor engine cooling system performance. As soon as the coolant warms up to 90 degrees Celsius (can be controlled by the sensor), touch the inlet pipe. The thermostat should be open at this moment.
In this case, the coolant is directed in a maximum circle (encompassing the radiator). In such a situation, the pipe that extends from the radiator will be well heated.
By the way, the lower pipe of the cooling system, extending from the radiator, will also be hot.
If the condition described above is not met, then we can talk about a breakdown of the thermostat and its incorrect operation (for example, the valve could be jammed). In such a situation, you need to check it and replace it if necessary.
The second option is also possible, when after starting the engine the tube leading to the radiator warms up almost immediately.
One of the reasons is the valve jamming in the open position and, as a result, the coolant moving in a large circle at once.
The result in this case is obvious - the power unit will not operate in normal mode due to the impossibility of reaching normal temperature conditions.
Such a malfunction is not dangerous for the engine, but can lead to increased fuel consumption.
Situations are possible when the valve “hangs” in the middle position, that is, it does not close or open fully. The problem is diagnosed by the long warm-up of the power unit.
It is more difficult to determine a malfunction in “field” conditions.
In this case, checking the thermostat can only be done by dismantling it.
Checking the functionality of the thermostat by removing
If it is not possible to determine the breakdown without dismantling, then proceed as follows:
- pour the antifreeze into a container prepared in advance. In this case, first install the vessel, and then unscrew the drain plug. To speed up the process of coolant release, unscrew the cap on the expansion tank;
- If there is no such plug, then place a container under the lower part of the radiator pipe. loosen the clamp that holds the pipe to the radiator and remove the pipe itself. Wait until the coolant is completely drained into the container, and then proceed to dismantle the thermostat;
- dismantle the outlet pipe;
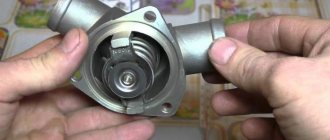
- take the thermostat and go to the kitchen. There you will need a stove, a saucepan (or any other metal container) and water. Pour in the liquid and set the pan to heat. Then place the assembly in water so that the body part does not touch the walls of the container itself;
- install a special thermometer in the water and monitor changes in its readings, as well as the actions of the valve itself;
- as soon as the desired temperature is reached, the unit should operate and open. This is possible thanks to the precise operation of the device’s working substance (artificial wax). When heated, the wax expands and allows the valve to operate. If it still does not work at the required temperature, then we can draw conclusions about the unsuitability of the entire assembly (we will talk about the operation temperature below);
- remove the thermostat from the water and let it cool. If the node worked earlier, it should close after a while. Again, if this does not happen, then it needs to be changed.
Thermostat operating principle, circuit diagrams
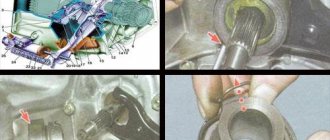
Thermostat operating principle
It is the same for all models, both for the domestic automobile industry and foreign-made cars. The difference is in the opening temperature of the thermostat and design features. For example, there are electric ones, where the opening temperature is regulated by a special heating element. Now we will talk only about mechanical ones installed in most cars.
In the initial position, the valve of the large circle is closed, only the small one is open. Coolant flows from the cylinder block into the housing. Through an open valve, it circulates along a small circuit - from the cylinder block and engine head, passes through the thermostat, pump and returns back to the engine.
When the opening temperature reaches 80 degrees, the wax in the cylinder expands. Squeezes out the movable rod, which rests against the body. Further heating of the antifreeze leads to a greater output of the rod from the cylinder. Since it has already rested against the body, it has nowhere else to move out; it pushes the cylinder itself in the opposite direction.
Remember, there are two valves attached to the wax cylinder. They begin to move with him. At the same time, the valve of the large circle opens slightly, and the small one closes. Circulation begins through two cooling circuits.
With a further increase in temperature, the rod extends to its full length. Which leads to the complete closure of the small circle valve and the opening of the large one. In this case, all the liquid “flows” through the radiator and returns to the engine.
The liquid cools, the wax contracts, and the rod is partially immersed deep into the cylinder. Due to the return springs, the valves try to return to their original position.
Thermostat repair
And if it comes to complete disassembly, then you should take into account that the antifreeze will begin to pour out. To prevent estrus, we close the pipe in every possible way and disassemble
After repairing the thermostat, it is still strongly recommended to replace it as soon as possible.
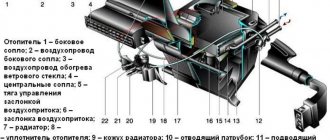
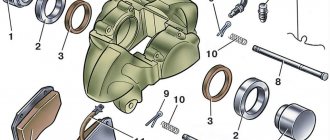
- Inlet pipe (from the radiator).
- Rubber insert.
- Solid heat-sensitive filler.
- Bypass valve spring.
- Inlet pipe (from the engine).
- Bypass valve.
- Outlet pipe (to the pump).
- Main valve spring.
- Main valve.
- Branch pipe (from the expansion tank).
- Piston.
Recently the thermostat on my VAZ 2114 swallow failed. There were no chisel thermostats in the store, but the seller said: “This one will do!” and put a thermostat from a VAZ 2111 on the table.
- The thermostat itself.
- Tee with an outer diameter of “19”.
- A hose 40-60cm long from the Moskvich 2141 stove.
- A couple of clamps.
- Take the "8" key and unscrew the screws securing the air filter.
- Take a screwdriver and loosen the clamps of the crankcase cooling system and the throttle pipe air duct.
- Unscrew the screw of the throttle valve cable bracket.
- Disconnect the electrical connector.
- We remove the rubber cushion of the filter housing from the hole in the bracket and remove the air filter.
- Using a 13mm wrench, unscrew the bolt securing it to the clutch housing and the bolt securing it to the block.
- We only loosen the lower fastening bolt with a 17 key, since the hole in the bracket is made in the form of a fork.
- move the module to the side.
- Using the “13” key, unscrew the plug on the block.
- Unscrew the radiator drain plug by hand.
- pour the “Antifreeze” into the prepared container.
- loosen the four clamps of the thermostat pipes.
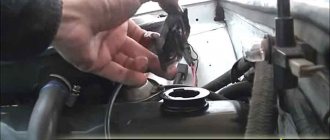
- remove the thermostat.
- disconnect the connector.
- Use a 19mm key to unscrew the temperature sensor.
- Using a 13mm wrench, unscrew the nut securing the ground wire of the controller.
- unscrew two more nuts.
- remove the pipe block.
Such a replacement is quite possible on a carburetor engine. In this case, the hole for the temperature sensor in the new thermostat must be securely plugged.
Signs of a broken thermostat
There are a number of signs that clearly indicate that the thermostat is faulty:
- The light on the instrument panel is constantly on, indicating that the engine is overheating. This usually happens because the thermostat valve has closed and is stuck in that position;
- The engine warms up very poorly. This means that the thermostat valve does not close tightly. As a result, antifreeze flows through both the small and large cooling circles and cannot warm up in a timely manner;
- After the engine starts, the lower thermostat tube heats up literally within a minute. You can check this by simply placing your hand on the nozzle. This situation indicates that the thermostat valve is stuck in the fully open position.
If any of these symptoms are detected, the driver should replace the thermostat as soon as possible. If the car owner ignores the above symptoms, this will inevitably lead to overheating of the engine and its jamming. It is extremely difficult to restore an engine after such a breakdown.
Which thermostat is better to install on a VAZ-2107 car
In any power unit, the cooling system performs one of the most important functions. When the engine overheats, very disastrous and sometimes irreparable consequences arise - from the combustion of the cylinder head gasket to the deformation of the head itself. But in both cases, repairs will cost you a pretty penny. Even when the car operates in less aggressive temperature conditions, but still at a level below acceptable levels, it will have a detrimental effect on many resources, and in winter it will also result in a cold interior.
That is why correct and stable operation of car cooling is very important. One of the devices that guarantees optimal operation of the cooling system is the thermostat. This relatively small unit monitors and adjusts the temperature of the antifreeze in the cooling system.
Replacing the thermostat on the "ten"
Checking the thermostat for functionality is available to every driver right in the garage. To do this, simply warm up the engine to operating temperature, then turn it off and open the hood. In the engine compartment, you need to find the upper and lower hoses of the cooling system and carefully check their temperature. If one is hot and the other is cold, it means that the thermostat has broken down, since the valve is in the closed position and the coolant is not able to circulate through the system.
Replacing the thermoelement of the VAZ 2110 thermostat is carried out much less often than it is necessary to reinstall the device itself. The thermocouple is a small device that is responsible for creating the optimal temperature in the cabin. It has a very simple structure, which is why it lasts for a long time. The normal service life for a thermoelement is a time interval of 5-7 years.
Replacing a thermostat is not a complicated procedure. As in any other business, the main thing is to prepare for yourself all the necessary tools and spare parts for installation. And, of course, familiarize yourself with the theory in order to better understand the essence of the upcoming work. The best solution would be to watch a video on replacing the VAZ 2110 thermostat. Finding a similar video on the Internet will not be difficult.
Replacing the thermostat on a VAZ 2110 with an injection engine occurs according to the following scheme:
- To make it easier to access the thermostat, you must disconnect and remove the battery.
- Next, unscrew the drain plug and drain the liquid from the cooling system.
- Then remove the front and rear hoses.
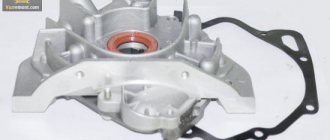
- After this, you can remove the thermostat along with the housing, having first unscrewed the mounting bolts.
- To remove the device from the case, you need to clamp it in a vice. Before this, you need to place rubber gaskets between the jaws so as not to deform the aluminum body.
- When the housing is clamped, using a screwdriver you will need to turn the fixing plate to the holes with grooves and pull out the thermostat.
- Installation of a new element is carried out in the reverse order.
When choosing a replacement device, you must take into account that different thermostats are designed for different operating temperatures. You should not choose a model with too high a value. This can lead to periodic engine overheating. But too low a setting is also useless. This will make it more difficult to warm up the engine to operating condition. So when purchasing, you must first take into account the climatic features of the zone in which the car is mainly used.
The device is not an expensive unit, so its frequent replacements will not put too much of a strain on car owners’ wallets. It is one of the consumables that have a relatively short service life, and therefore their cost is low. The price of a replacement thermostat for a VAZ 2110 will be about 300 rubles, which is a small amount based on current prices for car components.
The VAZ 2110 thermostat (either the original one or the more efficient one from the Lada Granta) is very easy to replace yourself in cases where it breaks down.
Replacing the Thermostat VAZ 2107 Injector
Replacing the thermostat on a VAZ 2101-VAZ 2107
Thermostat. this is what causes the engine to heat up very quickly or for a long time, if you remove the thermostat from the cooling system (And you can do this by inserting a random case in place of a similar piece of iron and connecting all three main cooling system pipes to it), then the fluid will immediately will start to work in large circles, in the summer this is good, because the car is not very warm, especially in traffic jams, but in winter you need to come with such a problem that the car did not warm up very much, it looms large, in this regard, the fuel consumption is additional (the car should warm up) more) , heavier loads are applied to the motor because motors are not designed and. A lot of money to run for a long time in a cool state because some problems just arise and it seems like such a small thing and it can create so many problems for your car, but as soon as cooling problems start, we immediately recommend replacing the thermostat and neither Do not put off replacing it under any circumstances.
To replace the thermostat with a classic one, you will need a minimal set of tools, namely a screwdriver (although this still shows how your clamps are attached (attachments are included, if they are bolted in then you will need a wrench, so keep that in mind), and you will need to fill the tank into which (without draining the thermostat it cannot be replaced, it will have to be partially drained, and therefore it will not be completely drained from the cooling system, but still 5 liters in order to buy in the car exactly the liquid that is poured into the engine of your car, it is necessary!
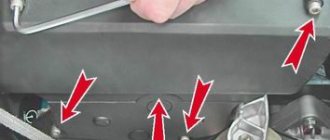
It is located below, in the engine compartment of the car, to see it, you will need to lift the hood and find where the battery is located (By the way, you can remove it if it suddenly bothers you, and how to Remove the battery, read the article “Car”), how As soon as the battery is removed, you will immediately see the thermostat, for clarity in the photo below it is also indicated by a red arrow, and blue shows the place where the bar on which the battery is installed.
When should I change the thermostat?
Methods for checking the health of the thermostat
If the driver detects one of the above malfunctions, he will have to check the serviceability of the thermostat. At the same time, there are two ways to check this device: with removal from the car and without removal. Let's talk about each method in more detail.
Checking the device without removing it from the car
This is the simplest option that every car enthusiast can handle. The main thing is that the engine is completely cold before starting the test.
The engine starts and idles for 20 minutes
During this time, the antifreeze will heat up properly, but it will not yet enter the radiator. After 20 minutes, carefully touch the upper thermostat tube with your hand. If it is cold, it means that the antifreeze circulates in a small circle (that is, it enters only the engine cooling jacket and the small stove radiator)
That is, the thermostat valve is still closed, and in the first 20 minutes of operation of a cold engine this is normal. By touching the upper pipe with your hand, you can check the serviceability of the thermostat
If the upper tube is so hot that it is impossible to touch it, then the valve is most likely jammed. Or it has lost its tightness and stopped responding adequately to temperature changes.
If the upper thermostat tube heats up, but it does so very slowly, this indicates that the central valve is not fully opening. Most likely, it is stuck in the half-open position, which in the future will lead to difficult starting and a very long warm-up of the engine.
Checking the device by removing it from the car
Sometimes it is not possible to check the serviceability of the thermostat using the above method. Then there is only one way out: remove the device and check it separately.
- First you need to wait until the car engine has completely cooled down. After this, all the antifreeze is drained from the car (it is best to drain it into a small basin, having first completely unscrewed the cap from the expansion tank).
- The thermostat is supported by three pipes, which are attached to it using steel clamps.
These clamps are loosened with a regular flat-head screwdriver and the pipes are removed manually. After this, the thermostat is removed from the engine compartment of the “Seven”. The thermostat without clamps is removed from the engine compartment - The thermostat removed from the car is placed in a pan of water.
A thermometer is also placed there. The pan is placed on the gas stove. The water gradually warms up. A small pan of water and a household thermometer are suitable for checking the thermostat. - All this time you need to monitor the thermometer readings. When the water temperature reaches 90°C, the thermostat valve should open with a characteristic click. If this does not happen, the device is faulty and needs to be replaced (thermostats cannot be repaired).
Diagnosis of problems
To diagnose a thermostat malfunction, several steps must be taken.
- Warm up the car engine to 95-100 °C (when the thermometer needle slightly does not reach the red mark).
- Turn off the engine. Open the hood lid and find two radiator hoses.
- It is necessary to check their temperature, either by touch (extremely carefully) or with any instrument. If one of the hoses is cold, this indicates a malfunction of the thermostatic device and the need for its urgent replacement.
There is another way to check if the thermostat is working properly, but it involves completely removing the device from the car. The vehicle's thermostat is located in a container, which is filled with water heated to boiling water (100 °C).
After a short period of time, the shut-off valve should move to the open position. With this option, it is revealed that problems in the heat removal system are located in another node. If this does not happen, then the condition of the thermostat is determined to be unsatisfactory and requires replacement.
Modification of the thermostat VAZ 2106
If you have driven a VAZ 2106 car in winter, you have noticed that the coolant temperature immediately begins to drop after turning on the interior heater. The thermostat regularly maintains the engine temperature within the specified limits, but only as long as the heater is not running. How to solve this problem?
There is a radiator under the hood of the car, from there the coolant flows into the thermostat, and there, in turn, the liquid goes into the engine to the water pump. It is there that it mixes with the fluid from the heater. And it is not surprising that her temperature is dropping. The colder it is outside, the lower the temperature drops and the thermostat can no longer influence this process in any way. In this case, drivers usually try to insulate the radiator in every possible way. To perform the test, we will have to measure the temperature at several points. First we measure on the upper half of the thermostat housing, and then on the water pump housing. The outside temperature is 0 degrees Celsius, the engine is running at 1500-1700 rpm, idling, the electric heater fan is functioning, it simulates an oncoming air flow when driving, we close the heater valve. Now let's check the results. The temperature on the thermostat is 78 degrees and remains at the same level regardless of the crankshaft speed of the VAZ 2106. The same temperature reigns on the water pump body, the fluid temperature indicator is within the required limits. The thermostat maintains the set temperature - 80 degrees. Now we turn on the heater to maximum mode, open the heater dampers, the temperature at the water pump immediately dropped to 60 degrees.
As for the thermostat, the temperature remains unchanged - 78 degrees. When the heater is running, fluid enters the engine several degrees lower than necessary, which means that the engine begins to operate in an abnormal mode. At this moment, dips appear, power is lost, etc. If the normal operation of the engine is disrupted by the heater, then everything needs to be corrected. You need to try to direct the cooled liquid not to the engine, but somewhere else. But where? Exit: we direct the cooled liquid back to the thermostat, because it is this element that controls the cooling system. Now the question is - how to connect to the thermostat? We solder a new pipe into the thermostat housing and move the hose from the water pump to the thermostat, plugging the hole in the pump. Now we check the operation of the engine after modifying the VAZ 2106 thermostat. The measurement conditions are the same as before, but the results are completely different. We warm up the engine, the temperature at the measurement points is 78 degrees and it remains at the same level regardless of the operation of the engine, heater and main radiator fan. The thermostat has always been a headache for drivers of domestic cars. Very often, motorists complain about a rapid increase in coolant temperature. So it is best to buy high-quality and original spare parts and beware of cheap fakes.
Removing and installing the thermostat on VAZ 2108, VAZ 2109, VAZ 21099 cars
Tuning the thermostat VAZ 2109
Thermostat VAZ 2106 – removal and replacement.
Lada 2106 Clover › Logbook › Adjustable thermostat
Hi all. I got confused with the cooling system. But more on that later. It came down to the thermostat. During the experiments, the old Soviet one stopped closing tightly. I already wanted to buy a new one, I walked around the market and was amazed. They sell crap and it’s expensive, and anything that’s a little better (Luzar, AvtoVAZ) looks like a fake. In general, I wanted the Metal Incar 83C in a metal version. It's not fate to find it. For that, there was already a new Fenox bought for 500 rubles, which opened at 65 degrees and cooled the coolant. That's where it came in handy. I couldn't afford to throw it away.
For modification, you can use a ready-made crane axle box or two bolts. I chose the second option because I need to drill a larger hole for the axle box, and I don’t have a step drill yet.
Next I drilled a hole in the thermostat. I cut the bolts to the required length with a grinder. I drilled a crooked hole in a large M5 bolt and cut an M6 thread. The bolt is screwed into one another onto a fum tape.
Next, drill a hole in the thermoelement support with an M4 drill
Since this thermostat opens early, it is necessary that when the thermoelement heats up, its rod climbs into the drilled hole in the support and rests against the bolt at 85 degrees. This moment is picked up on the fly. At the beginning I tightened the bolt “by eye”, I saw the temperature arrow hovered at 80 degrees while driving. I unscrewed the bolt a quarter turn and it went to 90.
Purpose of the thermostat on the VAZ 2106
The thermostat must control the degree of heating of the coolant and react in a timely manner when the antifreeze temperature becomes too high or, conversely, too low.
The thermostat maintains the temperature of the coolant in the engine cooling system in the desired range
The device can direct coolant through either a small or large cooling circle, thereby preventing the engine from overheating, or, conversely, helping it quickly warm up after a long period of inactivity. All this makes the thermostat the most important element of the VAZ 2106 cooling system.
Thermostat location
The thermostat in the VAZ 2106 is located to the right of the engine, where the pipes for discharging coolant from the main radiator are located. To see the thermostat, simply open the hood of the car. The convenient location of this part is a big plus when it becomes necessary to replace it.
To gain access to the VAZ 2106 thermostat, simply open the hood
Principle of operation
As mentioned above, the main task of the thermostat is to maintain the engine temperature within specified limits. When the engine needs to warm up, the thermostat blocks the main radiator until the engine reaches the optimal temperature. This simple measure can significantly extend the life of the engine and reduce wear on its components. The thermostat has a master valve. When the coolant reaches a temperature of 70 °C, the valve opens (it should be noted here that the opening temperature of the main valve can be higher - up to 90 °C, and this depends both on the design of the thermostat and on the thermal filler that is in it used).
Essentially, a thermostat is a regular valve that responds to changes in antifreeze temperature
The second important element of the thermostat is a special compression cylinder made of brass, inside of which there is a small piece of technical wax. When the antifreeze in the system reaches 80 °C, the wax in the cylinder melts. As it expands, it presses on the long rod connected to the main thermostat valve. The rod extends from the cylinder and opens the valve. And when the antifreeze cools, the wax in the cylinder begins to harden, and its expansion coefficient decreases. As a result, the pressure on the rod weakens and the thermostatic valve closes.
By opening the valve here we mean moving its leaf by only 0.1 mm. This is the initial opening value, which consistently increases by 0.1 mm as the antifreeze temperature rises by two to three degrees. When the coolant temperature rises by 20 °C, the thermostat valve opens fully. The full opening temperature can vary from 90 to 102 °C depending on the manufacturer and design of the thermostat.
Design and functional properties
The materials for the manufacture of parts of the body and filling of the thermostat of the VAZ 2106 car are brass and copper. The working process of the thermostat is as follows:
- A spherical piece of wax is placed in the cylinder of the device, which begins to melt when the engine reaches a temperature mark of 82 ° C.
- Having a significant coefficient of expansion, the wax begins to press on the end of the rod connected to the inlet valve.
- When the valve opens, coolant begins to circulate through the heat removal lines of the engine, cooling it.
- As the temperature drops, the wax begins to harden and shrink, which leads to a decrease in pressure on the rod, which returns to its place under the action of the return spring.
Problems with the thermostat arise when the engine is operated in incorrect operating modes: frequent overheating, prolonged driving with engine hyperthermia, or mechanical deformation of the thermostatic device.
If the valve jams in the closed position, severe overheating of the power plant occurs even at negative ambient temperatures. When the valve is partially opened, overheating still occurs, but under gentle operating conditions this will not lead to the engine boiling.
Checking the thermostat (VAZ 2101-2107)"
thermostat
Belmag, for Lada, Tsrab = 85 degrees. Checking the operation of valves without temperature control. At the end…
When the shut-off valve of the car thermostat is in the fully open position, the engine cannot warm up to the temperature required for normal operation. In this case, the wear of parts of the crank and gas distribution mechanisms increases, the required degree of expansion of the cylinder-piston group is not achieved, which leads to insufficient sealing of the combustion chamber and a decrease in the degree of compression.
The auto mechanic explained that thermostats in our country are not of good quality, be it France or Russia, to say that they are not of good quality is to say nothing at all.
AURORA is especially guilty of quality. Therefore, in order not to install a obviously defective thermostat on a car, it must be checked for functionality.
Types of thermostats
The VAZ 2106 car was produced for many years. And during this time, engineers made a number of changes to it, including thermostats. Let's look at what thermostats were installed on the VAZ 2106 from the release of the first cars to the present day.
Single valve thermostat
Single-valve thermostats were installed on the very first “sixes” that rolled off the VAZ assembly line. The operating principle of this device has been described in detail above. To date, these devices are considered obsolete, and finding them on sale is not so easy.
The first “sixes” were equipped with the simplest, single-valve thermostats
Electronic thermostat
An electronic thermostat is the latest and most advanced modification that replaced single-valve devices. Its main advantages are high accuracy and reliability. Electronic thermostats have two operating modes: automatic and manual.
Electronic thermostats are used in modern cooling systems and differ from their predecessors in high accuracy and much greater reliability
Liquid thermostat
Thermostats are classified not only by design, but also by the type of fillers. Liquid thermostats were the very first to appear. The main component of a liquid thermostat is a small brass cylinder filled with distilled water and alcohol. The operating principle of this device is the same as that of the wax-filled thermostats discussed above.
Solid thermostat
The filler in such thermostats is ceresin. This is a substance similar in consistency to regular wax, which is mixed with copper powder and placed in a copper container. The cylinder has a rubber membrane connected to a rod, also made of dense rubber that is resistant to high temperatures. Ceresin, expanded from heating, presses on the membrane, which, in turn, acts on the rod and valve, ensuring the circulation of antifreeze.
The main element of a solid-fill thermostat is a container with ceresite and copper powder
Which thermostat is better
Today, thermostats based on solid fillers are considered the best option for the VAZ 2106, since they have the optimal combination of price and quality. In addition, they can be found in any auto store, unlike liquid single-valve ones, which are practically no longer on sale.
Thermostat
A thermostat is a device that regulates temperature. Essentially, it is a shut-off and control device that opens, closes and changes the direction of flow of coolant. There are two cooling circuits in a car engine cooling system: large and small. The large circle is the circulation of fluid through the main radiator, and the small circle is the circulation of fluid bypassing the radiator.
The operation of the thermostat is regulated by a valve, which, depending on the temperature, opens one pipe and closes the second.
How to replace the thermostat on a VAZ 2101-VAZ 2107?
Note! Before replacing it, do not forget to drain the coolant from the car, but only do this on a cold engine, otherwise you will get burned (For information on how to drain the liquid, read the article: “”), by the way, it is much more convenient to remove the thermostat from under the car, If you don’t have an inspection hole nearby, then you’ll have to crawl under the car by lifting one of its sides with a jack!
Removal: 1. The thermostat can be removed very easily, first disconnect all three pipes that are connected to it using a screwdriver or wrench (This all depends on which clamps are used to secure the pipes), for clarity, we have indicated in the photo below All the screws of the coupling clamps that secure the pipes, these screws will need to be loosened and then disconnect the pipes from the thermostat and then remove the thermostat from the car.
Note! We would like to warn you right away that on VAZ 2107 cars of the last years of production, the pipes are attached to the thermostat using tape clamps, which are very difficult to remove and require a special tool (This clamp can be seen in the right photo), if you notice just these clamps on your car, then don’t touch them, but just find the places where the pipes are attached, but not to the thermostat, but to other elements (the lower one is attached to the radiator, for example) and see how they are secured there (The pipes at the other ends should be secured with worm clamps, one of these clamps , shown in the photo on the left), if this is the case, then loosen the screws securing the pipes at the other ends and then remove the thermostat along with the pipes from the car, after removal you will figure out how to remove the band clamps (you can cut it off carefully with metal cutters)!
Installation: Installation of the thermostat is carried out in the reverse order of removal; if you had band clamps, then replace them with worm clamps and we also recommend lubricating the inside of the pipes in the places where they are connected to the thermostat with silicone sealant to eliminate the leakage of coolant through them.
Note! When installing a new thermostat, we recommend checking it, to do this, put it in hot water (Use a thermometer, determine when the water warms up to approximately 75-78 ° C) and stirring it, heat the water to a temperature of 87 ± 2 (This is for a thermostat with a temperature of 87 ° C ) or up to 80.6-81.5 (This is for a thermostat with a temperature of 80 ° C), this temperature is written on them themselves. By the way, when you buy a new thermostat, you will most likely be asked the question at what degrees do you need the thermostat to open, prepare for this question and go to the auto shop with the answer to it, let's go back to checking, when the thermostat warms up, its valve should open, you will immediately notice this and be sure to read the thermostat markings, we repeat once again, the valve opening temperature is written on them, if at this temperature, it opens (also take into account the error of 2 °C), which means the thermostat is working and can be installed on the car and the engine will no longer overheat (Exception: very large summer traffic jams)!
Additional video: You can see a clear example of replacing a thermostat in the video below:
Replacement procedure
Before changing the thermostat on a VAZ 2114, watch the video tutorials. making it easy to master a rather complex procedure with your own hands. You certainly can’t call a DIY replacement impossible. However, it won't hurt to gain additional knowledge.
Also prepare the necessary tools and materials:
- New thermostat;
- Screwdriver Set;
- Keys for 13 and 12 millimeters;
- Sealing gasket;
- Silicone based sealant;
- New antifreeze or antifreeze;
- Container for old coolant;
- Engine cooling system pipes.
Now let's get down to the repair itself.
- Place the car on the inspection pit. Before starting work, the engine must cool down, otherwise burns will be difficult to avoid.
- Open the hood and remove the air filter. Check its condition. It might be a good idea to replace it.
- Remove the expansion tank cap, unscrew the drain plug and remove all the antifreeze. Make sure it fits exactly into the container underneath.
- There are clamps on the cooling hoses that need to be loosened a little.
- Using wrenches, remove the nuts and studs responsible for fastening. Be sure to remove the ground wire.
- After you disconnect the hoses, wiggle the thermostat a little to allow it to be removed.
- Clean the thermostat mounting points and check the hoses for serviceability. Often during the life of the car they become covered with cracks, through which air and coolant escape. Even if they are intact, but have been on the car for a long time, we recommend replacing them with new ones.
- Treat the pipes on the body of the new thermostat with sealant and let them dry a little.
- Replace the old gasket, put the thermostat in place, fix the studs, nuts, and connect the pipes. The clamps must be tightened well, but carefully so as not to break the tightness of the connections.
- Close the drain plug, and then you can start adding new coolant.
- Start the engine and check the efficiency of your new thermostat valve.
- Make sure that the heating radiator is in good working order and check for any air pockets.
Before changing the thermostat on a VAZ 2114, watch video tutorials that will make it easy to master a rather complex procedure with your own hands. You certainly can’t call a DIY replacement impossible. However, it won't hurt to gain additional knowledge.
Luzar thermostats
There are some negative and some positive reviews about Luzar thermostats.
They write that after 5000 km it may leak. Manufacture: China. Didn't find the information you are looking for? on our forum.
We recommend reading:
Fuel system VAZ 2110 injector 8
Which gear oil is best for the VAZ 2107, oil change, how often should it be changed
The device of the rear brake cylinder of the VAZ 2109
Adjusting the rear axle gearbox of a VAZ 2106 at home
How to connect an alarm system to a VAZ 2107
Battery for VAZ 21214 recommended by the factory
How to remove the wing on a VAZ 2114
Do-it-yourself valve adjustment for VAZ 2110 8 cl.
Replacing the thermostat Lada 2131 (VAZ 2131)
Usually, if the thermostat malfunctions on a Niva, and indeed on all other cars, it is not repaired, but completely replaced. This procedure itself is simple, but first you will need to completely drain the coolant. Since the Niva and “classic” engines are the same, you can read about draining the antifreeze here: replacing antifreeze on a VAZ 2107. After the coolant has been drained from the engine and radiator, we can proceed further and here we only need one Phillips screwdriver or holder with a suitable size bat:
You will need to unscrew the bolts securing the clamps that securely connect the pipes and terminals of the Niva thermostat. In total you will have to unscrew three bolts, which are clearly visible below in the picture:
After this, we disconnect the pipes one by one from the thermostat outlets, which is clearly shown in the photo below:
After this, we buy a new thermostat, the price of which for a Niva is about 300 rubles, and install it in the reverse order.
Also, it is worth keeping in mind that before putting on the pipes, they must be wiped dry, and if necessary, replace the clamps with new ones. If, after installation, it turns out that antifreeze or antifreeze is oozing at some connection points, then the surest way would be to replace the required pipe with a new one!
The problem of thermostat failure on a VAZ 2121 Niva is quite common. Its breakdown is characterized by such symptoms as constant overheating of the engine or, conversely, the coolant temperature does not reach the operating temperature, but remains at 60-70 degrees. To replace the Niva thermostat, you only need a Phillips screwdriver of the required diameter.
After which you can begin the removal procedure by unscrewing with a Phillips screwdriver all the bolts of the clamps on the pipes that are connected to the thermostat:
Then, when all the clamps are loosened to the required level, remove the pipes one by one with your hands using medium force, as is clearly shown in the photo below:
And the last step will be to remove this part from the engine compartment. This is what it looks like after removal from the car:
We replace this device in the reverse order. The price of a new one is approximately 300 rubles, so you won’t have to spend much. Good luck with the repair to you and your Niva!
Removing the thermostat on a VAZ 2121 and Niva 2131 is done to replace or repair it. The thermostat is an all-metal housing with a built-in valve that opens/closes depending on the temperature of the liquid in the system. When the engine is not warmed up, the valve is closed accordingly, that is, the liquid flows through a small cooling circle, as a result of which the system warms up faster. When the temperature reaches operating mode, the thermostat valve opens and liquid begins to circulate through the radiator, that is, in a large circle.
Characteristic signs indicating a malfunction to the driver: the warm-up time has increased, which means that most likely the valve does not close and the liquid circulates all the time in a large circle, or, on the contrary, the engine overheats as a result of incomplete opening of the valve and the circulation of the main volume of liquid in a small circle. Also, after the engine reaches operating temperature, check the supply pipe to the radiator; if it is cold in relation to the system, then the thermostat is closed.
To carry out repair work, prepare a standard set of tools, drain the cooling system and perform the following sequence of actions:
- When removing the thermostat, residual liquid may get onto the generator; to prevent this, cover it with a plastic bag.
- Using a Phillips screwdriver, loosen the clamps securing the pipes and remove it. We make a replacement, after which we carry out the installation in the reverse order.
At this point, the repair work on removing and installing the thermostat on the VAZ 2121 and Niva 2131 has been completed.
Features of device verification
Today there are three main methods for diagnosing a thermostat. Let's briefly look at each of them:
Start the engine and wait for 7-10 minutes. Then lift the hood and touch the lower pipe extending from the radiator. During normal operation of the device, the temperature of the hoses should be identical. If the temperature is different, then the thermostat is faulty
But it is important to understand that there may be air pockets in the system that interfere with the circulation of fluid. The presence of air pockets can lead to overheating and incorrect diagnosis.
A good thermostat may be considered defective. Start the engine and touch the coolant pipe to the top of the radiator. If the thermostat is working correctly, the tube should be cold until the engine warms up to the desired temperature. The most effective and complex method is to remove the thermostat. In this case, it is necessary to dismantle the device and then immerse it in liquid.
POPULAR WITH READERS: Inflates the expansion tank. What to do?
The latter is heated in a special container until the valve is activated. But the opening and closing temperatures cannot be determined this way. In a pan, you can only check in principle the fact that the thermostat is working, but not its actual parameters.
To determine the actual indicators, the thermostat must be installed on a tripod with a dial indicator (for example, ICH-10), the indicator rod must rest against the main valve or other structural element rigidly connected to it.
After this, raising the temperature and monitoring it with a thermometer with a division value of 0.1 °C, we record the beginning of the opening, corresponding to the valve stroke of 0.1 mm. Further raising the temperature, we determine the valve opening value using the indicator.
- If the engine still does not reach 90
degrees Celsius 10-12 minutes after starting (provided the outside temperature is about 0), then we can talk about a breakdown of the device we are considering.
Most likely the valve is stuck and the coolant is constantly flowing in a large circle.
Read more about how to check the thermostat.