The ignition module is a mechanism whose malfunctions are very difficult to identify. Usually, problems begin to be solved when it becomes obvious that something is wrong with the car. If your VAZ 2107 does not start the first time, you cannot set the ignition, and uneven engine operation begins to confuse you - it’s time to carry out a proper check. Let us recall that the engine ignition module of the “injector” type is the same system that, with the help of coils, supplies electrical energy in order to form a spark and start the car.
Replacing the ignition module on VAZ 2108, VAZ 2109, VAZ 21099
Welcome! Ignition module - cars of the Samara family were equipped with a module and an ignition coil, there is a difference in these two things, although many people say that they are the same thing, for example, the ignition module was installed on more modern injection cars and it consists of two coils, and on carburetor cars, one large ignition coil was used, which first supplied voltage to the distributor and from the distributor the spark went to the high-voltage wires and spark plugs, but in injection cars no distributor is used, in them only high-voltage wires and spark plugs remained, so the injection The system is a more modern technology that replaced carburetor cars.
Note! To replace this unit, you will need to stock up on: Wrenches, a wrench with socket heads, in addition to all this you will need spanners and an extension cord, but this is only if you don’t have a wrench!
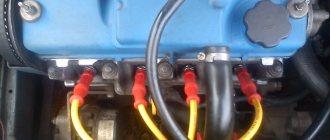
Where is the ignition module located? It is placed on a bracket and is attached to it with three nuts, so immediately decide how you will remove the module from the car, either together with the bracket or separately from the bracket (It is easier to remove the module together with the bracket), so let’s get back closer to the topic, the module is located deep in the engine and its location is not very convenient, for clarity, in the photo below it is indicated by a red arrow, and in the photo below one of the spark plugs is indicated by a blue arrow, so first find the spark plugs in the car and then look for yourself a little lower module.
When do you need to change the ignition module? There are two coils in the module, and if one fails, the car begins to become very dull, the car begins to experience severe dips, it will be very difficult for the car to accelerate, and on top of all this, the car will double (Precisely double, this is not a typo, two cylinders will not work ), in addition to all this, the noise of the engine during its operation will increase and thereby the sound of operation will change for the not very better, you will immediately understand this.
Connecting the ignition coil
If during dismantling you did not remember and did not mark which wire went to which terminal, the ignition coil connection diagram is as follows. The terminal with the + sign or the letter B (battery) is supplied with power from the battery, and the switch is connected to the letter K. The colors of the wires in cars may vary, so it is easiest to track which goes where.
The correct connection is important, and if the polarity is incorrect, the bobbin itself, the distributor, or the switch can be damaged.
How to replace the ignition module on a VAZ 2108-VAZ 21099?
Removal: 1) The module is not difficult to remove, but there will be problems with checking it, because for this, firstly, special equipment is needed, although using a conventional multi-meter you can check the module for functionality (We will describe how the module can be checked in the same article), but first you need to remove it, to do this, first disconnect the wire block from the module (see photo 1) which is attached to it by a latch, so don’t forget to bend the latch on the block, otherwise you can break it off, like As soon as the block is disconnected, take a wrench in your hands and use it to completely unscrew the upper bolt (see photo 2) of the module fastening, then unscrew the side nut (see photo 3, it is indicated by a red arrow) of the bolt and so as not to lose the bolt, you can remove it its the same way, and finally, move to the bottom (Under the car if you can) and there look for the last bolt securing the module in the lower part (see photo 4, the bolt is indicated by an arrow), loosen this bolt a little and then completely remove the ignition module from the car , while disconnecting all four wires that are connected to it, otherwise they will not allow you to remove the module from the car.
Note! In general, when working with the module, it is recommended to de-energize the on-board system (the network is de-energized by removing the minus terminal from the battery; if you don’t know how to remove the terminal, read the article: “Replacing the battery”, everything is written in paragraph one of that article), you never know what can happen, so safety is paramount, but before de-energizing the system, check the wiring block that is connected to the module and after that you can de-energize it, to check, disconnect it and turn the ignition key until all the devices in the car light up as soon as they light up they pick up a multi-meter and turn on the voltmeter mode on it and measure the voltage on the block, to do this, connect two wires coming from the multi-meter, connect one of the wires to the terminal that is marked (see the wire block, it has these markings on it ) with the letter C, and the other which is marked with the letter D and the device should show a voltage of 12 V, if it shows less or does not show anything at all, then either the battery is discharged or the wiring is faulty, but to check the ignition module itself it is better to do this either using a special device, or changing it to a known-good module, taking it from a neighbor as an example (If he has the same car), or using the same multi-meter, you can try (But even a multi-meter can show incorrect results, therefore, do not rely too much on this method), read about how to do this in the article: “Replacing the module and coil on a VAZ”, namely in that article the item “Note!” read it!
2) Now that the module has been removed, disconnect it from the bracket; to disconnect it, use a wrench and a socket head of a suitable size; in total, the module is attached to the bracket with three nuts (see photo 1), unscrew all these nuts and then you can disconnect the module from the bracket (see photo 2).
Diagnostic procedure
The diagnostic procedure can be as follows:
- Disconnect the connector with signal wires from the module.
Remove the connector from the module by moving the lock slightly and pulling the wire.
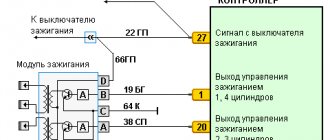
- Turn on the ignition and check the voltage at terminal 15 (central) of the control wire block. The rated voltage is 12 V. A drop or absence of voltage when the battery is charged indicates that the engine control unit does not supply power to the module. This means the reason lies in the ECU.
We check the voltage between pin 15 and the block ground.
- We remove the high-voltage wires, unscrew the module mounting bots and remove it.
Using a 13mm wrench, unscrew the bolts attaching to the cylinder block.
Unscrew the bolts securing the clutch housing.
Remove the module along with the bracket.
- We check the resistance of the primary windings of the coils - put the multimeter in resistance measurement mode and take readings from the rightmost and central terminals, then from the leftmost and central terminals. The nominal resistance of the primary windings is approximately 0.5 Ohm.
Scheme for checking the primary windings.
We measure the resistance of the secondary windings between terminals 1-4 and 2-3 high-voltage wires. Nominal value: 5.4 kOhm. If the readings do not correspond to the nominal value, the coil is not working correctly.
Scheme for checking secondary windings.
Check the module for a short circuit. To do this, install one tester probe on the central pin 15, the second on the metal body. The device should show the absence of a short circuit (one or infinity). Otherwise, one of the coils has shorted to the housing.
Scheme for checking the module for short circuit.
How to check the ignition module
Ignition of gasoline in the cylinders of an internal combustion engine occurs using a spark generated by the ignition system. The ignition module is the main element of the system, creating a spark on the spark plugs using high voltage. Each car manufacturer develops and produces its own original module, but the principle of its operation is the same for all devices. During operation, deviation from the specified parameters or breakdown of the ignition module negatively affects engine operation until the power unit fails.
Purpose and principle of operation
Ignition module VAZ 2110
The ignition module of a modern car performs the function of generating high voltage to produce a spark at the spark plugs. It consists of two coils with a closed magnetic circuit and a two-channel switch. Sometimes the switch is made as a separate device, but in most cases it is combined with an electronic control unit for the engine. Externally, the modules differ in the number of wires in the connection connector: a module with a switch has 4 wires, and paired coils have 3.
The ignition module is controlled by the ECU, which supplies constant voltage in the form of low-voltage control signals to the windings of its coils at the right moment. The end of the signal is the beginning of the spark. Thanks to magnetic induction, at the moment of application, a high voltage is generated, creating a spark at the spark plug. The device is located in the engine compartment and can be easily identified by the high-voltage wires leading to the spark plugs.
Signs of a malfunctioning ignition module
Checking the ignition module with a removed spark plug
A malfunction of the ignition module is determined by the following symptoms:
- Difficulty starting a cold engine due to lack of spark on one or more spark plugs.
- Floating engine speed at idle is a situation in which the speed changes without any action on the part of the driver.
- Dips in power, which manifests itself during acceleration and driving up a long climb.
- Decrease in engine power.
- Cylinders 1-4 or 2-3 do not work (engine “troits”).
- Indication of the “Check Engine” indicator.
Errors
A module malfunction can also be determined using an error scanner. Error codes associated with the module are:
- R-3000, R-3001, R-3002, R-3003 and R-3004 - gaps in sparking, the module itself, spark plugs, high-voltage wires or the ECU may be to blame;
- R-0351 - the coil of cylinders 1-4 does not work;
- R-0352 - the coil of 2-3 cylinders does not work.
The scanner readings do not yet indicate problems with the module itself.
It is possible that the spark plugs are not working or the high-voltage wires are broken, but if we initially diagnosed them, then the fault lies entirely with the ignition module. In this case, we can repair it ourselves, or buy a new one, which is faster, easier and guarantees uninterrupted operation of the ignition system. Good luck to everyone, strong spark and good roads!
Possible causes of ignition module malfunction
Despite the high reliability and durability of the ignition module, during operation it can fail, like any other mechanism. Among all possible causes of breakdowns, in 9 out of 10 cases the following occur and are diagnosed:
- Use of inappropriate components in the ignition system. High-voltage wires are selected based on the parameters of the module, since excessively high or low voltage creates malfunctions or burns out contacts.
- Defective or damaged parts, poor quality assembly. Defective components break down faster and damage other components or elements of the system. Practice shows that the selection of high-quality components and their periodic diagnostics allow the module to remain operational for a long time.
What does the market offer for the VAZ 2110-15?
I hope it’s clear how to change the ignition coil, it’s not complicated, right? Sometimes it is much more difficult to find the right part in a car store; let’s think about this using the example of modern classics).
An ignition module for 10-15 original production models (catalog number 2112-3705010) will cost you an average of about 3.5 thousand rubles. You remember, yes, that only original spare parts guarantee you efficiency and quality of work. Despite losing sight of existing analogues, I cannot!
As you can see, friends, changing the ignition coil is not difficult, it takes 20 minutes, 30 at most, the main thing is the desire to do it! I'll finish now, see you later!
Checking the ignition module
Checking the ignition module for functionality is carried out in the following ways:
Replacing the ignition module with a known good one
1. The easiest way is to connect a known working module. In this case, the devices must be completely identical, the high-voltage wires are in good condition, and the reliability of the contacts has been checked.
Checking the contacts on the ignition module
2. Moving the module, which allows you to identify unreliable contacts. To do this, move the wire block and the module itself. If during exposure the engine reacts by changing its operation, then the cause of the problem lies in poor contact.
Measuring resistance at the terminals of the ignition module
3. Resistance measurement. To do this, you will need a tester switched to ohmmeter mode. Measurements are carried out on the paired terminals of the module between cylinders 1 and 4, as well as cylinders 2 and 3. The resistance value should be the same and approach 5.4 kOhm.
Checking the ignition module using a tester
4. Check the voltage with a tester. One probe of the device is applied to contact A of the block, the second to ground. After turning on the ignition, take readings from the device. If the wire is in good condition, it will show a voltage of 12 V; if it is missing, check the fuse protecting the ignition module. Then check the continuity of the circuit with a 12 V test lamp. Apply one end of the wire to contact A and rotate the starter. If the lamp does not blink, the circuit is broken. The procedure is repeated in a similar way with other contacts.
Diagnostics of the ignition module with professional equipment
5. Diagnostics at a service station by connecting a computer with special software to the computer. Malfunctions are detected in the form of errors indicated by an alphanumeric code, after which a more in-depth diagnosis of the malfunction is carried out to make a decision - repair the ignition module or replace it. A similar check is carried out at a specialized service station using an oscilloscope.
Ignition module VAZ 2107
The design of the ignition module is quite complex: it includes one or more coils, a board, contacts and wires. Of all the above elements, only contact connections can be repaired; in some cases, replacement of parts (transistors, coils) is possible.
Let's sum it up
As you can see, the VAZ 2110 ignition module is a fairly simple device consisting of contacts, coils, boards and wires. However, only contact connections can be repaired. Other elements are beyond repair and need to be replaced.
At the same time, before starting repair work, it is necessary to properly test the module. To do this, you should adhere to the general rules, and also take into account the subtleties and nuances discussed above. As a result, diagnostics of the VAZ 2110 ignition module allows you to quickly identify certain problems and eliminate problems.
Ignition module for injection engine of VAZ 2108, 2109, 21099 cars
The ignition module on the injection engine of VAZ 2108, 2109, 21099 cars is part of the ignition system.
Purpose of the ignition module
The ignition module on VAZ 2108, 2109, 21099 cars is designed to create high-voltage voltage on the spark plugs at a certain moment.
Location by car
On the 2111 engine of VAZ 2108, 2109, 21099 cars, the ignition module is installed on a special bracket mounted on the front of the cylinder block on the gearbox side.
Ignition module design
The ignition module consists of a housing, inside of which there are two two-terminal ignition coils and a two-channel switch (two electronic units). The housing has four ignition coil terminals, which are connected to the spark plugs in a certain order. The wires for the first and fourth cylinders are connected to the two terminals of one winding, and the wires for the second and third cylinders are connected to the two terminals of the other winding. Therefore, a spark jumps in two cylinders at once (on the compression stroke - working and on the exhaust stroke - idle).
The current supply and control wires from the control unit are connected to the module through a connecting block.
Operating principle of the ignition module
The control unit of the ECM system receives a signal from the crankshaft position sensor about the position of the engine crankshaft and its rotation speed, from temperature sensors and mass air flow sensors information about the condition of the engine and the load on it. After processing the signals, it calculates the ignition timing and sends a command to the ignition module to fire the first or second pair of coils. The ignition module generates high-voltage pulses and supplies them through high-voltage wires to the spark plugs of either 1-4 or 2-3 engine cylinders.
Ignition module malfunctions
A faulty ignition module leads to difficulty starting a cold engine, jerking and failures during acceleration, especially on a cold engine (jerks may disappear after warming up the engine, and with it the ignition module), unstable engine idling (especially when warmed up), increased consumption fuel. Missing sparks lead to the release of a rich mixture into the converter, which leads to its failure.
If you suspect a malfunction of the ignition module, you should first check the high-voltage wires, spark plugs, and electrical circuit of the module.
Applicability of the ignition module
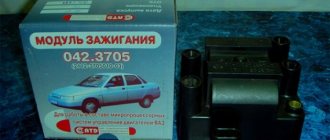
The following ignition modules are used on VAZ 2108, 2109, 21099 cars: 2112-3705010-01 – ECM with GM ISFI-2S control units (2111-1411020-10 (20, 21)) and 2112-3705010-02 (04, 05) – ECM with control units January 4.1 (2111-1411020-22), January 5.1 (2111-1411020-71), VS 5.1 (2111-1411020-62), VS 5.1 (2111-1411020-72), BOSH M1.5.4 ( 2111-1411020), BOSH M1.5.4 (2111-1411020-70), BOSH MP7.0N (2111-1411020-40), BOSH M1.5.4N (2111-1411020-60), BOSH MP7.0N (2111-1411020 -50).
Notes and additions
— The ignition module is not dismountable. If it fails, it is replaced with a serviceable one.
— Most often, two coils of the ignition module fail, and the engine begins to “doubly” - only two cylinders work.
Types of ignition systems VAZ 2107
The evolution of the VAZ 2107 has transformed the ignition system of this car from an unreliable mechanical design into a modern computer-controlled electronic system. Changes occurred in three main stages.
Contact ignition of carburetor engines
The first modifications of the VAZ 2107 were equipped with a contact-type ignition system. This system worked as follows. The voltage from the battery was supplied through the ignition switch to a transformer (coil), where it increased several thousand times, and then to a distributor, which distributed it among the spark plugs. Since voltage was pulsed to the spark plugs, a mechanical breaker located in the distributor housing was used to close and open the circuit. The breaker was subjected to constant mechanical and electrical stress, and it often had to be adjusted by setting the gaps between the contacts. The contact group of the device had a short resource, so it had to be changed every 20–30 thousand kilometers. However, despite the unreliability of the design, cars with this type of ignition can still be found today.
The contact ignition system requires adjustment of the gap between the breaker contacts
Contactless ignition of carburetor engines
Since the beginning of the 90s, a contactless ignition system was installed on carburetor VAZ 2107, where the breaker was replaced with a Hall sensor and an electronic switch. The sensor is located inside the ignition distributor housing. It reacts to the rotation of the crankshaft and sends a corresponding signal to the switching unit. The latter, based on the data received, supplies (interrupts the supply) voltage from the battery to the coil. Then the voltage returns to the distributor, is distributed and goes to the spark plugs.
In the contactless ignition system, the mechanical breaker is replaced by an electronic switch
Contactless ignition of injection engines
The latest VAZ 2107 models are equipped with electronically controlled injection engines. The ignition system in this case does not provide any mechanical devices at all, not even a distributor. In addition, there is no coil or commutator as such. The functions of all these components are performed by one device - the ignition module.
The operation of the module, as well as the operation of the entire engine, is controlled by the controller. The principle of operation of such an ignition system is as follows: the controller supplies voltage to the module. The latter converts the voltage and distributes it among the cylinders.
Recent comments
- Mechanik on Carburetor starting device 2108, 21081, 21083 Solex Check the fuel level in the carburetor float chamber. Plus check if the fuel pump is pumping.
- Boris on Carburetor starter 2108, 21081, 21083 Solex After gas does not work on gasoline. The engine starts for 2-3 seconds and stalls. Half a minute later the same thing.
- Boris on Carburetor starter 2108, 21081, 21083 Solex engine starts but stalls after 2-3 seconds. after 0.5 minutes the same thing
- Andrey on Replacing thresholds on a VAZ 2108 Thank you, useful article. I also have to change the threshold on the eighth road.
Malfunctions
Diagnosing the problem will not be a problem for you if you understand a little electrical engineering and know how to work with a device such as a multimeter. If not, we recommend that you contact a specialist. A professional check of the ignition module of a VAZ 2110 using a multimeter will give you the result you need and will allow you to answer important questions.
Do not rush into repairs, since the problem may not lie in this element at all. Before checking the ignition module on a VAZ 2110, consult with professionals and arrange a check of your car. You will have to spend time and money on this, but it is better to be prepared for troubles.
Before checking the VAZ 2110 ignition unit, make sure that all other engine systems are working properly.
Quite often, short-term breakdowns occur in the system, which soon disappear. The check engine light does not detect them, but they remain in the controller and are entered into its memory. If you try to read errors on the controller with a tester, it will not show anything, since there were problems, but now they are gone.
We have already become familiar with the signs of a malfunction in the VAZ 2110 ignition module, and the reasons for such situations may be dirty contacts, poor ground connection, electrical interference, and so on.
So, for the VAZ 2110 the most common problem is the disappearance of voltage on cylinders 2 and 3. After some time, the engine starts working normally again if you press the rear plate of the module.
You should not put up with such a situation; it is better to immediately check the functionality of the unit, restore or replace it completely.
Removing the module
The procedure is quite simple.
- Disconnect the negative cable from the battery.
- Remove the plastic cover that covers the motor.
- Remove the wires from the spark plugs.
- Disconnect the wires from the ignition module. Their numbering is indicated on special white rings. And the cylinder number is indicated on the ignition module housing.
- Disconnect the connector from the ignition module.
- Using a 10mm socket, unscrew the three nuts that hold the block we are looking for.
- Carefully remove it, after which you can begin further work.
Now let's move directly to working with the module:
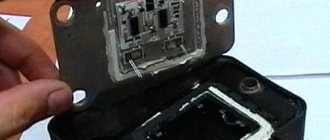
- Open the aluminum plate on the ignition module. A flathead screwdriver is useful for this.
- Inside you will find a small printed circuit board with electronic components. It is covered with a transparent layer of silicone, which will have to be removed.
- There are also wires that connect the board to the connector contacts. They are made of aluminum, so they can tear quickly.
- Tear off all the wires from the contacts, don’t be afraid. Others will be installed in their place. By the way, experts recommend using stranded wires used in computer mice.
- The ignition module circuit includes two switches and two powerful transresistors. If you decide to change these elements, you need to know that the switches are manufactured by SGS-THOMSON (model L497D1), and the transistors are of the BU931 type.
- The contacts are made of aluminum, so you will need a special flux to work with this metal.
- We solder the wiring to the board. It is more difficult to solder to the transistor collectors, since they are covered with a special material, the soldering of which is problematic. Therefore, try to hide the top coating from the element as carefully as possible. To prevent the soldering iron from transferring all the heat to the plate, place it on the stove and heat it to 180 degrees Celsius.
- Solder the wires to the contacts on the module so that they are as short as possible.
- Cover the areas where you soldered with varnish. Regular nail polish borrowed from your wife will do.
- Check if the ignition module is working.
- If everything is fine, coat the inner surface with a special autosealant, then reassemble in the reverse order.
- Upon completion of assembly, the wiring should be positioned fairly freely. Make sure that they are not compressed inside the box and that the integrity of the connections is not broken.
Carrying out such a repair of the ignition module on a VAZ 2110 with your own hands will not be difficult. But be careful, act carefully and consistently. Pay special attention to the soldering process.
But keep in mind that we have addressed the problem of bad contacts. She is not the only one for the “ten”. You may need to pinout the ignition module on the VAZ 2110. For this, it is better to contact specialists.
If the cause of the malfunction lies elsewhere, then there is a high probability that it is better to simply replace the VAZ 2110 8-valve ignition module with a new one. The search may drag on without yielding results. Replacing the element will completely solve the current problem.
A little about prices
We have already noted which switch and transistor are used when repairing the ignition module of a dozen. The first costs about 3 dollars, and for the second you will have to pay about 6 dollars.
Some craftsmen use a domestic analogue of the transistor - model KT848A . Of course, it costs less. But its problem is its lower quality and larger size, which somewhat complicates the repair process.
Source