Camshaft play in the VAZ 2110 is one of the most common problems. If the camshaft play of the VAZ 21102 deviates from the norm, a specific knocking sound appears in the engine. This breakdown can significantly affect the normal operation of the engine. If the slightest unusual sounds appear in the engine, you must immediately check its correct functioning. Before contacting a service station, you can independently confirm your guesses. To do this, it is necessary to perform specific audio diagnostics. To do this, you may need a stethoscope.
Symptoms of camshaft play
There are several types of noise that cause camshaft failure (see). In order to determine camshaft play on a VAZ 2110, you need to know the following causes and symptoms:
- The camshaft flange needs to be checked. It may come into contact with the cylinder heads or housings, creating sound. The same sound is produced by increased camshaft play. Under normal conditions, the camshaft size is 0.15 - 0.53 millimeters. A specific sound occurs at levels of 0.8 - 1.0 millimeters. If you listen closely, the noise can be heard on the side of the plug.
Note: To eliminate the knocking noise, some parts may need to be replaced. Replacing parts will help reduce the clearance between the rear flange, cylinder heads and accessory housing. You can get rid of the noise by replacing the timing belt.
- It should be noted the noise of the surfaces of the journals and camshaft supports on the surface of the gas distribution mechanism supports.
- The sound of the surfaces of the journals touching the surfaces of the cylinder head supports.
- A specific sound from the contact of the surface of the journals with the surface of the cylinder head supports due to a violation of the cylindricality of the supports.
Knock of crankshaft journals
Low pressure in the lubrication system and a dull knock that occurs at different speeds hint at problems with the crankshaft journals. To finally verify this conclusion, you can try changing the oil.
In this case, the semi-synthetic lubricant is replaced with a mineral one, after which the sound should become quieter. If you fill it the other way around, then the volume of impacts with such a problem will noticeably increase. But, again, it is better to contact a service center before the engine completely breaks down, including as a result of experiments by car enthusiasts.
Removing the camshaft
This way you can determine the value of the noise, check its location, and draw up an accurate action plan for replacing equipment. It is necessary to repair those parts that are damaged. Since the camshaft play must be eliminated, this part must first be removed from the car engine. To carry out this work, you must follow the rules that will help in case of breakdown:
- The rear timing belt cover is removed.
- The cylinder head cover suffers the same fate.
- Since the work is very specific, damage is possible. It needs to be disconnected or at least the wires disconnected.
- Using a socket wrench with the number “8” it is necessary to unscrew the 20 bolts that secure the camshaft bearing housing.
Note: work on unscrewing bolts must be carried out using a specific system. Each part must be unscrewed gradually. Do not completely unscrew one bolt and then the other.
- The camshaft bearing housing is removed.
- Specific plugs are installed on the technological holes. There are two of them here. They must be removed from their locations.
- The exhaust camshaft is dismantled.
- The camshaft for the intake valves is disconnected.
- The seals must be removed from each shaft.
- After removing the oil seals, you must carefully examine each journal and cam of the mechanism. It should not have cracks, scratches or other visible damage.
Assembly and installation is a specific matter
It is slightly unusual to install this mechanism in the previous position. While most car parts and mechanisms can be installed in the reverse order of disassembly, camshafts require a special approach to assembly:
- The first step is to completely lubricate all parts of the camshaft with machine oil.
- The camshafts, after the lubrication process, are carefully placed in the head.
Note: An important step is to place each shaft in its proper position. Each part has its own marking. They need to be placed in their places. To do this, just read the numbers on the shafts:
- 1006014 – exhaust camshaft.
- 1006015 – intake camshaft.
Also, the exhaust valve shaft has a special belt.
Note: it is also necessary to take into account that when repairing an engine, under no circumstances should you use a sealant that contains a large amount of silicone. Vapors from this sealant may enter the ventilation system or other systems. It is necessary to use sealants that have specific safety indicators on the packaging for human breathing.
Do not apply a lot of this sealant on the planes of the bearing housing. If it is too much, clogging of the oil channels may occur.
So:
- A thin layer of sealant is applied to the cylinder heads, bearing housing (lower part), near the spark plug channels.
- The cylinder head is being installed. The keyways should be positioned upward.
- The bearing housing is being installed on the cylinder head. The bolts are gradually tightened. It is necessary to tighten each several turns. The fastening bolts, after the surfaces of the mechanisms come into contact, must be tightened two at a time (each bolt located opposite each other must be tightened simultaneously and gradually).
- Installed. The removed plugs are returned to their place.
- Some parts are lubricated with clean engine oil (spark plug channels, rubber O-rings).
- Subsequent assembly is similar to disassembly, but in reverse order.
To eliminate camshaft play, the part can be bored.
If it is possible to purchase new parts, this method would be an excellent option. The cost of shafts may vary depending on the place of sale and seller’s markups. It should be noted that if you do not have the skills to work with turning equipment, you need to contact specialists from the service station. Watching the corresponding video and photo materials will help you work with your own hands. The main thing is to do everything as required by the instructions. If you do everything yourself, the cost of the issue will be low, because you only have to buy consumables without paying for repair services.
Replacing the camshaft oil seal on the VAZ-2109 and other front-wheel drive vehicles of the VAZ line is a simple, but necessary manipulation that allows you to extend the life of the power unit.
Ignoring cuff malfunctions leads to loss of oil, small solid particles entering the engine and, accordingly, increased wear of the internal mechanisms of the engine.
The main causes of knocking
See also
The key elements of the assembly are the neck and cams. Malfunction of the camshaft elements leads to the formation of extraneous knocks during engine operation.
If you hear this knocking noise, the problem lies in one of the following reasons:
see also
- Play in the shaft bed. It is unlikely that you will be able to solve the problem on your own. This requires boring or honing of the bed itself, or a complete replacement of the unit;
- Problems in the lubrication system. Even with a slight disruption of its operation, sound may appear. Moreover, the reason is not only in the quantity, but also in the quality of the lubricant;
- Deformation and mechanical damage. Most often, the supports burst and the neck breaks;
- Violations in the regulation of fuel supply processes;
- Development of the resource of cams. If the problem is definitely in the camshaft, and the knocking noise appears even when it’s hot, then the problem is in the cams.
It is almost impossible to give an accurate forecast as to what exactly was the source of the knocking noises without conducting comprehensive diagnostics. Masters often talk about this in various videos where the problem under consideration is described.
In any case, the knock should alert you. Whether you have hydraulic compensators or not, it does not matter. The sooner you send your car for diagnostics, the higher the chances of getting by with little damage and spending a minimum of effort and money to fix the problem. All in your hands.
Subscribe to our website, leave comments, ask relevant questions and tell your friends about our project!
When is it necessary to replace the oil seal?
The camshaft seals are replaced if oil leaks are detected in the pulley area.
In addition, the element is replaced if there is obvious mechanical damage. The procedure is not urgent, so a machine with a faulty cuff can be operated with some caution for a long period.
The exception is when the loss of oil through a destroyed element is sufficiently large or the destruction of the part is so massive that it allows dust to penetrate into the power unit.
List of tools
To replace the camshaft oil seal on VAZ-2110 and 2112 16 valves, a minimum set of tools is required. These include:
- key to “10”;
- key to "17";
- Slotted screwdriver;
- Mandrel for pressing;
- A small amount of motor oil.
A pit or lift is not required for manipulation. The unit is fully accessible from the engine compartment. On VAZ-2110 cars there are 8 valves and on 16 valve units the oil seal is located under the camshaft pulley, on the right side in the direction of movement of the car.
Replacement procedure
Replacing the camshaft oil seal on a VAZ-2114 8-valve car and other vehicles equipped with a similar engine is practically no different from that on the 16-valve power units of the 2112 model. However, there are still some differences.
Performing manipulations on 8-valve engines
The replacement procedure begins with fixing the car in a stationary state using the parking brake and “heels” under the wheels. The gear lever must be in neutral. After this, using a 10mm wrench, the timing cover is removed.
The camshaft and crankshaft pulleys should be installed in the TDC position. To do this, the mark on the camshaft sprocket is aligned with the installation lug located on the rear cover of the timing drive. After the gas distribution mechanism has been brought to the required position, it is fixed using a screwdriver inserted into the teeth of the flywheel.
Using a 17 key, loosen the tension roller bolt and remove the belt from the upper sprocket. After this, the camshaft pulley is secured from turning and the bolt securing it to the end of the shaft is removed. The star itself is removed. When dismantling the sprocket, care should be taken, since under it there is a small semicircular key, which is very often lost during the disassembly of the timing drive.
After the above-described manipulations, the camshaft oil seal is removed using a screwdriver. The new part is lubricated with engine oil and pressed into place using a special mandrel. If you don't have one, you can use a socket head of a suitable size. Assembly of the mechanism is carried out in reverse order.
Performing manipulations on 16-valve engines
Replacement of VAZ-2112 camshaft oil seals is carried out in a manner similar to that described above. In this case, the exhaust camshaft sprocket is first dismantled, then the intake camshaft. The amount of work increases slightly due to the greater number of mounting points for the timing cover.
On VAZ 2111 injection engines there is such a disease: “Axial runout of the camshaft”. This disease does not progress and does not cause damage to other timing components, but it manifests itself in the form of an unpleasant camshaft knock. The developers of the 2111 engine missed this point. Where carburetor engines used to have a fuel pump and distributor, injection engines have a regular plug into which the camshaft rests. The camshaft axial play set by the manufacturer should not exceed 0.15-0.20mm. Over time, as the camshaft pastel wears out, the axial play increases, and a distinct knock begins to be heard from under the valve cover. Of course, you can continue to drive with this knocking noise and not pay attention to it, but not every car enthusiast will be pleased with this. There is one simple, effective and absolutely free way to eliminate this annoying knocking noise by placing a washer between the camshaft and its side cover.
First you need to make sure whether the camshaft is actually knocking. To do this, remove the timing belt cover and start the engine. Then, with the engine running, press the handle of a screwdriver into the camshaft gear bolt. If the knock disappears when pressed, the reason is: Axial runout of the camshaft
Then we free up the space around the side camshaft cover, i.e. remove or move the air filter to the side.
Then, using a 17 key, set the camshaft gear to the mark. This is necessary so that the “pin” that is on the camshaft does not interfere with removing the cover.
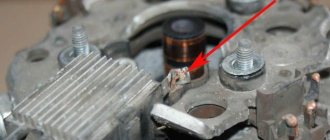
Then use a 10 mm wrench to unscrew the cover (2 nuts and one bolt with a rubber ring). Only 2 are visible in the photo, the third one is from the back:
Carefully remove the cover. Here you can see how this pin passes through the slot in the cover:
This is the same pin:
To make a washer, a piece of galvanized steel approximately 0.5mm thick is suitable.
Draw on it the required dimensions of the washer (inner diameter 25mm, outer 35mm) and hollow out the inner diameter with a chisel.
We cut out the outer diameter with metal scissors
We process the inner diameter of the washer with a round file, and grind off the sharp corners on the outer one:
We put the washer on the camshaft (it should fit freely, if not, then adjust the dimensions).
Put the cover back and tighten it. Attention!
Be sure to check if the camshaft is jammed. To do this, take a key set to 17 and try to rotate the camshaft.
It should turn with the same force as before installing the washer. If the camshaft becomes very difficult to turn, or is completely jammed, then remove the cover again, take out the washer and grind it to thickness:
After the washer is adjusted, the cap is tightened and the camshaft rotates freely - start the engine and enjoy the silence of its operation!
Many car owners are well aware that the main role of the camshaft oil seal is to prevent oil leaks through the joints. In other words, the cuff, that is, the oil seal, performs the tasks of a seal. But this is not its only function.
What does the cuff affect?
To assess the full significance of the role of the camshaft oil seal, let's try to work backwards. Let's take a closer look at what can happen if the oil seal fails and stops reliably performing its tasks.
- The minimum harm that a faulty cuff can cause is oiliness of the entire engine compartment.
- Oil consumption will increase significantly; you will have to add lubricant regularly. The corresponding warning light will constantly remind you of this and will soon become annoying.
- If the oil level drops, valve knocking will begin, which will soon fail. It's only a matter of time.
- Non-metallic elements of the engine compartment that are filled with oil will soon collapse, become deformed, and cease to perform their tasks efficiently.
- If oil gets on the contacts, it will cause problems with starting the engine.
- The camshaft position sensor will begin to generate errors. This will entail an increase in fuel consumption, since the ECU will not be able to regulate the supply of fuel to each cylinder; the load will be the same everywhere.
Functionality check
Before you start replacing the cuff, if you find traces of oil on the engine, you need to carry out several checks:
- It is likely that the system responsible for ventilating the oil sump is clogged;
- The hoses in the system may become pinched, causing a malfunction.
If checking these elements shows that everything is in order, you will have to replace the oil seal.
- Start the engine and listen for rattling valves or a loose camshaft making noise. A regular stethoscope will help you here, which will provide more accurate listening. It is likely that you will need to replace the cuffs and camshaft, or its components that are responsible for the knocking.
- In some situations, knocking can be eliminated by simply replacing the timing belt.
- Check the engine at idle speed. If the engine operation is unstable, or it is difficult to start the engine, check the condition of the camshaft position sensor. Sometimes replacing this element returns the motor to its previous operating efficiency.
Who is the engine knocking on?
A strange knock may call you on the road, but it does not come from the engine compartment of the car. If there is something knocking there, then it is probably the engine, which means it is in some kind of trouble. This can be confirmed by the indicator signal about a slight decrease in oil pressure in a heated internal combustion engine running in idle mode.
It happens that the engine does not make any suspicious knocks, but the oil pressure has still decreased. Then you need to step on the gas and listen to the operation of the internal combustion engine. A signal of a problem with the unit will be a noise reminiscent of a hammer hitting cast iron.
Sometimes knocking in the engine occurs at idle, and at higher speeds it subsides completely or becomes barely perceptible. Usually this scenario is not too dangerous - it’s another matter if pressing the gas increases the volume of the knock. Be that as it may, it is still better to find out where this “music” comes from.
The internal combustion engine, like other car components, gradually wears out, and sometimes something breaks. For example, a power plant idling may knock due to:
The engine, which has an automatic transmission, sometimes knocks due to deformations in the flywheel. The same element in an engine operating with a manual transmission is quite massive. Therefore, it is unlikely to burst.
Knowledgeable car enthusiasts can try to independently identify and eliminate the cause of a particular knock. For those who are not eager to understand the details or simply do not want to take risks in order not to completely finish off the power plant of the car, it is better to resort to the services of a car service.
Dismantling
To replace the problematic oil seal, you will have to perform several disassembly steps. As a result, you will need to do the following:
- Remove the front protective cover, and then remove the timing belt;
- Remove the camshaft pulley mounting bolts. To do this, hold the element with a screwdriver to prevent it from turning, and perform the removal procedure itself using a 17 mm wrench;
- Remove the toothed pulley;
- Remove the oil seal. For this operation, you will need a flat-head screwdriver or needle-nose pliers.
This set of measures will allow you to remove and replace the oil seal. But we advise you to check the condition of the camshaft and, if necessary, replace it.
To get to the camshaft you need:
- Remove the oil pressure sensor completely. If you don’t want to dismantle it, then at least disconnect the wires from the device;
- Unscrew the camshaft bearing housing mounting bolts. There are as many as 20 of them there. After this you can easily remove the case;
- Do not forget about the plugs that are located in each technological hole. Take them out;
- Disassemble the potentially problematic camshaft and determine the need for repair or replacement.
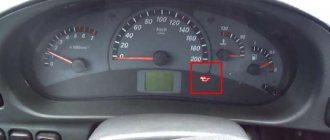
How to understand what exactly caused the light bulb to burn? How to fix the problem?
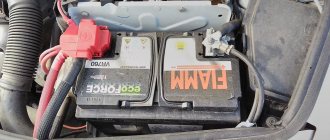
If the battery light is on while the engine is running, do not turn it off, open the hood and check the voltage at the battery terminals. If charging is supplied to the multimeter, the voltage should be 13.5-14.3V. If there is no charging, the voltage will be much lower - approximately 12V.
To solve the problem you will need:
- Two screwdrivers (flat and Phillips);
- “Control” (12V light bulb);
- Multimeter;
- Pliers, a knife and sandpaper to clean the contacts.