I came across an interesting article from my friend VaskoEvgeni in his blog. I find it useful information.
Learning to configure “Pioneer”
And so, you have become the proud owner of a Pioneer radio. You bought it because you heard the name of the brand, or because a friend has one, or because the sales assistant in the store was very complimentary... . You had it installed at a tuning center, or maybe you “have a mustache yourself”, because it would seem that audio preparation in a modern car is present from the factory, what a difficult trick to tuck in... . They turned it on, turned the volume knob, and heard wheezing from the speakers..., hmm, something was wrong, the seller deceived me. And the Pioneer is wheezing, or maybe the speakers were weak?
Don't rush to conclusions. Let's start setting up in order to realize all the capabilities of this device. And the first thing to do is to check the capabilities of the purchased front speakers and, by adjusting the cutoff frequency with the built-in filter, to avoid distortion along the front.
For example, we will use the Pioneer DEH 3100 or older models, which is quite popular today. It must be said that not all Pioneer models have the necessary settings in the database. Devices of the lowest price category, models whose first numbers are 1, 2, as well as 11, 21, and so on, are as empty as a drum. This is a budget, and you don’t need to demand much from them. For the money and functionality. But starting with model 3100 (this applies to last year’s model range), we have everything to experiment with.
A little about the joystick's capabilities. The handle can tilt to the right, left, up, down and recess into the center.
We set the volume level to about 30 units, even if the front end is clearly wheezing, press the joystick handle in the center and get into the settings menu. There are quite a lot of them, but don’t worry, for now we only need one item; by rotating the joystick to the right or left we find the “Audio” item, press the joystick again, and by rotating the handle, look for a mention of balance and fader.
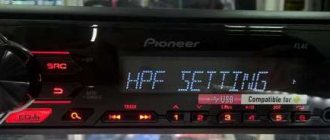
Here it is: FADERBALANSE. Press the joystick. We get the inscription: FAD 0, BAL 0. There may be other numbers if some kind of adjustment was previously made. By tilting the joystick to the right we move from the Fader menu to the Ballance menu. By rotating the joystick, we actually adjust these parameters. The current menu starts flashing. We move the Fader to position +15. At the same time, we send the entire signal only to the front speakers, so that the rear does not interfere with us rebuilding the front. That's it, you can adjust the cutoff frequency. Tilt the joystick to the left and drop out of the fader menu into the main audio settings menu. (it should be clarified that always when tilting the joystick to the left, we exit the current menu to the main menu. Rotate the joystick to search for the front acoustics filter settings. Here it is: HIGH PASS FILTER. Press the joystick, pushing it down and get HPF OFF. This means that the filter is turned off and the entire signal, the entire range, goes to the front acoustics, which of course leads to distortion. (This applies to small-sized and low-power acoustics; as a rule, just such speakers are installed at the front - size 13 cm) But even with speakers size 16 cm This setting is required.
We press down the joystick and the inscription changes. Now this is HPF 50. And again, clarification: The figure may be different if this parameter has already been configured. The figure indicates that now a signal will be sent to the front, the lower limit of which is limited to a frequency of 50 hertz (this is practically a sub-frequency and, naturally, not every speaker can cope with it). To exit the menu, use the BAND button located at the bottom left. Click on it and drop out of the settings menu. By rotating the joystick, that is, adding volume, we can check the level of distortion. Didn't like the result? Then we go back to the filter menu and, rotating the joystick, change the number to the next value and check again. I must say that for acoustics measuring 13 cm, you can safely immediately set the filter value to 100 - 125. For acoustics 16 cm, as a rule, it should be 80. That’s it, we got a clear sound, there is no distortion, but there are not enough low frequencies and it `s naturally. But now we are compensating for this deficiency with a special mode, switching the rear speakers to subwoofer mode.
Now we will work in the preset menu. Pioneer also has such a menu. How to get into it? Very simple. Turn off the device. Turned off? Now press the radio power button - this is the top left button, but not briefly, but for a long time. Hold it down until the display flashes. Yes, you are on the menu.
(A small digression. Almost all of these functions that we will talk about have always been present on the Pioneers, only entering the preset menu was carried out using different buttons. Sometimes this means holding the joystick in a recessed position for a long time. Sometimes it is holding down the Functions button. Almost always the radio should be in off)
Rotate the knob to check which items are present. There may be a language setting, discrete step of searching for radio stations, options for turning on additional inputs and much more. We need the inscription SW Kontrol. Rotate the handle to search for this inscription. Eat? Briefly press down the joystick and get REAR SP FUL. The inscription says that the entire range goes to the rear speakers, but we need the speakers to work in subwoofer mode. Rotate the handle. the inscription changes from FULL to SW. Leave it at SW. All. press the radio power button. The rear is not audible at all, but this is how it should be, it is only turned on in the mode we need, but not configured.
Equalizer
An equalizer allows you to make the sound more even - raise or lower the bass, mid and high frequencies. This is a rather fine adjustment of the audio system. It is not the entire sound range that is regulated at once, as in other menu items, but specific frequency bands. Different models have different numbers of them, depending on the class of equipment. There are five of them in Pioneer radios: 80 Hz, 250 Hz, 800 Hz, 2.5 kHz and 8 kHz.
The equalizer is located in the “Audio” section of the settings menu, EQ item. In it you can select one of the preset standard settings. For those who are not satisfied with these options, there are two sets of user settings (Custom). You can switch between them both from the menu and the EQ button next to the joystick.
To make changes to frequency parameters in a custom setting, you need to select it with the wheel and press the joystick. Then turn the wheel to select one of the equalizer frequency bands. Press the joystick again and set the position from -6 (attenuate frequency) to +6 (increase). By doing this you can make some frequencies louder and others quieter.
There is no universal recipe for setting the equalizer on the radio. It is performed by ear depending on the preferences of the consumer. In addition, different adjustment options are selected for a specific genre of music.
We can only give rough recommendations:
- if heavy music is played, it is worth increasing the bass - 80 Hz (but not too much, +2–+3 is enough). Percussion instruments sound around 250 Hz;
- for music with vocals, frequencies of approximately 250-800+ Hz are needed (male voices are lower, female voices are higher);
- for electronic music you will need high frequencies - 2.5-5 kHz.
Setting the equalizer is a very important step. Using this tool, you can improve the sound quality many times over. Even if the acoustics are not very expensive and of high quality.
External ports
- In addition to the radio, the radio can play music from external devices or CDs (older versions).
- To be able to connect external devices, you will need the same “System” menu described earlier in setting the time.
- Go to the menu as described above.
- Scrolling through the menu, select the AUX, USB or Bluetooth option (if this feature is supported).
- Use the arrows on the sides (or tilt the handle itself) to switch the position. There are two options available - enabled (On) or disabled (Off).
- Choose to enable the desired port.
- Press the joystick once to confirm.
- In the same way as in setting the time, exit the menu.
- Further connection depends on the models of the radio and the connected device.
Bluetooth connection
It should be remembered that for the connection via Bluetooth to work correctly, like most other devices that support this function, pairing will be required. The PIN code is entered on the radio and repeated on the device (sometimes, especially if the device has already been connected via Bluetooth, you will only need to enter it on the radio).
To enter the pin code on the radio, take the following steps:
- They turn it off.
- Hold down the power key and go to the initial menu.
- Rotate the joystick to find the PIN CODE INPUT function (will appear if BT is enabled).
- Move the joystick up and down to enter the code. If you need to move between symbols, do it by swinging the handle left and right.
- Confirm by pressing the knob once.
- Exit the menu.
Now you can activate the mode on the device and try to find the radio. Those who like to assign clear names to devices can use the above method, but they must select EDIT DEVICE NAME rather than PIN CODE INPUT. The remaining steps are identical.
Important. Pressing to confirm must be done once. Clicking on the same menu again will reset the code and require you to enter it again.
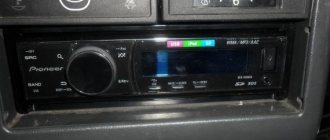
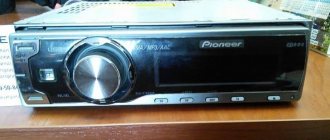
In the radio, the photo of which is presented below, the 3.5 AUX jack socket is located to the right of the radio control buttons, and the USB is behind a plug with the USB brand logo.
Radio "Pioneer" without CD, but with USB and AUX support
High pass filter
Next we find the HPF (High-passFilter) item. This is a high-pass filter that cuts the frequency of the sound supplied to the speakers below their specified limit value. This is done because it is very difficult for standard speakers (13–16 cm) to reproduce low frequencies due to their small diaphragm diameter and low power. As a result, the sound is reproduced with distortion even at low volumes. By cutting the low frequencies, you can get clear sound over a larger volume range.
If you do not have a subwoofer, we recommend installing an HPF filter at a frequency of 50 or 63 Hz.
You can then exit the menu using the return button and check the result. It is better to do this at a volume of 30.
Low pass filter (subwoofer)
After we have dealt with the speakers, we will configure the radio for the subwoofer. For this we need a low pass filter. With its help, we match the frequencies of the speakers and subwoofer.
The situation looks like this. When we removed the bass from the speakers (set HPF to 80+), we got loud and high-quality sound. The next step is to “dock” the subwoofer to our speakers. To do this, go to the menu, select the audio item, and in it we find the subwoofer control section.
There are three meanings here:
- The first number is the cutoff frequency of the subwoofer. Everything here is the same as with the equalizer. There are simply no specific settings, and the range in which you can “play around” is from 63 to 100 Hz.
- The next number is the volume of our subwoofer. We think everything is simple here, you can make the subwoofer louder or quieter relative to the acoustics, the scale is from -6 to +6.
- The next figure is the frequency attenuation slope. Just like in HPF, it can be either 12 or 24. There is also a little advice here: if you set a high cut, then set the slope to 24, if lower, then you can set it to 12 or 24.
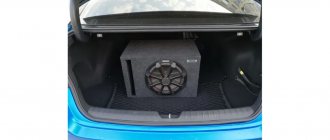
The sound quality depends not only on the settings of your audio system, but also on what speakers you have installed. If you want to replace them, we recommend that you read the article “what you need to know when choosing car speakers”
Audio
Front speakers
Having configured the radio receiver, as well as connecting sound sources, you can focus on sound quality.
The recommended volume for proper settings is no more than 30 units.
- After adjusting the volume, press the knob to get to the settings menu.
- Here they look for the “Audio” item.
- By pressing the handle, you enter this menu.
- After looking through it, they find the Fader instruction.
Very often it is combined with the balance menu, then the desired menu will sound like Fader/Balance
In the factory setting, these indicators are zero.
It has been empirically proven that here you can bet 100 - 125.
Rear speakers
The front speakers work cleanly, now it’s time to switch the rear speakers on the shelf into subwoofer mode - fortunately Pioneer can do this too.
- Turn off the radio.
- Press and hold the power button (as if you were going to set up the “demo” mode).
- Once in the menu, look for the inscription in the form of SW Kontrol.
- By pushing down the handle, you enter this menu.
- By rotating it, the parameter is set to SW.
- Confirm by pressing the handle again.
- Press the power button to save parameters and exit the menu.
- Then they return to the “Audio” menu (press the volume knob and rotate to select).
- By pressing the handle, you enter the menu.
- Here they look for the inscription SW SETTING1. Click on the handle to enter.
- Of the three options presented in the menu, you need to choose one of two - Normal or Rev.
In most cars, it is the second mode that will give the best sound.
The optimal solution would be to set 50 HZ.
Before moving on to the next settings, check at different volumes how the selected settings work. If you don’t like something, repeat the steps described, trying other values.
Loudness compensation
This option is hidden in the same “Audio” menu.
- Enter the menu, find the Loudness parameter.
- Select by pressing the knob.
- There are three values available here - High, Middle, Low (respectively high, medium, low).
- This parameter is responsible for adjusting frequencies at low volume levels. It is also impossible to give optimal settings here - they are set experimentally.
- Swing the knob to the left to go to “Audio” or from settings by pressing Band.
Equalizer settings
For advanced music lovers, here are a few more equalizer settings. They are hidden in the same “Audio” menu.
- Once in the menu, rotate the knob to select the EQ SETTING parameter.
- Enter this menu (depending on the model, you may need to enter another menu here). The three parameters offered in this menu are responsible separately for the settings of the low, mid, and high frequencies.
- Set according to your preferences. On some models, you can select several preset settings here. Depending on the speakers and your own preferences, adjust these parameters.
The settings here are no different from others - select by pressing, change by rotating, going to a higher level by swinging the knob to the left.
Radio setup
Even your favorite music recorded on a flash drive or USB drive can get boring over time. Therefore, many car enthusiasts like to listen to the radio while driving. Setting up the radio correctly on the Pioneer radio is not difficult and can be done in just a few steps - you just need to select a band, find and save stations.
There are three ways to configure the radio:
When all 6 preset stations are full, you can switch to the next memory section. There are 3 of them in total. In this way, you can save up to 18 radio stations.
Turning off Demo mode
Immediately after purchasing and connecting the radio, you should figure out how to disable the demo mode, intended for displaying the device in the store. It is possible to use the radio in this mode, but it is inconvenient, since when you turn it off, the backlight does not go out, and inscriptions with various information run across the display.
Disabling demo mode is very simple:
- We go to the hidden menu by turning off the radio and holding down the SRC button.
- In the menu, turn the wheel to reach the DEMO item.
- Switch demo mode from ON to OFF.
- Exit the menu using the BAND button.
You can also set the date and time in the hidden menu by going to the System section. The time display is switched here (12/24 hour mode). Then open the “Clock Settings” item and turn the wheel to set the time. In the System section there is also a language setting (English/Russian).
If your settings are reset when you turn off the ignition, the article “how to connect a radio” has the answer to this question