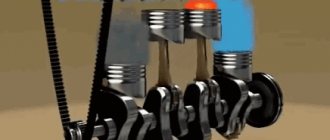
The camshaft (camshaft) is the most important element of the gas distribution mechanism. In fact, with the help of cams, the shaft pushes the valves, allowing the timing belt to work smoothly and accurately; the opening and closing of the intake valves occurs at a precisely defined moment.
Like any other mechanism, the timing belt also wears out. As a result, malfunctions and knocking appear. In this case, engine knocking is often associated specifically with the camshaft, and not with the crankshaft and crankshaft as a whole.
If the camshaft is knocking, in such a situation you can do the following:
- camshaft repair;
- replacing the camshaft.
It is important to know how to remove the camshaft for repair or replacement. It is also necessary to understand how to change the camshaft on a car, how the camshaft is tightened, etc. Read more in our article.
Indications for replacing the camshaft
The condition of the camshaft must be monitored regularly and carefully.
Its malfunction can also cause large-scale damage to the engine of a Japanese car itself. Usually the camshaft begins to “mope” with a dull knock when the engine starts. On cold engines, noise can be heard in the valve cover area. Experienced drivers understand the inner voice of their car, quickly identify the rumbling of the engine and “left”, uncharacteristic noises. They are able to immediately distinguish the quiet and even sound of the camshaft, which changes frequency depending on the engine speed. If a part is faulty, this is accompanied by dull tapping sounds reminiscent of hammer blows.
The malfunction is also indicated by:
- deterioration in the smooth running of the machine;
- drop in engine power;
- unstable operation at idle speed;
- strong vibration of the motor;
- Difficult to start in cold weather.
Particular attention is paid to the camshaft seals - they should not have ruptures, cracks or abrasions. The integrity of the drive must also be inspected.
However, it is difficult to determine camshaft wear by indirect signs. It is much easier to do this on a removed part, inspecting it visually from all sides. There should be no potholes, scuffs, or aluminum leaks from the bearings anywhere. A sign of undoubted wear is grooves and irregularities on the surfaces of the rocker arms and cams.
Checking camshaft wear
When dismantled, the camshaft can also be listened to. To do this, you need to hold it parallel to the ground with one hand, and tap on top with the other. There should be no knocking. A mandatory condition: the camshaft should not “walk” on the bed! Otherwise, clinging to the limiter, it will inevitably create noise, which can be mistaken for a malfunction.
High-quality camshafts are rarely damaged prematurely. But Chinese products or those repackaged in this country have a hardness 1.5 times lower than that of the original ones. A good shaft is made from forged steel.
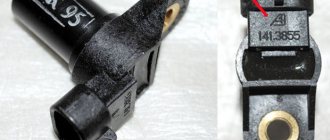
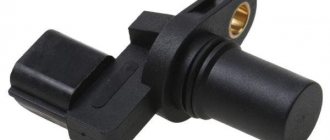
Camshaft position sensor
The camshaft sensor detects the current position of the camshaft. Depending on the readings of the crankshaft sensor and camshaft sensor, the engine control unit decides how to inject fuel and how to control the detonation of the power unit.
Camshaft sensors fail quite often. As a rule, if the sensor malfunctions, the engine idle speed begins to fluctuate. Also, a “Check Engine” icon appears on the car’s dashboard, and an error code for the engine control unit is recorded in the computer’s memory, which can be used during diagnostics to decipher the reason for the appearance of the “Check Engine” indication.
Replacing the camshaft sensor is relatively simple. Usually you don't even need to remove the engine valve cover to do this. But everything, of course, depends on the engine design, make and model. On average, it takes from 30 minutes to 2 hours to replace a camshaft sensor. The sensor itself costs approximately from 2000 to 6000 rubles. But the cost certainly depends on the car. You understand that a camshaft sensor on premium cars can cost a hefty sum.
Replacing with a new or restoring the old camshaft
Damage is always analyzed. Based on scratches and burrs on the bearing journals, cracks and deformations, experts determine the degree of wear. The area where the node sits in bed must be examined. The dimensions of the necks and body supports are measured using a micrometer. If the damage is severe and the deviations in diameters are large, it is not advisable to carry out repairs. In this case, it will be difficult to restore the part, it will cost much more.
When the defects are minor - for example, the wear of the shaft is weakly expressed, scratches on the surface under the seals are small, repairs are carried out. In this case, grinding the surfaces and installing new oil seals with a small axial cross-section will help greatly.
One of the most common problems with camshafts is worn camshafts. This defect usually manifests itself with a characteristic knocking sound inside the engine when starting “cold”. If you ignore the initial symptoms, the problem will get worse. The noise will increase, a metallic clang will appear not only at the start-up stage, but also during the movement.
Camshaft cam
The causes of early cam wear are:
- oil filter clogged;
- refueling with low-quality auto scrap;
- frequent overheating of the power plant - the metal of the cams begins to “lead” from this;
- low lubrication level;
- incorrectly set valve clearance;
- Incorrectly set phases of the gas distribution system.
The second common malfunction is defects in the support journals. These include nicks, scratches, and various abrasions. Supporting elements also bend, crack, and change their original shape. Minor types of violations are caused by natural wear or poor-quality composition of the engine oil. They can be easily eliminated by grinding and simultaneously cleaning the internal parts of a car engine - cylinders, pistons, rings. At the same time, the oil pump and the internal combustion engine cooling system are thoroughly diagnosed, and their incorrect operation is corrected.
The curvature of the support journals is determined not visually, but using special equipment. There is an acceptable degree of curvature, which is determined by 0.05 mm (for passenger cars).
Significant defects cannot be ground, so the camshaft is replaced with a new one
However, it is extremely important to be able to identify the cause that led to the wear. Otherwise, the problem will repeat
As a rule, cams and bearings often break and wear out prematurely under extreme conditions. When a car is used more than normal, it gets into accidents and various collisions.
The need to replace oil seals
The camshaft oil seal (cuff) is a sealing ring that prevents oil from leaking out of the camshaft. This gasket is equipped with engines that are equipped with a gas distribution mechanism (timing belt). If it suddenly does not perform its tasks, then the seal needs to be changed.
The main reason for malfunction is normal mechanical wear. All seals are common consumables, and after a certain amount of time they begin to deteriorate because they are made of elastic materials.
Any defect may appear: swelling, change in shape, tears, scarring, etc. Another possible malfunction: the cuff can be squeezed out of its seat.
It happens that the cuff is defective or installed (selected) incorrectly. In such situations, it is also necessary to change the camshaft oil seal, because it does not fulfill its intended purpose.
Oil seal failure is diagnosed visually. If it leaks, you can see traces of oil on the timing belt cover. In order to more accurately determine the extent of the problem, you need to remove the belt cover and conduct an inspection. If there is a malfunction, traces of wear will be visible, or due to increased moisture, the belt has jumped over one or a couple of pulley teeth.
We recommend
“Replacing gearbox seals: subtleties and tricks” More details The fact that the seal is faulty can be seen when it’s time to change the timing belt according to the plan. It is then that oil leaks can be detected on the belt or on the camshaft gear. If the seal is deformed, it should be replaced, despite the fact that oil is not leaking at this moment. However, changing the shape of the oil seal will cause oil traces to appear.
In addition to the above, the element should also be replaced if obvious mechanical damage is detected. This procedure is not urgent, and the car can be operated carefully for a long time. However, you should still know how to change the camshaft seal if it unexpectedly fails.
Moreover, if there are significant oil losses due to a damaged seal or the element is severely damaged, then there is no escape from replacement.
After traveling a certain number of kilometers, the car develops oil traces in the area of the camshaft pulley and oil seal. As the mileage increases, so do the leaks. This situation indicates that it is time to change the camshaft seal.
The problem here is not the loss of oil, but the fact that it is transferred to the timing belt and camshaft drive pulley. This turn of events becomes dangerous because the hot oil causes the rubber of the belt to deform. In this case, the oily liquid makes the belt slippery, and it may begin to slip on the pulley teeth.
As a result, cracks may form on the pistons or bend the valves. Be that as it may, you should change the seal to get rid of oil traces.
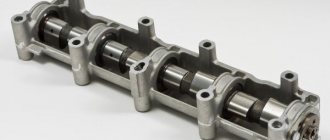
Device and principle of operation
The camshaft is a rod with cams and bearing journals. The number of cams corresponds to the number of valves.
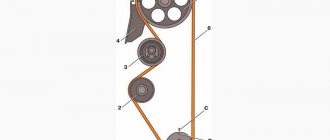
The element is connected to the crankshaft using a timing belt or chain. The belt drive is quieter, costs less, but needs regular replacement (60-90 thousand km). Chain transmission is noisy, expensive, does not require frequent maintenance, and has a long service life.
The camshaft is driven by special plain bearings. By rotating, the element regulates the phases of the gas formation process in accordance with the engine operating cycle.
When acting on the valves, the camshaft has to overcome the resistance of the springs, which act as a return mechanism. And the entire working process takes place under conditions of high pressure and temperature. And, despite the fact that the spare part is made by casting iron or forging steel, replacing the camshaft will still be necessary sooner or later.
What affects the serviceability and operation of the DPRV
The main factors that affect the operation of the sensor are temperature changes, shaking and metal dust. Therefore, it is necessary to replace the sensor every 100 thousand kilometers. This will avoid unexpected breakdown. When the engine is turned on, the temperature in the sensor area corresponds to the air temperature. As the motor heats up, the temperature of the sensor also increases. If the power supply or ignition systems are not adjusted, the engine runs intermittently, and the sensor is affected by stronger vibrations than designed. The engine has a lot of rubbing metal parts, the movement of which leads to the appearance of dust. If the lubrication system is not working properly, or the engine mounts are faulty, then more metal dust appears than usual. Some of it settles on the magnetic surface of the sensor, negatively affecting its operation.
What camshaft will we install?
It's not even a question. This is most likely a statement of the fact that installing a sports camshaft is a resolved issue.
Why install a sports camshaft? People's experience is better than any advertising.
What does installing and tuning a sports camshaft give to a standard engine? Engine response and power. The classics, such as the VAZ engine, have a significant, in the opinion of “hot” drivers, disadvantage.
At low speeds (up to 3000 rpm), the engine does not “pull”. This is expressed in dips when pressing the gas pedal at the beginning of movement, jerking when moving sharply, etc.
A solution, of course, was found. This is the installation and adjustment of a sports-type camshaft on classic engines. Fortunately, there are enough companies that produce tuning sports camshafts today.
How to understand that the camshaft needs to be changed?
To determine if the camshaft is faulty without opening the hood, there are two signs:
- Knocking;
- Reduced engine oil pressure.
The main cause of camshaft failure is the appearance of gaps. They appear between the magazines and the bearings of the frame on which the camshaft rests. The slots are formed because the camshaft parts are worn out. The gaps cause the shaft to move along a vertical or horizontal axis. If the shaft play is 1 mm, it affects the operation of the engine. Reasons for breaks:
- Timely replacement of the camshaft;
- Don't change your oil on time;
- Using low-quality oil;
- The driver works at low speeds, so there is little time, and parts wear out faster.
The camshaft also needs to be replaced if the oil passages are clogged. Before replacing parts, check for play, damage, deformation, or shaft runout.
Classification of sports camshafts
One of the key components that shapes the character of your car is the camshaft. For those who like to add 5-10 fresh horses to their engine, auto parts manufacturers offer engine tuning by installing a sports camshaft.
There are three main types of sports camshafts:
- the bottom shaft is used and is optimal for city driving;
- the universal shaft produces average results and is used both in the city and on the highway;
- The top shaft works most productively at high speeds in track conditions.
Typically, a camshaft has 3 main parameters - camshaft phase, overlap time and lift height. The wider the camshaft phases, the longer the valves remain maximally open, which allows the cylinders to be filled more intensively. The longer the camshaft overlap phase, the better the cylinders are purged, making room for a new portion of the air-fuel mixture. The valve opening height is also used to increase the time it remains open.
However, it should be remembered that the intake and exhaust valves also have a flow limit. When installing a sports shaft, it would be optimal to improve the entire cylinder head. It is recommended to immediately perform a comprehensive tuning of the intake and exhaust systems.
Honda F1 RA806E V8 camshafts
This is interesting: Interior lighting - a classic and atypical application
How to set marks on a VAZ 2107 Injector
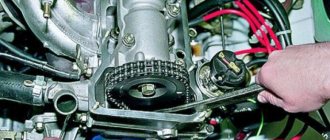
As for the VAZ 2107 carburetor engine, therefore, on the injection engine, the gas distribution mechanism in combination with the drive remained the same, in other words, the chain. If the chain is excessively worn, there are a number of negative consequences:
- Problem starting the engine.
- Significant increase in fuel consumption.
- The appearance of soot on valve seats.
- Abnormal engine operation in all modes.
- Faulty injection control sensor.
Timely preventive work is necessary to avoid such negative consequences. We will learn more about how to set time stamps on the VAZ 2107 Lada family with an injection power system.
Valve timing is when the piston in an engine moves up and down over a period of time. If the valves fail, the pistons move incorrectly for a certain period of time, and as a result, the engine on the VAZ-2107 runs unevenly.
If the driver notices that the car's power is decreasing, fuel consumption is increasing, and interruptions occur when the engine is running, then it is necessary to resort to setting the valve timing. We will learn from this material how to stick markings on the carburetor and injector of a VAZ 2107, since the design of the synchronization mechanism is similar.
The procedure includes the following manipulations:
- The VAZ 2107 must be installed on a hard surface, the wheels are blocked, and the handbrake is fully compressed. The gear shift lever must be set to neutral.
- The cover is removed from the cylinder head, having previously unscrewed our client, the fastening nuts remain at “10”. It is better to replace the gasket with the latest one, even if the old one shows no signs of damage.
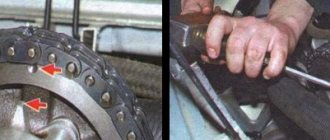
- Use the “24” key to turn the crankshaft on the VAZ 2107. This allows you to align the marks on the moving and stationary parts of the mechanism. We recommend using low light or a flashlight to perform these steps. The crankshaft rotates without adjusting the torque quality until the mark on the pump and generator drive belt pulley matches the long-term risk inherent in the unit.
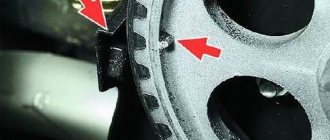
- Combining these dangers, the star rating should match the tide on the camshaft over time. If the mark is finally at the bottom, turn the crankshaft at full speed.
- If this doesn't work for label matching, proceed to the following steps:
- The crankshaft rotates until the marks connect with the sprocket and bed bosses.
- Using the “13” key, the tensioner must be loosened. 2.4 The tensioner nuts are unscrewed, then this device is removed.
- The screw is unscrewed, which secures the sprocket to the camshaft. To do this you will need to use the key at "17".
- The sprocket is removed, then it should be turned without performing high-quality torque adjustment until the marks on the VAZ-2107 timing belt pulley coincide with the long-term risk on the block. It is impossible to unscrew the sprocket mounting bolt because the camshaft sprocket rotates after removing the tensioner.
- The chain is put on the star if you decide to twist it and put it in place. Finally, the tensioner is installed, which must be tightened with 5 nuts to "10". You can install the tensioner first, but later you will need to use a breaker or mount to install the sprocket in this area. Finally, tighten the nut to “13”.
WEAK to set the time to zero? Camshaft, power chain and chain markings
This relative arrangement of the parts allows the piston of the 4th cylinder to be positioned at top dead center TDC.
If the VAZ-2107 is equipped with gas distribution markings, you must perform the following steps:
- The VAZ-2107 timing chain is tensioned.
- Adjusting the valves, or more precisely, the thermal gap between the camshaft cam and the rocker.
- Setting up a set of ignition accounting programs.
The process of adjusting valves on a VAZ-2107 is as follows: valves 6 and 8 are first adjusted, a report should be stored by the radiator. Once they are adjusted, you need to start adjusting 4 and 7 valves, then 1 and 3 valves, and then 2 and 5 valves at the end.
Start of work
The very first step is to remove the air filter. Of course, on a carburetor engine it is somewhat easier to remove it. If you have an injector, you will have to tinker with its rubber fasteners. But the essence remains the same - it is necessary to disassemble the fuel system completely to get to the cylinder head. But we will look at the example of not an injection, but a carburetor seven. Still, there are many more classic cars with such a power system.
It is advisable to dismantle the carburetor, since if you remove the head along with it, you can accidentally damage it. On all classic series cars, the carburetor is removed in the same way. This procedure is quite simple, but it will take some time. Now you can unscrew the nut securing the distributor and remove the distributor along with the wires. Getting closer to the engine, all that’s left to do is drain the antifreeze from the system.
And then turn off all the pipes that you see. After this, it will be possible to dismantle the cylinder head cover. It is secured with nuts and shaped washers. Don't lose them during repairs. That's all, the preparation is complete, you can begin the most difficult part - dismantling and installing the cylinder head.
How to detect a camshaft defect
The main reason for camshaft failure is oil starvation. It can occur due to poor condition of the filter or inappropriate oil for a given engine (read the parameters for selecting a lubricant in a separate article). If you follow the maintenance intervals, the timing shaft will last as long as the entire engine.
Typical camshaft problems
Due to natural wear and tear of parts and motorist oversight, the following problems with the gas distributor shaft may occur.
- Failure of attached parts - drive gear, timing belt or chain. In this case, the shaft becomes unusable and needs to be replaced.
- Seizures on the bearing journals and wear on the cams. Chips and grooves appear due to excessive stress, for example, as a result of improper valve adjustment. During rotation, the increased friction force between the cams and tappets creates additional heating of the assembly, destroying the oil film.
Oil seal leaking. It occurs as a result of prolonged inactivity of the motor. Over time, the rubber seal loses its elasticity. Shaft deformation. Due to overheating of the motor, the metal element may bend under heavy load. This problem is detected by the appearance of additional vibration in the engine.
Typically, such a problem does not last long - due to strong shaking, adjacent parts will quickly fail, and the motor will need to be sent for major repairs. Incorrect installation This in itself is not a problem, but due to non-compliance with the standards for tightening the bolts and adjusting the phases, the internal combustion engine will quickly become unusable and will need to be “overhauled”. Poor quality of the material can lead to failure of the shaft itself, therefore, when choosing a new camshaft, it is important to pay attention not only to its price, but also to the reputation of the manufacturer.
Some motorists try to eliminate some timing shaft problems by grinding damaged areas or installing additional bearings. There is no point in such repair work, because when performing it it is impossible to achieve the accuracy necessary for the smooth operation of the unit. If a problem occurs with the camshaft, experts recommend immediately replacing it with a new one.
Timing gears
This is worth talking about separately. The gas distribution mechanism requires very precise gear adjustment. Often it is enough to align the gears according to the camshaft marks on the VAZ-2106. But for more precise adjustment there is a special split gear. The teeth in it are fixed with bolts to the base.
More expensive cars have modern engines where this process is automated. Instead of a camshaft gear (as on the VAZ-2106), hydraulically controlled clutches are used. The sensor knows the current shaft angle as well as the engine speed. In this way, the gas distribution phases are adjusted for different engine operating modes.
How to check
There are two ways.
- Multimeter.
- An oscilloscope.
Both technologies have pros and cons.
Niva Chevrolet: how to check the phase sensor with a multimeter
The procedure is as follows.
- Open the hood and find the DPRV.
- Using the car's electrical diagram, determine the power and signal terminals.
- Connect a multimeter to body ground and signal terminal.
- Turn on the car ignition.
- If the sensor is working properly, the tester display will show a figure between 10 and 10.5 Volts. Otherwise, the part must be replaced.
Checking the sensor using an oscilloscope
A more accurate method involves the use of special equipment. Experts recommend using a physical tool, not a virtual program on a laptop, which is justified by the dubious accuracy of the readings of such a combination.
The essence of the test is to connect the device to the sensor and measure the actual pulses. Depending on the sensor model and engine characteristics, the data on the display may vary significantly. Among the disadvantages, one can emphasize the presence of experience and knowledge of how to use an oscilloscope correctly.
Instructions: Removing and installing the camshaft
Before dismantling, the camshaft is checked for axial displacement. You don’t have to hit the bed too hard and listen. If the part knocks, the malfunction is confirmed. The part is removed in the following sequence:
- loosen the clamp, separate the breather tube from the air filter;
- pull out the air filter hose;
- remove the choke cable;
- remove the gas damper drive;
- pull out the valve cover by unscrewing the eight nuts - they connect the part to the cylinder block;
- install the camshaft at the compression end of cylinder number 4;
- loosen the camshaft chain tensioner nut by resting the mounting blade on the shoe and firmly fixing the rod - if you can’t loosen it, remove the tensioning mechanism completely;
loose camshaft chain
- bend the lock washer and unscrew the gear mounting bolt, release the camshaft sprocket - before doing this, put the gearbox lever in fourth gear to avoid turning the camshaft;
- remove the chain and hang it on a wire;
- unscrew the bed clamps to the cylinder head, acting in a staggered manner;
unscrewing the camshaft bed bolts
remove the camshaft.
The bed can be removed together with the camshaft, as on the Vases, or separately. If it is pulled out at the same time, then the thrust flange is pulled out next. It is held on by a nut numbered “10”. After removing the flange, the shaft is removed from the bed - you need to slightly raise the cam, thereby freeing it from the spring pressure.
The old camshaft must be troubleshooted. As mentioned above, if the level of damage is significant, there is no point in repairing. When removing the camshaft, other timing parts are checked simultaneously - rocker arms, springs, oil seals.
Installation of a new or repaired camshaft is carried out strictly according to the instructions. One of the main rules is to tighten the bolts in a certain order and with the required force. For example, for Zhiguli, the tightening torque is 18.3 N/m.
Further on installation:
install the cam spring;
- lubricate the bed with clean oil;
- install the new camshaft so that the cams do not rest on the valve tappet washer with the upper part of the nose;
- tighten the bolts of the thrust flange using a “10” wrench;
- tighten the fasteners, following the same pattern - one at a time;
- put the split gear, chain, washers in place - it is recommended to connect the chain to the gear with a thread so that there is no jumping over the teeth;
- tighten the sprocket mounting bolt using a “17” wrench;
- install the lock washer;
- engage the tension mechanism by resting the pry bar against the shoe and firmly holding the camshaft rod.
Also, any self-respecting auto mechanic will replace the shaft at the same time as installing new rockers. They are also called rocker arms. This is done because the production of parts leads to premature wear of the camshaft itself.
How to replace the camshaft oil seal?
Replacing the camshaft oil seal is included in the mandatory list of works. The oil seal or cuff is a sealing ring made of elastic material that prevents oil from leaking out of the camshaft. The main reason for wear of this gasket is simple obsolescence. There are 2 oil seals installed on the camshaft - front and rear.
The malfunction of an element manifests itself in any way - a change in shape, swelling, rupture, or the appearance of cracks. Often the oil seal simply falls out of its seat. A seal malfunction is diagnosed visually - the appearance of oil traces on the timing cover, belt jumping, etc.
Replacing the front oil seal is much easier than replacing the rear oil seal. It is enough to remove the valve cover, also remove the timing belt, and secure the pulley from turning with a pry bar. The pulley from the camshaft shank and the key located behind it are also removed. Then the oil seal is picked out with a screwdriver or tweezers.
Replacing the camshaft oil seal
How to replace a camshaft chain?
If the vehicle's timing mechanism is equipped with a chain drive, the camshaft chain may need to be replaced. Despite the structural strength, this element breaks due to operational wear, poor metal quality, camshaft jamming and other related reasons. A break can also be caused by sudden braking of the car or an intensive increase in speed.
The procedure for replacing the chain will also not be particularly difficult. It is necessary to remove the metal valve cover, rotate the crankshaft until the marks match and fix the shafts. The old chain can be removed without dismantling the crankshaft gear
Particular attention is paid to the tension of the leading branch. It should be carried out taking into account the coincidence of the marks on the camshaft gears and bearings
Replacement Guide
The work of removing the crankshaft on a VAZ 2106 is somewhat labor-intensive, but a driver with little experience can do it. We do not need special equipment or special tools to work.
Set of tools
- set of heads;
- ratchet;
- knob;
- extension;
- a set of keys;
- rags.
Sequencing
- To get to the crankshaft, you first need to remove the air filter and housing.
- Next, disconnect the choke cable.
- Gas damper drive.
- Clean and wash the valve covers thoroughly. Usually dust and dirt accumulate on it, otherwise they may get inside the motor.
- Now you need to unscrew all the nuts and remove the valve cover. Experts recommend replacing the gasket when removing the valve cover. When purchasing, buy a rubber-cork one, as it holds oil much better than rubber.
- By removing the cover, we gain access to the camshaft; in most cases it is very dirty.
- Now you need to loosen the camshaft sprocket fasteners. To prevent the motor from turning over, insert a screwdriver between the sprocket and the chain.
- Important! Be sure to align the mark on the crankshaft and the camshaft sprocket. You must strive to ensure that the mark on the crankshaft pulley is against the long mark, and the mark on the camshaft sprocket is against the protrusion on the camshaft bed.
- After alignment, we proceed to removing the chain tensioner.
- Unscrew the nuts with a wrench.
- Remove the tensioner.
- We remove the star, which is located on the guide pin.
- After unscrewing the bolt securing the sprocket, remove the sprocket. A hammer may be needed here.
- We tie it to a chain.
- Now you need to unscrew the nuts securing the crankshaft and remove it.
- By the way, it will be noted that if a stud with a nut is turned out, then it is screwed back in with a special stud turner.
- Next, we inspect the camshaft and replace it if necessary.
- The shaft is clamped according to the diagram. The tightening order must be observed. The tightening torque is also important. On a VAZ 2106 car, the tightening torque is 18.3 N/m.
- When assembling, be sure to check that the marks are aligned correctly. If they are out of order, they need to be set correctly.
- Finally, adjust the tension of the chain and valves.
Operation and repair of camshafts
The camshaft is a fairly reliable part that will last at least until the first major engine repair. If you have a classic engine model without hydraulic compensators, every 10-15 thousand kilometers you need to monitor the camshaft clearances with rockers and adjust them. In all types of engines, the tension of the timing belt or chain should be monitored. Such nodes have a limited service life. Over time, chains can stretch and interfere with the engine block during operation.
Camshaft faults
Camshafts, like all “rubbing” parts, are subject to mechanical wear. The bearings also become unusable, and the camshaft oil seal may collapse and lose its shape. A broken camshaft can subsequently damage other engine mechanisms.
The causes of such problems may be:
- natural wear of the camshaft;
- low quality oil;
- insufficient oil pressure;
- insufficient oil level;
- violations of engine temperature conditions (outside the operating temperature range, the oil becomes liquid and partially loses its properties);
- mechanical damage, for example, the tension roller and camshaft belt have a limited service life; if the timing belt breaks, the engine and camshafts can suffer significant damage.
Camshaft diagnostics and repair
Possible problems with the camshaft are indicated by noise during its operation. The cause of the noise may be the camshaft bearing, which requires replacement.
If the camshaft is knocking, most likely the wear of the working surfaces has led to critical play. Typically, shafts have tolerances for the size of the groove and curvature. If noise occurs, it is necessary to measure the camshaft surfaces. A camshaft knock is a reason to urgently contact a service center.
A drop in engine oil pressure can also indicate camshaft wear.
Measuring the diameter of the camshaft journals with a micrometer
How to check the camshaft? The most reliable way is to remove the camshafts. If they have obvious, noticeable burrs and streaks, restoration or replacement is necessary. To determine the exact output values, micrometers of various modifications will be required. If repairs are unavoidable, it is necessary to perform a full diagnostic of the cylinder head and all timing components.
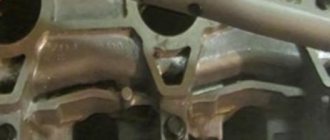
Development on the camshaft journal
How to restore camshafts? Camshafts that have acceptable dimensions of wear and curvature are subject to restoration. In case of relatively minor wear, the shaft is only slightly corrected by grinding. For more significant wear, the surface is electroplated with chromium or iron. When significant restoration is required, metal surfacing is performed using gas or electric arc welding. Then the contact surfaces are precisely adjusted. The camshaft bed (the place where the camshaft is installed) is machined on a special machine or manually using “reamers”. All elements are carefully polished and brought to nominal sizes. Such procedures require serious knowledge of process technology and the availability of special equipment.
Various reamers for camshaft journals and bearings
Welded camshaft lobes before grinding
Camshaft replacement
How to install a new camshaft yourself? Replacing a camshaft is a complex procedure, but if you have the necessary knowledge and skills, this operation can be performed in a home workshop. Before starting work, carefully study the components and mechanisms of the engine, and find out how to remove its elements.
Cylinder head VAZ 21061 - cylinder head; 2 - camshaft; 3 - rear camshaft bearing housing; 4 - gasket; 5 — cylinder head cover; 6 — front camshaft bearing housing; 7 — camshaft oil seal
Skoda Superb 1.8T › Logbook › Final repair of the cylinder head (+ restoration of the camshaft beds)
The problem was described in an earlier post. Thanks everyone for the advice! Indeed, it turned out that the oil seals on the Erling intake valves were either fake or simply of poor quality. Carbon deposits formed on the intake valves, which prevented them from closing. And also, I think that this was the reason for my slight oil burn, which, as I initially assumed, was due to VKH. Now to the point. It was decided to replace the valves, unscrew the bushings, since some of the valves were slightly wedged in them, loosen the seats, and grind them in. The reamer was bought in a store at 7mm, if I’m not mistaken, but with cutters it’s more difficult. We found where to buy a set for a VAZ 2110. The angle of one of the cutters there corresponds to the angle of my cylinder head, but the pin is already 1mm smaller in diameter. We had to look for the axers that this pin made for us.
Next comes the processing of the saddles themselves. First, let's talk. Somehow some of the saddles themselves turned out imperfectly, so they found someone who helped and suggested. In general, we coped with the task.
We grind long and hard.
We collect everything and start it up. Works fine. We try to give gas, something happens in the engine, a loud knock appears. Disassemble again... We remove the cover and see that the hydraulic compensator has jumped out, got under the camshaft, and that in turn melted the camshaft bed... The picture is terrible. It is not clear why the rocker jumped out like that, or the pump simply didn’t pump enough oil, and the camshaft itself first scratched the bed. The fact is that the head and valve cover are damaged. It's not cheap. I wanted to have the head restored at Mechanics, but they refused because nothing would work well anyway. I found another one that took my cylinder head to work. The camshaft is slightly damaged, but not critically, there is no runout, so I decided to leave the old one (a new one costs at least 30 thousand). Here is what has deteriorated on the shaft:
I would like to express my gratitude to the employees of MotorIntech LLC for their quality work, in particular to the Inspector Yuri for his respectful attitude towards clients. Within a week they completed all the work to restore the beds, as promised. All this cost me 13 thousand, and a working used cylinder head costs about 50 thousand.
REMOVAL, DEFECTIVENESS AND INSTALLATION OF CAMSHAFT
REMOVAL, DEFECTIVENESS AND INSTALLATION OF CAMSHAFT
The camshaft is installed in the bore of bearings made in the body of the cylinder head and is fixed by a thrust flange. The camshaft acts on the valves through rocker arms mounted on studs at the top of the cylinder head and secured with nuts through the rocker arm holders.
You will need: the same tools as for removing the timing belt, cylinder head cover (see “Replacing the cylinder head cover gasket”), as well as a “13” socket, a “13” wrench, and a torque wrench.
1. Set the piston of the 1st cylinder to the TDC position of the compression stroke (see “Installing the piston of the 1st cylinder to the TDC position of the compression stroke”).
2. Remove the camshaft timing pulley (see “Replacing the camshaft oil seal”).
NOTE
The camshaft can be replaced without removing the cylinder head. In this subsection, replacing the camshaft is shown for clarity on a removed cylinder head.
3. Unscrew the fastening nut...
4. ...remove the rocker arm with the holder from the stud...
5. ...and remove the hydraulic compensator.
6. Similarly, remove the remaining rocker arms and remove the gyro compensators.
7. Remove the two mounting bolts...
8. ...remove the thrust flange...
9. ...and remove the camshaft from the cylinder head body.
WARNING
Replace the oil seal with a new one each time you remove the camshaft.
10. Inspect the camshaft.
There should be no damage or wear on the keyway and the threaded part on the shaft toe, and there should be no signs of excessive wear or nicks in the groove under the thrust flange. The surfaces of the bearing journals and cams must be well polished without damage. If there are signs of binding, overheating, deep marks or wear steps, replace the shaft.
WARNING
Grinding the camshaft cams to eliminate stepwise wear is prohibited, since changing the dimensions of the cam profile will disrupt the valve timing.
11. Measure the height of the cam profile (the size between the top and the back of the cam) and compare with the nominal size indicated in the table. 5.1.
| Table 5.1 NOMINAL JAW PROFILE SIZE | |
| Measuring cam | Nominal size, mm |
| Intake valve cam | 37,559 |
| Exhaust valve cam | 37,559 |
12. Measure the diameters of the camshaft journals and their bearings, calculate the clearances in the shaft bearings, determined by half the difference between the diameters of the bearings in the cylinder head and the diameters of the journals (Tables 5.2 and 5.3).
If wear exceeds the permissible limit, replace the camshaft with a repair one, since regrinding the journals to a repair size is not provided.
| Table 5.2 NOMINAL DIAMETERS CAMSHAFT JACKS AND BEARINGS | ||
| Neck number | Neck diameter, mm | Bearing diameter, mm |
| 1 | 44,74–44,76 | 44,783–44,808 |
| 2 | 44,99–45,01 | 45,033–45,058 |
| 3 | 45,24–45,26 | 45,283–45,308 |
| 4 | 45,49–45,51 | 45,533–45,558 |
| 5 | 45,74–45,76 | 45,783–45,808 |
| Table 5.3 REPAIR DIAMETERS CAMSHAFT JACKS AND BEARINGS | ||
| Neck number | Neck diameter, mm | Bearing diameter, mm |
| 1 | 45,12–45,14 | 45,163–45,188 |
| 2 | 45,37–45,39 | 45,413–45,438 |
| 3 | 45,62–45,64 | 45,663–45,688 |
| 4 | 45,87–45,89 | 45,913–45,938 |
| 5 | 45,12–45,14 | 45,163–45,188 |
WARNING
When installing a new camshaft, replace the valve rocker arms with new ones. Before starting the engine for the first time and to improve running-in conditions, it is recommended to add an extreme pressure antifriction additive to the engine oil.
13. Install the camshaft lubricated with engine oil into the cylinder head body. Install all previously removed parts in the reverse order of removal.
WARNING
After installing the camshaft, you can start the engine no earlier than one hour; this time is necessary for the sealant to polymerize.
14. Adjust the tension of the generator and air conditioning compressor drive belts, as well as the power steering pump.
Return to contents
All rights to photos and text materials belong to Third Rome Publishing House LLC
ENGINE
| Detail | Thread | Tightening torque, N.m (kgf.m) |
| Cylinder head bolt | M12x1.25, | See Engine section |
| Nut of the stud securing the intake and exhaust manifolds | M8 | 20,87–25,77 (2,13–2,63) |
| Tension roller nut | M10x1.25 | 33,23–41,16 (3,4–4,2) |
| Camshaft bearing housing stud nut | M8 | 18,38–22,64 (1,87–2,31) |
| Camshaft pulley bolt | M10x1.25 | 67,42–83,3 (6,88–8,5) |
| Accessory housing mounting screw | M6 | 6,66–8,23 (0,68–0,84) |
| Nuts of the studs securing the outlet pipe of the cooling jacket | M8 | 15,97–22,64 (1,63–2,31) |
| Main bearing cap bolt | M10x1.25 | 68,31–84,38 (6,97–8,61) |
| Oil sump bolt | M6 | 5,15–8,23 (0,52–0,84) |
| Connecting rod cap bolt nuts | M9x1 | 43,32–53,51 (4,42–5,46) |
| Flywheel bolt | M10x1.25 | 60,96–87,42 (6,22–8,92) |
| Coolant pump mounting bolt | M6 | 7,64–8,01 (0,78–0,82) |
| Crankshaft pulley bolt | M12x1.25 | 97,9–108,78 (9,9–11,1) |
| Coolant pump inlet pipe mounting bolt | M6 | 4,17–5,15 (0,425–0,525) |
| Muffler exhaust pipe fastening nut | M8 | 20,87–25,77 (2,13–2,63) |
| Nut securing the flange of the additional muffler | M8 | 15,97–22,64 (1,63–2,31) |
| Nut securing the clutch cable to the bracket | M12x1 | 14,7–19,6 (1,5–2,0) |
| Nut of a bolt of fastening of a forward support of the power unit | M10x1.25 | 41,65–51,45 (4,25–5,25) |
| Nut of the bolt securing the left power unit support | M10x1.25 | 41,65–51,45 (4,25–5,25) |
| Nut securing the left support bracket to the power unit | M10x1.25 | 31,85–51,45 (3,25–5,25) |
| Nut securing the rear support of the power unit | M10x1.25 | 27,44–34 (2,8–3,47) |
| Nut of the bolt securing the rear support bracket to the power unit | M12x1.25 | 60,7–98 (6,2–10) |
| Bolt securing the oil receiver to the main bearing cover | M6 | 8,33–10,29 (0,85–1,05) |
| Bolt securing the oil receiver to the pump | M6 | 6,86–8,23 (0,7–0,84) |
| Oil pump mounting bolt | M6 | 8,33–10,29 (0,85–1,05) |
| Oil pump housing bolt | M6 | 7,2–9,2 (0,735–0,94) |
| Oil pump pressure reducing valve plug | M16x1.5 | 45,5–73,5 (4,64–7,5) |
| Oil pressure warning light sensor | M14×1.5 | 24–27 (2,45–2,75) |
| Carburetor mounting nuts | M8 | 12,8–15,9 (1,3–1,6) |
| Cylinder head cover nut | M6 | 1,96–4,6 (0,2–0,47) |