Stary Oskol, Russia
About a couple of months ago, with the arrival of warmer weather, I began to notice a knocking noise under the panel in the glove compartment area. At first I didn’t attach much importance, because... I thought it was stuff in the glove compartment! but the sound did not pass and infuriated me more and more! Lately, I was no longer happy about Mouzon, but just drove and listened to this rattling sound! It looked like some kind of iron ball was rolling around the stove! I glued all the parts under the panel where my hand could reach, nothing has changed...
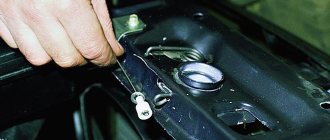
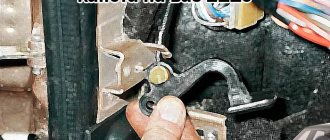
None of my friends had ever encountered anything like this; half of the donkey advisers simply said, “It’s AvtoVAZ!” So Drive can help us! It turns out that this is another Prior disease: the knocking of the hood hinge! I tried to press the corner of the hood while driving and OH MIRACLE! the sound is gone! It can be solved by either removing the hood or rubber banding under the fender! I had no desire to remove it, so I bought an elastic band from the rear stabilizer of a VAZ 2108.
I trimmed the edge a little and stuffed it between the wing and the hinge.
And that's it, now there is peace and quiet)))
FakeHeader
Comments 34
Which is put on the frill and rests against the hood from the inside.
By the way, time has passed and I can draw conclusions. In extreme heat on bad roads, you can still hear those same unpleasant sounds, but it’s still quieter than before. The idea works. In addition, the hinges can be repaired later.
Friends, there is a simple quick way, I made it for myself, we put what we have at hand, porous rubber, a tourniquet, into the seal of the engine shield inside the tube, the main thing is not to overdo it. And the hood receives reliable support and the hinges do not knock.
Is this the same seal that is placed along the windshield or would it be more correct... on the frill that is put on?
It was also knocking on the passenger side, I just bought a new hinge and installed it. price 310 rubles
That's it, I've been listening to this concert for a month now...
that's how people sell it later)))
But it seems to me that we need to do it properly, and not put rubber bands)))
The proper way to do this is to remove the hood and hit the hinge several times with a hammer. And if you take it off, then you won’t be able to display it as it was...
Well, the eyes are afraid, but the hands are doing it))) You just need a partner to take pictures and put them on.
Well, maybe I’ll need something, then I’ll take it off))
Well, the eyes are afraid, but the hands are doing it))) You just need a partner to take pictures and put them on.
You didn't even need a partner. Everything is displayed easily) But you just need to do everything in a timely manner, and not like me (((
I found what was knocking. The hammer, on the tube, hammered the glass for one and a half minutes when starting the engine.
Yah? Thank you very much for this post) I’ve been looking for the reason for this knocking for days))) I was thinking about using a loop but didn’t know what to come up with) I’ll do it today)
You're welcome)) I also suffered for a long time and found a solution on this site. This turns out to be a prior disease.
I have the factory rubber there, but there is still a knocking noise.
Wow, I wanted to look for them instead of this terrible one. This means they don’t solve the problem either...it’s a shame
The loop on the right side began to knock
well, this thing costs 25 rubles in a panauto))
Yes, I'll have to go buy it this weekend
I suffered with this crap for 3 months! Only on the left side. Already...and so I climbed this panel up and down. He was just about to start taking it off. But one fine day, while drinking beer and discussing the problem with a friend, we found the reason)
Main menu
The hood can be removed as an assembly with the elements installed on it. To do this, simply disconnect the hose from the windshield washer pump. In this way, the hood is removed to dismantle the engine using a hoist or winch.
But if necessary (for example, to paint the hood or replace it), the work can be done with preliminary disassembly: removing the hood trim, windshield washer nozzles, and decorative trim.
We carry out the work with an assistant.
1. We prepare the car for work.
2. Remove the casing from the left hinge of the hood.
3. Disconnect the hose from the windshield washer pump.
To remove the disassembled hood, use a 10 mm socket wrench to unscrew the two nuts securing the safety hook and remove the hook.
We turn out the two hood buffers.
Using a screwdriver or a puller, we remove the hood trim holders.
Remove the hood trim.
Disconnect the hose from the windshield washer nozzle.
Using a screwdriver, press the two latches
remove the nozzle from the hood hole.
Similarly, remove the second injector and remove the hose from the hood.
Lada Priora Sedan SNOW WHITE › Logbook › hood stop technomaster
Today I started installing nishtyaks from Tolyatti, I started with the hood stop. I admired this stick for the last time
I’ll describe in detail how I did it - first you need to remove 19 of these pistons
old stop retainer
I tried to remove the casing but the lock didn’t work, I didn’t tear it, I unscrewed the two nuts by 10
for some reason I decided to glue it with a vibrator, washed the hood, degreased it and stuck on a little more than a sheet
Through the hole in which there used to be a hood latch, we insert a bracket, after that we put the trim on and secured it to several pistons near the bracket. The second end of the bracket should come out through the hole in the hood a little to the right into which the piston was inserted, we secure with two nuts and washers the upper mount of the stop on the hood, the lower one I didn’t buy the mount, the brace was already on the brace, I screwed a bolt with a round head from the stop into the hole of the brace, the stop itself was securely packaged and instructions were included to install the hood stop on the fasteners, it’s best to use two people, since you first need to remove the standard stop, and then click the gas gas into the mount stop. now opening the hood is a pleasure
Reason for knocking
Knocks always cause some concern among drivers, since extraneous sounds may indicate that car parts have worn out and will soon fail. In addition, knocking creates serious discomfort when traveling, and even music in the cabin does not help get rid of the unpleasant sensations.
Many car owners are beginning to sin with the plastic elements of the interior. Someone glues the center console, the glove compartment, and then the entire dashboard, but the sound does not go away. The next idea is to fix the radiator. Having dismantled half of the interior and glued all the plastic parts related to the radiator, the driver gets behind the wheel in the hope that the “crickets” will stop. But no. His next thought is problems with the suspension, but similar faults can also occur on new models that have not traveled even 50 thousand km. Therefore, the suspension has nothing to do with it either.
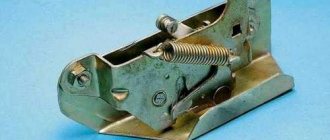
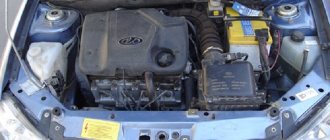
In fact, unpleasant sounds that haunt you while driving are created due to the hood hinge. In Lada Priora models, play occurs in the hinge, which loosens the fastening. This is the source of noise while driving. To diagnose, use the help of a friend. Press down on the hood while driving at low speed. If the sound disappears, then the problem lies in the loop. This can be determined by checking the play at the bottom of the hinge. If there is mobility in the hinge structure, it is worth ending the search and moving on to repairs.
practical guide
To complete the work you will need:
- nylon cord at least 5 m long;
- ballpoint pen body;
- a piece of thin steel wire 10 cm long or a paper clip.
To replace the hood lock drive rod (together with the shell), it is necessary to perform labor-intensive work - remove the instrument panel. Here we describe a method that allows you to replace the hood lock rod with minimal disassembly of the car. On vehicles equipped with an air conditioner, the work is made difficult by the condenser installed in front of the radiator of the cooling system. It is necessary to move the condenser along with the radiator into the engine compartment. This can easily damage the air conditioning system pipes. It is recommended to carry out such work at a service station with the removal of the capacitor elements.
If the rod moves easily in the sheath, but you have to change it because it has broken off, you can only replace the wire by pushing it into the old sheath.
We carry out the work with an assistant.
1. Remove the front bumper.
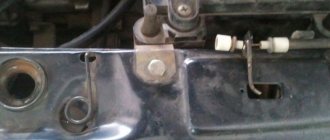
2. Using an 8 mm open-end wrench, unscrew the nut of the rod clamp.
The nut is located above the clamp loop, so it is difficult to unscrew it (the photo shows the view from below).
3. We remove the rod through the slot from the bracket stop and disconnect the front end of the rod from the hood lock.
4. Remove the clamp first from the threaded rod and then from the rod shell.
5. Pull the rod shell into the resulting opening.
6. Fold the nylon cord in half and put the resulting cord loop on the bent end of the cable. We tuck the end of the cable into the sheath.
Access to the hood release lever is made difficult by the instrument panel, so the work will have to be done by touch. In the photo the instrument panel has been removed.
7. Under the instrument panel, remove the tip of the rod shell 1 from the bracket and pass the rod through the slot in the bracket. By similarly removing the rod through the slot of the lever, we remove the plastic tip of the rod 2 from the hole in the lever.
8. Pull the rod sheath into the car interior (until the cord appears).
9. Disconnect the cord from the rod and remove the rod assembly with the shell.
10. Using a piece of steel wire, bending it in half, we pull the cord loop through the body of the ballpoint pen (the tapering part of the pen body should be directed in the direction opposite to the cord loop).
11. Using pliers, bend the end of a new rod 3-4 cm long. We put a cord loop on the bent end of the rod. To securely fix the cord on the rod, we wrap the rod with insulating tape.
12. Slide part of the handle body tightly onto the shell of the new rod. Apply a little soap solution to the handle body.
13. Insert the plastic end of the new cable into the hood opening handle (see above).
14. From outside the car, use the cord to smoothly pull the hood lock drive rod, while at the same time directing the handle body from the passenger compartment into the hole in the rubber seal of the engine compartment partition and pull the cable out.
15. We fix the lock opening handle on the axis, remove the cord and attach the rod to the hood lock (see above).
When attaching the drive rod to the hood lock lever for fitting, first put the lock in place. Make sure that the rod is routed correctly: there is no twisting or creasing of the shell. Using pliers, fully extend the rod and place a mark where the rod bends. Bend the rod with pliers.
16. Further assembly is carried out in the reverse order of removal.
Add a comment Cancel reply
You must be logged in to post a comment.
Repair
There are two ways to help stop knocking in the hood:
- Fast, but temporary.
- Reliable, but will require some tinkering.
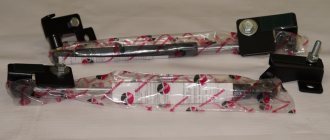
The first method of troubleshooting can rightly be called “collective farm”. In this case, to get rid of knocking, you need to install a rubber stop under the hinge. A bushing from the stabilizer or an elastic band from the jet thrust will be suitable as a lining. To prevent the hood from sticking out and the hinge from closing at a break, the rubber element must be sharpened to fit. It needs to be installed between the hinge and the wing. It’s interesting that on the Priors there is an excellent recess for the elastic band, where the part fits like a native one. It seems that this corner under the hood was originally designed for inserting “collective farm” rubber bands and eliminating such problems. It's nice - everything is done for people!
Of course, this method will not eliminate the causes of the problem, but will only temporarily relieve you of the consequences. Many drivers will not like this method, since they are used to carrying out car repairs efficiently and seriously. This is correct, but if you don’t have time for repairs or are on a long journey, this method will be quick and effective. And since a suitable bushing can be purchased for less than 100 rubles, repairs will also be cheap.
The second method of repairing the hinge will require more time and effort, but will help eliminate the cause and completely relieve you of knocking. To do this, you need to dismantle the loop. To remove the hood hinges, you do not need to disassemble the entire front part. Some car owners do not undertake this procedure because they mistakenly think that for repairs they will need to dismantle everything down to the headlights.
In order to get to the hinges, it is important to remove the hood cover, fender liner, fender and unscrew part of the bumper. The bumper does not need to be completely removed. It is enough to unscrew a few bolts coming from the edge of the bumper on the side of the rattling hinge. Before dismantling the wings and hinges, you should put marks on the parts and frame of the car so that after the repair everything will fit smoothly.
By removing the hinge, you will see for yourself the source of the play, which is located in the riveting. To get rid of it, you need to hammer the rivet with a hammer, setting the stop on the opposite side. But do this carefully so as not to damage the fastening elements.
After eliminating the play, install the hinge on the stiffening frame, observing all the marks you made. Then reassemble the fender, fender liner, bumper and hood in reverse order. If you were able to align the hinge and fender according to the drawn marks, the bumper will not have any distortions and will close perfectly.
As you can see, in this case there is no need to dismantle the bumper and headlights, so the repair procedure is much simpler, although it does take some time.
How to open the hood if the cable is broken
But if you have free time, the necessary tools and are confident in your own abilities, you can try to open the hood yourself; below are tips from the experts of our technical assistance service on opening the hood. Of course, the design of the hood lock and the location of the cable differ on different cars, but most often the general sequence of actions for opening the hood remains the same.
It is necessary to figure out where the hood release cable broke.
In this case, in order to open the hood with a torn (torn from the fastening) cable, you need to grab the edge of the cable with pliers and pull it towards you, i.e. towards the car interior (as shown in the photo with the hood cable). To prevent the hood cable from slipping out, you can make a loop at the end of the cable and wrap it around the jaws of the pliers. That. you can open the hood if the cable inside the car breaks.
If you examined the hood lock handle in the cabin and did not find a torn or broken cable fastening, then the most likely cause is related to a broken cable in the area of the hood lock. Such a breakdown is quite complicated, because in order to open the hood, you need to get from the outside to the hood lock and force it open. We recommend that you seek the help of specialists who can open the hood and call a car mechanic from our technical assistance service.
Most often on modern cars the hood opens from the front, but there are exceptions when the hood opens forward and the hood lock is installed at the rear, near the windshield on all VAZs of the classic family (VAZ 2101 - 2107) and Nivas, see the video of opening the hood on a VAZ below.
Video on how to open the hood on a VAZ 2101-2107 and Niva
https://youtube.com/watch?v=KY6clFmLPqQ
How to open the hood if the cable breaks near the hood latch
On many cars, this can be done using an extended screwdriver or a wire hook (see photo of opening the hood), carefully insert the screwdriver or hook through the slots in the radiator grille and try to open the hood latch. On some cars, the radiator grille is solid, or does not allow you to get to the lock, in which case you need to try to remove the grille. If you can’t get to it with a screwdriver or remove the grille, there is another way to get to the hood latch - you need to jack up the car, remove the plastic or metal crankcase protection, and/or the lower elements of the bumper and try to get to the hood latch from below.
For example, this way the hood can be easily opened on front-wheel drive VAZ cars (2109, 2110, 2111, Lada Priora, etc.), as well as on our very popular Ford Focus car, which features an original hood lock with front opening.
If you can’t open the hood on your own, call our technical assistance service by phone, we’ll give you some advice, we’ll come and help.
Summing up
If your hood starts knocking, don’t rush to buy a canister of glue and fill the entire interior with it, but first check the condition of the hinges under the hood. This especially applies to owners of domestic cars. From the article reviewed, it is clear that the repair procedure is not difficult, so every driver can perform it independently. The main thing is to set marks with a marker that will help avoid distortions when reassembling the elements, and to be careful when removing the play.
practical guide
To complete the work you will need:
- nylon cord at least 5 m long;
- ballpoint pen body;
- a piece of thin steel wire 10 cm long or a paper clip.
To replace the hood lock drive rod (together with the shell), it is necessary to perform labor-intensive work - remove the instrument panel. Here we describe a method that allows you to replace the hood lock rod with minimal disassembly of the car. On vehicles equipped with an air conditioner, the work is made difficult by the condenser installed in front of the radiator of the cooling system. It is necessary to move the condenser along with the radiator into the engine compartment. This can easily damage the air conditioning system pipes. It is recommended to carry out such work at a service station with the removal of the capacitor elements.
If the rod moves easily in the sheath, but you have to change it because it has broken off, you can only replace the wire by pushing it into the old sheath.
We carry out the work with an assistant.
1. Remove the front bumper.
2. Using an 8 mm open-end wrench, unscrew the nut of the rod clamp.
The nut is located above the clamp loop, so it is difficult to unscrew it (the photo shows the view from below).
3. We remove the rod through the slot from the bracket stop and disconnect the front end of the rod from the hood lock.
4. Remove the clamp first from the threaded rod and then from the rod shell.
5. Pull the rod shell into the resulting opening.
6. Fold the nylon cord in half and put the resulting cord loop on the bent end of the cable. We tuck the end of the cable into the sheath.
Access to the hood release lever is made difficult by the instrument panel, so the work will have to be done by touch. In the photo the instrument panel has been removed.
7. Under the instrument panel, remove the tip of the rod shell 1 from the bracket and pass the rod through the slot in the bracket. By similarly removing the rod through the slot of the lever, we remove the plastic tip of the rod 2 from the hole in the lever.
8. Pull the rod sheath into the car interior (until the cord appears).
9. Disconnect the cord from the rod and remove the rod assembly with the shell.
10. Using a piece of steel wire, bending it in half, we pull the cord loop through the body of the ballpoint pen (the tapering part of the pen body should be directed in the direction opposite to the cord loop).
11. Using pliers, bend the end of a new rod 3-4 cm long. We put a cord loop on the bent end of the rod. To securely fix the cord on the rod, we wrap the rod with insulating tape.
12. Slide part of the handle body tightly onto the shell of the new rod. Apply a little soap solution to the handle body.
13. Insert the plastic end of the new cable into the hood opening handle (see above).
14. From outside the car, use the cord to smoothly pull the hood lock drive rod, while at the same time directing the handle body from the passenger compartment into the hole in the rubber seal of the engine compartment partition and pull the cable out.
15. We fix the lock opening handle on the axis, remove the cord and attach the rod to the hood lock (see above).
Troubleshooting in a car service center
Car breakdown, like illness, always comes at the wrong time. Many types of damage are difficult to predict without regular diagnosis. If the breakdown occurred suddenly and you urgently need to repair your car, use the Uremont.com website.
It contains the addresses of more than 3,600 professional car repair shops capable of repairing any car of varying complexity. The smart map will automatically determine your location and display the addresses of the service centers closest to you. This is especially convenient during a business trip or traveling to unfamiliar cities.
The main problem drivers have when contacting a car service center is mistrust. They worry that they may receive low-quality services or encounter incompetent specialists. This problem is especially relevant if you are in a foreign city. On the Uremont.com website we have collected only trusted car services for you, to whom you are not afraid to entrust your car.
To have your car repaired, leave a request on the website, providing the necessary information:
- Car model.
- Year of manufacture of the car.
- Your contact details.
- Your location.
- The type of breakdown that needs to be repaired (for example, the hood is knocking).
After filling out the form, you will be able to get to the car service offered to you, where professional mechanics will quickly and efficiently fix the problem.
If necessary, you can order a tow truck by checking the appropriate box. The price of car repairs will pleasantly surprise you, and the quality of service will ensure a long and comfortable ride.
Uremont.com is a convenient assistant for fast and qualified repair of your car.
To watch online, click on the video ⤵
Priora full luxury plus, repair of Priora hood hinges at a cheap price. )) Read more
The Prior's hood is knocking. Solution for a hundred. More details
Elimination of play in the hood hinge. (Priora) More details
Priori hood hinges Read more
PRIORA REPAIR OF KNOCKING HINGES OF THE HOOD AND RADIATOR OF THE OVEN WITH YOUR OWN HANDS AND AT DESHMANN))) More details
Knock under the panel! Lada Priora, solution in 2 minutes! More details
WHAT HAPPENS IF YOU DO NOT LUBRICATE THE HINGES AT PRIOR More details
Problems with the hood hinge. Body repair. More details
Priority hood hinge knocking More details
Knock in the dashboard of Lada Priora, DRL daytime running lights, improving the quality of low and high beam Read more
Priora, I remove the play in the door hinges. More details
Lada Priora Priora The hydraulic lifters of the VAZ 2170 are knocking More details
The steering rack on a Priora is knocking - how to tighten it?! More details
How to lift a sagging door in 1 minute Read more
Shumka on Priora and live impressions Read more
noise in the cabin of the VAZ2170 Priora Read more
WE RAISE A SAW DOOR ON ANY CAR Read more
door sagging VAZ 2110-2112 repair 5 minutes Read more
We restore door hinges, if the door is sagging, we repair the hinges Read more
Replacement process
To carry out this procedure you will need:
- screwdrivers - figured and flat;
- marker;
- a piece of fabric;
- set of socket wrenches.
This is a sufficient set for the procedure. Open the engine compartment cover (hood) and secure it well with the stop. Unscrew and remove the windshield wipers. Pull out the decorative plugs holding the air intake panel of the Priora heater. You will have access to the base of both loops. Carefully place the fabric on the glass, under the lower edge of the Priora hood. Now unscrew the nuts securing the hinge to the lid itself. The second person must fix it so that it does not fall. When all four nuts are unscrewed, remove and carefully set the hood aside to avoid damage. Now you can remove the hinges themselves for replacement or repair.
Be sure to use a marker to mark the points where the old hinges stood and dismantle them. Under them there are rubber gaskets that also need to be replaced. Remove any dirt that has accumulated under the base of the loop and wipe the area. The main thing is not to erase the marks. Install according to the marks and carefully fasten the new hinges. Lubricate moving parts well with grease. Now, together with your partner, carefully put the Priora’s hood back in place.
When the cover is in place, without large gaps and evenly, tighten all the nuts well. Reinstall the air intake panel and wipers. Close the decorative caps.
Introduction
Due to certain circumstances, VAZ cars cannot boast of their perfection. Idealistic car owners who use exclusively models from domestic manufacturers try to improve their car, make it more convenient, practical and beautiful. In the article below, we will look at ways to help anyone who wants to modernize their car, in particular, the tips given will help you understand how to lift the hood on its hinges.
Unfortunately, VAZ cars are not perfect and owners often have to upgrade them