When the owner of a decent-sounding home audio system spends a lot of time behind the wheel, sooner or later he pays attention to the standard audio in his car. And he comes to the conclusion that the automaker was lying, promising him a good sound, and sometimes even seasoning the promise with some famous nameplate. The standard question that arises is “What can be done to make the headphone sound normal?”
The concept “sounds normal” usually means something different to everyone. For some, it is enough to simply increase the reserve of undistorted volume, while others are trying to get closer to the home High End (the “dolbit normalno” options, sorry, I don’t want to consider). However, home principles still don’t work in a car. At least because the acoustic properties of a car interior are completely different from those of a room. And there are no speakers as such, but the speakers are scattered according to the principle “where there is room, they put it there.” There is nothing to say about the acoustic design for them - its role is played by the design elements of the car. In general, it has nothing to do with “homework”.
For some reason, marketers often associate the quality of an audio system with the number of speakers in it.
Hence, by the way, the assertion that exists among evil tongues that a high-end car is absurd, and it is impossible in principle to build a high-end audio system in a car. Personally, I don’t really like this approach; well, I don’t like spending two or three hours a day in the car, stuck in city traffic jams, listening only to the radio. And I think I'm not the only one. This means we will look for other solutions, not homemade ones. And, as practice shows, such solutions exist.
It would probably be wrong to lump everything into one article. Explaining all the nuances of sound in a car in one go is something from the realm of “Quantum physics in a nutshell.” But choosing the right direction to take the right first step towards good sound is, perhaps, half the success. Let's start with this.
I wouldn't go so far as to say that all stock systems sound bad. There are a lot of interesting ones that sound really great. But, unfortunately, with one big drawback - the monstrous cost
The first thing we need to decide is what we actually need. If you want to make a truly high-class system, then in any case you cannot do it with simple means; you will have to approach the issue comprehensively and prepare for decent financial investments. If the goal is not to match the sound quality of multi-kilobuck home systems, then you can approach it step by step. But at what stage to stop is everyone’s business. Let's start with something simple.
Level one. Noise insulation
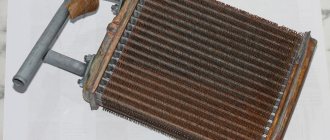
Yes, yes, this is the very first point for any upgrade of a standard audio system. If you want to listen to music, first of all get rid of unnecessary sounds. By the way, we are talking not so much about outside noise as about body noise. Look at the home speaker. Durable body, devoid of overtones. Sound emits only what should emit sound, and what should not be held monolithically. Now take a look at where and how any car speaker is installed and what the housing is for it. Most often it is mounted on some kind of metal panel, and in the worst case, even on plastic upholstery. And the body of such a “column” is a door or some kind of body niche. Tough, and that's all. By the way, in the literal sense of the word.
The easiest way to improve the acoustic operating conditions of speakers and get rid of unnecessary resonances and other metallic sounds is to use vibration-damping materials. They are usually made from bitumen or rubber, often with some additives. Their main feature is high internal viscosity. Basically, these are just sheet materials that are cut right on site and carefully rolled onto the metal. But sometimes such materials come in the form of mastics.
Treatment with vibration-damping materials eliminates metallic sounds and improves the operating conditions of installed speakers
Vibration-damping materials are heavier and more rigid, more effective, but they are also harder to work with, so not all craftsmen like them. Thinner and lighter ones are easier to work with, but their effect is not so high. The optimum is usually somewhere in the middle.
Various kinds of lightweight foam and fibrous materials can be considered only optionally; they work somewhat differently and do not have much effect on the absorption of metal vibrations.
Installation procedure
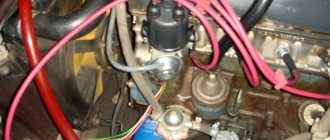
First of all, you need to lay the power cables from the battery into the interior. Once you have selected and purchased your conductors, run the negative and positive wires. For this purpose, many cars have a special hole in the shield that separates the engine from the passenger compartment.
When laying wires through a metal hole, you need to protect them from chafing with a piece of rubber or plastic tube. Otherwise, a short circuit may occur.
The positive conductor must be connected through a fuse, the current strength of which must be the same as that on the amplifier's fuse. This fuse link should be located close to the battery (about 30 cm).
Installing tweeters
High-frequency tweeter speakers are installed on the windshield pillars
Before installing “tweeters” in the car (as they are popularly called), remove the lining of the windshield pillars. High-frequency speakers are the basis of sound. They need to be positioned at eye level of the passenger and driver, facing the middle of the windshield. In this position, they will emit sound onto the glass, from which it will be reflected into the cabin.
The left beeper will reflect the sound to the right passenger, and the right one will reflect the sound to the driver.
Laying and connecting wires
The next step is to carefully lay out the rest of the wiring, which includes the wires between the blocks, power wires and acoustic wires. It is not recommended to lay different types of wiring next to each other, or together with the car’s wires.
The intersection of wires of different groups is allowed only at 90 degrees.
Before connecting the speakers in the car, strip the ends of the wires from insulation. Next, connect the wires to the subwoofer and power amplifier. If the sub is purchased in a body, then for a sedan body it is recommended to turn it towards the back of the rear seats. For station wagons and hatchbacks - towards the trunk door. You can make the subwoofer housing yourself, but this will be discussed in a separate article.
Level two. Replacing standard speakers
This is where you need to be very careful. This is a field with a rake; you can’t run with your eyes closed. This upgrade option is not always applicable. If you replace only the speakers and leave everything else, then it is far from a fact that the system will “sing.” Moreover, in some cases the result may be completely negative. Although the standard audio system itself is not of a high class, everything in it is matched to each other and balanced.
It is clear that the audio system is far from a priority element when designing a car, but sometimes the methods for installing standard speakers are simply surprising. The photo shows a standard BMW speaker, which was simply attached to the inside of the upholstery and covered with a light casing
One of the tricks that automakers resort to is reduced acoustic impedance. In general, the most common acoustics in car audio are 4-ohm ones, but in “standard” speakers they often use 2-ohm ones. All in order to boost the dead standard amplifier and slightly increase the volume headroom. Replace these speakers with more conventional 4-ohm ones and you get a quiet system, and any attempts to increase the volume will be accompanied by an increase in distortion.
But that’s okay, there are plenty of aftermarket acoustics with 2-ohm ones. Don't step on another rake - a corrected signal. This, by the way, is one of the “tricks” of many branded standard systems - it’s not the components that are better, but correction that compensates for the features of cheap speakers and the shortcomings of their acoustic design. Replace the dynamics in such a system, and such a correction will no longer be appropriate.
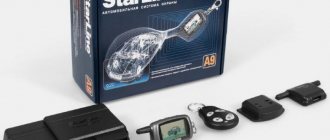
But there is no need to be scared and completely discard this option. Today you can find many acoustic kits that are tailored specifically for certain brands and models of cars. Mainly for European ones, in this part of the world such an upgrade is most in demand.
The video demonstrates the ease of upgrading a standard audio system by simply replacing the OEM speakers with a set specially designed for a specific car brand:
What's the result?
The presented options are suitable for customers who are not ready to plunge into the wilds of car audio or participate in car audio festivals. These are some ready-made solutions that meet the needs of slightly more demanding clients who have a rough idea of what they want to get from the sound. Representative Ilya Smirnov compares the creation of a car music system with tailoring a jacket: the client must always determine what is closer to him. That is why, after finishing the work, the studio specialists suggest traveling for a couple of weeks, getting used to the music, listening to your favorite tracks, and then, if necessary, returning to refine and fine-tune the system.
Level three. Upgrade without replacing the standard head unit
If all these “flowers” with speakers seem frivolous to you, it’s time to move on to the “berries” - touching on the amplification part of the system. The main problem that has to be solved in this case is where to get the original uncorrected linear signal from which to start building a new audio system.
In fact, you won't find it anywhere just like that. And there is simply no single recipe for all cars; in any case, you will have to turn to professionals who specialize in “voicing” cars. By and large, it all comes down to four options.
The first option is to “pull out” the linear signal from the electronic bowels of the head unit. For many models, this process, by the way, is well established, and for a relatively small amount your standard head unit will acquire a tail with RCA connectors on the rear side.
In many head units it is not difficult to get a line signal. Sometimes, however, its level is low, and in order not to pick up interference on the way to the amplifier, you have to add a small output buffer. But for an experienced master this does not cause any particular difficulties.
The second option has to be used when it is not possible to display “linear lines”. In this case, we leave the standard amplifier in the system, decisively disconnect the standard speakers from it and connect its outputs to the inputs of the new amplifier. The only requirement for the latter is the presence of so-called high-level inputs.
High-level inputs are a feature exclusively of car audio equipment; at home, it would hardly occur to anyone to connect one amplifier after another. In a car this is a necessary measure, and although technically it is not very elegant, it still makes sense. After all, it is no longer low-impedance speakers that will be connected to the standard amplifier. Its output stages will operate in a completely different mode, with lower currents, so the signal quality will be somewhat different. In any case, you will get better sound than in the state.
But this option is also not always applicable. A little higher, I already said that many systems introduce intentional signal correction. In this case, there is no point in simply passing the “crooked” signal from the standard amplifier to a new one. And if the standard system has channel-by-channel amplification, then you won’t even find a curved signal - only frequency “cuts”.
For such cases, there is a third option, using a digital processor like Audison bit One, Audison bit Ten, Helix DSP, etc. The trick of these devices is that they can combine the original audio signal from these separate frequency pieces, remove the correction (or rather , adjust the signal “in the opposite direction”) and send such a restored signal to a new amplifier. In the right hands, by the way, it’s quite an effective thing.
Typically, automotive processors are configured from a laptop or tablet
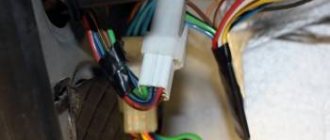
Well, the fourth option is applicable in cars in which the standard system is built using the MOST bus (Media Oriented Systems Transport). By the way, there are quite a few of them these days. The peculiarity of the MOST structure is that all devices (source, amplifiers, monitors, changers, etc.) are united by a single digital bus through which data circulates around the ring. It is impossible to take and remove anything from such a system; the data transfer is interrupted and everything simply stops working.
Despite the apparent complexity at first glance, this option is actually one of the most convenient for installing a new system. All you need is a MOST adapter. It is included in the MOST ring as another device, pulls the digital audio signal out of the bus and gives it to us “on a silver platter” - in the form of the usual SPDIF.
If the standard audio system uses a MOST bus, then using an adapter allows you to get SPDIF without surgical intervention in the head unit or wiring
And then we can do whatever our heart desires with it - from an economical “processor + amplifier in one package” solution (MD.Lab AM-60.6DSP, Audison Prima AP8.9 bit, Helix P SIX DSP, etc.) and to extravagant systems with an external DAC and other audiophile tricks.
What kind of car radio should it be?
You simply cannot achieve high-quality car audio without a good radio, so this is the first thing you need to worry about. Like other components, the head unit affects the sound quality, and even if you have a good sub and amplifier, but the radio itself turns out to be complete slag, then you can forget about good sound.
Build quality
When choosing a head unit (head unit), I recommend relying primarily on the brand and build quality. Pioneer and Alpine are brands that have proven themselves well in the modern market. On average, for 4000-12000 you will buy a pretty good radio. Monsters such as McIntosh, Denon and Nakamichi are more designed for professionals.
Well, if your budget is too limited and you still don’t want to listen to advice, then pay attention to Mystery, Prology, Challenger, etc.
Here you can give one piece of advice: remember - it is better to buy not a fancy, but a high-quality radio for its intended purpose. Most second-tier manufacturers offer a device stuffed with stupid functions that not only hardly work, but in principle you don’t even have to use them.
A highly targeted device will do its job much better than a multimedia combine - this has been tested many times.
Number of linear outputs
Next, we look at the number of line outputs. One line output allows you to connect one two-channel amplifier. Two outputs allow you to connect a four-channel amplifier, etc. More details about amplifiers are written in another article.
Below is a simple diagram that should help you understand the essence of linear outputs.
Remember, if the radio does not have linear outputs, then we are not interested in it and should take a closer look at another device.
Management, design
Yes, specifically for management. When choosing a radio, we press all the buttons, check the joystick, see where the equalizer settings are hidden, how quickly the track switches, etc. If you have extra money, it’s better to invest it in wiring, then you can buy a radio with a fancy design. Although personally, I prefer to amaze people with high-quality sound rather than show-off.
It is worth noting that in conditions of frequent falsification of products, it is almost impossible to specifically indicate which radio tape recorder is better, therefore the purchase of a car system, even in branded stores, must be accompanied by a “live” check of the parameters.
More information about choosing a radio is written here - How to choose a car radio
Level four. Complete replacement of the standard system
There are situations when you are not satisfied not only with the sound of the standard system, but also with the functionality of the head unit itself. In this case, thoughts about replacing it become especially annoying. But this cannot always be done with small forces.
Initially, this Honda was equipped with a standard head unit integrated into the dashboard. Using a non-standard panel, it was possible to install a new head unit of standard DIN sizes
First of all, take a close look at what the standard head unit is. If it has its own display, and all audio system controls are not connected to other car systems (climate control, on-board computer, etc.), then it can most likely be safely removed, while all other systems will remain unaffected.
Don't let the original shape and size of the standard GI confuse you. Firstly, there are now many alternative head units that are produced for specific car brands and fit into the panel using the pin-to-pin principle - the seats and connectors are completely the same. Or you can use an adapter frame to install a standard 1DIN or 2DIN size device and an adapter from a standard connector to a standard ISO. They are produced by many manufacturers, so choosing the right set is usually not difficult. As a last resort, no one has canceled the custom solution either.
If the standard head unit has many standard functions, then replacing it is a very difficult task; there are not simple solutions for every car. Pictured is an Alpine kit designed specifically for Mercedes
But if the standard “head” is combined with other car systems, then it’s more complicated. It is far from a fact that there is an alternative head unit for your car. In this case, the approach will be individual, and most likely costly.
This McIntosh became the head of the new audio system, and a mounting frame was made especially for it. All that remains of the standard system is the head unit, which now serves as the second most important source
But there is another option. It looks quite extravagant, but sometimes the only way to organize a truly high-quality audio source in a car is to leave the standard head unit unchanged and install a second one. In this case, it becomes the main one in the system, and the audio system is built from it. The standard one is shifted from the role of the main one in the system and becomes additional - its outputs are connected to the AUX inputs of the new head unit.
Stories from our readers
The advantages of the speakers include ease of installation - every car owner can connect the tweeters correctly. Holes are made in the door and body for rubber corrugation, which will prevent chafing and breaking of wires. Pull the acoustic wire into the corrugation using steel wire.
The location of the amplifier and equalizer on an additional shelf under the glove box allows you to minimize the length of the power cable.
Tools To connect the tweeters to the radio or crossover you will need: cable;. Subwoofers of the closed type, having a sealed housing closed Subwoofers of the bass reflex type vented, are characterized by the presence of a bass reflex - a slot or pipe that serves to adjust the frequency response in the low frequency region Subwoofers of the bandpass type - differ from the above in that the speaker itself is retracted inside the subwoofer housing, and the sound radiated through a bass reflex subwoofer with a passive radiator have an additional diffuser or speaker without a magnetic system, which serves to lower the overall resonant frequency of the loudspeaker.
Choosing a location Initially, you will need to decide on a location for the future speaker system. Another option is to route the wires using a crossover frequency filter. We strongly advise you to do this so that your passengers are not irritated by rattling plastic, which will react this way to loud music coming from the speakers.
Related article: How to restore electrical equipment on
To help car enthusiasts
It is enough to use the correct connecting cables and not make the wrong polarity when connecting. In order for the sound from both sides to be perceived at the same volume, you can use balancing to increase the sound volume of the right speakers. The driver of the car sits on the left, and is closer to the left speakers.
Bridged connection of amplifier channels is a connection in which 2 amplifier channels operate on 1 speaker. Compared to the previous class, the efficiency of this is almost 2 times higher, but high distortion in the output signal makes it rarely used. The photo shows a cross-section of a classic low-frequency electromagnetic loudspeaker.
There is one more problem. A subwoofer is a large-sized element, very labor-intensive to manufacture and install. First, let's look at the characteristics that are indicated in the passport.
These can be the following components: Amplifier Speaker systems Subwoofer This set of technical means allows you not only to increase the sound volume, but to significantly improve the quality of music playback. Rated electrical power is the power that the speaker can reproduce for a long time without distortion. How to connect an odd number of speakers
Setting up music in a car is easy with your own hands
You can handle the settings on your own, even if this is your first time working with audio systems in a car. First, you need to understand your needs. If you listen to music in the car exclusively for yourself and don’t like the bass rattling meters away from the car.
car audio system
There’s no need for an expensive Car Audio, the basic components are enough:
- The radio itself is built into the car. All you need to do is connect it with the rest of the elements and check the maximum power.
- Front acoustics - sound from the front.
- Rear acoustics - sound from behind.
- Frontal acoustics - peripheral sound.
All these devices must match in power, otherwise the “lagging” equipment will simply burn out. There is nothing complicated about how to connect speakers in a car correctly. No more than an hour of work will give you pleasure from music for years to come.
Preparatory work: how to remove the trim
Before carrying out work, turn off the ignition and disconnect the negative cable from the battery. Then do this:
- Often there is no speaker panel, and the speakers are hidden behind a non-removable mesh (grid) of the door trim. In this case, remove the door handles that interfere with dismantling. If there are fastenings with self-tapping screws, remove the protective plugs and unscrew the screws. Then remove the trim.
Slowly rocking, remove the panel, releasing one fastener after another.
- If the standard speakers are covered with a separate decorative panel, carefully pick it up in the least visible place and pull it, roughly identifying the attachment points. Slowly rocking, remove the panel, releasing one fastener after another.
Remove door handles and other body parts that interfere with dismantling
- If fastening with plastic clips, hook the trim in a less visible place, being careful not to leave scratches on the surface. Remove it, releasing the latches sequentially around the perimeter of the door.
How to connect speakers in two-piece systems
Approximately 80% of car enthusiasts who install component sound systems are limited to installing additional tweeters. For some, this is not enough, since achieving the highest sound quality is impossible without “drawing” the lower frequencies of the sound spectrum to the point of the limits of human hearing.
Obstacles to the propagation of vibrations of the lowest frequencies degrade the quality slightly. Therefore, huge subwoofers operating in the lower sound band are placed in the trunk or on the rear parcel shelf.
A component car audio system can contain from 2 (including tweeter) speakers per channel to 4, 6 or more
Thus, a component car audio system can contain from 2 (including tweeter) speakers per channel to 4, 6 or more. Practical implementation depends on the aesthetic requirements of the car owner, his desire to spend money and time to achieve them.
Types of speakers for cars
Any speakers intended for use inside a car belong to one of the following types:
- broadband - manufacturers usually equip their cars with such speakers at the factory;
- coaxial (coaxial);
- component.
The single speaker of a wideband speaker reproduces the entire spectrum of sound frequencies. This is the cheapest solution, usually used in standard audio systems.
The single speaker of a full-range speaker is capable of reproducing a wide range of sound frequencies
The sound quality will improve if you divide the sound spectrum into several bands and entrust the reproduction of each of them to a separate emitter.
The coaxial speaker has several sound emitters installed in a single housing, which significantly improves sound quality
In a coaxial speaker, several (2–5, usually 3) emitters are installed in a single housing, usually on the same axis, along with filters that highlight the audio frequencies that are optimal for each head.
The speakers of the component system are spaced throughout the vehicle
Component speaker systems have the widest range of high-quality reproduction capabilities. In them, as in coaxial speakers, the sound signal is reproduced by several emitters, but each is made in the form of a separate speaker.
Two-component systems: tweeters and crossovers
Tweeters or tweeters are high-frequency speakers whose task is to reproduce the frequencies of the upper band of the sound spectrum. Conventional tweeters are flat or slightly convex. Horn tweeters are slightly larger than usual ones, as they are equipped with an element that forms a clear polar pattern - a horn.
Tweeters or tweeters are called high-frequency speakers
To highlight bands in component systems, crossovers, audio frequency separation filters made in the form of separate blocks, are used.
Crossovers can have from one to four stages: the more stages, the better the sound quality
Component sound systems are the most difficult to install. However, the separation of speakers in space provides the highest quality and surround sound.