In the process of servicing cars, owners have to periodically change some consumables, as well as check their current condition. This makes it clear whether it is time to drain this or that liquid, or whether it can still serve normally for some time.
Antifreeze can easily be considered one of the most important fluids in a car. It is also coolant or simply coolant.
In addition to draining and replacing antifreeze, motorists often check the density. Not everyone understands why to do this and how to perform such a procedure.
Coolant for cars
Antifreeze (antifreeze) in a car radiator performs two main functions:
- protects the engine from overheating during operation;
- prevents freezing of coolant at subzero ambient temperatures in winter.
Antifreeze is produced by industry according to international standards; there are classes G13, G12, G12+ and G11. As a rule, G11 antifreeze is colored blue or green and freezes at a temperature of about -40ºC. Compositions G13 and G12 are usually concentrated and do not lose their properties up to minus 80 degrees Celsius.
Antifreeze is essentially the same antifreeze, only produced for Russian cars. There are three types of this coolant - A40, A65 and AK (concentrated composition), respectively, A40 antifreeze freezes at a temperature of -40ºC, grade A65 - at -65ºC. In any case, the concentrate must be diluted with water; when mixing the two components in a 1:1 ratio, the coolant will crystallize at 30 degrees below zero.
Subtleties of choosing antifreeze
If you have problems choosing antifreeze, first study the manufacturer's recommendations. The specification clearly indicates the brand and class of coolant that should be used in your car model. If original products are too expensive for you, then you should take a closer look at analogues. The first selection criterion is the novelty of the car. For cars produced before 1996, use G11. From 1996 to 2001, a G12 class cooler is suitable
In models after 2001, fill in G12+ and G13. Additionally, when purchasing, we recommend paying attention to a number of aspects:
- there should be no sediment at the bottom of the container;
- the packaging must have a high-quality label and no traces of tampering;
- antifreeze does not have a pungent odor;
- buy products with a pH value of 7.4-7.5;
- The cost of the product must be comparable to the market price.
Among the products there are several already established manufacturers. HEPU has an almost impeccable reputation. The company produces high-quality coolants with a wide range of additives. An alternative option is to take products from Febi. In stores you can buy compositions from Felix and domestic ones. Before purchasing, be sure to read all the markings on the label, since the color of the composition does not always characterize its class. It is recommended to regularly check the color saturation of the antifreeze in the car. A change in color indicates that the liquid has lost its properties and therefore requires replacement. Knowing the ins and outs of coolant selection makes your purchase smart, safe, and targeted.
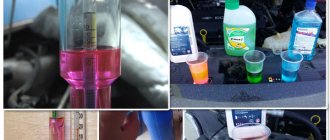
Checking the density of antifreeze with a hydrometer
It is most often necessary to measure the density of antifreeze (antifreeze) before winter, when it is necessary to top up or replace the coolant - it is important that it does not freeze at any negative air temperatures. You can measure the density of antifreeze with a hydrometer; when obtaining the result, you should be guided by the data in the table. Under no circumstances should measurements be carried out on a hot engine:
- there is a risk of getting burned by the coolant;
- the results obtained will be inaccurate.
You can measure the density not only of the coolant that is in the radiator, but also of antifreeze purchased in a store - it is possible that ethylene glycol was diluted with more water than prescribed. To check the density you will need:
- container with coolant;
- hydrometer for electrolyte and antifreeze;
A special hydrometer has two scales; to measure the density of the electrolyte, the measuring device has markings for density and freezing temperature.
We check antifreeze bought in a store like this:
- unscrew the cap on the canister;
- We collect coolant into the measuring device flask.
The flask must be filled with antifreeze in sufficient volume; with a small amount of coolant, the readings may be incorrect. It is also necessary that the float floats in the liquid.
For accurate measurement, you should shake the hydrometer - this must be done so that air bubbles come out of the coolant and the float does not stick in the flask.
If the coolant, according to the hydrometer readings, corresponds to the norm, it can be poured into the radiator, but it does not hurt to check the antifreeze for its authenticity. There are often cases when a dishonest manufacturer adds sulfuric acid to the coolant to increase density. This component is very harmful to the cooling system; it corrodes the walls of the cylinder head and cylinder block from the inside. Checking for the presence of sulfuric acid in antifreeze is very simple:
- pour coolant into the container;
- add soda to it.
If a reaction occurs (antifreeze hisses), then acid has been added. The absence of any reactions indicates that the antifreeze is normal.
Measurements with a hydrometer should be made at a coolant temperature of plus 20 degrees, so it would be a good idea to use a thermometer here. Measuring density directly in the cooling system is carried out with the hydrometer partially immersed in the radiator (installed in the filler neck) or in the expansion tank. You can also carry out a secondary check after five to seven days of using the car, and if necessary, adjust the density of the antifreeze by adding distilled water or concentrate, depending on the readings obtained.
Counterfeit, how to detect?
When purchasing a coolant in a store, it is not possible to determine a low-quality coolant using a hydrometer. It has already been noticed that scammers prepare a technical solution using low-quality water, acids, sugar, salt, excluding ethylene glycol. That is, when measured by the device, the density indicator of antifreeze will have a normal value.
The main problem with low-quality coolant is time - as time passes, it loses its properties. A couple of weeks is enough for the counterfeit product to lose its useful cooling properties.
To check the quality of the coolant, you must first test it with a hydrometer. If the value is at a normal level, then the solution can be poured into the car and driven for 7 days. After a week, you should retest the antifreeze density:
- the readings remained at the same level - everything is in order;
- slight deviation from the norm - should be rechecked after 7 days;
- significant change - it is necessary to drain the cooling component and add a new portion.
Running a vehicle on counterfeit antifreeze will quickly damage the vehicle's propulsion system.
Antifreeze density table, dependence of freezing temperature on coolant density
Many car enthusiasts periodically have difficulties with the density of antifreeze. This occurs due to a coolant or antifreeze leak. Some car owners simply add water in the summer, which freezes in the winter and disrupts the system. To avoid such problems, you need to be able to use an antifreeze density table and a hydrometer to measure it.
Checking the density of antifreeze with a refractometer
Unlike checking with a hydrometer, measuring coolant density with a refractometer is very fast, and one drop of antifreeze is enough to measure.
You can check the coolant in any condition; the temperature here does not affect the readings obtained. The measurement procedure is as follows:
- using a pipette, place a drop of the tested antifreeze on the prism of the device;
- We focus using the reflectometer eyepiece;
- We read the readings from the value scale (along the dividing line).
The device is adjusted using distilled water; when testing it, the bar in the eyepiece should be at the very bottom of the scale, that is, at zero. If the device is not adjusted accurately, it is adjusted with a screw located under the protective cap. The refractometer kit includes a screwdriver, pipette and spatula.
Checking the density of antifreeze using the traditional method
In many modern refrigerators, the temperature in the freezer compartment is adjustable; you can set its minimum value to -24ºC. You can approximately check the density of antifreeze here as follows:
- pour a small amount of coolant (50-100 grams) into a plastic bottle and seal it tightly;
- place the container in the freezer for one hour.
If the antifreeze has not crystallized, it means it can withstand this temperature and will not freeze in the radiator in such frost.
What should this value be for antifreeze and antifreeze?
Antifreeze is a type of coolant, which means it is also antifreeze. Thus, their performance should be similar. The density of antifreeze and antifreeze is on average 1.10 g/cm3. It varies from 1.034 to 1.112 g/cm3. At the first indicator, the liquid will begin to crystallize already at -10 degrees Celsius, at the second - at -20. And this is the entire range of antifreeze, someone might ask? No, oddly enough, with average values - from 1.083 to 1.082 - it will provide protection down to minus 60-65 degrees Celsius. This is the arithmetic.
By the way, for comparison, the density of water is 0.9982 g/cm³. At first glance, the difference is small. But it is she who will determine when and at what temperature the liquid poured into the cooling system will boil and solidify.
Table of the relationship between coolant density and antifreeze concentration
| Coolant temperature (°C) and specific gravity (g/cm3) | Temperature (°C) | Antifreeze concentration (% volume) | |||||
| 10°C | 20°C | 30°C | 40°C | 50°C | Freezing liquid | Safe Operation | |
| 1,054 | 1,050 | 1,046 | 1,042 | 1,036 | -16°C | -11°C | 30% |
| 1,063 | 1,058 | 1,054 | 1,049 | 1,044 | -20°C | -15°C | 35% |
| 1,071 | 1,067 | 1,062 | 1,057 | 1,052 | -25°C | -20°C | 40% |
| 1,079 | 1,074 | 1,069 | 1,064 | 1,058 | -30°C | -25°C | 45% |
| 1,087 | 1,082 | 1,076 | 1,070 | 1,064 | -36°C | -31°C | 50% |
| 1,095 | 1,090 | 1,084 | 1,077 | 1,070 | -42°C | -37°C | 55% |
| 1,103 | 1,098 | 1,092 | 1,084 | 1,076 | -50°C | -45°C | 60% |
Checking the density (concentration) of antifreeze using a hydrometer
Any car owner wants the coolant he purchases to actually correspond to the characteristics indicated on the sticker. But according to recent studies, the proportion of counterfeit products sold on the market is more than 50 percent. Despite the attractive plastic container and bright labels on it, there may only be a liquid inside that looks like antifreeze or antifreeze, made in Russia or abroad. What a hydrometer for antifreeze is is what we will discuss in our article.
There is no guarantee that the inside of the container is not ordinary water with unknown additives, and there is no natural antifreeze or antifreeze. So what's the solution? How to check the quality of a purchased product? It is for these purposes that such a simple device as a hydrometer is used, with the help of which any car owner can check what they are offered to purchase. You can also use it to check the condition of the liquid that is already poured into the system. Based on the realities of today, we recommend that every driver have such a device, and we will tell you how to use it below.
The process of pouring coolant into the tank
Where can I buy a hydrometer and for how much?
Car hydrometers are not in short supply and are sold in virtually all stores that sell auto parts. The device is inexpensive. No more than five dollars.
You should not choose the most expensive device; to check antifreeze or antifreeze, buy the simplest one. In some cases, it makes sense to purchase a hydrometer, with which you can check not only the density of antifreeze and antifreeze, but also the electrolyte.
What is an antifreeze hydrometer?
A hydrometer is a very simple device for checking the quality of coolant, similar to a fishing float. It provides a special scale on which you can check the density of the electrolyte and in degrees of antifreeze and antifreeze. Using a rubber bulb located at the top of the device, antifreeze, antifreeze or electrolyte is sucked into the pipette. The contact of the coolant or electrolyte with the hydrometer rod shows the density of the liquid being tested in kg/dm3 or the freezing point in degrees. For the readings to be accurate, measurements must be taken at an ambient temperature of about 20°C.
Components of a hydrometer
Device
This device is designed very simply. There is a special scale with risks at the top. There is also a rubber bulb placed on the top of the device. Below is a pipette for collecting liquid.
Principle of operation
The principle of operation of the device is based on the well-known law of Archimedes, which we all remember very well from school. This video shows the principle of operation of a hydrometer and explains how to use it.
Useful tips
As experts advise, if antifreeze is purchased in the form of a concentrate, after pouring the finished liquid into the cooling system, be sure to measure the density of such a composition. If you purchased ready-made antifreeze or antifreeze, you must immediately measure its density before pouring it into the system.
The fact is that there are a large number of counterfeits of well-known brands of coolants on sale (Shell, Liqui Moly, Bizol, etc.). Simply put, there is no ethylene glycol/propylene glycol. Instead of the base, acids and sugar and salt are used.
The danger of such products is that initially measuring the density may show the norm, and the liquid will not freeze in the cold. However, after a short period of time after heating and cooling, the fake antifreeze will lose its properties and freeze in slight frost with all the ensuing consequences.
To avoid such risks, it is better to check the density of the liquid again a couple of days after replacing the antifreeze. If there are obvious changes in the direction of decreasing density, then it is a fake. It is urgent to drain such antifreeze, thoroughly flush the entire cooling system and refill with a high-quality original product.
In practice, it is ready-made antifreeze (already mixed with water) that is most often counterfeited, but similar manipulations with the concentrate also cannot be ruled out. For insurance, we can recommend purchasing antifreeze, antifreeze and other technical fluids exclusively at official or verified points of sale.
Safety precautions
When working, you need to be careful. If you are checking the quality of coolant that is already in the car system, then turn off the car and wait several hours before checking. The coolant must cool down. If you unscrew the radiator cap immediately after a trip, you risk getting burned.
Also remember that many fluids in a car, such as electrolyte, are acidic and can cause burns if they come into contact with the skin. If this does happen, immediately rinse the burn area with clean water and go to the clinic. If electrolyte gets on your clothes, soak them in water immediately, but most likely the stain will remain on the fabric.
About mixing antifreeze
The variety of products on the market has led to drivers often asking whether it is possible to mix g11 and g12 antifreeze and other classes? There are a number of rules that every driver should be familiar with:
- Mixing G12 and G11 is strictly prohibited due to the use of organic and inorganic additives in these antifreezes.
- You can mix G12 with each other with different colors with the same composition.
- Composition G12 is compatible with G12+.
- Compositions from G12+ to G13 can be added to the G11 product.
It is allowed to add a small addition of distilled water, but only as a last resort. It should be borne in mind that each manufacturer uses its own set of additives. One can only guess about the reaction of such additives in different products, so to avoid problems with the engine and cooling system, we recommend adding antifreeze only of an identical brand. To switch to another coolant class, it is necessary to flush the system.
It is also recommended to do a complete drain when you do not know about the class of the compound being poured. The car may use low-quality antifreeze. If you top up with products of the same class, but of a higher quality, a conflict may occur, so do not take risks. Using incompatible coolants may lead to the appearance of sediment in the form of flakes. They will completely clog the system and, naturally, lead to motor failure due to high temperatures. Now you know whether it is possible to mix g12 and g13 antifreeze with G11.
Checking the quality and density of antifreeze at home
When examining the appearance of the cooling solution, first of all you need to pay attention to its color. The color of the emulsion must be a rich natural shade and comply with the characteristics reflected in the regulatory documents.
The second significant sign of a good quality product is the absence of oil stains and inorganic inclusions on the surface of the liquid.
The freezing temperature threshold of the mixture can be determined using special instruments - a hydrometer or a refractometer. The first determines the alcohol content in percent, the second records the crystallization temperature in degrees Celsius.
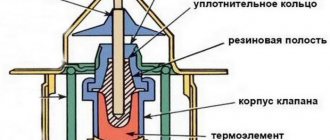
Hydrometer design
A hydrometer is a special device used to analyze the density of liquid substances. The device consists of a sealed glass flask with a measuring scale, the internal space of which is filled with lead shot.
The amount of metal chips is a calculated value depending on the type of liquid being tested. The device is configured (calibrated) by specialists to work only with a specific substance.
The operating principle of the device is based on Archimedes' law. A body immersed in a liquid is subjected to a buoyant force equal in magnitude to the specific gravity of the mixture in question. Different solutions have different density values, which means the hydrometer will float differently.
In some liquids the float may sink, while in others it will move along the surface at different distances from the watershed boundary (device scale). Therefore, if you need to study the density of antifreeze, then this particular reagent should be specified when purchasing the device.
Refractometer Review
A refractometer is another device for measuring the density of antifreeze. The operating principle of the device is based on the deflection (refraction) of a light beam when passing from one aqueous medium to another. The magnitude of the refraction angle depends on the temperature of the medium and the chemical composition of the emulsion.
The device consists of the following parts:
- polymer body;
- refractometer with glass prism;
- pipettes;
- adjusting screwdriver;
- napkins.
The refractive index depends on the consistency and physicochemical properties of the liquid being tested.
As the initial concentration of the solution increases, the degree of curvature of the light beam increases. The greater the bending angle, the higher the antifreeze density parameter.
Measuring antifreeze density without instruments
There are two ways to measure the density of automotive coolant:
1). Pour antifreeze into a wide and tall glass vessel (glass, test tube, etc.). Immerse the hydrometer in the liquid. Wait for the float to float up. Determine the density of the solution using the instrument scale. During the experiment, you need to control the position of the device in the container; it should not touch the walls of the glass.
2). Pipette a drop of distilled water onto the refractometer prism. Bring the eyepiece to your eye. The number divisions will be visible in the lens, and part of the scale will be colored blue. The line at the interface between light and dark colors will serve as an indicator for measuring density.
The demarcation line, in the case of clean water, should point to zero on the instrument scale. Now, if water is replaced with antifreeze, then this value will change upward (above 0°C). The result obtained will be an indicator of the quality of the liquid.
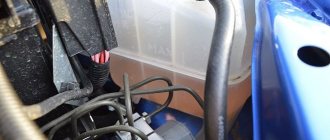
The main reasons for the loss of antifreeze
- Leaky sealed expansion tank.
Such reasons for antifreeze leaving the expansion tank are the result of driver inattention. A loose expansion tank cap will not be able to contain the pressure in the cooling system, so when the engine heats up, antifreeze will leak through it.In winter, the leakage of coolant through a poorly tightened tank cap will be indicated by the appearance of steam in the area of the main radiator grille (antifreeze evaporates and forms a white haze). In this case, you can eliminate the loss of antifreeze by tightly tightening the cap of the expansion tank of the cooling system.
- Defects in the antifreeze tank.
The expansion tank body is made of plastic. It can be damaged by a metal tool if repair work is not carried out carefully. If a small “hole” is located above the coolant level, then it may not be noticed.The defect appears during the operation of the car. When heated, the coolant expands, therefore, its level rises and it flows out of the reservoir. After the engine cools down, the antifreeze level drops and the fluid must be added.
You can find where the coolant is leaking by visually inspecting the expansion tank. A damaged tank should be replaced, since after soldering the plastic, the antifreeze flow resumes after some time (during engine operation, a fairly high pressure is created in the tank).
- Cracks and other defects in tubes, hoses and their attachment points to the main radiator.
The pipes and hoses of the vehicle's cooling system are constantly exposed to aggressive substances, temperature and pressure changes. Oil and other technical fluids from various vehicle systems, getting on pipes and rubber hoses, contribute to their destruction. In this case, the damage may not be noticeable upon visual inspection, but antifreeze will leak through it. As a result, after some time the coolant level will drop and it will need to be topped up.This reason for the loss of antifreeze can be eliminated only by replacing damaged pipes and hoses.
- Coolant level too high.
The upper mark of the antifreeze level on the expansion tank is located so that the liquid fills half of its volume.At this level, excess pressure will not be created in the tank when the antifreeze expands (otherwise the tank may burst).
In addition, car designers have provided a hole in the tank for overflowing coolant when its level critically increases. To prevent antifreeze from escaping through the overflow hole, you need to fill it in such a way that the level is no higher than the maximum mark.
- Damage to the radiator of the cooling system.
Hot antifreeze is cooled in the radiator of the cooling system, which is located in the front part of the engine compartment of the car. When a car moves at high speed, small stones, dirt and dust can fall onto the radiator along with air flows.It happens that a rapidly flying stone damages the radiator honeycombs and antifreeze begins to leak through them. The rate at which coolant leaves the radiator depends on the size and nature of the damage.
- Engine.
Experts consider antifreeze getting into the engine combustion chambers as the most unpleasant malfunctions. It is in this case that white smoke with a sweetish odor may come out of the exhaust pipe. This sign indicates that the coolant is burning along with the fuel-air mixture.A whitish coating on the dipstick for checking the oil level indicates that antifreeze has entered the engine. In this case, car repairs must be performed by qualified technicians using special equipment.
In order to promptly detect the loss of coolant, experts recommend looking under the hood of your car more often. The sooner a fault is detected, the less money and time it will take to fix it. An insufficient level of antifreeze leads to overheating of the engine, which may result in a major overhaul.
How not to buy a fake
High-quality antifreeze has the required amount of special additives and density specified at the factory. All this provides reliable protection for the car engine from sudden temperature changes.
Even at low values exceeding the recommended values, the solution, in case of freezing, will turn into a plastic jelly-like mass and will not damage the structural elements of the motor.
If, instead of a conditioned liquid, a counterfeit is poured into the cooling system, then when the temperature drops below 0°C, such a mixture will expand and increase in volume. Having reached a critical threshold, frozen antifreeze will tear the cooling jacket, radiator and engine water pump.
HOW to dilute antifreeze concentrate?
After reading the above material, there should no longer be any difficulties in preparing antifreeze of suitable density from ethylene glycol concentrate. Let's briefly consider why do this at all, if the market is full of ready-made compounds, on the label of which the main parameter for the car enthusiast is written - freezing temperature.
- Firstly, the characteristics indicated on the packaging do not always correspond to reality. Many manufacturers of budget coolants simply save money by not adhering to the proportions discussed above. Water is cheaper than ethylene glycol.
- Secondly, it is quite possible today to find ethylene glycol concentrate at a very competitive price. Naturally, it will be more expensive than ready-made compounds. But you will need almost twice as much of it. In addition, by preparing antifreeze with your own hands, you will know exactly what density it is and to what temperature it is guaranteed not to freeze.
In conclusion, let's look at a brief concrete example of how to dilute the concentrate. To do this, you will need, in fact, the concentrate itself, distilled water (required), a hydrometer to control the resulting density, and a couple of containers of the appropriate size.
How much to buy depends on how big your car's cooling system is and the coldest winter temperature in your area. Let's consider the situation using the example of the same car with a cooling system with a volume of 7 liters, which is operated in a region where the thermometer drops to a maximum of -29°C.
To prevent the prepared coolant from freezing in winter, we need to obtain antifreeze with a density of 1.063. This figure corresponds to 45.6% ethylene glycol content in the total volume. Accordingly, to prepare 7 liters of antifreeze we need 3.2 liters of concentrate and 3.8 liters of distilled water. Mix, mix thoroughly, measure the density with a hydrometer and pour into the cooling system.
BEHIND THE STEEL
Having chosen and purchased an antifreeze fluid for the cooling system, every car enthusiast wants it to actually have the properties stated on the label.
According to recent studies, the share of counterfeit products in the antifreeze liquid market ranges from 40 to 50%. Despite the nice plastic container and neatly made stickers on it, there may be a liquid inside that only vaguely resembles domestic antifreeze or foreign antifreeze. Where is the guarantee that the inside of the canister is not colored water, flavored with battery electrolyte, or water with added sugar or salt?
Why is counterfeit dangerous?
What happens to antifreeze (or antifreeze) poured into the cooling system when its temperature drops to the value (for example, -40 0 C) indicated on the packaging? It crystallizes and the antifreeze loses its fluidity, turning into a kind of jelly. At the same time, it does not increase in volume, therefore it does not put pressure on the internal walls of the radiator and the “jackets” of the cooling system.
The picture is completely different if instead of a non-freezing liquid in the cooling system there is a counterfeit made from ordinary water. Having reached zero temperature, the water freezes, noticeably increasing in volume, and since the cooling system is conditionally sealed, the resulting ice simply crushes and breaks the radiator channels, water pump and engine cylinder block.
Even if the counterfeit antifreeze still contains some part of ethylene glycol and it does not freeze but crystallizes as the temperature drops, it is unlikely that the counterfeiters bothered to add special anti-corrosion additives to its composition that envelop the non-freezing liquid with a protective film.
Consequently, an aggressive liquid, which is a mixture of water and alcohol, will immediately begin to corrode parts of the engine cooling system. It is unlikely that the engine will withstand at least one season of operation in such conditions.
It is almost impossible to check the presence of protective additives at home, but anyone can find out whether an antifreeze liquid can cope with the cold.
Litmus paper
By moistening the litmus paper with the coolant, the quality of which needs to be determined, and then comparing the color it acquires with a special color scale, it will not be difficult to determine its pH with sufficient accuracy.
If there is no such scale, it doesn’t matter; the approximate acid-base balance of antifreeze can be determined “by eye.” Coloring litmus pink will indicate that there is an excess of acid in the liquid being tested (pH ranges from 1 to 5), and this is direct evidence of counterfeiting.
The blue color of litmus paper will indicate a pronounced alkaline environment with pH > 10, therefore such antifreeze or antifreeze is also a fake, and of disgusting quality.
If the litmus turns green, you know that this is a decent quality antifreeze with an acid-base balance of pH ranging from 7 to 9.
In addition to measuring the density of the electrolyte, modern aerometers can determine the freezing point of antifreeze. Such hydrometers have a scale graduated in degrees next to the density scale.
Having collected antifreeze or antifreeze into the hydrometer using a rubber bulb, it is necessary to determine the line of contact of the tested liquid with the hydrometer rod. Finding a line in the area of the green scale will indicate the crystallization temperature of antifreeze in the range from -30 to -40 0 C. If the indicator points to the red scale, then the coolant has partially lost its properties and will begin to crystallize at a temperature from -20 to -30 0 C. The yellow scale corresponds to the temperature range from -10 to -20 0 C. If the tested liquid in the hydrometer comes into contact with the hydrometer rod in the area of the blue scale, such antifreeze should be replaced immediately, since it has become completely unusable and will behave like ordinary water.
Test freezing
Having collected 100-150 ml of the test liquid into a small plastic bottle, you need to squeeze the bottle a little before tightening the cap, releasing the air from it - suddenly the antifreeze turns out to be fake and after freezing it will crush the plastic container.
After placing the bottle of liquid in the freezer and waiting 1-2 hours, you need to remove the prototype and study it. The temperature in the freezer reaches about -35 0 C, so if the liquid under study has not frozen and has not undergone crystallization at this temperature, it is guaranteed to withstand even more severe frosts, ensuring reliable and stable operation of the engine in winter.
Did you like the article? Subscribe to the channel to stay up to date with the most interesting materials
How to use a battery hydrometer
In addition to universal hydrometers with a bulb, separate devices are used for electrolytes, only for this liquid. These are models such as Vympel AR-02 5002, Heyner Premium 925 010, JTC 1041, Orion AR-2, Sparta 549125.
Orientation according to the color markings of the hydrometer
Often, hydrometers, in addition to the usual scale, also have color markings - for example, green indicates a normal level, red indicates a very low level, etc.
A car hydrometer allows you to measure the density of the battery electrolyte and thus determine what to do next: either how much water needs to be added, or how much acid to add.
In the case of an electrolyte, measurements are complicated by its transparency. Therefore, it is better to first lower your eye below the surface of the electrolyte, and then slowly raise your gaze until the elliptical surface becomes a straight line. The point at which the line is located on the hydrometer scale will be the hydrometer reading.
Checking battery density with a hydrometer at home
The process of properly using a hydrometer to measure the density of the electrolyte in a car battery.
The algorithm for measuring the density of electrolyte with a hydrometer with a bulb is as follows:
- The battery should sit for about 6 hours, and the electrolyte inside should reach room temperature, about 20°C.
- Unscrew the battery plugs.
- Place the hydrometer in the first jar and collect the electrolyte.
- Wait until the hydrometer stops moving and record the measurement result.
- Repeat the procedure for each jar.
- Based on the measurement results, decide how much water to add. Instructions are here.
The dependence of the charge level on the electrolyte density is in the table below.
| Charge percentage | Electrolyte density, g/cm3 | Battery voltage, V |
| 100% | 1,28 | 12,7 |
| 80% | 1,245 | 12,5 |
| 60% | 1,21 | 12,3 |
| 40% | 1,175 | 12,1 |
| 20% | 1,14 | 11,9 |
| 0% | 1,10 | 11,7 |
Remember that electrolyte contains acid, so it is important to follow all safety precautions. Wear gloves to prevent electrolyte from coming into contact with skin, clothing or other surfaces.
How to use a stick battery hydrometer
What does a hydrometer look like with sticks inside?
There are also hydrometers of a special design - with “sticks” inside. The meaning of their work is that when the container is filled with electrolyte, a plastic stick corresponding to a certain density floats up. The marking is applied to the body, opposite each stick (float).
But judging by the reviews, this is not a very reliable device - the sticks do not always float up, or several of them float up at once to different heights (the lightest is the highest). Because of this, it is difficult to determine what the actual density of the electrolyte being tested is.
To correctly check the density with such a hydrometer, you need to take your time. Having collected the electrolyte into the flask, wait about 10 seconds. When the measurement occurs on the edge of the density of the last floating stick, it floats up with a delay.
There are actually several options for such a hydrometer for a battery with stripes, one with colored stripes (from white - 1.19 to green - 1.27 and then red and brown, when the density is higher than necessary ), and the second with floats of the same color. They emerge not one at a time, but several at once ( if four emerge, then the density is normal ).