The design of the cooling system of all cars, including the VAZ 2107, uses pipes. These are lines that connect system elements and ensure the transportation of coolant. Coolant flows through the tubes, so their main condition is tightness. The reason for the leakage of the cooling system of the VAZ 2107 may be the pipes, the specifics of replacing which we will look into in the material.
The stove blows slightly warm air
Every owner of a VAZ classic has probably encountered this phenomenon, because all big problems begin with small ones.
However, even with diagnostics, things are not so simple here, because there can be many reasons why warm or cold air is blowing from the VAZ 2101-2104 stove.
For example, due to the fact that the heater fan motor rotates much slower than the nominal operating mode. This malfunction is a consequence of oxidation/contamination of the collector. Cleaning the commutator brushes or completely replacing the electric motor are possible repair options.
Bearing jamming usually leads to the same results - it is diagnosed by the appearance of creaks from the side of the stove, which intensify over time, up to the jamming of the armature shaft.
The second common reason why the VAZ-2101 stove heats poorly is insufficient warming up of the engine. If the temperature gauge needle does not rise to the required 90 degrees, it can be assumed that the thermostat is jammed, and in a position where coolant is constantly circulating through a large circuit. In this case, you will need to replace the thermostat, which can be done independently on a penny:
- you need to work with a cooled power unit installed on a level surface;
- unscrew the plugs of the main radiator and expansion tank;
- pour the antifreeze into a previously prepared container of suitable volume (about 3 liters);
- tighten the drain plug;
- Using a flat-tip screwdriver, loosen the clamps of the pipes connected to the thermostat;
- dismantle the thermostat;
- We replace it with a known working one;
- We carry out all other work in reverse order.
After the coolant is added to the norm, we start the engine and monitor how the thermostat behaves by feeling its pipes - the lower one should remain cold until the engine warms up to 85-90 degrees.
Heater air duct VAZ-2101
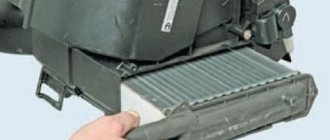
Another common reason why the VAZ-2101 stove does not heat is contamination of the stove radiator. As a result, the heat transfer of the device is sharply reduced (which is facilitated by both the deterioration of antifreeze circulation and the decrease in heat transfer due to the adhesion of scale and other contaminants on the external and internal walls of the tubes).
How do you know if a clogged radiator is to blame for the lack of heat? It’s very simple: with the engine warm, check the inlet and outlet hoses by touch. If the first one is hot, and the second one is much colder, it is obvious that heat loss occurs precisely in the stove radiator.
It can be revised, but it is better to replace it with a new one - the decision is made after its dismantling based on the results of the inspection.
Here is the algorithm for dismantling the “kopek” stove:
the user instructions recommend draining the antifreeze, but in this case, due to the loss of a small volume of liquid, this may not be done (no more than a liter of antifreeze will spill out); from the engine compartment side, loosen the clamps on the radiator flanges and pull off the pipes
You need to work carefully - the hoses usually stick, and it will take a lot of effort to remove them; unscrew the cover of the rubber seal and dismantle it; go to the interior, unscrew the screws holding the car radio panel (if any); loosen the fasteners for the heater faucet drive, disconnect the cable; unscrew the brackets securing the fan casing; we move the casing down and to the left - it will not be possible to completely dismantle it due to the electrical wiring; we take out the stove radiator from the casing.. VAZ-2101 stove fan
Heater fan VAZ-2101
Now you can begin a thorough inspection of the radiator, as well as the stove faucet. If the tubes have traces of through or almost through corrosion, further inspection can be stopped - it will not be possible to repair such a radiator.
If the condition of the radiator is more or less tolerable, you can try to clean it using store-bought or “folk” remedies.
We also check whether the faucet handle is stuck - this usually happens if the stove has not been used for a long time (it has not been turned on throughout the warm season). We replace the faucet if traces of leakage are also found on its surface.
When installing a new or restored radiator, do not forget to install new gaskets, which can be pre-lubricated with silicone - this will prevent possible leaks. We perform the same operation in relation to the rubber pipes connected to the radiator. Add the required amount of antifreeze and check the operation of the stove, as well as the tightness of all connections.
Types of systems
To upgrade your VAZ-2106 car and its heater with your own hands, you can choose one of three current methods. They are used quite actively and make it possible to increase the level of comfort inside the interior of domestic classics.
Additional electric heater. This is a device for heating the interior, which is quite simple and elementary in terms of use and installation. Electric heaters operate by connecting to the cigarette lighter on the front panel. To complete the installation, no special skills are required, since the heater starts working immediately after connection. However, this is an electric unit that will take energy. When operating at maximum speed, the battery will quickly drain. So, when the engine is not running, you should not use such a device. In fact, this is an ordinary hair dryer with a heating element and a fan, which creates the effect of additional heating inside the VAZ-2106. Autonomous heaters. For the VAZ-2106, such devices are practically irrelevant. More often used for additional equipment of trucks, large minivans or vans. The heater receives power from fuel. It has an autonomous combustion chamber and exhaust system. The operation of the system does not depend on the car engine. The unit has complex installation and negatively affects fuel consumption. And buying an autonomous system will cost significantly more. Externally, it is a metal structure with a combustion chamber and the necessary electronics. Auxiliary radiators
To heat the interior, car owners, including the VAZ-2106, where the standard stove does not cope with its tasks, often pay attention to additional radiators. The connection is made through the standard cooling system and stove.
Expansion tank
Installed on the body in the engine compartment. It is necessary to maintain the fluid level in the engine cooling system. When antifreeze heats up, it expands and increases in volume. When cooling, the reverse process occurs. With all this, it is necessary that the liquid always, regardless of temperature, be kept at the same level. This is what the tank is for.
Its functions are the same as those used in heating structures of houses for the operation of boilers. Without it, the cooling system of the VAZ-2107 will not be able to work. The carburetor also needs to be heated, so the height of the reservoir is the same as that of the fuel injection device. Please note that there are marks on the expansion tank indicating the minimum and maximum liquid levels. It is necessary to adhere to the golden mean.
Reasons for replacement
Replacing the VAZ-2107 stove motor occurs for several reasons. Let's look at the most common cases when a new VAZ-2107 heater fan is needed.
- A terrible sound with a characteristic screeching sound. If such a squeal appears when the car is warming up, it is better not to lubricate the engine, as many do, but to replace the VAZ-2107 heater fan.
- The air does not flow and the interior does not warm up - there is nothing left to do but remove and change the heater motor on the VAZ-2107.
- The air flow is very weak.
- The interior warms up extremely slowly.
Remember that a well-functioning system will be almost inaudible, since insulation and other materials ideally muffle sound very well. However, if something is broken, you can easily fix it.
Do-it-yourself repairs
Anyone who has basic knowledge of how the cooling system of the VAZ-2107 works, plumbing tools and is able to determine the cause of the problem can try to fix the breakdown on their own. The driver will be able to cope with replacing a damaged wire or pump belt without any problems. But if you are not sure of the diagnosis or there is a suspicion of a serious breakdown, it is certainly better to put the car in the hands of a specialist.
Improperly carried out repairs can create many serious problems. First of all, the driver should know that a malfunction of the car’s hydraulic system will very quickly lead to complete destruction of the engine.
Flushing the system
Regular cleaning is necessary. It is not difficult to do; you just need to use a special solution designed for this purpose. Pour it into the system, start the engine and let it warm up to operating temperature. After this, turn off the engine, drain the solution and repeat the procedure 2-3 times, only use clean water. Solutions intended for washing are very aggressive and can destroy rubber and metal with prolonged contact.
Please note that before draining the liquid from the system, you must wait some time for the temperature to drop to a safe value - about 50 degrees. If there is damage, carry out repairs.
The cooling system of the VAZ-2107 has two drain holes - on the radiator and the cylinder block. And don’t forget to open the stove tap when flushing so that the solution gets into the radiator. The price of this procedure at service stations ranges from 500-700 rubles. It's not that much compared to renovations.
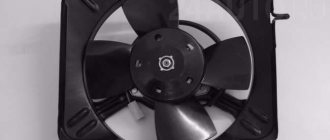
Electric fan
We are talking about the fan that is installed on the cooling radiator. It works quite rarely. It turns on only when the temperature at the radiator outlet is exceeded. A sensor is installed in this place, or, to be more precise, a thermal switch. It consists of a bimetal plate, which at a certain temperature is deformed, changing its geometry. In this case, the contacts connected to this plate mechanically are closed.
It is worth noting that the cooling system of the VAZ-2107, malfunctions of which can be eliminated fairly quickly, is still not very perfect. The sensor, according to the manufacturer, is capable of switching large currents and has an impressive service life. But it is better to have a degree of protection - switching on should be done using an electromagnetic relay, which is controlled by a sensor. This way you can increase the resource many times. In addition, it is necessary to have a button in the cabin connected parallel to the sensor. With its help, you can force the fan to turn on.
Caring for the VAZ 2107 stove.
As a result of prolonged use, the stove radiator becomes clogged. This entails incorrect operation of the heating system. To restore the functionality of the stove, it is necessary to clean it. This procedure does not require much effort and can be easily done with your own hands.
Materials:
- Pair of clamps
- Pair of rubber seals
- Spanners
- coolant
Operating procedure.
- Before starting, you must wait until the engine has completely cooled down.
- We put gaskets under all the tubes (you can use fabric).
- Remove the clamps securing the inlet and outlet hoses to the engine compartment.
- Remove the hoses from the tap (substitute a container for liquid).
- We unscrew the fasteners and remove the seals.
- We remove the radiator.
- We replace all rubber seals.
- We remove the tap and clean the inlet hoses.
- Using coolant, flush the radiator.
- We assemble the heating system in the opposite order and check that it is working properly. Carefully check the tightness of all components!
- If a leak is detected, increase the pressure of the clamps.
Be especially careful when upgrading your car's heating system. Improving the stove on a classic VAZ is a fairly simple, but very productive procedure. If you approach things responsibly, you will definitely get the desired result! Maintain the stove regularly and clean the radiator. Happy modernization!
Main radiator
The radiator is designed to cool the coolant entering it due to heat exchange with the environment. This is achieved thanks to the features of its design. The radiator is installed in the front part of the engine compartment on two rubber cushions and is attached to the body with two studs and nuts.
Radiator design
The radiator consists of two vertically located tanks and tubes connecting them. On the tubes there are thin plates (lamellas) that accelerate the heat transfer process. One of the tanks is equipped with a filler neck that is closed with a sealed cap. The neck has a valve and is connected to the expansion tank with a thin rubber hose. In carburetor VAZ 2107 engines, the radiator is provided with a mounting socket for the sensor for turning on the cooling system fan. Models with injection engines do not have such a socket.
The radiator consists of two vertically located tanks and tubes connecting them
The principle of operation of the radiator
Cooling can be carried out either naturally or forcefully. In the first case, the coolant temperature is reduced by blowing the radiator with a counter flow of air while driving. In the second case, the air flow is created by a fan attached directly to the radiator.
Radiator malfunctions
Radiator failure is most often associated with loss of tightness as a result of mechanical damage or corrosion of the tubes. In addition, the tubes may become clogged with dirt, deposits and impurities in the antifreeze, and coolant circulation will be disrupted.
If a leak is detected, you can try to solder the damaged area with a powerful soldering iron using special flux and solder. Clogged tubes can be eliminated by flushing with chemically active substances. Solutions of orthophosphoric or citric acid, as well as some household cleaning products for sewerage, are used as such substances.
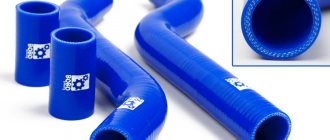
DESCRIPTION OF PIPES VAZ 21073
What a set of pipes for a VAZ 2107 with an injection engine looks like is shown in the figure below:
RICE. 1. A set of rubber pipes for the VAZ 21073 “injector”.
- Outlet pipe
- Inlet pipe,
- Water pump coupling,
- Bypass pipe.
1. Outlet pipe - popularly called the lower radiator pipe. Catalog number 2105-1303010.
The lower pipe is designed to connect the lower part of the cooling radiator to the thermostat. The pipe removes liquid from the radiator and supplies it to the thermostat. It is also used on VAZ “classic” cars with carburetor engines.
2. Inlet pipe – popularly called the upper radiator pipe. Catalog number 2123-1303025. It supplies coolant to the upper part of the radiator of the engine cooling system. It can also be used as an outlet pipe on a Niva - Chevrolet.
3.Water pump coupling - installed between the thermostat and the pump. Its catalog number is 2103 - 1803092. It supplies coolant from the thermostat to the water pump. It is also used in all VAZ “classic” engines. People also call him “shorty”.
4. Bypass pipe - connects the top of the thermostat and the exhaust pipe of the engine cooling jacket. Catalog number 2101 – 1303090. It is also called “corner”.
LOCATION OF PIPES VAZ 2107
Next, we will look at where and how all these pipes are located using the example of a fragment of a VAZ 2107 engine:
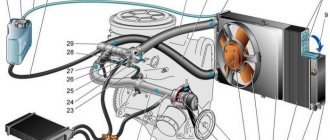
RICE. 2. VAZ 2107 engine cooling system.
1. Outlet pipe. 2. Supply pipe. 3. Water pump coupling 4. Overflow pipe. 5. Hose for supplying hot fluid to the heater radiator. 6. Expansion tank. 7. Engine cooling jacket. 8. Radiator cap. 9. Engine cooling radiator. 10. Fan casing (diffuser). 11. Radiator cooling fan. 12. Lower radiator support. 13. Water pump pulley. 14. Liquid outlet pipe from the heater radiator. 15. Water pump belt. 16. Water pump. 17. Exhaust pipe, engine cooling jackets. 18. Thermostat. The arrows here indicate the direction of movement of the coolant.
REASONS FOR MALFUNCTION OF RADIATOR PIPES IN VAZ 2107
The cooling system pipes are replaced when it is discovered that the coolant level is decreasing over time. If you find this in your car, then carefully inspect all the pipes. Sometimes it happens that one of the clamps is loose, and simply tightening it is enough. In some cases, the leak appears in the cooling radiator itself.
Then you will have to change it if you have an aluminum radiator, and if you have a copper radiator, then soldering the radiator will save the situation. But, since we have a different topic today, we will consider the case when liquid leaks due to a defect in the rubber pipes of the cooling system.
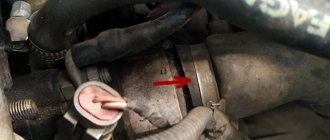
Most often, cracks appear on the rubber at the places where they are secured with clamps. This can be detected when leaks appear. It is necessary to slightly bend the pipe in this place and then this crack will immediately become visible. As an example, I will give you the photo below:
RICE. 3. A crack in the pipe where it is secured with a clamp.
Sometimes they install pipes that are not quite suitable in shape and bends. Then either stress or deformation occurs in the material. It is in places of deformation that cracks most often form (or even the rubber breaks off completely) and liquid begins to flow out through them.
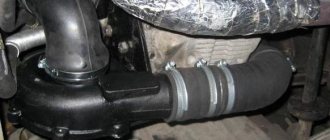
It also happens that the pipes burst altogether, as shown in the figure below:
RICE. 4. Broken main radiator pipe.
REPLACING RADIATOR PIPES VAZ 21073
Before replacing the VAZ 21073 pipes, you need to remove the plugs from the radiator and expansion tank. Let's prepare a hose of a suitable diameter and some kind of container, maybe an old canister, but not less than 10 liters. According to the passport, the cooling system of the VAZ 2107 contains 9 liters of liquid.
Then we find the engine drain valve. It is located at the bottom of the block. We put one end of the hose on the fitting of this tap. We insert the other end into a container, which we prudently placed below the engine level. If we install it anywhere, it may turn out to be higher than the engine level. In this case, the cooling system fluid will not leak from the engine.
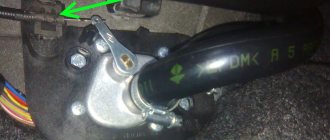
Do it yourself: Replacing the pipes of the engine heating boiler and stove
So, we continue to prepare for winter, I recently noticed a leak from the pipe of the engine heating boiler, although the liquid did not leave, I decided to replace both pipes, since they were still standard and had already been like that for 7-8 years.
Also, a crack was discovered on the incoming pipe of the stove, they are also factory, it turns out they have been driving for 12 years, I also decided to replace both.
To do this, I bought 2 sets of pipes for the injector (one of the pipes is shorter on the carburetor), 0.5 meters of diesel-resistant hose of suitable diameter, clamps, a flexible socket screwdriver with a set of 1/4 heads - I’ve been wanting to buy it for a long time, since it’s difficult to get to clamps and bolts with a regular wrench or screwdriver. I also prepared plugs and sealant, since I decided not to drain the antifreeze.
The short pipe included in the kit is ideal for the heater; it just needs to be trimmed, but the long one is a bit short, so I got a 0.5 m fuel hose from a spare parts store for tractor-trucks, and in theory it should also hold antifreeze.
First, we remove one end, put on a hose with a chopper, then the other, no liquid came out of the entrance to the head at all. Only 100 ml came out from the bottom hole in the block while I was putting the pipe on.
The standard pipes have turned into hard plastic.
I also replaced it on the stove, after closing the faucet, the liquid didn’t even come out. I simply tore the factory clamps with a screwdriver, installed normal ones, and, where possible, coated them with a thin layer of sealant.
The pipes were also hardened to the point of plastic.
Also, one of the connections of the recently rebuilt faucet began to dig again. Apparently, he didn’t wind up enough fuma.
I decided to try expensive plumbing fixtures, as they say, they are suitable for aggressive environments and for moving joints. The structure is reminiscent of flax fibers, only synthetic and already impregnated, I wound it thicker to be sure.
I didn’t de-air anything, the heater works well, the car doesn’t overheat. It's been a couple of months and everything is holding up.
At the same time, I replaced the air filter, which I do every year in the winter.
Flexible screwdriver - 100 RUR
Set of heads 1/4 - 225 RUR
Stove pipes - 120*2 = 240r
Air filter - 205 rub.
Subscribe! Good luck on the roads!
- More about this car:
- Logbook
- Breakdowns
- I fell into a hole on the highway, I thought I slipped through, but after... 218,000 km
- The beginning of the story: ... 218,000 km
Once again, it is worth praising the author for a detailed review supported by close-up photos. Well, once again I can’t resist a couple of comments.
I also replaced it on the stove, after closing the faucet, the liquid didn’t even come out. I simply tore the factory clamps with a screwdriver, installed normal ones, and, where possible, coated them with a thin layer of sealant.
There would be no need to fuss and close the faucet, the effect would be similar. (if the radiator cap was closed at the same time), Further, judging by the photo, the clamps were far from being factory ones, because from the factory there were band clamps, not worm-type clamps. Well, using sealant in these places is not good.
Also, one of the connections of the recently rebuilt faucet began to dig again. Apparently, he didn’t wind up enough fuma.
In fact, the reason for the “undermining” is not in the small number of turns of the tape, but in something completely different. The respected author probably used FUM tape with a thickness of only 0.08 mm. It is usually sold everywhere and costs less than other analogues. It seals threads even of a modest size of 1/2 inch very poorly. Therefore, a little advice when buying a tape is to always pay attention to its thickness (written on the side of its reel) and purchase a tape with a thickness of at least 0.1 mm, or better yet even thicker. In addition, I hope that he knows that the winding should be clockwise and the number of turns of the tape at the start of the thread should be less, and at the end - more (figuratively speaking, as if on a cone). Something like this.
Where can I get another stove?
Since on domestic cars, for example, on the VAZ-2107, the heating system does not allow you to constantly maintain a comfortable temperature in the cabin due to the device itself, drivers can install an additional heater on the VAZ-2107. In fact, if the temperature outside is below minus 10, then the radiator is no longer doing its job well, and only two stoves in the VAZ-2107 can make heating faster.
Most often, for additional heating of the interior, a Chinese-made 12-volt device is used, with six channels on the right and six channels on the left (3 for each fan).
When ordering a second stove for a Chinese-made VAZ-2107, you must take into account the location of the outlet pipes that feed into the system. The position of your new heating system during installation will depend on them.
The system allows air to be drawn from the passenger compartment using two fans. Speed control is usually found in every device, and it is better to choose a three-stage control.
Furnace systems can have not only two, but also one fan with three outlets. Even such a small additional stove can warm up the interior to plus 25 in 2–3 minutes.
Cooling design of car drive
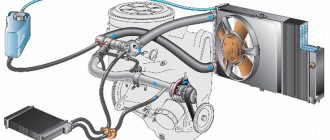
The hydraulic cooling system of a car is a group of devices and pipelines connecting them, as well as channels in the internal combustion engine block, which allow the heat received from the parts to be removed from the parts during the operation of the mechanisms.
Structure of the cooling system in the VAZ-2107:
- radiator;
- expansion tank;
- water pump;
- thermostat;
- fan.
You may also be interested in an article by our specialist, which describes in detail how to adjust the carburetor on a VAZ-2107.
The main task of the cooling structure is to maintain the optimal temperature when the engine is running, regardless of operating conditions, by removing part of the heat produced in it through the coolant. Cars use an intermediate cooling layout:
- heat from the engine;
- coolant;
- heat exchanger, such as a radiator.
Consequently, the cooling design prevents overheating of the engine and a decrease in temperature below the optimal value, which ensures stable operation of the motor, good lubrication of rubbing parts, and reduction of gaps when parts come into contact. In the 2107 car model with an injector, a heated throttle body is installed.
The heat received from the engine can be used to heat the car. This task is implemented by a second heat exchanger of similar design, in which the process opposite to the cooling radiator occurs. Heated air from the heat exchanger is supplied to the vehicle interior.
The structure of the VAZ-2107 carburetor engine cooling system consists of two circuits:
- circulation of coolant in a small circle inside the engine;
- the contour of a large circle, which includes the radiator and expansion tank.
Thermal comfort of a modern engine requires cooling consisting of two independent circuits - for the block and the cylinder head. This allows the cylinders to reach high temperatures to improve their lubrication, since the oil viscosity is lower and frictional resistance is also reduced. The temperature of the block head also decreases, which protects the engine from detonation combustion of fuel.
A modern view of regulating the temperature conditions of the engine using the so-called smart cooling system 21074 with an injector includes:
- electronic control of the pump regardless of engine operation;
- fan with adjustable variable speed;
- coolant temperature sensors placed in the cylinder head gasket to monitor engine operating conditions;
- multifunctional valve instead of a traditional thermostat.
Such a device quickly and flexibly regulates the fluid temperature in the current operating mode of the engine. Its maintenance consists of the following operations:
- control and periodic replenishment of the amount of refrigerant;
- checking the tightness of the hydraulic system;
- coolant suitability test;
- periodic replacement of antifreeze;
- monitoring the operation of sensors and indicators.
Processing the engine compartment
But one more problem remains - the long time it takes to warm up the interior. And to eliminate it, you need to insulate the engine. This will allow the engine to reach operating temperature faster and cool down more slowly.
But it is not possible to insulate the motor itself; there are a significant number of moving elements on it that cannot be covered. But insulation of the engine compartment is allowed.
First you need to insulate the hood of the VAZ-2107. To do this, you can purchase a special cover from the auto store that is attached to the cover from the inside of the hood.
But many car enthusiasts prefer to do this with improvised materials. But when deciding to treat the hood, you should choose the right insulating materials. They must be non-flammable and not absorb oil. Therefore, it is not recommended to use ordinary fabrics.
The engine compartment can be better insulated by gluing insulating materials onto the shield separating the engine from the passenger compartment. But this can only be done by removing the engine from the car.
We recommend: How to flare a brake pipe yourself
In addition to the hood, the radiator also needs to be insulated. For this purpose, masks are used that are attached to the radiator grille.
Instead of a mask, you can use a regular cardboard sheet placed between the radiator and the grille. But it is worth considering that you cannot completely close the radiator; heat exchange must still occur. Therefore, a sheet of cardboard should not cover more than 2/3 of the radiator area.
There is no need to take this into account with a mask, since in addition to the grille, there are enough holes in the front end for the air flow to pass to the radiator.
Coolant suitability
The refrigerant is checked based on monitoring its freezing point. This temperature increases over time as the glycol content in the liquid decreases, which evaporates faster than water. Control can be carried out by measuring the density of the liquid with a hydrometer.
Measuring the density of antifreeze can also be done using an optical disc tester - a refractometer. This instrument uses the relationship between the concentration of glycol in a liquid and the refractive index of light. A drop of the material under study is applied to the prism of the device, and it is observed where the boundary between the white and blue fields lies. Two scales are used for two grades of glycols.
Periodic replacement of refrigerant
The period for replacing the fluid is indicated by the manufacturer in the operating instructions. In older engines, the replacement interval is usually 2 years or 60 thousand km of the vehicle. In new engines, this period is increased to 5 years or up to 120 thousand kilometers of total mileage.
To replace the cooler, it is necessary to drain the used one. To drain, you need to perform the following operations:
- wait until the engine cools down, otherwise there is a risk of burns;
- open the radiator cap;
- install a wide vessel under the radiator;
- Unscrew the drain plugs in the radiator and engine block.
When replacing coolant, and especially when changing its type, it is necessary to flush the hydraulic system. Flushing involves supplying water with a hose to the radiator filler neck and passing it through the entire hydraulic system. During the procedure, you can start the engine so that the running pump participates in the flushing process.
After emptying and flushing, the drain plug must be tightened. Slowly fill the radiator, block jacket and pump to the maximum level. When the radiator cap is open, you must start the engine to remove air from the pipeline. Only when you are sure that the air has been removed can you tighten the plug tightly.
After filling with antifreeze, you must leave the engine running for another 10 minutes to check the tightness, as well as the time it takes to reach the desired temperature (signaled by turning on the radiator fan).