Car manufacturers pay great attention to sound insulation. But it is not always effective. The greatest amount of noise, as practice shows, comes from the engine. Many motorists do not pay attention to this, while others approach this issue thoroughly. Let's figure out how to soundproof the engine compartment, what the nuances may be and how to choose the right material.
General information
In fact, the engine compartment is the most problematic part in terms of sound insulation. Often, to get to the required place it is necessary to disassemble the entire torpedo, or even more. But it’s worth it, because after the work is done, the acoustic comfort in the cabin will improve several times.
Although the work is labor-intensive, with the right approach you can complete it quickly enough. In fact, there is nothing complicated here: the main thing is to follow some simple rules and everything will definitely work out. This guide will be useful for those who have no sound insulation in the engine compartment or leave much to be desired. Much depends on how the engine operates. Excessive wear of rubbing metal parts leads to additional noise and this must be understood. In such cases, it is not the “Shumka” of the internal combustion engine that is needed, but its repair.
Sound sources
As is known, noise perceived inside a car can be of two types:
- primary, provoked by autonomous sources. These, in addition to cars passing by, turbulence of incoming air, primarily include the engine and transmission elements;
- secondary. Sound waves emanating from noise sources pass through the materials that insulate the vehicle interior: metal body parts (engine shield, tunnel, wheel arch, etc.), vehicle control components, as well as plastic trim and dashboard elements. They all resonate, creating structural noise. This not only contributes to the transmission of primary noise, but also provokes its own vibration vibrations (most of all at the junctions of the listed parts).
That is why sound insulation of the engine compartment is almost the first point from which high-quality sound insulation of a car begins. Of course, we cannot cover the engine or transmission itself with soundproofing materials. The following are processed:
- engine shield from the inside and outside (a partition separating the car interior and the engine compartment);
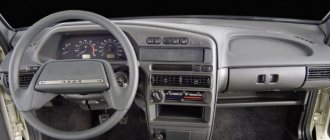
- interior cavity of the dashboard;
- hood;
- interior part of wheel arches, side panels;
- “tunnel”, near which the exhaust system passes, and on cars with rear-wheel drive or all-wheel drive there is also a cardan drive.
How to make noise less
Noise insulation of a car engine is carried out using three classes of materials.
- Vibration damping – compositions based on bitumen and foam rubber. It has a viscoelastic structure and serves to convert mechanical vibrations into thermal energy. In practice, the tight fit of the material makes it possible to dampen resonant vibrations of metal and plastic elements. The vibration absorber forms the base layer. Most effective when insulating thin-walled metal surfaces (up to 3 mm).
- Soundproofing - a material with a closed-cell structure. Reflects not only sound, but also heat waves.
- Sound absorbers are a fibrous or porous material in which there are a large number of interconnected cavities (in some models with a dense insulating layer on the front side). The open cell structure traps and diffuses noise.
Choice
How to choose the best material? The effectiveness of soundproofing compounds is characterized by the sound absorption coefficient (SAC). Vibration isolation is also assessed by the degree of mechanical losses (MCL) and the dynamic modulus of elasticity. All self-respecting manufacturers label the models of their noise-insulating compounds KZT. We can only trust when choosing sound insulation for a car engine.
If different models of material have the same composition and structure, but different thicknesses, then you can follow the rule - the thicker the better. Moreover, the effectiveness also depends on the method of combination and the area of pasting. Not for all materials and areas of the vehicle, the percentage of area covered is directly proportional to efficiency.
Among the manufacturers we can recommend:
- STP and Shumoff, which are recognized leaders in the domestic market;
- Vikar;
- Noisebuster;
- SGM.
Selection of materials
Direct comfort while driving depends on how significant the noise reduction is. The main point here is the selection of the required quantity and type of materials. There are both budget solutions and more expensive ones. It all depends on the thickness of the sound insulation, its quality and properties, but first things first.
So, after you have calculated the required amount of materials, you need to proceed directly to purchases. First, you will need vibration isolation (vibroplast). Next you will need soundproofing sheets. Pay attention to the thickness. The larger it is, the better the result will be. But even here you need to know when to stop, since excess weight will negatively affect the dynamics of the car. Don’t forget about anti-gravel, which protects noise and vibration insulation from high temperatures. It is not recommended to buy combined materials that supposedly combat noise and vibration at the same time. Their efficiency is usually quite low, and the cost is high. In addition, such sound insulation from the engine compartment will not bring the desired result.
How does noise enter the cabin?
The characteristic sound of a diesel engine finds many ways to penetrate into the cabin; cracks and glass are the best assistants for annoying sounds. If the engine is faulty, then half the interior may vibrate from its operation, usually due to malfunctions of the cylinders or fuel pump.
The importance of soundproofing is undeniable
It is necessary to get rid of the noise entering the cabin by any means. To do this, you must first inspect the plugs and bushings, which many drivers do not consider necessary to return to their place after installing the amplifiers
Next, you need to pay attention to the door seals: if they are compressed, then this is bad. If there are no traces, then it is necessary to achieve tightness of the doors in the closed position
It is easy to check the tightness of the door to the counter using a regular sheet of paper. The sheet is inserted between the counter and the door, if after opening the door the sheet turns out to be crumpled, then everything is fine with the insulation, but if the sheet remains intact, then this is not good.
Research at one of the technical centers revealed a similar problem with doors in many car models: Dodge, Mitsubishi, Hyundai and others. Even a small gap will be an excellent conductor for the tiresome sounds of wheels, engine or wind into the cabin.
From simple to complex
It is recommended to start with the most problem-free area of the car - the hood. It must first be cleaned and degreased. If there is an old lining that turns into a black rag over time, then it is better to remove it and then replace it with a new one. Usually there are stiffening ribs on the hood, so it is advisable to make a stencil to get around them with the greatest accuracy. Pieces of sound insulation are cut out along it. As a rule, the material is sold on a self-adhesive basis. That is, it is enough to remove the protective film and you can glue it.
Vibration insulation is attached as the first layer, and “Shumka” goes on top of it. The thickness must be selected so that the hood closes tightly without obstructions. If you cut and glued everything correctly, then you have already achieved certain results, but you shouldn’t stop there.
Stages of work
Personal experience of Toyota Corolla 110
Surely many readers have not done this kind of work before. Therefore, you need to start with a simple place in the car - the hood. Preparatory work:
- Cleaning from dirt.
- Degreasing.
The old trim, if any, must be removed and replaced with a new one.
Structurally, the hood is not a sheet of steel. On its inner side there are stiffening ribs. Therefore, for thorough pasting with anti-noise, it is better to make a stencil out of paper.
Pasting order:
- Vibration isolation.
- Sound insulation sheet.
The material is mostly self-adhesive
Pay attention to the thickness of the insulation. It must be such that the hood can close without any hindrance
The installation took place without any problems, and everything was cut out neatly? This is a success and you can move on to the next part. If there were mistakes, then the work needs to be redone and be more careful in the future.
Do-it-yourself soundproofing of the engine compartment
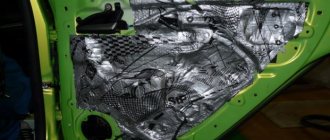
Now it is advisable to start working from the inside. Typically, the configuration of parts requiring processing has a complex shape. Therefore, as in the previous case, it is advisable to make stencils from paper and cut vibration and noise insulation using them. Since the main source of noise is the partition between the engine and the passenger compartment, special attention must be paid to it.
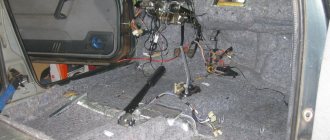
It is worth noting that in this case you will have to completely disassemble the dashboard. This will require a certain amount of time and patience. It is advisable to take photographs of the disassembly process so as not to forget in what order everything is assembled. For example, soundproofing the engine compartment of a VAZ-2107 and other classics is extremely simple, but problems can arise on modern foreign cars. After you have taken everything apart, we try to cover the maximum area with vibration and noise insulation. It is advisable to use materials with a foil front side, since it reflects noise and does not disturb the temperature regime.
Where is the noise coming from?
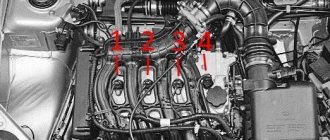
First you need to inspect the motor (listen to its operation) to understand where the increased noise comes from:
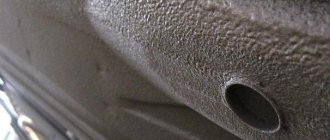
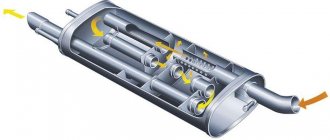
The most common sources of excess noise are chains or their tensioners (if the engine has them) A worn fuel pump is noisy The engine may be noisy from low-quality fuel Also check the integrity of the engine mounts Listen and check the condition of the gearbox It is worth paying attention to many other engine elements that indirectly can make an additional contribution to the overall noise. Among them, the exhaust pipe (and the entire system) of the car deserves a separate topic, and specifically burnt-out mufflers or direct-flow pipes. Why do you think we spend so much time on the technical condition of your car? This is because without eliminating the sources of additional noise, subsequent fiddling with the sound insulation of the car will be simply pointless. The main way for the spread of noise from the engine is cracks, loud exhaust, vibration, uneven operation of the cylinders, malfunction of the fuel pump When inspecting the engine compartment, you should pay attention on the cracks (holes), holes leading into the cabin. Especially check the standard plugs and bushings. Because they usually forget to put them in place when installing amplifiers or stretching wires for the alarm siren. Close the hood and strongly pull the hood curtains (near the windshield), there is play. in this case, it should be absent. Do not neglect this simple check. We often encounter such a nuisance even on new cars of the BMW level. When something squeaks by ear, such a noise is often mistaken for a “dead” shock absorber. After this, it is worth carefully inspecting the front wheel arches in order to detect holes in the wheel arches. Surely you will find them. Through such holes, for example, brake hoses can come out. After this, go to the front doors of the car, then open the door, check the gap between the pillar and the door itself. In the gap, can you see the arch niche (see Soundproofing car arches different materials)? After this, carefully inspect the sealing rubber on all doors and along its entire length. This refers to the rubber band that should seal the door when closing. It is checked very simply. If your rubber band has traces of pressure on the entire surface, then everything is in order, however... Most often There is a situation when in one place there is a good clamp, but in another there is none. To check, we advise you to take a sheet of paper and insert it into the gap, then close the door. Pull the sheet, if you were able to pull out the paper, this means that there is no sealing I hope now you understand that sound insulation of the engine compartment on the engine side begins after a thorough inspection of the car and elimination of sources of increased noise and sealing problems
Processing wheel arches
Usually the greatest amount of noise comes from the arches and the engine shield. We have already “made some noise” with the last one, all that remains is to deal with the arches. Due to the noise of the wheels and the operation of the suspension, this element becomes one of the most loaded in terms of vibrations and noise. In addition, as practice shows, the standard “noise” is often absent there.
But here, unlike the motor shield, there is practically nothing complicated. You need to start by thoroughly washing the surface and drying it completely. Next, the surface is degreased and anti-gravel material is applied. If there is a regular one, then this item can be omitted. We glue a vibration-absorbing layer of the “Noise-off” type. After this, a layer of mastic is applied using a brush, preferably 2-3 layers with drying intervals of 20-30 minutes at a temperature of 20 degrees Celsius. The final stage is adhesive sound insulation, preferably based on foam rubber.
Is it possible to close a car radiator in winter and why do it?
- The honeycomb fencing prevents the flow of cold air, which does not allow the coolant to heat up to operating temperature.
- When parked for a short period of time, the engine will take a little longer to cool down.
- When starting, the engine heats up faster.
A little theory
On machines where there is no ECU, and the cooling functions are performed mechanically thanks to a belt drive and a fan. Such a system is extremely dependent on the speed of the power unit. In practice, such cooling is not always effective in summer, and in winter it prevents the engine from warming up at atmospheric temperatures below -25°C. In such cases, the question of whether it is possible to close the car radiator in winter practically does not arise. The fact is that at this temperature, even with the fan turned off, it is extremely difficult to heat the coolant, not to mention driving with incoming currents of cold air. That's why drivers of old cars prefer to cover the radiator grille with cardboard. On more modern cars there is a viscous coupling that regulates the operation of the fan. This system is very effective at all temperature conditions. In winter, the fan practically does not turn on
But here it is important to consider the average temperature in your region. If it often drops below -20°C, then cardboard will not hurt in a modern car
Paired with engine insulation, this measure will help quickly get the car into working condition.
Legends and myths
In fairness, it should be noted that among car enthusiasts, winter modernization of the cooling system is almost a universal panacea. Some of the myths are quite popular:
- The ability to reduce fuel consumption by 25% using insulation materials is a marketing ploy by manufacturers of insulation products. In reality, of course, there are savings, but their percentage is overestimated, because this occurs due to the rapid warming up of the engine in winter.
- Thermal insulation of the radiator will greatly facilitate the morning startup of the power unit in severe frost. This opinion is true when the car, after standing for 2-3 hours and retaining some of the heat, starts easier and faster. It’s another matter if the car was left all night in the cold, in which case the effect of the presence of insulation on starting is minimal.
About important details
As you can see, there is nothing complicated about soundproofing wheel arches. Nevertheless, this is the weak point of many cars, for example, the VAZ-2110. Soundproofing the engine compartment also involves treating the arches, don’t forget about it. In this case, special attention must be paid to mastic, since many do not use it. Nevertheless, unprotected material will be destroyed due to road dirt, salts, etc. Anti-gravel is precisely designed to protect vibration and noise insulation from the effects of technical fluids, that is, an aggressive environment. That is why it is recommended to apply mastic in several layers.
Pros and cons of sound insulation
If all the necessary operations are carried out correctly, in full accordance with the recommendations of specialists, sound insulation of a car engine will give a positive effect even during its first test. However, there are certain risks that can nullify all the work done or significantly reduce its effectiveness. For example, during dismantling, due to haste or inattention, expensive parts of electrical equipment can be damaged, latches can be deformed, and the surface of plastic and other inserts can be damaged. Thus, there is a possibility of such damage during reverse installation, which will lead to deviations from the norm in the functioning of the climate control, problems with the on-board computer and other components of the car.
Therefore, both of these processes should be carried out as carefully and responsibly as possible. It is best if they are handled by experienced craftsmen.
About the results
Based on the results of the work, the following should be pasted over:
- hood cover;
- motor shield;
- wheel arches.
You shouldn't expect anything special from the soundproofing of the hood lid. If you leave the cabin, the result will of course be noticeable, but the acoustic comfort in the car is most directly affected by the treatment of the engine shield and wheel arches. The material used, the number of layers of anti-gravel, etc. depend on how quieter it becomes in the cabin. In any case, you can expect a noise reduction of about 20-40%, depending on the design features of the car. Since the cost of materials is insignificant, it is definitely worthwhile to perform sound insulation. You might even think about completely treating the car.
Which cigarette lighter should I replace the burned out one?
There are many different options on the market
When choosing, you need to pay attention to how much the Lada Granta cigarette lighter costs. A price that is too low indicates that low-quality materials were used in the production process; such a device will not work for a long time
The normal cost of the device is 600 – 1200 rubles.
You can buy a short European cigarette lighter. There are no uniform size standards for parts. Therefore, they will differ in length or diameter. You must select a plug of the appropriate size. If the diameter does not match, the device will short out, which can lead to a fire.
Let's sum it up
I would like to note that you can often save significantly on materials. For example, the same vibroplast will cost much less in the construction market than in a car dealership. This also applies to other materials, such as anti-gravel and sound insulation. Remember that the larger the area covered, the better the result. But everything is good in moderation, so gluing several sheets of vibroplast in a row also makes no sense. Then it will be difficult to put all the elements of the dashboard in their rightful place, which is due to the reduction in usable space.
Since you can make soundproofing of the engine compartment with your own hands even without any experience in this field, it makes sense to do it. This is especially true for cars that do not have standard noise, and classics, where noise insulation is nominally available, but the factory saved a lot on the material and there is practically no use for it.
Good day to all! It's spring and warming up, but this doesn't stop those who want to modify and improve their own car. The topic of our conversation today will be sound insulation of the engine compartment.
The concept of car comfort usually means the presence of climate control equipment, comfortable seats and various additional functions.
But there is one more extremely important point. And it concerns specifically the noise level in the cabin when driving. Some will say that Shumka was originally provided from the factory. This is true. But not really. The quality of factory sound insulation is sometimes extremely low, and rather it is there purely for show. Plus, not all car companies insulate the engine compartment, which immediately negatively affects the level of comfort.
Therefore, the car owner has to buy materials and take on the task of correcting the factory’s defects with his own hands. At one time I also made myself a Shumka with felt on my first car. But now modern and highly effective materials have appeared. I recommend using them.
Why don't cars leave the factory with complete sound insulation?
Many car owners are wondering: why didn’t the manufacturer make good sound insulation of the car from the beginning? After all, if the car is of the lower and middle class, then there is either no soundproofing material at all, or its quantity is minimal.
The main reason for this is the manufacturer’s desire to save on insulating components, since each element of sound insulation will have to be spent. And if we take into account the volume of products produced, the cash costs of the car plant will be large.
The second reason is the manufacturer’s reluctance to devote time to installing soundproofing materials. All operations on the conveyor are scheduled to the minute, and equipping a car with high-quality noise insulation will require a lot of them.
The third reason is the extra weight (several tens of kilograms), which the complete “noise” adds to the weight of the car.
Although already in the process of creating a new model, at the stage of developing design characteristics, manufacturers seriously think about the issue of car sound insulation. To do this, the optimal mounting points for the exhaust system are calculated, the selection of engine mounts, supports, etc. The higher the cost of the car, the more serious the fight against external noise stimuli will be.
Due to the rapid motorization of Russia at the beginning of the new millennium, a great demand for noise and vibration insulation arose. In the mid-2000s, modern models of well-equipped, inexpensive cars appeared on sale. However, there was practically no factory sound insulation in them. According to the demand, a supply appeared in the form of various accessories and materials designed to provide additional noise and vibration insulation, which formed a separate market niche. Naturally, this gave impetus to the development of the service industry in this area.
Therefore, today soundproofing work is carried out both by private owners and official dealers. Some car owners do this themselves. The cost of soundproofing a car largely depends on the contractor.
There are two ways to install car soundproofing. The first involves the use of a ready-made kit, which includes a full set of necessary materials. In addition, there is a diagram of the car indicating the places where to glue and the sequence of work. Currently, there are very few such kits on sale. There is enough red tape with them, while the difference in cost compared to the work of specialists is small. Moreover, everything will depend on the quality of the manipulations performed.
Car noise insulation, performed by professionals using specialized materials combined in several layers, reduces the internal sound impact by up to 50%. If the work is carried out by the car owner himself, it will cost less than specialists. However, taking into account the time spent, possible errors in the process of installing sound insulation yourself (incorrect application, waste of material), the difference in cost will be insignificant.
Where to begin
First of all, many people ask questions about the advisability of the soundproofing procedure specifically on the engine side in the engine compartment.
There is an opinion that this is a completely useless event. And supposedly there is no meaning in it. But this is said mainly by those who have not felt the difference between cars with and without sound insulation, or who initially drive a car that has high-quality and efficient noise insulation from the factory. In the second case, I really don’t see the point in further insulating the engine compartment. But this occurs mainly on expensive and new cars. Owners of older and cheaper cars are less fortunate.
How to soundproof your car yourself
1.Doors.
Frontal acoustics are placed on the doors. To keep the door “silent” while driving and playing music, it is treated with special materials.
“Budget” treatment - pasting the outer panel and door card.
But let's look at the standard version of door noise reduction, consisting of the following steps:
- Disassembly.
- Cleaning and degreasing of surfaces.
- Pasting.
They start by processing the outer panel. For this purpose, vibration and noise-absorbing materials are used, covering up to 80% of the area with them.
For example, "Bimast" and "Spleen". Next, the door frame is treated with Viek aluminum foil. The resulting monolithic surface is covered with a vibration absorber.
The final stage is door trim. Using sealant or hot-melt adhesive, the joints on the sheathing are treated, and the pockets are covered with any vibration absorber. The interior lining is additionally treated with Bitoplast.
NOTE: A similar treatment method is suitable for the side parts of the interior and trunk.
2. Gender
Floor treatment is a difficult stage in installing sound insulation. Using soft “Vibroplast M1” is a mistake, as it will not give the desired result. It is worth using Bimast, guided by the technology presented below.
The cut part is heated and applied to the installation site. Next, the protective coating is removed and the part is applied to the desired location.
About 50–60% of the floor is treated in this way. To enhance the effect of heat and sound insulation, a sound absorber is laid on the floor surface. For example, "Spleen".
3.Engine compartment and arches.
It is advisable to treat these body elements with “Barrier”. Bimast is additionally applied to critical areas.
4.Roof.
Complete sound insulation of a car includes treating a thin ceiling with Vibroplast M1 or Vizomat PB. To avoid panel resonance, increase its rigidity.
Foamed polystyrene and perforated steel profiles are suitable for these purposes. The level of thermal insulation will be improved by noise-absorbing material applied on top of Vibroplast M1.
5.Trunk.
The treatment of the trunk is as important as the sound insulation of other elements of the car. After all, vibration and noise will enter the cabin through the ventilation duct or body. The task becomes more complicated if there is a subwoofer, the sound of which should not complement the crackling of the panels.
The treatment of the floor and wheel arches of the trunk is similar to the soundproofing of the floor in the cabin. But the side parts of the trunk are covered with vibration and noise-absorbing materials.
After such work, even standard acoustics will sound much better.
6. Engine compartment.
For anti-noise treatment of the engine compartment, a standard vibration absorber and noise-absorbing material such as Isoton are sufficient. This is ideal for diesel engines.
They will cool down longer, which will make starting easier in severe frosts, and will also warm up faster. There must be heat and vibration insulation between the engine compartment and the ventilation system.
Materials and tools
The main clients of the engine compartment soundproofing procedure are domestic cars or foreign cars with a fairly long history, that is, they were produced a long time ago.
Therefore, Shumka is not so rarely carried out on the following cars:
- Peugeot 308;
- VAZ 2114;
- Lada Priora;
- Lada Kalina;
- VAZ 2107;
- VAZ 2110;
- Volkswagen Polo;
- UAZ Patriot;
- Lada Granta;
- Volkswagen Transporter T4;
- Gazelle;
- Daewoo Lanos;
- Renault Megane;
- Renault Logan;
- Nissan Maxima, etc.
The list can be continued endlessly. Even these cars have factory noise. But its quality is extremely low.
Soundproofing material is presented in the form of special mats and sheets of various thicknesses. They are attached to body parts around the perimeter, directly to the metal.
The internal parts of the doors, trunk, roof, partition between the engine and the passenger compartment, floor, hood, engine compartment cavities, etc. are processed. High-quality material in combination with properly done work creates the effect of additional insulation of the car, which is important for our country.
Yes, if we are talking about the coldest regions, then Shumka cannot replace a car blanket for the engine. Here it is necessary to take into account specific operating conditions.
The main list of materials and tools for cleaning the engine compartment consists of the following components:
- Hair dryer. What is needed is construction equipment, not women's household equipment. You can buy it, borrow it from friends, or even rent it;
- Stitching roller. An extremely useful thing that helps in high-quality installation of sound insulation;
- Rags. When it comes to working with cars, rags are never superfluous;
- Sharp scissors for cutting material;
- A stationery knife for the same tasks;
- Cardboard required for creating blanks;
- Degreaser used in surface preparation;
- Malelin as a means of isolation;
- Splen. Sold in rolls and available in different thicknesses. Based on the features of your car;
- Bimast Super or Vizomat MP. Interchangeable materials.
I have repeatedly seen on the same Drive2 step-by-step instructions along with a photo where the guys isolate the engine compartment with their own hands.
I can’t give the same detailed photo instructions due to its absence, but I can offer some recommendations.
Technology for installing soundproofing materials
When you have already purchased everything you need and have carried out the preparatory work, you can proceed directly to the procedure of covering the engine compartment with sound insulators. You need to understand that our main task is to create a kind of capsule, and it should be as airtight as possible. Therefore, when applying insulating layers, strictly follow the technology so that as a result there are no unpleasant surprises that will negate all your efforts. So, let's do the following:
- degrease the surface of the engine compartment. This applies specifically to body elements. Engine noise insulation is a rather broad expression, since we do not affect the engine. The materials will be glued specifically to the body elements. When degreasing, do not use acetone or solvent. They only drive grease particles into the layer of paint underneath. And with the slightest heating, fats are pushed back to the surface of the paint. The cheapest and most effective remedy is white spirit. It can be purchased at every point where paint and varnish materials are sold;
- then you should arm yourself with a hair dryer. Without it, it is unlikely that it will be possible to lay the next two layers of vibration and noise-absorbing materials efficiently. There is no need to try to heat the sheets by leaving them in the sun on a warm day or on a radiator during the heated period of the year. If the material is not sufficiently heated, air bubbles will remain between it and the surface of the body or the previous layer. After a certain period of operation, this layer will completely fall off, which means there is no need to skimp on tools;
- Using a hairdryer, we warm up the elements cut from a single sheet and apply them to the degreased surface of the body. Using a rubber spatula or a special roller, firmly apply the vibration insulation to the metal surface of the body;
- then we heat the noise-insulating material with a construction hairdryer. We also carefully apply it to the previous layer with a rubber spatula. Without this tool, the sheets will not stick together tightly enough, and air bubbles will almost certainly form between them, which will only grow over time and lead to delamination of the materials;
- in the same way we heat and glue the third, protective layer.
The sound insulation of the shield between the engine compartment and the passenger compartment also requires attention. We glue it on both sides with the first insulating materials described above, not forgetting about degreasing the metal surface.
Processing procedure
The price of all assembled components is definitely lower than the cost of professional sound insulation services. After all, you still have to pay extra for the work.
By following a certain sequence, following the instructions and adhering to the rules, you will be able to cope with the task yourself.
The procedure can be described as follows:
- Since this is the engine compartment, it also includes the hood. It's better to start with him. First, the structure is removed and cleaned of dust, dirt and rust. Next it is degreased. This needs to be done with all body elements to which Shumka will be glued;
- Surfaces must be as dry as possible. Therefore, do not be lazy to wipe them with a rag, reaching to each cavity;
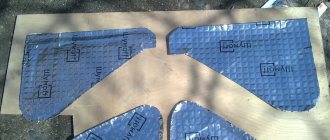
- Make patterns from cardboard, then cut out pieces of soundproofing material from them;
- First, a vibration-absorbing material is applied to the metal;
How to remove the cigarette lighter on a Grant
Before work, you will need to stock up on the necessary tools. To remove the cigarette lighter on a Grant, you need:
- protective gloves;
- Screwdriver Set.
To troubleshoot you will need:
- soldering iron with solder;
- diagnostic tester;
- needle file to remove oxides or rust.
Detailed video instructions
After preparation, you can begin the dismantling process.
- Turn off the ignition, open the hood and remove the terminal from the battery. The negative contact must be removed - this will de-energize the system and eliminate the possibility of a short circuit.
- We remove the metal cartridge from its seat.
- Using a thin screwdriver, bend the latches inside the socket.
- We take it out and disconnect the wire block.
- Remove the green filter.
Now you can repair the part or replace it. Assembly is carried out in the reverse order described earlier. Detailed instructions on how to change the cigarette lighter on a Lada Granta car are shown in the video.
Materials for soundproofing the engine compartment
There are specific requirements for materials used to quiet the engine compartment:
- resistance to high temperatures;
- inertness to aggressive chemicals.
To reduce noise in the engine compartment, you can use vibration isolation Shumoff M4 or MixF. These are vibration-damping materials on a mastic basis with a foil front covering.
Shumoff P8 or Germeton are suitable as soundproofing materials. Shumoff P8 is a sound insulator with heat-insulating properties based on polyethylene foam. And Shumoff Germeton is an effective non-flammable sound absorber based on polyurethane foam.
Sound insulation of the hood
Soundproofing the hood is the first and easiest stage
When selecting materials, you should pay attention to the fact that they will stick and be constantly exposed to an aggressive environment. There are fuel vapors, lubricants, and when the engine is running - increased temperature under the hood
To ensure that the new sound insulation does not become unusable after a month or two, you should use a material that is heat-resistant and resistant to gasoline vapors.
A lightweight vibration-insulating material, for example, Gold or Silver vibroplast, is suitable for the hood. Accent LM is used for thermal insulation - a laminated material that is resistant to high temperatures
It is very important to choose the lightest possible material for the hood, because by making the hood too heavy, we risk rendering its shock absorbers unusable
The installation procedure is quite simple. If available, we dismantle it. The surface of the hood is cleaned of dust and dirt. After this, the vibroplast is glued. The inside of the hood between the stiffening ribs is covered. If there are none, then the entire surface under the hood is sealed, but a thinner vibroplast is taken. In all areas it is better to use solid pieces of material, having previously measured and cut the required size. You can even make something like a “pattern” from cardboard to make it easier to cut out the necessary pieces of vibroplast before gluing.
When gluing, it is very important that the first layer adheres as tightly as possible to the surface. The protective layer is gradually removed from the vibroplast and the adhesive side is pressed against the surface
To avoid the appearance of wrinkles, immediately compact and smooth this area using a stitching roller. After this, the heat-insulating Accent LM is glued using a similar technology. And on top of everything, the factory sound insulation is mounted back, if it was there initially.
Stages of soundproofing the engine compartment
The main task when quieting the engine compartment is to create a sound and vibration-absorbing capsule around the power unit. To do this, the hood lid and engine compartment are covered with a vibration absorber and sound-proofing material.
Soundproofing the hood begins with dismantling the standard noise reduction system. Next, the metal is cleaned of dirt and degreased, after which all surfaces between the stiffeners are covered with a vibration insulator. After this, a sound insulator is applied and the standard protection is installed in place.
In the engine compartment, a vibration damper is applied to all free surfaces. Depending on the car model, this may be the partition of the engine shield, the left pillar, wheel arches, or the space behind the battery.
The price of engine compartment noise reduction depends on the make and model of the car. You can purchase soundproofing materials individually or as a ready-made kit.
What is needed to install Shumka
To effectively soundproof an engine, you need to prepare not only all the necessary insulating materials, but also auxiliary ones, as well as a set of tools so that you don’t have to look for them when the soundproofing process is in full swing. First of all, you should have on hand:
- a heat hair dryer in which you can adjust the heating intensity;
- high-quality sharp scissors and a knife with strong handles;
- degreaser;
- several convenient spatulas and brushes;
- roller for rolling out the mixture.
To clean surfaces from dirt and all kinds of waste, a portable vacuum cleaner is also useful.
Is there an effect
What does soundproofing a motor shield provide?
:
- Reduces engine noise.
- Reduces the level of vibrations on the body.
- Makes the engine shield stronger (the effect is similar to installing a bulkhead amplifier): less vibration on the steering wheel when driving, the steering wheel rotates more easily (on cars without ESD/power steering).
To reduce the noise level in the cabin by 2-4 dB (a difference of 1 dB is barely noticeable or not noticeable at all), it is necessary to approach the sound insulation of the car comprehensively, work on all parts of the body (floor, doors, roof, trunk, dashboard, etc.). etc.), wheel arches and fender liners. Also, on LADA cars it would be a good idea to install additional door seals (instructions for XRAY, Vesta, Granta/Kalina/Priora, Largus and Lada 4x4).
Manufacturers' recommendations (different methods)
Floor soundproofing installation diagrams with materials:
| Shvi layer | Material | STP (thickness, mm) | Shumoff (thickness, mm) |
| 1 | Vibration isolation (vibration damper) | StP Aero Plus (3mm) Bimast Bomb Premium (4.2mm) | SHUMOFF L3 (3mm) SHUMoff Mix F (6.2mm) |
| 2 | Sound-absorbing Thermal insulation | Accent Premium (8-10mm) Barrier (10 mm) or Splen (10 mm) | Shumoff P8V (8mm) |
| 3 (optional) | Soundproofing (soundproofing membrane) | NoiseBlock (2mm) | Germeton A30 (3mm) |
VAZ sedan and hatchback:, 2110, 2112, 2114, 2115, Priora, Granta, Kalina
Vibroplast – 32 sheets, 4 mm splen with sealant - 11 sheets, 4 mm splen with glue 7 sheets,
bitoplast – 1 roll, anti-creak tape – 1 roll, aluminum tape (aluminum tape) – 2 rolls.
VAZ coupe: 2112, 2113, Priora
Vibroplast – 23 sheets, 4 mm splen with sealant - 6 sheets, 4 mm splen with glue - 6 sheets,
bitoplast – 1 roll, anti-creak tape – 1 roll, aluminum tape (aluminum tape) – 2 rolls.
VAZ station wagon: 2111, Kalina, Priora
Vibroplast - 39 sheets, 4 mm splen with sealant - 14 sheets, 4 mm splen with glue - 8 sheets,
bitoplast – 1 roll, anti-creak tape – 1 roll, aluminum tape (aluminum tape) – 2 rolls.
In addition to the material itself, you will need
- Durable and sharp knife.
- Scissors.
- Technical (construction) hairdryer.
- Iron rolling roller or its equivalent.
- Marker.
- Roulette.
- White Spirit.
- And 2-3 days of free time if you do everything alone.