Give it a repost, let people read it carefully, it will save nerves, a relatively “large” amount of money to repair the generator (especially “large” when there is no money at all) and the time spent on all this, a drained battery, and God forbid a fire!
The new generator works stably, but the voltage is kept low like all generators similar in design. Without consumers 13.9 volts, headlights 13.7 with the heater at speed 2 (this is not enough), and if the rear window heating is turned on with the heater speed 2 it drops to 13.2 volts. This is an ass. In the summer it may still be normal, but in winter the frozen battery not only does not charge at all for the first 15 minutes in frost minus 25, but such a low voltage is not enough for normal charging. And considering that I go to work like a donkey by 8 am (it’s usually dark here), and I leave work from the office at 5:30 pm, that is, it’s already dark again, then in fact the generator will always produce low voltage due to the headlights, heater and rear window , the battery will not hold its charge and density properly and will gradually run out...
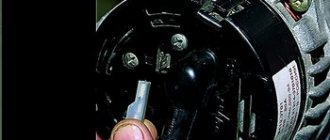
The trick of this regulator is that the voltage regulator on it looks at the voltage not at the + terminal, but at the voltage at 3 additional diodes. I know this problem, and I know how to easily solve it. Thanks for this article. Let's go to the store and buy the CORRECT voltage regulator. I read which ones work better. Exactly the one in the photo. With a square tablet. These brushes are the most stable in terms of quality and stability of work. The trick of this regulator is that it looks at the voltage at the + output of the generator. Among the additional features of this regulator: The charge indication lamp can actually show the absence of this very charge, as well as if there is an overvoltage in the event of damage to the diode bridge, for example. If this chain dies, it will still work normally. The regulator is independent. Another huge plus is that until the generator spins up, it does not get excited. And does not create a load for the engine. That is, until the engine starts, the generator does not provide a load, this is useful during cold starts when every penny of energy counts
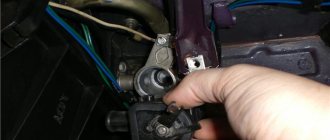
Extremely simple installation of this regulator:
We bite off the tips and connect 2 terminals. The hole that goes to the winding should be 8mm! Read why below. it is important
I was very surprised that the tablet is noname
Don’t forget to remove the diodes or cut the jumper
Now I STRONGLY recommend paying attention HERE This applies not only to converted generators, but in general to all generators of a similar design
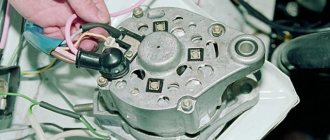
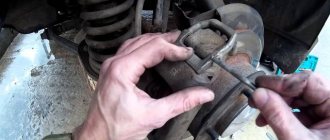
The fact is that these generators often burn. Well, in the literal sense, it also happens, but most often the diode bridge burns in them. As a techie, I quickly realized why. And I was very surprised at how down at the factory they came up with this design. The contact on the diode bridge is a platform. A ring winding contact is placed on top. On many generators it is soldered. Here it’s just a ring on a ring. and the MOST creepy thing is that everything is pressed with a TEXTOLITE WASHER BEHIND ITS CENTER! Moreover, the washer on top is NARROW and thin, bending it inward, and some MORONI stuck a GROVER in there! GROVER CARL! It simply bends both the washer and the tectolite washer, too. Naturally, these generators burn, since the textolite stupidly bends like a satellite dish, the 2 contacts are not pulled together normally on the diode bridge, and they need to be pulled not by the center, where they are not, but by the contacts themselves, and this edges... sort of... and...
The diode bridge just melts.
It’s enough to just walk around with the words “KZATE generator burned out,” “KZATE diode bridge burned out,” and that doesn’t only apply to them. This applies to many...whose windings are not soldered
I decided to solve this problem in advance. A washer with an internal diameter of 8mm is placed on top of these 2 connections. A piece of SOFT plastic tube, approximately 1 mm in size, maybe a little larger in location, is inserted into the washer (for centering so that it does not short to the bolt! This is ATTENTION!). This is done to press on the edges. and not behind the center. A native textolite washer is placed on top of this washer (as an insulator), on top of another metal washer, preferably thicker, with an internal diameter of 6 and an outer diameter of approximately 10. The bolt is simply screwed on top. There shouldn't be ANY GROVERS there. The plastic sleeve is needed so that the washers are centered and the bolt does not touch what is UNDER the textolite washer. That is, we get the design 1. Bridge and contact pad on it 2. Ring contact of the winding (there is an internal 8 external 10) 3. Washer internal 8 external approximately 10 4. Textolite washer 5. another washer only this time internal 6 external 10 6. Insert bolt and tighten it
Device Description
On Niva 21214 cars there is a generator of type 9412.3701, on VAZ 21213 - type 371.3701, on Niva Chevrolet there is a generator 2123. All of them are alternating current electric machines with electromagnetic excitation, having a built-in rectifier unit with silicon diodes and an electronic voltage regulator.
The maximum current produced by the generator unit type 9412.3701 is 80 A, voltage - 13.2 - 14.7 V, rotation - right. Design of unit 21214
The unit covers are attached to the stator using 4 bolts. The covers have bearings installed. They rotate the rotor shaft. In the front bearing, the inner race is clamped with a nut along with a thrust ring and washer. The 2nd bearing is also pressed into the back cover.
The stator has a 3-phase winding, one of the ends of which is connected to a rectifier unit consisting of 6 diodes. Of these, 3 diodes are negative, 3 are positive. According to the polarity, they are pressed into the plates. The entire structure consists of a rectifier unit, which is located on the back cover of the generator unit covered with a protective casing.
The design of the unit also includes contact rings and brushes. On the back side of the back cover there is a brush holder, which is structurally connected to the voltage regulator. The rectifier contains a capacitor that protects the electrical network from power surges.
The “B” terminal of the generator set must be connected to the positive terminal of the battery, and the negative terminal of the battery to the vehicle ground. If the connection is incorrect, this will lead to breakdown of the diodes.
Generator Niva 21214
Generator replacement
The instructions below will help those Niva owners who decide to remove the generator for repairs or to completely replace it. Usually, it is not necessary to change the entire device so often, since most of its components are sold in stores, the same rotor, stator or diode bridge. All these spare parts can be replaced with new ones if one of them fails. If you still decide to install a completely new generator, then again, the instructions described below will help you with this.
Or is it still better to take a more powerful one - 100 amperes? I recently thought about this question, because either my gene has become quite worn out and can no longer produce the required voltage. That’s why my battery is almost always dead, so I almost have to immediately turn off the appliances, the stove, etc. In general, if the gene is bad, then you can’t even listen to music in nature for a couple of hours, the battery will die. And if the time has come to change it, then maybe immediately take a more powerful one?
I recently changed the alternator belt, there was a whole story about how it broke and I got home with grief in half. Be sure to read it, I think it will be useful to many. And take a second spare with you))
Also useful information for Shevik owners - cars before September 2003 have a lower-mounted generator, this is not a hum, when overcoming deep puddles and fords it usually floods and this situation is not a fountain, you understand. It’s not for nothing that many car enthusiasts carry genes that are much higher, both in Nivas and Cheviks.
But since September 2003, Sheviks have come with an overhead generator, this is already an excellent solution. The gene is located at the top right if you are facing the open hood. When overcoming puddles, it will be much more difficult to fill it than the lower ones.
So I started thinking, maybe I’ll install a more powerful generator, because I plan to install a trunk and, of course, a chandelier; I think 4 lamps from hella will fit in quite well. Plus I will also install a winch, and it also drains the battery pretty badly. And if the gene is weak, then when fighting off-road, we can get a situation where we are skidding in the dark, the chandelier is turned on, the engine is boiling - both fans are threshing at full strength, we are pulling with a winch - will the gene be enough for 80 amperes? Such energy consumption, of course, will not happen often, but when it happens, it’s better to be safe, isn’t it?
So I’m looking at a 100-amp Pramo gene, it costs about 3,500 rubles. But first, let's check the generator that I got with the car by default. It seems to me that either the brushes there are worn out, or something else - well, it cannot charge the battery normally; in 4 months of summer operation I have already recharged the new battery 3 times. Apparently the gene charges only superficially.
Also interesting: Niva Chevrolet knock sensor - Auto magazine MyDucato
On the other hand, wouldn’t a 100 ampere battery drain the battery? After all, the battery is new and it would be wrong if it only lasts a year or two. As I read again on the forums, a more powerful gene shortens the life of the battery.
I read the reviews of Shnivovodov - the majority say that betting on a hundred is a good thing, but only when it is actually needed, in the sense of needing a gene of increased power. Because the staff is quite enough if it works as it should. But if the car has a winch and additional light, then it is better to install a 100-amp generator. We'll keep thinking ))
Who thinks what, share your thoughts in the comments.
There are three types of generators that can be installed on popular Russian SUVs. The output voltage is the same, but other parameters vary. For carburetor engines, a power of 600-750 W is sufficient. The maximum current that could be removed was 40-50 amperes.
Important! The generator for old modifications of Niva cannot be installed on new engines. Overloading will quickly damage it and require repairs.
If replacement is necessary, such a solution can only be temporary.
Injection engines produced before 2003 were equipped with power from 1100 to 2000 W. Load current from 80 to 130 amperes. Both generations were equipped with a mono-V pulley. Generators of this type
without consequences.
Modern overhead motors are equipped with similar energy sources, only the pulley is designed for a larger load - it is poly-V-ribbed, like a belt.
To repair or replace the generator, the car owner will have to remove the unit completely from the car or turn to professionals for work. If you still want to carry out the replacement yourself, then first you will need to prepare all the necessary tools:
- hammer;
- extension;
- keys to "10" and "19".
The procedure consists of the following sequence of actions:
- First, you will need to park the car in a place designated for inspection and repair. The car will also need to be secured using special wheel chocks. Finally, in order for the work to be carried out safely, you should disconnect the battery by disconnecting the terminals from it.
- After this, you need to remove the engine protection. It is attached to several bolts, and they must be unscrewed to get to the lowest bolt of the generator.
- After this, you will need to knock out the mounting bolt using a hammer. It is recommended to knock carefully so as not to damage the thread and to prevent the bolt from coming out in the opposite direction. A hammer is necessary, since a wrench or any other tool simply cannot handle a bolt.
- Next, you need to remove the bolt, swinging the generator from side to side. It is necessary to bolt in any case, as this makes it easier to remove the rod.
- The fourth step involves disconnecting the wiring. To do this, the power wires connected to the housing are disconnected from the unit. In this case, you can first disconnect the plug from the wires.
- Wires are also attached to the generator, tightened with a nut or bracket. In this case, the nuts must be unscrewed with a wrench, and then the loose wires must be pulled out.
- Finally, after disconnecting the wires, you can begin to unscrew the upper fastening element with the belt tensioner. For this you will also need a wrench, as well as a small extension cord.
- Disconnecting the fastener will allow you to remove the belt and alternator. Then you can start cleaning the vacated space with a brush and installing a new unit.
The structure is assembled in the reverse order; the entire procedure will take about two hours if you have all the necessary tools.
Additionally, it is worth noting that when everything is assembled, you will need to adjust the position of the generator using the tensioner. To do this, you need to unscrew the tensioner nut and tighten or loosen the belt, while observing the battery charge.
If the indicator returns to normal, then the selected tension is sufficient. There is no need to tighten the structure, as the generator bearing may fail. If the tension is insufficient, the generator will work intermittently, and this can also lead to breakdown.
Generator for Lada 2123/Chevrolet Niva 135A cars
STARTVOLT code:
LG 0123
STARTVOLT code:
LG 0123
OEM number:
9402.3701000-04С 9402.3701-04С 5112.3771000-10 5112.3771-10 5112.3771000-30 5112.3771-30 21230-3701010-03-0 21230-3701010-0 3 2123-3701010-01 21230-3701010-02-0 21230-3701010-02
9402.3701000-04С 9402.3701-04С 5112.3771000-10 5112.3771-10 5112.3771000-30 5112.3771-30 21230-3701010-03-0 21230-3701010-0 3 2123-3701010-01 21230-3701010-02-0 21230-3701010-02
Where can I buy
- Online store
- Retail store
- Wholesale purchase
Applicability for vehicles
| Model | Engine code | Year | Engine capacity, l. | |||||
| NIVA 1.7 4×4 | NULL | 2002 - present | NIVA II (2123) 1.7 | BA3 21214 | 2002 - present | NIVA II (2123) 1.7 LPG | BA3 21214 | 2002 - present |
| Manufacturer | Name | Power, W | Max. current, A | Pulley** | moisture-resistant housing | |||
| VAZ 2121 - generator 2101-3701010 (G221A) | ||||||||
| KZATE | G221A.3701 | 590 | 42 A | m | No | |||
| ELDIX | ELD-A-2101-14V-50A | 700 * | 50 A * | m | No | |||
| StartVOLT | LG 0101 | 1200 * | 85 A * | m | No | |||
| Carburetor VAZ 21213, VAZ 2131, VAZ 2120 - generator 21213-3701010 | ||||||||
| KZATE | 371.3701-02 | 770 | 55 A | m | Yes | |||
| Injection VAZ 21214, VAZ 2131, VAZ 2123 until the fall of 2003 - generator 21214-3701010 | ||||||||
| KZATE | 9412.3701 | 1120 | 80 A | m | No | |||
| ELDIX | ELD-A-21214-14V-90A | 1400 * | 100 A * | m | No | |||
| ELDIX | ELD-A-21214-14V-135A | 1850 * | 135 A * | m | No | |||
| PRAMO | 5142.3771 | 1120 * | 80 A * | m | No | |||
| PRAMO | 5142.3771-10 | 1400 * | 100 A * | m | No | |||
| StartVOLT | LG 01214 | 1970 * | 135 A * | m | No | |||
| Chevrolet Niva with overhead generator 2123-3701010 | ||||||||
| KZATE | 9402.3701-01 | 1120 | 80 | P | No | |||
| KZATE | 9402.3701-04 | 1120 | 80 | P | No | |||
| ELDIX | ELD-A-2123 02.3701-01 | 1260-1600 * | 90-115 * | P | No | |||
| PRAMO | 5112.3771 | 1120 * | 80 * | P | No | |||
| PRAMO | 5112.3771-10 | 1400 * | 100 * | P | No | |||
| StartVOLT | 1950 * | 135 * | P | No | ||||
Table 1. Characteristics of generators for cars of the Niva family
* According to the manufacturer. We have not tested actual performance characteristics
** m - for a mono-V belt, p - for a poly V-belt
Signs of a generator malfunction
As a rule, a sign of generator failure is a red indicator light on the instrument panel. However, there are times when it does not light up, but nevertheless the generator does not provide current, the battery does not charge and all consumers of the car work at its expense. At the same time, you may notice that something is wrong - the car loses a little power, the engine works differently. The headlights, if they are on, are dimmer.
If the generator stops working, you have approximately 2-4 hours, during which the car will drive if the battery is working. At some point, it will no longer be started by the starter, but it can be started from a hill, from a tow, or by “lighting it” from another battery. But the movement's resource is almost exhausted.
Problems with the voltage of the on-board network, undercharging of the battery and the associated difficulty starting the engine can be caused by poor tension or wear of the drive belt, especially for cars with a mono-V belt. In this case, the red warning light on the instrument panel should light up. Pay attention to a squeaking sound under the hood when starting the engine and sharply increasing the speed. Be sure to carry a spare belt with you.
Separately, we can talk about a special case of failure of the voltage regulator, when the generator voltage does not drop or disappear, as in most cases of failure, but, on the contrary, increases by more than 14.7 V. The red warning lamp does not light up, and you do not notice anything. The car seems to be running fine. But after some time - a typical period of 2 months - the battery fails, and problems begin with starting the engine. A sign of increased voltage on the on-board network - the so-called “overcharge” - may be frequent burnout of lamps, especially headlight lamps. As a preventive measure, we advise you to buy a simple voltmeter and periodically check the voltage at the battery terminals while the engine is running. It should be within 13.4-14.3 v. And remind service technicians during scheduled maintenance of the need to check the voltage of the on-board network
What faults can be repaired?
If the diode bridge and voltage regulator (relay-regulator) fail, it is advisable to repair the generator. If a breakdown of the windings occurs, repairing the generator is not profitable.
When repairing generators, we install additional mounting supports that allow for better tightening of the terminals and thus delay overheating and failure of the diode bridge as long as possible.
Manufacturers of generators for the Niva family:
ELDIX: ELDIX Ltd. Bulgaria, Stara Zagora 6006, apt. Kolyo Ganchev, Around the Path
Pramo: JSC ELTRA and LLC Pramo-Electro, Rzhev, Tver region.
StartVOLT 192102, St. Petersburg, st. Fuchika, no. 8.
Characteristics of the standard generator
The main characteristics of the generator installed by the manufacturer in Niva 21214, 21213, 2121 will be considered using the example of generator type 9412.3701:
- current – 80A;
- voltage – 13.2 V,
- rotation is right.
The cost of standard models of electric generators is 5-7 thousand rubles. If the unit breaks down, it is possible to replace its components or completely replace it with the original or analogues. The prices of the most common ones are presented in the table.
| Analogue | vendor code | Cost, in rubles |
| Generator VAZ-2104-21073,21214 | 9412.3701-03 | 5900 |
| Generator VAZ-2104-21073,21214 | 372.3701-03/05 | 3800 |
| Generator VAZ 2121-21213,21214 | 9412.3701 | 5450 |
The table shows that in the process of replacing a generator on a Niva, you can give preference to a cheaper universal analogue.
Also interesting: How to change the oil in a VAZ 2121 Niva engine
| Analogue | vendor code | Cost, in rubles |
| Generator VAZ-2104-21073,21214 | 9412.3701-03 | 5900 |
| Generator VAZ-2104-21073,21214 | 372.3701-03/05 | 3800 |
| Generator VAZ 2121-21213,21214 | 9412.3701 | 5450 |
Basic malfunctions and ways to eliminate them
- If the value is higher or lower than the set value, the lamp lights up or blinks. Indication details may vary between models, so please read the operating instructions carefully.
- The headlights are not as bright as during normal operation. When the starter is cranked, the voltage “drops” so much that it is noticeable by the blinking of the lamps.
- The sound of the engine changes, and extraneous noises are heard.
- Engine power is lost (provided that other systems are working properly).
- There is a smell of burnt insulation coming from the generator.
- There is less than 13 volts at the battery terminals when the engine is running.
Checking the health of the unit is done using a multimeter. After the engine is started, the voltage at the battery terminals should be 13.6 V. If the value is higher or lower, this indicates a break or short circuit of the windings, oxidation of the slip rings, a malfunction in the brush assembly, or voltage regulator.
The generator unit may not work well due to weak belt tension or its breakage. In this case, you need to adjust the tension or replace the belt. Faulty voltage regulator, needs to be replaced. If a breakdown, short circuit, or damage to the rotor windings is detected, it should be replaced. If there is a break or short circuit in the stator windings, it requires replacement. If the diodes are damaged, the rectifier unit is replaced.
During the operation of any car, unpleasant situations often arise in the form of failure of one or another element. Niva is no exception, and most often the generator suffers.
If the generator seems to be faulty, it is recommended to check its functionality using a multimeter. To do this, you will need to start the engine and check the voltage at the battery terminals. The standard value that a multimeter should read is 13.6 V.
If the readings during measurement are higher, it means that a break or short circuit in the windings has occurred in the structure. The same can be said about the case when the voltage is below the specified number. This procedure is carried out regardless of the engine: injector or carburetor.
Also, if the breakdown is caused by another reason, you can replace the generator itself. Usually, for replacement, they turn to special service stations, but if necessary, the work can be done with your own hands.
How to check a diode bridge
Hello, friends! Today I will tell you how to check a diode bridge on a car generator. To do this, you will need a multimeter with a dialing function.
The most common malfunction of a diode bridge is breakdown of power diodes. How to find a broken diode? We turn the multimeter into dialing mode and start ringing the horseshoe. The first diode is positive polarity. The resistance of a working diode when tested in one direction should be from 400 to 700 Ohms.
In the other direction the resistance is infinity. If this is the case, then the diode is fully operational.
We check the second diode of negative polarity in the same way. The resistance of the diodes can vary within certain limits depending on the ambient temperature; when heated, it decreases, and when cooled, it increases. For a broken diode, the multimeter will show a slight resistance in any direction. A burnt-out diode will have a resistance of infinity.
Using this diagram, we check the remaining two pairs of diodes.
We check small diodes in the same way as large ones. The resistance of these diodes will be slightly different from the resistance of larger diodes.
It should be noted that a slight difference in the resistance of similar diodes is considered normal. This completes the diode bridge test. Read about how to repair a car generator with your own hands here: Do-it-yourself generator repair.
Friends, I wish you good luck! See you in new articles!
Generator repair
- The voltage regulator has burned out.
- The diode bridge has failed.
- Break or short circuit in the windings.
Replacing worn out removable brushes,
This is a consumable item that is checked at every maintenance. To remove the old brushes and install new ones, the entire assembly must be disassembled.
Mechanics can be easily “treated” if you have basic plumbing experience. No special tools required. A regular set of wrenches and screwdrivers. Damaged bearings can be removed using a drift or a special puller.
Disconnect the voltage regulator and diode bridge board. Ring the diodes and connecting buses with a tester. Faulty radio components can usually be seen without measurement. Their repair is impossible, only replacement. Inspect the rotor current collector tracks. The copper surface must be free of oxide deposits, cracks and other damage.
If necessary, you can clean it with fine sandpaper. Connect the tester to the stator and rotor windings and check them for open circuit or short circuit. There is no need to replace the generator; the windings are easily restored. After eliminating the damage, reassemble the housing without damaging the internal parts. Reinstall the assembly, tighten the drive belt, and crank the crankshaft without starting the engine.
Nuances of moving a generator
When replacing a generator with a Niva 21213, 2121, 21214, a number of subtleties arise, and one of them is the location of the generator unit. It is located at the bottom of the engine compartment.
Actually, this is why problems arise with the operation of the structure: while driving, various contaminants get on the generator, and coolant drips. If you don’t want to constantly change the generator unit, it is recommended to move it upstairs.
To ensure that no problems arise during the operation of the car, it is important to monitor the condition of the car. First of all, it is recommended to regularly inspect the generator.
So, when the “battery” light blinks on the dashboard, if suspicious noises or creaking sounds occur, you should be wary and think that the generator is not working correctly.
Timely inspection will help to avoid unpleasant situations in the form of breakdowns of the constituent elements of the generator, and as a result, failure of entire electrical systems.
The disadvantage of domestic Niva SUVs is the location of the generator unit - at the bottom of the engine compartment. It constantly gets contaminated when driving off-road, and coolant constantly drips. The problem is solved by moving the generator upstairs (the author of the video is SARTANETS).
Also interesting: Fuses and relays (location and purpose of fuses and relays) Niva Chevrolet
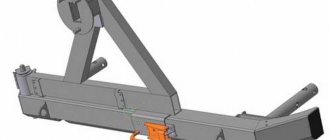
To transfer, you will need a set of keys, a bracket, mounting bolts, and a V-belt. You can make a generator transfer bracket with your own hands according to the drawing below.
Drawing of a homemade bracket
Sequence of actions during transfer:
- We dismantle the propeller, pump and remove the belt.
- By unscrewing the standard bracket, you can remove the generator.
- We cut off the bead around the side of the cylinder head and on the cylinder block.
- Then you should unscrew the two bolts and two studs.
- Next, the assembly is installed on a new bracket and final assembly is performed.
Thus, moving the generator unit upstairs is not difficult.
Chevy Niva diode bridge
After 2003, the Chevy Niva is equipped with a generator 9402.3701-03.
On earlier releases there was a generator 9412.3701, that is, the one that was installed on the injection classics. The generator structure and operating principle can be found here
Generator 9402.3701-03 differs from the usual “tenth” generator 9402.3701 in that it has a pulley of one strip, a diode bridge without additional diodes, and a more modern voltage regulator.
A tenth generator can be installed instead of a Chevy-Nivsky without even changing the pulley. Reverse replacement will require mandatory replacement of the pulley.
The “tenth” generator circuit with additional diodes has long been outdated and is not used for generators developed in the last 20 years. Therefore, it was abandoned for Schevi-Niva.
another version of the scheme, see below
The generator 9402.3701-03, which was developed for Chevy Niva, uses a voltage regulator on a microcontroller. Such voltage regulators use a pulse-width control principle that maintains the generator voltage more accurately.
In addition, the microcontroller implements additional functions, monitoring the operation of the generator and protecting the voltage regulator.
The field winding is powered directly from the generator output, and there is no need for additional diodes.
A feature of generator circuits with microcontrollers is that an alternating voltage signal is supplied to the voltage regulator from the generator winding (usually from the point where the phase is connected to the diode bridge). Such voltage regulators are often called “Phase controlled” and indicate “Stator” in the parameters
When the ignition is turned on, a signal is sent to the microcontroller. Transistor T2 opens and the light bulb (LED on the instrument panel) lights up, this is information that the generator is ready for operation. Transistor T1 begins to operate in short pulses. The average current value is sufficient to excite the generator. The engine starts, and when the speed becomes stable, the alternating phase voltage acts on the microcontroller, for it this is a signal that the generator can be turned on. The microcontroller increases the duration of the pulses, the average value of the excitation winding current increases to the operating value, and the generator begins to operate. The microcontroller closes transistor T2 and the light on the instrument panel goes out, this is a signal that everything is in order, the generator is working.
The voltage regulator, as usual, is included in the excitation winding circuit; changing the pulse duration (open - closed) allows you to accurately regulate the voltage at the generator output at a level of 14.2 V.
Advantages of a voltage regulator with a microcontroller
Pulse-width control of the excitation current ensures precise maintenance of the output voltage.
Delay in turning on the generator when starting the engine to facilitate the operation of the battery and starter
Smooth increase in the moment of resistance when turning on a powerful load (the generator does not pull the belt)
The field winding can be powered from the generator output; no additional diodes are needed.
Accidental battery discharge is excluded if the ignition is on and the engine is not running. The fact is that transistor T1 remains operating in high duty cycle mode (with short pulses) and the current flowing from the battery is very small.
The control light has broader diagnostic capabilities; it lights up if the generator has stopped working and starts flashing if the voltage exceeds the set value.
The regulator can have current and voltage protection, which significantly increases its reliability.
Voltage regulators for this generator are produced by different manufacturers.
The circuit may differ slightly depending on the type of voltage regulator.
Energomash and VTN and others use the A-Cicuit circuit with a grounded transistor. (Regulators 844.3702 and 7931.3702-01)
"Electroimuls" 7936.3702D3 uses a circuit with a B-Cicuit grounded brush.
Voltage regulator 7936.3702D3. In this scheme the brush is on ground.
The regulators are completely interchangeable and the difference in the regulator circuits does not affect the operation of the generator in any way
If there is no such diode bridge or voltage regulator, you need to install a ten diode bridge with an additional one. diodes together with a ten-point voltage regulator.
Guide to removing and connecting the generator
To remove the unit, you need to prepare a set of tools: keys “10” and “19”, ratchets with heads, a hammer and a small extension.
The process consists of the following steps:
- First of all, remove the negative terminal from the battery.
- Next, you need to remove the engine protection and the right mudguard.
- Then, using a hammer, carefully knock out the mounting bolt and remove it.
- At the next stage, you need to disconnect all the wires going to the generator: the plug and the wires secured with a nut.
- Then the fastening on which the belt tensioner is located is unscrewed.
- By removing the belt, the assembly can be dismantled through the hole that was formed after removing the protection.
- After replacement or repair, install the unit in reverse order.
How to check a diode bridge with a multimeter?
Press out the three latches securing the rear cover of the generator Remove the plastic casing of the generator Unscrew the two screws securing the voltage regulator Niva Chevrolet Remove the voltage regulator with brush holder Disconnect the wire from the terminal of the regulator Remove the four screws securing the rectifier unit and the screw securing the capacitor Niva Chevrolet Bend the three terminals of the stator winding so that they made it possible to remove the rectifier block. Remove the rectifier block with the capacitor. To replace the capacitor, unscrew the contact bolt nut, remove the washer and spacer sleeve.
Remove the capacitor wire tip from the contact bolt. Remove the four tightening screws; the screws are tightened with a large torque.
Spring and flat washers are installed under the screw heads. Using a screwdriver, remove the generator cover from the side of the slip rings.
Clamp the generator rotor in a vice not too tightly so that the Chevrolet Niva diode bridge does not rotate and unscrew the pulley mounting nut.
Remove the spring washer and pulley. Remove the generator thrust washer Remove the Niva Chevrolet generator rotor from the cover on the drive side Remove the spacer ring from the rotor shaft Inspect the slip rings. If you check the Chevrolet Niva diode bridge there are scuffs, marks, scratches, signs of wear from brushes, etc. If the damage to the rings cannot be removed with sandpaper, you can grind the rings on a lathe, removing a minimum layer, and then grind them. Check the resistance of the rotor winding with an ohmmeter tester, connecting it to the contacts.
If the ohmmeter shows infinity, it means there is a break in the windings and the rotor needs to be replaced. Check with a test lamp whether the winding is shorted to the rotor body. To do this, turn on the test lamp to an AC voltage. You can use a rechargeable battery and a 12 V lamp.
Oscilloscope An oscilloscope will immediately show a generator malfunction, so diagnostics through it are considered more accurate. Let's consider the principle of testing: Connection diagram of the generator to an oscilloscope for testing Connection diagram for testing the generator with an oscilloscope: This is necessary in order to understand how the process itself takes place.
Generator disassembly diagram Generator parts checking the Chevrolet Niva diode bridge Components of the VAZ generator Signs of a diode bridge malfunction: You can check the serviceability of this unit in three ways: By connecting a test lamp with a current of 12V to it.
We check the second diode of negative polarity in the same way. The resistance of the diodes can vary within certain limits depending on the ambient temperature; when heated, it decreases, and when cooled, it increases.
For a broken diode, the multimeter will show a slight resistance in any direction. A burnt-out diode will have a resistance of infinity. Maybe the repair will cost a little less, but no one will give you guarantees about the quality of rewinding and the uninterrupted supply of current to the battery.
Generator Niva Chevrolet
Removing the generator For this process you need to take a Phillips screwdriver. In addition, you need to use a car tester or ohmmeter, a 10mm wrench and a test lamp. To change the generator, it must be removed from the engine compartment.
First, disconnect the wire and terminal of the battery with a negative charge. Next, disconnect the block with wires and the generator output, and take out the protective cover from there.
Then, unscrewing the nut, disconnect the wires on the generator contact bolt. Then unscrew the bolt that secures the generator to the tension bar and pull it out.
It is also necessary to unscrew the bolt-shaped fastening at the bottom of the generator. Then you should remove the belt. After removing all the bolts, the generator must be removed from the bracket using a mounting spudger.
To install a new one, you need to go through the entire process in reverse order. After replacing the described electromechanical device, you need to inspect its drive belt and adjust its tension.
But before you replace the old Chevrolet Niva generator with a new one, you need to make sure that the replacement is really necessary. There are times when you can do repairs yourself, without the help of specialists. In order to avoid confusion, you need to note how the generator covers are correctly positioned. Since there are two diodes, we perform this operation one by one.
Since in this case the diodes will be turned on in the forward conducting direction, then on the multimeter display we will see numbers like 0.V checking the Chevrolet Niva diode bridge. This is the voltage drop across the PN junction of an open diode. It is also called threshold, that is, in order to open the diode, you need to exceed this voltage. In foreign datasheets, this parameter is called Forward Voltage or Forward Voltage Drop, abbreviated as Vf, which loosely translated means “voltage drop in direct connection.”
For silicon diodes, the threshold voltage Vf is The result should be similar. Take a look. As you can see, this diode also conducts current in direct connection, and the threshold voltage is slightly different mV, which is normal.
Checking one diode In both cases, the display will display a check of the Chevrolet Niva diode bridge, which indicates a high resistance of the PN junction. When connected this way, the diodes do not allow current to pass through. They are fine.
How to check a diode bridge
So, we checked diodes number 1 and 2 and made sure that they pass current in one direction. Now we check the other part of the bridge - diodes 3 and 4.
To do this, connect the negative probe of the multimeter to the positive terminal of the bridge and, in turn, connect the red probe of the multimeter to the AC terminals of the diode assembly.
A) Belt break.
Carefully examine the presence of a belt on the water pump and generator pulleys. To return it to its destination, you will need socket wrenches 17 or 13, depending on the year of manufacture of the car, as well as a strong flat-head screwdriver.
Disconnect the HF position sensor (for example, at 21213,21214).
Loosen the nuts securing the tension bar and slide it to the side towards the cylinder block.
Put a belt on your professionalism landing place.
After installation is complete, adjust the tension, controlling the deflection when pressing with a huge finger on the clearance of the belt between the generator and pump pulleys - 10-15 mm, pump and crankshaft - 12-17 mm. Failure to comply with this requirement may result in the belt slipping with subsequent damage and rupture.
D) Diodes or rectifier unit are faulty
To assess the condition of the mentioned components (negative, positive and additional diodes), arm yourself with a low-power lamp and battery. Diodes are indicated by numbers in the diagram: 1. Positive
Operation is determined by connecting “” to the 30 terminal of the generator (for positive), the bolts of the rectifier block (for negative) or to 61 (for additional), and “-” to its body (for negative) or to any of the bolts of the rectifier block (for positive and additional). The glow of the lamp indicates that the diodes have been shorted, which leads to the conclusion that the diode bridge will have to be replaced. Be attentive to the indications on the instrument panel. Often the icon lights up half-heartedly and is not noticeable in bright light.
Read also: Where Does Engine Oil Go?
Battery charging lamp VAZ 21214
After replacing the alternator belt, charging stopped
, as a result, the battery died and the controller stopped working. The location where the charging relay is located near the field is determined by the age of the car. Thus, a remote relay can be found on the right fender liner of a car with a classic engine compartment layout; more modern modifications of generators are equipped with a launch vehicle combined with a brush assembly.
The element is not repaired, but replaced completely. To assess the condition, you will need power supplies of 12-14 V, followed by replacement with 16-22 V, and also an incandescent lamp of 1-3 W. According to the diagram drawing, apply current to the voltage regulator in series. If the first test is characterized by the operation of the lamp, and the second - by the absence of glow, then the LV is working.
If there is a break, the lamp will not light up at all; if there is a breakdown, it will glow constantly. In addition, weak charging, as well as its absolute absence, is often explained by abrasion of the brushes (residual height less than 5 mm) and slip rings of the generator. If the first part is changed along with the brush holder, then the second is restored by grinding, grooving or removing the remains of the old rings and pressing in new ones. It is recommended to supplement the disassembly of the unit with a total cleaning.
Read news about the new Niva
- Front axle. VAZ 21213, 21214 (Niva)
- How to bleed the clutch on a Niva? Algorithm of actions
- Replacing the drive gear oil seal of the front axle VAZ 2121 Niva 2131
- Installation and reviews of Euro handles for Niva 4x4 (VAZ 2121, 2131) » Lada.Online - all the most interesting and useful about LADA cars
- How to bleed the brakes on a Niva yourself? "
- Interior heater valve VAZ 2121 Niva 2131
- Do-it-yourself Niva 2121 elevator: drawings, dimensions
- The modernized Lada Niva Legend (4x4) 2021 was shown on the Internet
Diode in the circuit
ATTENTION! A completely simple way to reduce fuel consumption has been found! Don't believe me? An auto mechanic with 15 years of experience also didn’t believe it until he tried it. And now he saves 35,000 rubles a year on gasoline! Read more"
Installing a diode with a toggle switch is the easiest way to increase the voltage. There is no need to bother, look for a lot of information in books, etc. Everything is as accessible as possible, no special difficulties.
This option of increasing the voltage, despite its simplicity, gives the most reliable result. Ideally suited for domestic and VAZ car models.
The purpose of this method of increasing the voltage in the vehicle's on-board network is to deceive the regulator, which is located inside the generator. As you know, on old domestic car models (kopek, VAZ 2105, etc.) the voltage drop sometimes reaches critical values - sometimes it drops to 12.5 volts. The battery, of course, will not be charged at this voltage.
A voltage regulator is the same brushes, a tablet, a chocolate bar - there are many names, but it is the same element that is responsible for regulating the voltage in the generator. On our domestic cars, mostly older ones, the tablets are of poor quality. They do not regulate voltage well, and as mentioned above, sometimes the current value drops below the baseboard.
So, what you need to do is insert an additional diode into the circuit. By this we will achieve the following: by how much the voltage on the diode is reduced, the regulator will increase the total current in the circuit.
There are several ways to integrate a diode. One of the best - remotely. Take a simple toggle switch and install it somewhere convenient.
Obviously, the toggle switch should be routed through the wire to the generator. You can insert the diode into the slot in the generator bridge, in the place where the wiring runs from the excitation winding to the regulator. That is, we simply insert the diode into the wiring between the bridge and the regulator.
We connect a separate toggle switch to the diode through two wires, as shown in the photo below.
When the voltage in the on-board network is sufficient, for example, in the summer, the diode is simply installed and not used. If the current is low, just turn on the toggle switch by activating the diode. In this way, we deceive the regulator.
The following diodes can be used.