Grinding the cylinder head is an operation that is performed during a major overhaul of the internal combustion engine, engine overhaul, etc. Also, the need to grind the head may arise when the so-called “iron” tuning of the internal combustion engine is carried out, changes and modifications are made to the engine design in order to boost the power unit, the engine compression ratio is increased by reducing the height of the head, etc.
We also recommend reading the article about what the compression ratio of an internal combustion engine is. From this article you will learn about this value, as well as what the compression ratio in the internal combustion engine device affects.
As you know, the cylinder head (cylinder head) is one of the main components of the engine. The head of a modern power unit contains a timing belt, the head itself fits tightly to the cylinder block (BC) through the cylinder head gasket, part of the combustion chamber is made in the head housing, and the channels of the engine lubrication and cooling system also pass through. For this reason, for the best fit, it is necessary to grind the cylinder head; in parallel with grinding the cylinder head, in some cases the surface of the cylinder block is also grinded. Next we will talk about how the cylinder head is ground, as well as how to perform this operation yourself.
DIY cylinder head grinding
A bent cylinder head is a fairly common occurrence. Therefore, car enthusiasts often wonder about cylinder head grinding. The cylinder head is an integral part of a car engine. It is in it that thermal processes occur. This is the cover that covers the cylinder, and is usually secured to the block with bolts or studs. In the cylinder head system, everything is interconnected, and therefore the failure of any part can lead to a malfunction of the entire system. To avoid such problems, you need to look after the engine and especially prevent it from overheating. In this case, it remains very important to monitor the operation of the cylinder head and carry out repairs in a timely manner. There is no need for grinding for prevention; it should be carried out only in case of unevenness.
Grinding methods
Grinding is one of the most popular cylinder head repair procedures. Of course, the most accurate and correct grinding is carried out in workshops, but this may not always be available. Special equipment is very expensive. A problem for this may also be the fact that in small villages there is not always a tire service. But you shouldn’t despair; you can grind the cylinder head yourself, thereby saving money on repairs. The process of grinding with your own hands, although not simple, is quite real.
Reasons for grinding
An important condition for grinding is the unsuitability of the cylinder head gasket, namely its burnout. Overheating of the car engine, ingress of a small amount of water or other mechanical particles and parts can cause this. The gasket itself is a complex part, which consists of several balls with a frame and made from perforated sheet steel. Its main purpose is to seal joints. Signs such as engine boiling, bubbles in the radiator, and gray oil may indicate a malfunction of this cylinder head gasket. In this case, the tightness of the gasket and cylinder block is broken, which leads to all these problems and consequences. The second reason for grinding the cylinder head is engine tuning. Also, a decrease in engine power is a sign of deformation of the cylinder head. This can be observed when pressing the accelerator, when the engine simply does not pull. Oil leakage can be easily noticed and will be displayed on the visual panel. Gasket failure can also be caused by low-quality fuel. If camshaft bearings are installed on the head, distortion of the cylinder head surface will quite possibly lead to them jamming.
Preparing for work
A set of feeler gauges and a metal ruler will help determine the degree of surface unevenness. The ruler is placed on the edge of the cylinder head, then passes the necessary feeler gauge, which determines irregularities and measures the gap. With the help of these devices, you can detect the deepest unevenness and the necessary degree of grinding to level it. Although this method is not 100% accurate, it is certainly possible to determine the quality necessary for normal operation. It should be noted that it is in the place where the gasket burns out that there will be the greatest curvature and unevenness. But that is not all. In addition, there may be defects such as cracks. There is a pretty good method for determining them. To do this, the cylinder head must be painted with slow-drying paint. Then wipe it off after a while. After this, you will be able to see the cracks, and if there are none, you can start sanding. True, it is impossible to determine microcracks or microcracks inside a block without a special device. In a specially designed device, the head body is heated, and then bubbles appear due to pressure, and thus cracks appear. To continue working you need to fix this problem.
Beginning of work
Having removed the head from the engine, the first thing that appears is a lot of questions about the evenness of the head, how much to grind it, how to check the result, and the like. But not everything is as scary as it seems. In reality, everything is much simpler. This procedure can be done without special tools. To do this, you can take either a sharpening stone or a cutting disc. Regardless of the condition of the head, this task will not take much time. There is, of course, another way to, so to speak, fix the problem, but such repairs will not last long. You can simply replace the gasket, but the engine will not run for long if there are irregularities. Gases will pass through them, which will again lead to the gasket burning out. Thus, it is better to go ahead and do a complete repair, namely grinding the cylinder head. When grinding, it is a good idea to wipe the valves and replace the valve seals. It is better to do this right away, so that later after the work is done you do not have to wipe the burnt valve. This will increase engine power. It is not necessary to buy new valves. Old ones will also work if they are in good condition.
Second phase
Before starting work, you should clean the head gasket. This can be done with a knife. Then you need to put the disk on the head and run it over it several times. The effect of a sharpening stone will be the same, but the procedure will take longer. It should be noted that the manufacturer may indicate the maximum allowable grinding depth for engine operation. If this is not observed, the degree of compression will increase, and the center-to-center distance will change and become deformed. In this case, you will have to buy a new part. Movements along the cylinder head should be smooth in the shape of a figure eight or zero. After this, you can see the curvature of the head. Thus, you need to wipe it until all the irregularities are corrected. The disk itself also needs to be rotated in a circle. The cutting disc should be applied evenly along the entire length, otherwise there will be uneven areas that will be difficult to align with the rest. The result should be a mirror-like surface of the head, which will create the maximum required seal. A properly ground cylinder head can be safely installed on site.
How to do it yourself correctly
There are several ways to grind valves. The best option is to use machines and cutters, but they are not always nearby. In this case, it is better to resort to the manual option.
Lapping Tools
Lapping devices are divided into 2 groups.
- Clamping the valve from above, fixed on the rod. There is a handle on one side. To achieve the result, you need to pull and rotate it.
- "Suckers." They are fixed on the valve plate and are also equipped with a handle. To use, you need to press the valve against the plate and rotate the device in different directions.
Valve lapping tool: top clamping model
If you don't have a tool, a screwdriver or drill will do.
We recommend: Diagnostics and adjustment of headlights on a Lada Granta car
Regardless of the tool you choose, you will need the following equipment:
- abrasive or diamond paste;
- spring - such that you can easily squeeze it with your hands and put it on the valve;
- kerosene.
Can't get hold of abrasive paste? Prepare it! To do this, you will need fine-grain sandpaper or sandstone shavings. Remove the stones from it and mix them with grease or a similar substance in a ratio of 2 to 1. The consistency of the mixture should resemble shampoo. In extreme cases, standard motor oil will work as a base.
An important step in valve grinding: applying abrasive paste
Do-it-yourself lapping on a VAZ 2109 using paste
- Take the valve in your hands and put the spring on it. Return the valve to its place, back to the car.
- Press it with your fingers and place the pre-prepared tool on the leg.
- Use a screw to secure the tool to the valve.
- Apply abrasive paste to the grinding surface of the plate.
- Rotate the valve in both directions while lapping. You need to perform about 5 movements, after which you should lift the product, turn it 90 degrees and repeat the steps.
- Perform the procedure until a matte gray ring appears on the plate and head seat.
- Upon completion of work on all valves, wipe them with kerosene and dry them thoroughly with a rag.
This is what the valve should look like after lapping.
How to lap on a machine
If you have access to a machine, it is better to use it.
- Clamp the valve in a special clamp, turn on the machine. The grinding wheel rotates quickly in one direction, the valve rotates in the other, more slowly. Carefully bring the product to the circle and rub it in.
- Do not sand the product too hard. Stop processing as soon as the sanding process becomes continuous.
- Stop the unit, remove the valve and wipe it with kerosene.
- After this, you need to inspect the cylinder head. Examine the seats pressed into the head. They can be ground in only if there is no damage. If there is a burn on the saddles, work it with a rolling cutter until a gray ring appears all over the circle.
To process the saddles, you need this kind of cutter
How to grind a cylinder head with your own hands
Grinding the cylinder head is an operation that is performed during a major overhaul of the internal combustion engine, engine overhaul, etc. Also, the need to grind the head may arise when the so-called “iron” tuning of the internal combustion engine is carried out, changes and modifications are made to the engine design in order to boost the power unit, the engine compression ratio is increased by reducing the height of the head, etc.
As you know, the cylinder head (cylinder head) is one of the main components of the engine. The head of a modern power unit contains a timing belt, the head itself fits tightly to the cylinder block (BC) through the cylinder head gasket, part of the combustion chamber is made in the head housing, and the channels of the engine lubrication and cooling system also pass through. For this reason, for the best fit, it is necessary to grind the cylinder head; in parallel with grinding the cylinder head, in some cases the surface of the cylinder block is also grinded. Next we will talk about how the cylinder head is ground, as well as how to perform this operation yourself.
Read in this article
When does a cylinder head need to be ground?
Any defects that affect the tightness and tightness of the fit of the cylinder head to the engine cylinder block itself lead to malfunctions and/or malfunctions of the internal combustion engine. The most common reason why a head has to be ground as part of an engine repair is engine overheating. A fairly common problem is also considered to be violation of the rules for wrapping the head during engine assembly, after which deformation of the cylinder head housing occurs.
Most often, unscheduled head troubleshooting is carried out when problems arise with the head gasket. This gasket may burn out, resulting in a breakthrough of gases from the combustion chamber, and engine oil or antifreeze may leak through it. Before replacement, it is necessary to accurately determine the reason why the cylinder head gasket is burned out or broken.
Such repairs are indicated for any units, regardless of what work is being carried out (replacement of the camshaft, gaskets, or others). Otherwise, after removing the head and disassembling, it is worth paying increased attention to the condition of the surface while performing other operations.
How the cylinder head works
It is a complex and sophisticated part of petrol and diesel engines. Cylinder heads in automobile engines are made of light metals or aluminum alloys and cast. Cylinder head components differ depending on the type of fuel the engine runs on.
Cylinder head components, purpose.
- Intake and exhaust valves are used to enter the air-fuel mixture and exhaust exhaust gases.
- Camshafts open and close valves and are driven by a timing chain or drive belt connected to the engine's crankshaft.
- Injectors (gasoline), through which gasoline is injected directly into the internal combustion engine;
- Injectors (diesel), used to inject diesel fuel directly into the combustion chamber or into the intake chamber;
- Spark plugs (gasoline) or glow plugs (diesel) initiate combustion in the engine (gasoline) or are a cold starting aid (diesel).
The photo shows the operation of a 4-stroke gasoline engine.
- In position 1, the piston is at bottom dead center; The camshaft cam opens the intake valve, the cylinder is forcibly filled (by the starter) with a mixture of gasoline and air.
- In 2 – the piston has reached the top point, with the valves closed, the mixture is compressed, the temperature and pressure in the combustion chamber increase.
- In 3 – the mixture ignites, gases are formed that push the piston down; power stroke, the crankshaft connected by connecting rods to the piston converts translational motion into shaft rotation.
- In 4 - the piston passes the lower point and moves upward by inertia due to the flywheel, the exhaust valve opens, and exhaust gases are discharged through channels into the exhaust pipe.
The compression temperature reaches 300-400°C, and the pressure is 0.1-0.15 MPa, and at the moment of ignition - 2500°C and 3-4 MPa. The presence of complex components in the cylinder head leads to expensive repairs if the problem is not corrected in time: knocking of valves, wear of camshaft cams, destruction of the gasket.
How the block head is polished
Let's start with the fact that skilled operations with the cylinder head and grinding the cylinder at home are not recommended, although this is possible and there are several ways. Now let's move on to the procedure itself, taking into account how it should be performed correctly. First of all, you need to check the plane of the cylinder head. This is done using a long steel ruler, as well as feeler gauges (feelers can be used to adjust the thermal clearance of valves). An important condition is that the ruler must be smooth, equal in thickness, without bending or defects. The specified ruler must be applied diagonally to the lower plane, after which a suitable probe is inserted into the gaps that form between the plane of the head and the applied ruler. These actions are performed one by one.
Let's move on. If defects are found, then the next step is to check the head for cracks. In the garage, they usually use paint or dyes with similar properties, which cover the body of the cylinder head, which has been previously washed and free of dirt. Then the dye is removed from the surface, after which problem areas are identified using the remnants of the dye trapped in the cracks. The method is quite simple, but microcracks or internal damage to the body cannot be determined using paint. To more accurately diagnose the tightness of the housing and check for cracking of internal surfaces, you need to contact specialists or have suitable equipment on hand. The cylinder head needs to be heated, after which the head is placed in a special bath of water. Without going into details, microcracks appear due to air bubbles that come out as a result of the supply of pressurized air to the head housing. Then the cylinder head crack (if any) should be repaired, after which the cylinder head can be ground.
During milling, the most important parameter is the permissible grinding thickness. To put it simply, you need to know how much metal can be removed as much as possible from the surface of a particular cylinder head. Information about the depth to which the head can be ground should be contained in technical literature, repair manuals and additional sources in relation to a specific type and model of internal combustion engine. The engine manufacturer must indicate this parameter for repair, after which the unit will operate normally. If the plane defects are too serious, that is, deep milling to eliminate them may require removing the entire allowable margin and exceeding the value recommended by the manufacturer, then in this case it may be necessary to replace the cylinder head.
Cylinder head crimping technology
It is recommended to check the cylinder head for leaks during each engine disassembly. If the repair is associated with overheating, belt breakage, head deformation, or improper bolt tightening, then pressure testing must be performed.
Defects are looked for on a special stand with a bath to identify problem points. Work order:
1. Dismantle the head, remove all excess, clean from oil, close the technological holes with rubber plugs. Only the hole for connecting the compressor hose is left open.
2. Pump air under pressure of 5-7 atmospheres. This is enough to detect defects.
3. Place the assembly in a bath of hot water and inspect it from all sides. The heated metal expands, pores and cracks become larger, and air bubbles begin to appear at points of through damage.
4. Mark problem areas.
5. Restore tightness. If repair is not possible, then replace the cylinder head.
What's the result?
It is quite obvious that the further selection of the cylinder head gasket will also directly depend on the depth of grinding, not only in terms of materials of manufacture (for example, metal or reinforced paronite), but also in terms of thickness. This statement is also true if, after milling, there is a risk that the timing valves will be too long. In such a situation, the thickness removed during grinding is compensated by the increased thickness of the new gasket, installation of a double gasket, and also shortening of the valves.
Qualified work on checking for leaks, repairing cracks, boring and grinding the cylinder head or cylinder head allows you to obtain a tested and fully functional part, which, after installation on the car, will be the key to the further proper operation of the internal combustion engine. For example, a professionally repaired and correctly installed head will last for more than tens of thousands of kilometers, provided that general recommendations during operation and timely maintenance and repair of the engine are followed.
How to independently determine that the cylinder head gasket has burned out. Recommendations for pulling the cylinder head after replacement. Which gasket is better to choose?
Grinding in valves: how to do it yourself. Why and when do you need to grind valves? How to grind valves, what grinding paste to choose. Recommendations.
Why do antifreeze or antifreeze enter the engine cylinders and what to do in such a situation. How to determine the presence of antifreeze in the cylinders yourself, repair methods.
What malfunctions are indicated by the emulsion on the oil dipstick and oil filler cap? Ways to independently determine the causes of this problem.
Repairing a cast iron or aluminum engine cylinder block using a liner. Types of sleeves and how the sleeves are inserted into the block. Tips and tricks.
When it is necessary to bore the engine crankshaft, what is crankshaft boring for? How the crankshaft is bored, features of the selection of liners.
Step by step guide
VAZ 2107 cylinder head in the engine compartment Many problems can be resolved after tightening the bolts, but if this does not help, then a major overhaul of this unit may be necessary, which involves removing not only the cylinder head, but also other parts of the block. Some parts may need to be replaced, such as gaskets, valve stem seals and valve guides.
Tools
To work we will need the following tools:
- a set of keys;
- micrometer;
Micrometer - flushing liquid;
- pliers;
- hammer;
- mandrels for removing and installing valves and caps;
- torque wrench;
Torque wrench - tiles (preferably the spiral is closed);
- desiccant.
Valve desiccant
Before starting repair work on the cylinder head, it must first be removed and cleaned of dirt.
Preparatory work and head removal
- The first step is to drain the coolant from the engine.
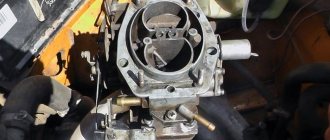
- We remove the carburetor.
- Having disconnected the pipes and hoses, remove the air barrier.
Disconnect the hoses and pipes - Remove the head cover.
- We align the marks on the crankshaft pulley with the mark on the camshaft drive and the marks on the camshaft pulley with the mark on its housing as shown in the photo.
Aligning marks - By disconnecting the camshaft lock washer, loosen the chain tension.
- Having torn off the bolt, remove the sprocket.
- Unscrew the fastenings.
- We remove the camshaft with the housing.
Camshaft - Having previously made marks using a marker, remove the rockers.
Removing rockers - Disconnect the wires.
- We remove the pipe and unscrew the bolts securing the cylinder head to the block.
- We remove the head.
- We inspect its condition and clean it of dirt.
Inspection of the head condition
This video shows the process of removing the cylinder head.
Checking status
Now it's time to dry out the valves. This is done with a special device. If chips, cracks, and rust are not visible, we conduct a further inspection. We evaluate the condition of the saddles, the repair of which is recommended every two hundred thousand kilometers.
Changing guide bushings
We inspect the guide bushings; if they are in unsatisfactory condition, they must be replaced.
A special tool is used to remove them. If you don’t have this on hand, you can get by with pliers and a clamp. After removing the bushings, we measure their diameter. We buy similar ones, the size of which is 0.05-0.07 millimeters larger than the ones being replaced.
The guides are pressed in using a mandrel, an electric stove, a hammer and lubricant.
- We place the head on a stand at the edges.
- We place the electrical device under the place of work.
- We wait until the metal heats up to about one hundred degrees (so that it expands).
- Now you need to properly lubricate the bushing with grease.
- Having removed it from the holders, we drive in new guides.
- When all eight are replaced, we wait for the cylinder head to cool down.
- The valves should not dangle and move freely, there should not be any jamming.
Checking the tightness of the head
Checking tightness To ensure a tight fit of the valves to the seats, do the following. Using lapping paste, lubricate the valve and insert it into the head. There are several techniques for rotating it, here are some of them:
- using a hose tightly placed on the part;
- using a device very similar to a corkscrew.
The main sign of good valve lapping will be a specific matte surface of the seat in the place where it contacts the part.
The tightness of the head can be checked by pouring kerosene into the collectors; you can also use gasoline. If done correctly, there should be no leaks for the first five to seven minutes.
When assembling the head, be sure to pay attention to the correct tightening of the bolts. It must be carried out strictly according to the scheme
In case of incorrect broaching, distortions may appear and, as a result, all your previous work will be crossed out. If you have any questions, watch the video.
Loading …
DIY cylinder head grinding
The engine is one of the main components of a car, and the cylinder head is the heart of this component. When repairing, sanding is often necessary. We'll talk about grinding methods, reasons, preparatory work and the process.
Engine failure is not a pleasant situation, and a bent cylinder head is often the cause of failure. In this case, the first question becomes how to polish the cylinder head, since it is the cylinder head that is responsible for the quality of engine operation. What is a cylinder head? It consists of a cover that covers the cylinders and, according to the standard, is attached to the block with studs and bolts.
Everything in the cylinder head is interconnected; if one part fails, it pulls the rest along with it. Thus, it is worth looking after the engine as best as possible and carrying out repairs on time. As for grinding, it should not be carried out every time there is a breakdown, but only if irregularities appear.
Cylinder head gasket defects
No manufacturer can absolutely guarantee a long service life, since the formation of defects is influenced by many factors - engine condition, car model, driving style. Among the main defects, it is worth highlighting breakdown and burnout of the element in question. Why does the cylinder head gasket break, and what reasons can cause a burnout?
Cylinder head gasket failure and its causes
Almost all drivers do not notice a burst gasket until a serious breakdown makes itself felt. Parts of domestic cars are more susceptible to breakdown, since traditionally their quality is much lower than imported ones.
The need for repairs may be indicated by the presence of steam under the hood and noise when the engine is running, which was not there before. These signs of a broken cylinder head gasket indicate an external breakdown.
An internal breakdown is much more dangerous due to its invisibility. The problem can be detected by measuring compression in the cylinders, and drivers often perform such diagnostics when the engine is shaking.
Air bubbles in the radiator fluid and the presence of white steam in the exhaust pipe also indicate a problem. Oil may leak at the joints in the engine.
When it comes to causes, driving negligence is one of the most common. Let's look at them in more detail:
This is interesting: How to stop registering a car? Procedure for processing documents in 2022
Cylinder head gasket burnout and its causes
As for burnout, the problem area is considered to be the area between the water jacket and one of the cylinders. As the burn gets worse, it spreads further. Among other possible options, it is worth highlighting the area between the cooling channel and the oil channel. If we are talking about a new engine, the only reason for burnout is overheating, even if it is minor
A driver without experience will not pay attention to the first symptoms of a breakdown, and only worsening symptoms will force him to pay attention to the problem
Since the car will not be sent to the service station immediately after the cylinder head gasket has burned out, but after further use, the burnout is not associated with recent overheating, and the search for causes continues in the wrong direction. Slight overheating of the head may occur if the coolant is filled in insufficiently.
Circulation in the system allows the liquid to cool, but heat removal in the required volume does not occur. The temperature of the liquid is displayed by the car's instruments, and at first glance everything is fine, but the temperature of the parts is not displayed. Consequently, the driver will not even notice how the gasket burns out due to overheating.
Other reasons relate to omissions after repair work:
Signs of cylinder head gasket defects
Since we are talking about two main defects in the cylinder head gasket, the signs of their manifestation should also be considered separately. If the cylinder head gasket is blown, the symptoms will be as follows:
The following changes in the operation of the machine indicate burnout:
This is interesting: How to choose a starting charger for a car? 4 Popular Booster Models on the Market
How to check the gasket for defects?
Before starting repair work to replace the cylinder head gasket, we recommend checking it for damage using the following methods:
Main Reasons for Grinding
The first and main condition for starting grinding is the uneven installation of the cylinder head gasket and its subsequent burnout. The reasons for this appearance may be overheating of the engine, the ingress of small mechanical parts, or water, which, if detonated, can damage the gasket.
The gasket itself is not so simple; it consists of several layers and a frame; it is made from perforated sheet steel. The main purpose is to seal the joints of two parts. Boiling of the engine, bubbles in the cooling system, change in oil color are the first indicators that the cylinder head gasket has become unusable.
Engine tuning is often considered the second reason for grinding. A sign of this is a decrease in engine power when you press the accelerator pedal, or simply the engine stops pulling. I would like to say right away that the process is not easy and will require the expenditure of both time and money.
Cylinder head grinding options
Cylinder head grinding is a delicate and time-consuming process. The best grinding is carried out in service centers at service stations, but as an option you can do it at home. Special instruments and devices are very expensive. If we take remote settlements, then it is not always possible to find a simple service station.
Basically, it can be divided into manual and mechanical grinding. Mechanical work is performed on special machines. Manual grinding of the cylinder head, although a longer procedure, requires a lot of patience and perseverance.
Preparation for sanding
In addition to such unevenness, there may also be cracks and similar defects. This indicates that the engine overheated well and detonated. To identify such cracks, it is worth painting the cylinder head with slow-drying paint and wiping it off after a few minutes. Where the paint remains there will be a crack. It is advisable to use bright colors of paint. Unfortunately, only large cracks can be seen, but microcracks can only be seen with the help of special instruments.
In any case, no matter how bent the cylinder head is, the first thing you need to do before starting grinding is to check for both large and micro cracks.
Other processing technologies
Conchoidal
Used for decorating marble, granite, dolomite. Depressions 2-3 mm deep are cut into the stone.
Melted
The product is processed on a thermal gas jet machine. This improves the color and texture of the mineral. He looks melted.
Rocky
The rock is cut using wedges. Chaotically located depressions with a depth of 05.-2 cm are formed on the surface of the processed product.
Ultrasonic
The gems are placed in a liquid abrasive medium and high-precision ultrasonic waves are passed through them. The method is used to give relief and remove excess rock.
Cylinder head grinding process
Removing the cylinder head is different for each car and there is no point in describing it. But you should understand that for this you will need to drain the oil and coolant, remove everything that is in the way, and stock up on new consumables.
Having removed the cylinder head, there are many questions about how much it costs to grind it, how it should be done and how to check the result. But everything is not as scary as it seems at first glance. It would be a good idea to check the valves during grinding and replace the valve seals. This is done so that after collection you do not have to rub in the burnt valve.
To start grinding, we need a sharpening stone or something similar to remove uneven layers evenly, accurately and without bending. Next, you should take a piece of glass the size of the cylinder head and some diesel fuel, since it has the property of not drying out quickly. After a little grinding, wipe the entire surface of the cylinder head with a thin layer of diesel fuel and apply clean and dry glass. It will immediately show where there is still a gap, and where the process was overdone.
It is worth knowing that when grinding the cylinder head, the movements with the grinding stone should be smooth in the form of a zero or a figure eight, but not straight and sharp. The result should be a mirror-like and completely flat surface, after which you can safely install and assemble the engine.
Video “Grinding the cylinder head of a BMW car”
You can learn more about milling the cylinder head on a BMW from the video.
The issue of grinding the cylinder head arises when the gasket under the head has burned out. A sign of a burnt-out head gasket is that the engine boils, bubbles enter the radiator, and if the gasket burns out very badly, the coolant flows into the engine block, the oil becomes gray in color and increases in volume. Since our man does a lot of things with his own hands, not trusting workshops and saving money on repairs, I will explain how to polish the block head at home, yourself.
We removed the head from the engine, saw a burnt-out gasket, a lot of questions immediately arise: is the head straight, how much does it cost to grind the head, where are the heads ground, how to check the straightness of the head, etc. Everything here is simpler than we think!
To resolve these issues and not fool yourself, you just need to take it and grind the block head yourself at home without special machines. To grind the head in, you will need either a new cutting disc or a new sharpening stone. Usually, even severe unevenness in the heads can be leveled out in about twenty minutes, on your own.
Cylinder head grinding price
In many ways, the cost of such a procedure will depend on the chosen method and brand of engine. It is worth remembering that the more expensive the car and the larger the engine, the more expensive the procedure will be.
On a special machine, such a procedure will cost from 800 rubles per cylinder, manual work will be cheaper, about 500 rubles per cylinder. But it is worth remembering that if the work is not carried out by a professional, then when manually grinding the cylinder head, mistakes may be made. After a while you will need to repeat the procedure again.
Video of cylinder head grinding:
Grinding the cylinder head yourself
The cylinder block is one of the main parts of the engine, which directly affects the quality of its operation. Violation of the normal functioning of this motor unit mainly occurs due to deformation of the head, which is the cover covering the cylinders. Any unevenness or curvature of this part prevents a normal fit to the block and causes problems in the operation of the engine. Grinding the cylinder head, which is carried out during a major engine overhaul, helps eliminate deformation.
When is cylinder head grinding necessary?
Experts advise checking and grinding the cylinder head when performing any complex work on engine components associated with removing the block. Direct indications for performing the process are.
- Violation of the geometry of the part due to overheating.
- After welding work. If there were defects in the head that were eliminated by welding, grinding is a mandatory step after completion.
REFERENCE. Grinding is also carried out in order to increase engine power when fine tuning it. Reducing the head height allows for a higher compression ratio.
Deformation of the cylinder head leads to a loose fit of the gasket, and this in turn causes problems in engine operation:
- reduction in engine power;
- leakage of technical fluids;
- difficulty starting the engine;
- motor overheating.
If such problems occur, unscheduled grinding of the cylinder head is required.
Preparation for the process
The first step when performing work is to assess the condition of the cylinder head. Defects of the mating surface are carried out by placing the block on a perfectly flat surface using a steel ruler and a set of feeler gauges. A ruler that is free of defects and even in thickness is applied with its edge to the bottom plane diagonally. If a gap is visible between it and the surface of the block, a probe is inserted into it.
Gaps of up to 0.05 mm are considered acceptable and do not affect the operation of the cylinders. If the gap is greater than 0.1 mm, grinding is necessary. If there are significant gaps, the cylinder block must be replaced. Flat grinding is used only if the height of the head after the process is at least 135.60 mm.
IMPORTANT. If there is a burnout of the gasket, the surface deformation will be located exactly in that place or near it.
After detecting head deformation, the BC cylinders are inspected for cracks. A part with large cracks should not be sanded, since it will still not work correctly.
If no major defects are found, the block is checked for microcracks. In a service station, this is done using special equipment. In the garage, the test method is to paint the block and then clean it after 5-6 minutes. After being erased from the surface, the paint gets stuck into the cracks, and they are clearly visible. But this method can only identify external microcracks. The internal ones remain unnoticed. Before the grinding process, microcracks must be eliminated.
Step-by-step instruction
At service stations, cylinder head grinding is carried out mechanically on a special machine equipped with a grinding wheel. The result of the process depends on the professionalism of the master. If it exceeds the maximum allowable grinding layer specified in the engine manual, the part will have to be replaced.
Self-grinding of the cylinder head is carried out manually using sandpaper or a grindstone. It looks like this.
- The surface is treated without strong pressure, using movements in the form of a figure eight or zero. Sharp, straight movements are not allowed.
- After the first stage of grinding, take a piece of glass according to the size of the head and a small amount of diesel fuel. The surface is lubricated with diesel fuel and glass is applied. In places where too much layer is removed, a circle with liquid around the edges is formed. Where the insufficient layer has been removed, there is an air circle with fuel around the edge.
- Next, the glass is removed and the grinding process continues, taking into account the results of the control measurement.
- As soon as a perfectly smooth, mirror-like surface is obtained, the cylinder block can be assembled and installed in the engine.
IMPORTANT. An excessively removed layer of metal during grinding can permanently damage the part, so experts do not recommend performing the procedure yourself without certain skills.
A skillfully and carefully polished cylinder head, subject to proper operation and maintenance of the engine, will serve the car owner for tens of thousands of kilometers. Violation of the technology of the procedure will require it to be repeated after a short time.
Instructions
Grinding machine
It is unlikely that you will be able to carry out this process yourself, since, as you can see in the video, this requires a milling machine. However, we will still introduce you to the technology of this process so that you have an idea about it.
When the cylinder head is dismantled from the engine to the machine, the first question that arises concerns the thickness of the milling. In this case, you should familiarize yourself with the maximum repair depth of surface milling, and this is stated in the service book for your car. If you follow all the nuances of this issue, then you will not have problems with the further functioning of the motor. In addition, when you find out the required thickness, you should definitely tell the specialist who will do the milling on the machine, so that he can select the gasket of the required thickness.
We also recommend replacing the valve seals and wiping the valves themselves. It is advisable to do this before starting work so that you do not have to wipe the burnt elements afterwards. It should also be noted that this will increase the engine power, and it is not at all necessary to buy new elements; it is quite possible to use old ones. Of course, if their condition is not sad.
It is also necessary to clean the inner surface of the cylinder head from gasket residues. This is done using a regular knife or sharpening stone. Please note that the movements you make to remove any remaining gasket should be in a zero or figure eight shape. They should also be smooth. When all the residue is removed, you will be able to see how warped the head is, so you need to process the cylinder head until all the uneven areas are corrected. As a result, you should get the most even and mirror-like plane of the assembly as possible, which will ensure the most maximum compaction.
As you understand, this process is unlikely to be carried out properly at home, so we advise you to seek help from professionals.