VAZ 2109 cooling system pipes and their replacement
As you know, the level in the coolant expansion tank is constantly decreasing. Therefore, you have to top it up all the time. Every motorist must know that it is necessary to check the tightness of the cooling system. This check is carried out after every 15,000 km. If flaws are found in the hoses, the cooling pipes of the VAZ-2109 are replaced. It is worth noting that replacing the VAZ 2109 pipes can be easily done on your own.
Description of design
The cooling system is liquid, closed type, with forced circulation. The tightness of the system is ensured by the inlet and outlet valves in the expansion tank plug. The exhaust valve maintains pressure in the system when the engine is hot (due to this, the boiling point of the liquid increases and steam losses are reduced), it opens at a pressure of about 1.1 kgf/cm2. The intake valve opens when the pressure in the system decreases relative to atmospheric pressure by 0.03–0.13 kgf/cm2 (on a cooling engine). The thermal operating conditions of the engine are maintained by a thermostat and an electric radiator fan.
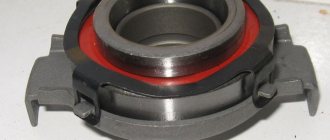
The coolant pump is a vane, centrifugal type, driven from the crankshaft pulley by a camshaft drive timing belt. The pump housing is aluminum. The roller rotates in a double-row bearing with a “lifetime” supply of lubricant. The outer ring of the bearing is locked with a screw. A toothed pulley is pressed onto the front end of the roller, and an impeller is pressed onto the rear end. The distance from the mating surface of the pump cover to the outer end of the pulley should be 52±0.5 mm, and to the outer (facing the block) end of the impeller - 39.8±0.1 mm. A thrust ring made of a graphite-containing composition is pressed to the opposite end of the impeller, under which there is an oil seal. If the pump fails, it is recommended to replace it as an assembly.
The redistribution of liquid flows is controlled by a thermostat with a solid heat-sensitive element. On a cold engine, the thermostat valve closes the pipe leading to the radiator, and the liquid circulates only in a small circle (through the thermostat bypass pipe), bypassing the radiator. On VAZ-2108, -21081, -21083 engines, the small circle includes the heater radiator, intake manifold, carburetor throttle assembly heating unit (on engines with semi-automatic starting - and the liquid chamber of the semi-automatic starting device). On the -2111 engine, fluid is supplied to the heater and the throttle assembly heating unit.
At a temperature of 87±2 °C, the thermostat valve begins to move, opening the main pipe, while part of the liquid circulates in a large circle through the radiator. At a temperature of about 102 ° C, the main valve opens completely, and the bypass valve closes, and all the liquid circulates through the engine radiator. The stroke of the main valve must be at least 8 mm.
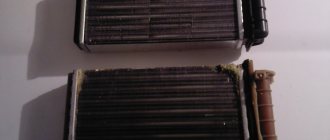
The radiator consists of two vertical plastic tanks (the left one has a baffle) and two horizontal rows of round aluminum tubes with pressed-on cooling plates. To increase cooling efficiency, the plates are stamped with a notch. The tubes are connected to the tanks through a rubber gasket. The liquid is supplied through the upper pipe and discharged through the lower. Next to the inlet pipe there is a thin pipe for the steam pipe.
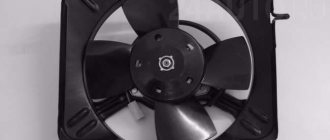
The electric radiator fan on VAZ-2108, -21081, -21083 engines is switched on by a sensor-switch screwed into the right radiator tank. Its contacts close at a temperature of 99±3 °C and open at 94±3 °C. On cars manufactured before 1998 (with an old fuse box), another sensor (TM-108) was installed that controls the fan motor through relay 113.3747 in the mounting block. On the -2111 engine, the fan is turned on by a signal from the electronic engine control unit (via a relay).
The expansion tank is made of translucent polyethylene, which allows you to visually monitor the liquid level. In its upper part there is a fitting for the steam removal hose from the engine cooling radiator.
To monitor the coolant temperature, a sensor is screwed into the engine cylinder head and is connected to a temperature gauge on the dashboard. An additional temperature sensor is installed in the engine exhaust pipe -2111, which provides information to the electronic engine control unit.
When the engine overheats, the control unit turns on the “Check Engine” warning light in the instrument cluster (see Controls and Instruments).
The heating system is described in the chapter Heating and ventilation system.
Modernization of the VAZ 2109 heater
Those who like to “tinker” with cars and experiment can carry out a small modernization of the crane in the old “old-fashioned” way. This will require a ball valve with an angled handle. The sequence of actions will be as follows:
- 1. Drain the coolant;
- 2. Unscrew the plug in the tap and pull out the valve. It won't be useful anymore.
- 3. A 3-kopeck USSR coin will be suitable as a new plug. It will need to be inserted into the “glass”;
- 4. Screw in the plug;
- 5. Under the hood, cut off the heater pipe and install a water tap;
- 6. Tighten the clamps on both sides;
- 7. Pour in antifreeze;
- 8. Check the system.
Every car enthusiast has the right to decide what suits him best. Experienced VAZ 2109 owners recommend a ceramic faucet for replacement. The complete set consists of the part itself, fasteners, and rubber seals. Situations of leakage or “sticking” do not occur after installation and during operation. It makes sense to purchase new pipes. It is likely that during use they have lost their elasticity and cracked. And this is one of the reasons for coolant leakage.
As you know, the level in the coolant expansion tank is constantly decreasing. Therefore, you have to top it up all the time. Every motorist must know that it is necessary to check the tightness of the cooling system. This check is carried out after every 15,000 km. If flaws are found in the hoses, the cooling pipes of the VAZ-2109 are replaced. It is worth noting that replacing the VAZ 2109 pipes can be easily done on your own.
Removal and installation of the fuel tank VAZ 2108, VAZ 2109, VAZ 21099, Lada Samara
| 1. Fold back the rear seat cushion and unscrew the cut-out part of the sound insulation. | 2. Unscrew the two screws securing the hatch cover. | 3. Remove the hatch cover with the rubber gasket. |
| 4. Disconnect the block with wires from the fuel level sensor. | 5. Unscrew the nut securing the sensor, under which the ground wire is secured. | 6. Remove the wire from the stud. The remaining operations are carried out under the bottom of the car. |
| 7. Loosen the clamp. | 8. Disconnect the hose from the filler pipe. | 9. Loosen the clamp and disconnect the air release hose from the fitting on the fuel tank. |
| 10. Loosen the clamp and disconnect the separator hose from the fitting on the fuel tank. | 11. Loosen the clamps and disconnect the hoses from the fuel lines. | 12. Holding the tank, unscrew the two bolts of the tank mounting clamps. |
| 13. Pull the clamps down while supporting the tank. Bend the clamp on the left side behind the resonator pipe. | 14. Lower the front end of the tank down and remove it from the vehicle. Drain any remaining gasoline from the tank. | 15. Unscrew the five remaining sensor mounting nuts and remove the fuel gauge sensor from the tank. |
| 16. Remove the sensor gasket. | 17. Inspect the tank along the line where the upper and lower parts meet. If you find a leak, pour out the remaining gasoline, thoroughly rinse and dry the tank. Then solder the leak with soft solder. If necessary, glue the torn rubber gaskets on the tank. | |
| 1 – fuel tank 2 – fuel drain line 3 – fuel supply line |
| 1 – air release hose 2 – separator hose 3 – filling pipe hose |
Note
It is recommended to have an assistant remove the fuel tank.
| EXECUTION ORDERFuel gauge sensor: 1 – mesh filter2 – float |
Reasons for the release
The first step is to figure out why the coolant is being thrown out of the expansion tank.
- Wear of CO elements. In particular, we are talking about pipes and connecting hoses. They are constantly exposed to high pressure and temperatures. Therefore, over time, their wear and tear is a completely natural phenomenon. As a result, antifreeze begins to be thrown out.
- Low quality components. If natural wear and tear is typical for used cars and cooling systems that have been in operation for quite a long time, then when using low-quality components, even on a completely new or updated cooling system, serious problems can arise. An example is simple burrs on the neck of the expansion tank. Because of them, the lid does not fit tightly enough, which leads to a gap and the release of antifreeze.
- Expansion tank. Alas, the quality of the plastic from which expansion tanks for the VAZ 2109 are made today leaves much to be desired. Because of it, the plastic simply bursts under high pressure.
- Faulty engine. If the engine itself is not working correctly, the coolant may boil. This leads to damage to the thermostat, radiator, and pump.
From this we can conclude that the quality of the CO directly depends on the technical condition of the car and the quality of the components used.
Coolant emission
Signs of coolant emission
It is important to understand that coolant can be thrown out not only through the expansion tank cap, but also inside the system. It is important to monitor the condition of the CO and identify signs of a leak in time. Antifreeze evaporates very quickly, so traces of it are not always visible.
Antifreeze evaporates very quickly, so traces of it are not always visible.
- If coolant is released through the reservoir, puddles immediately form under the car.
- If liquid enters the cabin due to a malfunction of the CO, this can be determined by the smell. It has a sweetish tint.
- Antifreeze also often leaks into the engine system. Such a breakdown is determined by white smoke emanating through the exhaust pipe.
- The most unpleasant and dangerous situation is the release of antifreeze into the engine crankcase. If this happens, a white emulsion will appear on the surface of the oil filler cap.
- Periodically checking the space under the timing belt cover will determine whether the pump has failed. If yes, then you will find high humidity there.
Expansion tank
Signs of boiling
If there are problems with the engine, antifreeze may simply boil in the CO
There is nothing good about this, so it is important to detect the malfunction in time. There are five main signs of coolant boiling:
- The temperature gauge jumps to 130 degrees;
- White foam appears at the filler neck;
- The engine stops working properly;
- The coolant level in the expansion tank rises sharply;
- White smoke comes out of the exhaust pipe.
If problems arise with CO, you must first check it for leaks. According to recommendations, this should be done every 15 thousand kilometers. If a problem is discovered with hoses or pipes, they are replaced as a whole set, and not just those that have defects.
Symptoms of malfunction
In most cases, the stove announces its own dilemma with the onset of cold weather. Most drivers turn off the heater tap during the summer, stopping the flow of cooling water into the radiator. As the temperature drops, car owners begin to use the heater intensively, and often encounter wet spots of unknown origin on the carpet under the glove compartment on the front passenger side. This is the first sign that the heater radiator is leaking.
From time to time it happens that a leak cannot be visually found. Coolant can simply leak into the heater body, and from there, evaporating under the influence of warm air, enters the cabin through the deflectors of the ventilation and heating system.
In both cases, a specific smell inherent in antifreeze or antifreeze will linger in the cabin. In addition, a leak of cooling water into the car interior may be accompanied by the formation of a snow-white oily coating on the inside of the windshield.
If the listed symptoms appear, it will be necessary to replace the radiator of the VAZ-2109 heater, but before doing this, you should make sure that it is it that is leaking, and not the heater tap.
See:
Installation of new pipes
Malfunction of the VAZ 2106 cooling system It is recommended to buy a set of new clamps for a set of new pipes. It is necessary to put them on the pipes before installing them, they must be in a free position, we will tighten them after installing the hoses on the fittings.
If the pipe does not fit well onto the fitting, do not make much effort, just lubricate the fitting. Apply efforts evenly, after successful installation, tighten the metal clamp. It must fit evenly over the entire surface, distortions are not allowed.
In general, the installation of pipes is complete. Upon completion, it is necessary to visually check again and perform a final tightening. Next, fill in new coolant. To do this, we lift the nose of the car so that the new fluid does not create air pockets. Next, turn on the stove to maximum and fill in the liquid. We wait until it completely fills the radiator, heating stove, and block. As soon as the level is at the desired level, you can close the expansion tank cap. At this point the procedure is considered completed.
Upon completion of repairs, periodically check the coolant level. The absence of stains under the car engine, and a constant level of fluid in the expansion tank will tell you that you did everything right, and there is nothing to worry about for the next 3-5 years. In conclusion, I would like to note that this type of repair is not something fantastic, this procedure is carried out frequently and allows you to avoid engine overheating.
Replacing pipes
And when it’s time to change the heater radiator pipes on your VAZ 2109, don’t be afraid to do the replacement yourself. First of all, it is important to know where the stove radiator and its pipes are located.
So, the heater radiator is located on the right heater casing (that is, to the right of the panel of heater control levers), direct access is blocked by the dashboard console.
The price of the pipes themselves is a pittance, but for replacement at a service station they will demand a tidy sum, why? Now you will see for yourself. There are two ways to replace pipes (the methods are also suitable for replacing a stove radiator):
- The first - (the so-called classic) is carried out in accordance with the instructions (manual) for the operation, maintenance and repair of the VAZ2109.
- It involves removing the dashboard and draining the fluid from the engine cooling system.
- The second is simpler (folk), does not require complex manipulations
- In our article we will consider both methods so that you can choose the most convenient one for you.
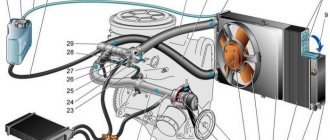
Engine power system
The power system includes the following devices: fuel tank 40, gasoline vapor separator 46, fine fuel filter 33, fuel pump 32, check valve 30, two-way check valve 45, fuel lines and hoses, air filter 28 with thermostat, carburetor 29, intake pipe and exhaust gas devices.
Fuel supply with reverse drainage of part of the fuel from the carburetor back to the fuel tank through a calibrated hole in the carburetor pipe with a diameter of 0.70 mm. A check valve 30 installed on the drain hoses prevents fuel from draining from the tank through the carburetor when the car rolls over. The fuel tank is connected by a hose 43 to a separator 46, which serves to condense gasoline vapors. To prevent fuel from leaking out of the tank through the separator, a double-acting check valve is installed on the second separator hose 44. The valve works in both directions: as fuel is consumed, it allows atmospheric air into the tank, and when the pressure in the tank increases, it releases air with fuel vapor from the fuel tank.
Examination
If there is no inspection hole in the garage, then the car must be placed on an overpass. In bad weather conditions, it is still better to drive it into the garage. Raise it higher with a jack and place reliable supports under each part of the machine.
Note: Never leave your vehicle on a jack for long periods of time.
To work you will need:
- tool set;
- a lamp with a protective cap - in case of a fall or impact, the lamp will not break, and the fragments will not cause injury;
- antifreeze for topping up.
- First you need to disconnect the negative terminal from the battery.
- Lay a sheet of plywood or thick cardboard on the floor.
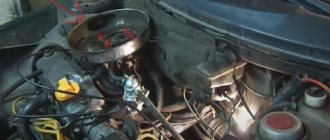
- It is necessary to start the inspection from the engine compartment and first make sure that the temperature of the cooling radiator and the engine has reached the ambient temperature.
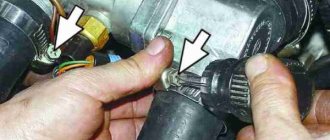
- Check the connections of the pipes on the outlet and inlet fittings of the radiator.
- The connections to the thermostat at the expansion tank are also carefully checked.
Note: check with the palm of your hand, running at the bottom of the connections. You need to determine whether liquid is accumulating.
- Tighten the clamps, but do not tighten them too much, as you can damage the pipe itself if you overtighten the clamp.
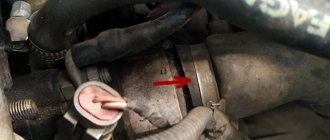
- Then lie down on the prepared cardboard at the bottom of the car under the engine and check the pipe, as well as the suitable pipe of the water pump.
Note. Don’t forget to check the pipes that go to the interior heating system.
- Then continue checking under the hood.
- Rubber tubes suitable for the carburetor are carefully checked.
- Don’t forget to check the tightness of the radiator drain plug and coolant temperature sensor.
- After completing the inspection, make sure that all inspected connections are tight.
- Make a conclusion about the condition of the pipes.
Necessary tools and tools
After conducting a preliminary inspection of the heating system and making an accurate diagnosis, you can begin to prepare for repairs. You should start by purchasing a new heater core. Today you can find two types of these spare parts on sale: copper and aluminum. The former are reliable and, with proper operation, can last an average of five years. Of course, they cost more (1500-2000 rubles). Aluminum radiators are a little cheaper (about 1000 rubles), but they last half as long. There is another type of heat exchanger made of the same material (non-original), which is better not to buy, especially if you are making a car for yourself. It’s unclear where they are produced, but they cost about 600 rubles.
How to replace the radiator of a VAZ 21099 stove
The video shows how to replace the interior heater radiator of a VAZ 2109
with a high instrument panel.
How to replace the heater (stove) radiator of a VAZ 2109
How to remove the panel -.
In addition, independent replacement of the VAZ-2109 heater radiator involves the use of the following tools and means:
- set of wrenches;
- Phillips and slotted screwdriver;
- container with a volume of about 5 liters (for draining coolant);
- clean rag.
It is also desirable to have a male assistant present, who will help both physically and morally, because the upcoming procedure is not particularly exciting.
What to do if the engine overheats
First of all, it should be remembered that if the overheating is short-term (for example, the temperature needle rises in a traffic jam), then you should observe whether the temperature will drop after you start driving (counter air flow appears) or as a result of turning on the radiator fan.
If the car was already in motion and the engine temperature reached a critical level, you should not immediately turn off the engine. Also, you should not try to cool the engine by pouring water on it from outside, pouring cold water into the radiator, etc. Such actions will lead to the need to repair the internal combustion engine, and it may be necessary to change the BC and cylinder head.
Next, you need to wait a few minutes, while simultaneously inspecting for obvious and strong signs of antifreeze/antifreeze leakage under the car or in the engine compartment. If no leaks are visible, but the temperature does not drop, the unit must be turned off.
Please note that you need to immediately turn off the engine when steam starts coming out from under the hood; traces of intense coolant leakage are clearly visible. In this case, the engine must be stopped, without expecting that turning on the stove will reduce the heating
Lada 2108 1987, 63 l. With. — self-repair
Comments 19
Participate in the discussion can only registered users.
I've tried opening the expansion tank and turning on the gas, but nothing comes out. It only pours when the car has already warmed up to 105 degrees (this is only in the summer) in winter it is not possible to heat the car even to 92 degrees, it keeps 87 stable, sometimes 90 in traffic. what could it be?
the return fitting on the radiator is clogged, the radiator is clogged, the pump is not original (the impeller overhang is less)
on the main radiator or stove?
the return fitting on the radiator is clogged, the radiator is clogged, the pump is not original (the impeller overhang is less)
the return fitting on the radiator is clogged, the radiator is clogged, the pump is not original (the impeller overhang is less)
I checked the fitting, everything is fine when the car heats up to about 94 degrees, it starts to leak, which means it’s not clogged! I changed the plug on the expansion valve, nothing has changed! Turn the heater on to the second position and the car cools down to 82 degrees =(
Along the way the thermostat stuck
The thermostat when the temperature reaches a little over 90, the lower pipe starts to become warm.
Well, you answered your own question, it's a thermostat
At what temperature should the bottom one become warm?
I don't know, everything is different, but the lower pipe becomes warm when the thermostat is open
Should there be a trickle from the return line at idle or not? Or does it only happen at high rpm?
On 08 - 99, not in most cases, if you plug in a baker pump. At stock, the return flow only moves at rpm.
ehh... and I was already happy, the stove heats only at high speeds, when a strong stream flows from the return line, but at idle it’s not strong, it just spits...
either it’s airy, or install an additional electric pump from a gazelle and you’ll have a warm stove
already installed, due to poor circulation it doesn’t reach it... i.e. only there is no response from her, the reason seems to be the pump
I’m not saying that antifreeze is contraindicated and is complete crap; antifreeze is better for a chisel.
What nonsense about antifreeze
verified fact. If you bought antifreeze for 250 rubles for five liters, this is repainted antifreeze.
Full version of the site
Cooling system VAZ 2109 - characteristics of components
The cooling system of the VAZ 2109 consists of five main elements. Every car owner should know the layout of this unit in order to avoid surprises on the roads. The advantage of domestically produced cars is their particularly unpretentious operation: the main thing is to be able to start the engine.
Most breakdowns on our cars can be corrected with improvised means. Even if you remove some parts from the car, you can still get to the finish point.
Main parts of the cooling system
The main function of the cooling unit is to remove excess heat from overheated engine parts. This is ensured by forced circulation of the cooling system of the VAZ 2109.
The VAZ 2109 engine cooling unit is a sealed closed-type system with forced fluid circulation. The presence of inlet/outlet valves ensures that pressure is maintained while the vehicle is moving. The VAZ 2109 cooling system diagram consists of the following main elements:
- expansion tank;
- liquid pump;
- radiator;
- electric fans;
- sensors;
- thermostat.
The operation of the VAZ 2109 cooling system begins with the expansion tank. The expansion tank is the main element in this scheme: the working fluid is poured into it. The tank contains a kind of reservoir into which excess boiled (expanded) antifreeze is supplied. After cooling, the liquid returns to the system. The total volume of the VAZ 2109 cooling system is 7.8 liters.
The expansion tank is equipped with valves whose function is to maintain a certain pressure. When the pressure increases, the exhaust valve operates, and when the pressure decreases, the inlet valve operates. The synchronized operation of the valves maintains the pressure in working condition. The expansion tank is made of a translucent substance (polyethylene), thanks to which you can observe the liquid level.
To connect the tank to the thermostat, hoses from the VAZ 2109 cooling system are used.
Replacing assembly parts
After 15,000 km, the VAZ 2109 cooling system is diagnosed for leaks and repaired if a leak is detected at the junction of the unit with the hoses.
Hoses must be replaced if they lose elasticity or damage their integrity. Before replacing hoses, it is recommended to empty the system of fluid.
The VAZ 2109 cooling system pipes must be replaced when the hoses fail.
The liquid pump (pump) provides cooling of the motor. This element of the system is based on three parts:
- frame;
- impeller;
- pulley
The cooling system contains two radiators: the first is located between the headlights, the second is on the stove. Thanks to the favorable location of the main radiator, high-quality engine airflow is provided.
Another common problem in car repair is the brake system, you can read about it in this article. Read about how to tune a VAZ 2109 here.
The pump housing is made of aluminum. The unit is driven from the crankshaft pulley by a toothed belt. If the VAZ 2109 cooling system malfunctions, it is recommended to replace the pump together with all elements.
The radiator needs to be replaced due to an antifreeze leak.
For a more detailed introduction to the cooling system of domestic cars, we recommend watching a short video course.
Replacing the heater radiator on a VAZ-2109: instructions
We will bypass the method of replacing the heater, which involves dismantling the control panel. Although it is considered correct and is even written in the manual, it can take up a lot of not only your time, but also your nerves. Let's dwell on the folk method, invented and repeatedly used in our garages.
See:
The first step is to remove the front passenger seat, as it will interfere with our process. Next, turn off the heater valve and begin unscrewing the screws securing the control panel to the body on the right side. Don't forget to remove the glove compartment. Then unscrew the screws securing the panel on the right to the floor.
Check that all screws are unscrewed. To do this, try lifting the panel and pulling it towards you. If something interferes with this, it means that something is not unscrewed somewhere. If the panel moves, place any object (a block, a log, a bottle) between it and the body that would hold it in a raised state.
Replacing the VAZ-2109 heater begins with disconnecting the hoses from the pipes. To do this, just use a screwdriver to loosen the clamps and pull the hoses towards you. Be prepared for coolant to start leaking from the radiator. A clean rag should always be at hand. After this, you can dismantle the radiator itself. We unscrew the three screws on its cover, securing it to the body. The radiator can now be removed from the heater housing. The new part is installed in the reverse order.
But that is not all. Replacing the heater radiator yourself without removing the VAZ- 2109 should end with a thorough check of the tightness of the connections. When the radiator is installed, do not rush to screw the panel. Pour coolant into the system, remembering to tighten the drain plug, start the engine and warm it up. Having moved into the cabin, inspect the connections of the hoses and pipes, as well as the heater valve. If there are no leaks, you can assemble the panel.
How the cooling system of VAZ 21093,2109,21099 works
The cooling pump drive is driven by the timing belt. The total volume of the system, including the stove, is 7.8 liters. Temperature control is carried out using a sensor installed on the cylinder block jacket. The temperature indicator is displayed on the instrument panel.
During operation of the VAZ engine, liquid from the block jacket passes into the radiator (where heat is removed) or into the thermostat (short circuit - to warm up the engine). Next, the liquid is pumped into the cooling jacket of the VAZ injector power unit. The pipelines circulate and heat the fuel mixture in the intake manifold and throttle valve area.
Principle of operation
Any car, with the exception of electric vehicles of course, produces a lot of heat, it must be removed and the engine cooled. The cooling system is responsible for this. This system in almost all cars operates on the same principle and does not have any fundamental differences: radiator, expansion tank, pump, and of course the cooling system pipes.
Moreover, the pipes installed on the VAZ 21099 cooling system (injector) are not fundamentally different from the pipes of the VAZ 21099 cooling system equipped with a carburetor; these cars differ only in the fuel injection system, and the cooling system is designed according to the same principle.
Pipes and hoses VAZ 2108-21099
Engine pipes 21082 reinforced rubber red for VAZ 2108-21099, 2113-2115 injector
Heater pipes reinforced rubber blue 21082 for VAZ 2108-21099, 2113-2115 injector
Blue silicone radiator pipes for VAZ 2108-21099, 2113-2115 injector
Blue silicone stove pipes for VAZ 2108-21099, 2113-2115 injector
Silicone blue expansion tank pipe for VAZ 2108-21099, 2113-2115 injector
Blue silicone breather pipe for VAZ 2108-21099, 2113-2115
Radiator pipes reinforced rubber red for VAZ 2108-21099, 2113-2115 injector
Crankcase ventilation hose (breather) silicone blue for VAZ 2108-21099, 2113-2115
Radiator pipes reinforced rubber red for VAZ 2108-21099 carburetor
Throttle pipe heating hose for VAZ 2108-21099, 2110-2112, 2113-2115 injector
Heater pipes reinforced blue rubber for VAZ 2108-21099 carburetor
Heater pipes reinforced red rubber for VAZ 2108 carburetor
Expansion tank hose (from tank to radiator) for 2108-2115
Thermostat pipe injector corner for VAZ 2108-21099, 2110-2112, 2113-2115, Priora
Blue silicone hose 1 meter diameter 20 mm
Heater pipes 21082 reinforced rubber red for VAZ 2108-21099, 2113-2115 injector
Silicone blue expansion tank pipe for VAZ 2108-21099, 2113-2115 carburetor
Blue silicone radiator pipes for VAZ 2108-21099 carburetor
Blue silicone hose 1 meter diameter 8 mm
Blue silicone stove pipes for VAZ 2108-21099 carburetor
Carburetor outlet hose for VAZ 2108-21099
Set of engine pipes silicone blue cs20 profi for VAZ 2108-21099, 2113-2115
Thin breather hose (pipe) for VAZ 2108-21099
Rear heater supply hose (pipe) for VAZ 2108-21099, 2113-2115
Radiator drain hose (pipe) for VAZ 2108-21099 injector
Thermostat connecting pipe (short) for VAZ 2108-21099, 2113-2115
Breather pipe Forward Auto parts for VAZ 2108-21099, 2113-2115
Upper crankcase exhaust ventilation hose Forward Auto parts for VAZ 2108-21099, 2110, 2113-2115, Lada Kalina
Set of engine pipes silicone blue cs20 profi for VAZ 2108-21099, 2113-2115 with engine 21082
Cooling system filling hose for VAZ 2108-21099, 2113-2115
Upper (small) crankcase exhaust ventilation breather hose (pipe) for VAZ 2108-21099
Radiator supply hose for VAZ 2108-21099, 2113-2115
Exhaust cooling system pipe without hole for temperature sensor on VAZ 2108-21099
Rear heater outlet hose (pipe) for VAZ 2108-21099, 2113-2115
Radiator supply hose (pipe) for VAZ 2108-21099 injector
Heater heater outlet hose (pipe) front VAZ 2108-21099, 2113-2115
Heater pipe (engine compartment, small) 2108-8101208R for VAZ 2108-21099
Heater heater supply hose (pipe) front Forward Auto spare part for VAZ 2108-21099, 2113-2115
Hose (pipe) of the lower crankcase exhaust ventilation breather on VAZ 2108-21099
Hose outlet fitting for VAZ 2108-21099, 2113-2115
Front supply hose (pipe) for the heater heater on VAZ 2108-21099, 2113-2115
Water pump outlet pipe with hole for temperature sensor on VAZ 2108, 2110-2112
Radiator outlet hose (pipe) Forward Auto spare part for VAZ 2108-21099 injector
Set of heater system pipes for VAZ 2108-21099
Set of heater system pipes for VAZ 2108-21099 (injector)
Some useful tips
Finally, here are some tips to ensure that your car heater serves you for as long as possible.
If the condition of the cooling system in the VAZ-2109 leaves much to be desired, the motorist needs to know how to properly replace the cooling pipes. Experts generally recommend checking every 15,000 km, regardless of whether the engine cooling system is working properly or not.
Do not despair if the test result is disappointing - even a beginner can cope with replacing the pipes in a VAZ-2109 with his own hands.
Classic way
It is worth noting right away that it is quite labor-intensive and will take quite a lot of time. You will need a lot of patience and care (as mentioned above). The most difficult part is removing the instrument panel and installing it, as it is much more difficult to get the instrument panel into place correctly.
Tool
- Coolant drain container
- Screwdriver Set
- Head with a wrench to unscrew the steering wheel
Let's start in order:
- Removing the terminals from the battery
- With the heater tap open, drain the coolant by unscrewing the drain plugs located on the radiator and cylinder block (into a substitute container)
- Removing the decorative trim from the steering wheel
- We unscrew the nut securing the steering wheel so that its end is flush with the end of the steering column shaft.
- The steering wheel is seated very tightly on the shaft splines, so for safety reasons it is not recommended to completely unscrew the nut securing the steering wheel: with a sharp impact, it will jump off the splines and can cause injury
- Be sure to mark the location of the steering wheel in relation to the shaft
- Knock the steering wheel off the shaft splines with sharp blows of your hand.
- Now you can finally unscrew the nut and remove the steering wheel
- Unscrew the six screws securing the lower steering column casing
- Remove the lower casing from the steering column, as well as the lining of the ignition switch (lock)
- Then remove the upper casing from the steering column
- Loosen the bolt securing the base under the steering switches
- We remove the base from the shaft, disconnect the blocks with wires (there are two of them) from the contacts of the car horn
- Now we disconnect the block with wiring from the windshield wiper and washer switch lever
- It is recommended to mark the terminals with wiring before disconnecting. This will help you avoid confusion during assembly and save time.
- Disconnect the block with wiring from the headlight and turn signal switch lever
- Pull the carburetor choke control handle (aka “choke”) towards you so that the draft comes out, remove the handle from it
- Unscrew the two screws securing the dashboard console trim
- Removing the cover from the console
- Remove the cigarette lighter from the socket
- We take out the ashtray from the nest by pressing on the plate to extinguish cigarettes
- Remove the handle that switches the heater fan
- Then we remove the three knobs that control the stove and hook them with a screwdriver
- Disconnect the block with wiring from the heater fan switch, located under the heater control panel
- Disconnect two wires from the contacts of the lamp illuminating the heater control panel
- Remove the headlight direction adjustment handle, just pull it towards you
- Now remove the instrument cluster lighting switch knob
- Unscrew the nut securing the instrument lighting switch
- Unscrew the nut securing the headlight hydraulic corrector
- We push the hydraulic corrector for headlights and the instrument lighting switch inside the panel
- Remove the side nozzles located on both sides of the dashboard using a screwdriver
- Unscrew one screw securing the trim on both sides of the dashboard
- Using a screwdriver, use a screwdriver to remove the exterior lighting switch.
- Disconnect the block with wires from the switch. Push the block inside the dashboard
- We use a screwdriver and remove the socket intended for radio equipment. If you have radio equipment installed on your VAZ 2109, remove it first
- We remove radio equipment according to the manufacturer’s instructions
- Then unscrew the screw securing the trim to the dashboard
- We insert two screwdrivers so that we can bend the plastic latches
- Raising the dashboard trim
- Disconnect the wiring harness from the cigarette lighter
- Disconnect the block with wiring from the block for lighting the cigarette lighter
- Disconnect the block with wiring from the lamp illuminating the hazard warning switch
- We disconnect the block with wiring from the hazard warning switch, and finally remove the dashboard trim
- Gently press down and remove the speaker cover located on the left side of the dashboard. Be careful - latches break easily
- Disconnect the block with wiring from the heated glass switch
- Remove the block from the rear fog lamp switch
- Unscrew the two screws securing the instrument cluster
- We take out the instrument cluster from the dashboard, unscrew the nut securing the cable from the speedometer and disconnect it
"Folk" way
Folk craftsmen - these are brave and very desperate craftsmen - offer a much less labor-intensive method. The bottom line is that replacing the stove pipes (and the stove itself) is done without draining the coolant and without dismantling the instrument panel. The tools you will need are a set of screwdrivers, rags and a container (small) to drain the liquid from the pipes. In this case, replacing the heater radiator pipes is carried out according to the following scheme:
- Removing the terminals from the battery
- Close the heater tap
- We remove the right front seat (to make it easier to do the work)
- We unscrew the two screws securing the dashboard on the right side, and one screw located in the glove compartment, then, pulling the dashboard towards you, we place a wooden block
- Now there is a gap on the side of the passenger seat and you can get to the pipes and to the heater radiator itself
- Lay a rag on the floor of the cabin and prepare a container to collect the coolant
- Which will spill from the radiator and pipes
- We loosen the clamps of the pipes (photo above) and carefully, one by one, remove them from the radiator, replacing the container. 200 - 300 grams of coolant will drain into it
- Replace the pipes with new ones, and change the clamps, just in case.
- If necessary, unscrew the three bolts that secure the radiator to the stove and pull it down to the right
- We install the pipes and the new radiator in the reverse order.
Here are both methods, choose the one that suits you, and also watch a video on this topic.
Fast and high-quality replacement the VAZ-2109 heater radiator
Owners of VAZ Samara family know firsthand that one of the most vulnerable parts of the cooling system is the heater radiator. It very often fails, or rather, leaks. And the metal from which the radiator is made seems fine, and the heat exchange is good, but that’s all it leaks. Fortunately, the prices for this spare part are applicable, which allows for replacement as needed. Yes, and here everything is not so smooth. The fact is that replacing the VAZ- 2109 requires disassembling and removing the control panel. At least, this is what is indicated in the user manual for this car. We will tell you how to quickly replace the heater radiator of a VAZ-2109 without disassembling the dashboard.
Drain the liquid
You will need an inspection hole, overpass, jack or lift. Since the liquid can only be drained from under the bottom of the car, it needs to be raised.
Set of pipes: radiator pipes with clamps (3 pcs.); steam outlet pipe and expansion tank pipe. An important point: hot coolant cannot be drained. Let it cool and then proceed.
First, unscrew the cap of the expansion tank. This is necessary to completely drain the liquid from the system. It is best to place the car in such a position that the nose is not tilted up, otherwise some of the antifreeze will simply remain in the system. You will need a container to collect old coolant. It is better to take the volume with a reserve, 10 liters.
We unscrew the engine protection and find a drain plug in the radiator area, substitute a canister, unscrew the plug and drain it. Next, it is better to return the plug to its place.
How to check the condition of the VAZ-2109 pipes
Ideally, an inspection hole is needed to inspect the machine. In a garage this is not always possible, so craftsmen came up with another way out of the situation - they installed the VAZ-2109 on an overpass. You will also need a powerful jack; the car is placed on reliable supports.
To inspect the condition of the VAZ-2109 cooling system, stock up on the following tools:
- a lighting fixture with a protective cap that prevents injury from fragments of a broken lamp in case it falls;
- antifreeze to top up the fluid in the expansion tank to the maximum level.
Follow the step-by-step instructions and the test will be completed without any difficulties:
- Disconnect the negative terminal from the battery.
- Lay plywood or a thick sheet of cardboard on the flooring.
- First inspect the engine compartment, it is important to understand that the temperature of the cooling radiator and engine is equal to the air temperature.
- Evaluate the tightness of the connections of the pipes on the fittings that approach and extend from the radiator.
- The fit of the expansion component to the thermostat must also be carefully checked and felt by running your palm along the bottom of the connections. If the tightness leaves much to be desired, liquid is released.
- Tighten the clamps properly, but do not over-tighten, otherwise you may damage the pipe.
- Lie down on the cardboard placed under the VAZ-2109 and inspect the pipe along with the incoming pipe of the water pump. The hoses responsible for the interior heating system are also important.
- Pay attention to the pipes under the hood.
- Do not go past the rubber channels adjacent to the carburetor.
- Tighten the radiator drain plug and antifreeze temperature gauge securely.
Self-replacement
Like most repairs, this procedure is carried out on an overpass. Replacement requires the following tools:
- Container for draining coolant;
- Classic set of wrenches and screwdrivers;
- Sealant;
- WD – 40;
- New faucet with a set of rubber gaskets.
Operating procedure:
- 1. Display the VAZ 2109 car;
- 2. Place the prepared empty container under the motor and, opening the drain hole, allow the coolant to drain;
- 3. Next, you need to unscrew the pipes running from the engine to the heater. To do this, just loosen the fastening clamps. It happens that they do not give in, then it makes sense to use a “bucket” and clean the threads of the crane bolts;
- 4. Remove the pipes and drain the remaining antifreeze;
- 5. Remove the side trim of the dashboard in the car interior. Here, too, unscrew the pipes;
- 6. Then, using a 10mm wrench, loosen and unscrew the faucet fastening nuts. It's under the car. Continue working inside the car again and tighten the tap on the passenger seat side. Then remove the clamp. Disconnect the control cable;
- 7. The next stage is the installation of a new tap. First of all, it must be connected to the control cable. Now put the spring clip in place. Tighten the fasteners. When installing pipes, use sealant.
Having finished installing the new heater part, you need to pour coolant into the system and check how the replacement went as a whole.
Replacement
Set of pipes for the VAZ 2109 cooling system
If at least one of the pipes is in doubt, the entire cooling system set must be replaced.
Dismantling
Begin:
- First of all, you need to open the cap from the expansion tank. This must be done so that the cooling system has access to air.
- Open the interior heating valve, turn the lever to the right until it stops.
- Remove the crankcase protection, first unscrew the fastening bolts.
Note. To drain antifreeze from the radiator and engine, you need to prepare a container. It must be plastic or metal. It is better to use an old 10 liter plastic canister. To do this, cut off the top with a sharp knife. With such a container it will then be easier to backfill the radiator.
- Clean the area near the radiator drain plug and cylinder block well so that dirty residues do not get into the drained antifreeze.
- First place the prepared container under the radiator drain plug.
- Open it and wait for everything to drain.
- Do the same work under the cylinder block.
- Wait for the antifreeze to drain completely, then tighten both plugs - on the radiator and the block.
Replacing cooling on a VAZ 2109
Note. The replacement must begin from the interior. To make repairs easier, you need to unscrew the instrument panel fastenings and move them to the side. The front seats - passenger, driver, must be moved to the farthest position towards the rear seats.
- Unscrew the clamps securing the antifreeze supply and return pipes from the heating tap. It is located in the partition between the engine compartment and the passenger compartment.
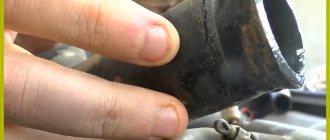
- Remove the rubber pipes if they are difficult to turn a little in different directions. Since they will be replaced, then you need to cut them lengthwise with a sharp knife. During operation, hot antifreeze causes the pipes to stick to the metal fittings. Therefore, it can be difficult to remove them, even with great effort.
Note. If you pull too hard, you can damage the metal connections of the fittings, which will lead to unpredictable consequences. Therefore, this work requires patience and attention. The same work of removing the pipes must be done under the hood. Unscrew the nuts that secure the heating valve.
- Using a flathead screwdriver, remove the valve from the engine compartment.
- Use pliers to disconnect the holder from the heating tap drive rod.
- The tap needs to be cleaned and the inside needs to be blown out with a pump.
- Consistently remove all other pipes from the engine and radiator.
Note. You should remember the sequence of their removal so that you can easily install new pipes later.