During the operation of vehicles, regardless of the type of engine installed, a common malfunction is starter failure, as a result of which it is not possible to start the engine after turning on the ignition. In other words, the car starter does not respond to turning the key in the ignition switch. In such situations, after turning the key, instead of cranking the engine crankshaft, the starter is completely silent, buzzes or makes clicks, but does not turn the engine. Next, we will look at the main malfunctions when the starter does not respond in any way to turning the key in the ignition, as well as other reasons that may cause the starter to not work.
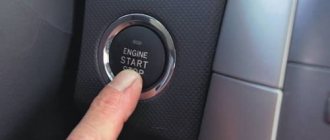
The starter does not turn: what is the reason and what to do?
Experienced motorists have probably encountered a situation where the starter does not work. There can be many reasons for this. This includes insufficient battery charge, problems in the solenoid relay, insufficient conductivity in the contacts on the circuit, and, trivially, mechanical failures in the starter itself, and other problems. In this situation, you need to clearly understand the reason, because most repair work can be done independently, without resorting to the services of service centers. Let's figure out what can cause malfunctions in the starter and what can be done in such a situation.
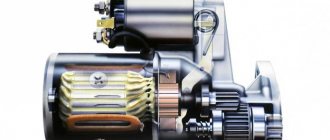
Starter device
What do you need to know about contactless safety equipment breakdowns?
If we talk about malfunctions of the non-contact ignition system, then the primary sign of malfunctions in its functioning is considered to be incorrect operation of the engine. If there is no ignition, the internal combustion engine may not start at all or will start only once, in addition, the engine will most likely function less stably in neutral gear. Also, one of the main signs is the inability of the car to develop power properly. It also happens that when trying to turn on the ignition, the driver sees that the warning lights on the panel are not lit. If the warning lights stop lighting, then the reason most likely lies in the lock itself, since this may be due to a lack of contact as a result of turning the key.
As for the main reasons, the following malfunctions are typical for non-contact SZ:
- Breakdown of the distributor cap is one of the most common problems; it usually occurs as a result of improper operation of the distributor or when it is worn out.
- A break in the circuit of high-voltage wires; as a rule, such a problem is associated with an insulation breakdown, which, in turn, is fraught with current leakage. Also, the reason may lie in poor contact of high-voltage batteries with spark plugs.
- Failure or wear of spark plugs, coil, controller or transistor switch. These elements can also fail due to wear and tear or improper use. As for the spark plugs themselves, they may not work correctly due to the constant use of low-quality fuel when refueling.
- Another common malfunction is a break from the stator winding controller.
- There is no contact at the switchgear output.
- A less common malfunction is the absence or disruption of contact between the wires and hardware elements of the SZ. If such a problem occurs, the driver will most likely hear uncharacteristic shots from the exhaust pipe.
- Increased gap in spark plugs (video author - Vyacheslav Chistov).
As practice shows, malfunctions in the operation of a contactless safety device can often be identified by increased fuel consumption. In this case, the reason is usually the failure or incorrect operation of the centrifugal or vacuum regulators, or both at once, or the failure of the spark plugs.
What are the signs of a bad starter?
The engine may not start not only because of problems with the starter. The following signs indicate a malfunction:
- The starter does not turn on.
- The starter turns on, characteristic clicks are heard, but the engine crankshaft does not start.
- When the starter is turned on, the crankshaft begins to rotate, but too slowly to start the engine.
- You can hear the metallic grinding sound of the Bendix gear, which does not mesh with the crankshaft.
- These signs directly indicate to you that the cause of the car malfunction lies in the starter. If none of the “symptoms” fit, then the root of the problem lies in another plane.
Replacing starter brushes: step-by-step instructions with photos
Let's see how you can replace the starter brushes with new ones yourself, if the need arises. Regardless of the car model, the process will always be approximately the same. For you - step-by-step instructions with photographs.
Step 1. First you need to unscrew the nut securing the brush assembly from the relay bolt.
Unscrewing the nut securing the brush assembly
Starter relay bolt
Step 2. Next, remove the brush assembly output contact from the relay bolt. This is a kind of cap plate with a hole in the middle.
Removing the brush assembly output contact
Step 3. The next step requires unscrewing the starter tie bolts, two in number.
Unscrewing the starter bolts
Step 4. Next you need to remove the motor from the housing.
Removing the motor from the housing
Step 5. Then you need to remove the so-called anchor along with the brush assembly.
Removing the armature with brush assembly
Step 6. Next, you need to unscrew the screws that secure the rear cap, and then remove the cap itself.
Unscrewing the screws securing the rear cap
Removing the rear cap
Step 7. After this, you need to remove the retaining ring from the back of the “anchor”.
Removing the retaining ring
Step 8. Next, the back cover from the armature also needs to be removed - after removing the retaining ring, this is not difficult to do.
Removing the starter rear cover
Step 9. All that remains is to remove the old brush assembly.
Removing the old brush assembly
Step 10. Now you can put the starter back together, but using a new brush assembly. You need to take it out of the package and put it in place of the old one.
Installing a new brush assembly
Step 11. All that remains is to assemble the starter by repeating steps 9 to 1 in reverse order.
Reassembling the starter in reverse order
Video - Replacing starter brushes
Why doesn't the starter turn?
As is usually the case, the most obvious answer is often the correct one. Applicable to our situation, most often the starter does not turn the flywheel because the battery is too discharged. This is not related to problems with the starter itself, but before carrying out more serious diagnostics, you should start with a simple check of the battery charge level. If this was the root of the problem, congratulations! It is enough to simply recharge the battery. At the same time, check the electrolyte level and, if necessary, replenish it.
Let us also give a rather special case that may cause problems. The iconic “second” Ford Focus 2007-2008 may not turn the starter due to the “inherent” features of the original immobilizer. To identify this error, you can run battery power directly to the starter - it should work normally. Usually, official dealers change the immobilizer under warranty without any dispute.
The reasons for the starter not working correctly - if the problem really lies there - are:
- Violation and disappearance of contact on the starter circuit. This usually happens due to poor bolt tightening of the wiring, or corrosion. Statistically, eight out of ten cases of starter problems are related to problems with the car's electrical circuitry. To resolve the issue, check the wiring: inspect the power supply circuit at the starter and tighten the bolts on the terminals and blocks. Also, check for voltage on the control wire that leads to the starter using a multimeter. To do this, you need to close the starter “directly”, but we will return to this later.
- Problems with the solenoid relay on the starter. In this case, you should diagnose the relay and check it for short circuits, broken windings and mechanical damage.
- Short circuit in the winding. It doesn’t happen as often as it could, but it creates problems for the driver. Usually occurs in “middle-aged” starters. Time does not have the best effect on the winding insulation, which leads to short circuits. Other possible reasons include mechanical damage and exposure of the starter to aggressive auto chemicals.
- There are problems in the ignition switch, or, more precisely, in its contact group. In this case, the starter does not operate when the ignition key is turned. When the contacts in the lock are damaged, they do not allow current to pass through, and, accordingly, it does not flow to the electric motor. You can diagnose this problem using a multimeter. Find out if it goes to the ignition switch. At the same time, check the serviceability of the contact group fuses.
- The starter drive freewheel slips. In such a situation, it is necessary to replace the mechanical starter drive.
- The drive moves tightly along the shaft thread. To fix this problem, disassemble the starter and clean its threads from dirt and lubricate it with oil.
- If the starter still turns the crankshaft, but does not do it quickly enough to start the engine, the problem may lie in the following reasons:
- Engine oil viscosity does not correlate with temperature. This problem occurs in severe frosts. Cold causes the oil to thicken, which prevents the crankshaft from rotating at normal speed. In such a situation, changing the oil will help.
- Battery charge is too low. The residual charge is not enough to rotate the crankshaft at the required speed. The solution is to recharge or replace the battery.
- The tightening of the wires that go to the starter is insufficient, or the contact on the brushes is broken. To deal with this problem, check the brush assembly and, if necessary, replace the brushes, adjust the tension in them and clean the commutator.
Atypical situations also occur that lead to the starter not turning:
- Problems with the control wire going to the starter. If the contact or insulation is damaged, you will not be able to start the engine with the key. In such a situation, it is worth replacing the wire.
- The permanent magnets in the starter stator have become unstuck. To solve the problem, you need to disassemble the starter and glue them to the designated places when reassembling them.
- The fuses have failed. Quite rare, but a very likely cause of starter failure. Check the fuses of the ignition system contact group.
- The return spring on the starter retractor relay flies off. You need to remove the relay and reinstall the spring.
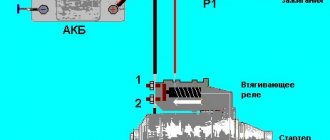
Unreliable connection between the traction relay and the electric motor
If, after turning the ignition key, the solenoid relay clicks, but the electric motor does not hum, then the culprit is often the conductor connecting them to each other. Under the influence of an aggressive environment and passing large currents, the wire gradually deteriorates. To eliminate the break, it is recommended to weld or solder a new copper conductor.
The starter clicks but doesn't turn over
Often, in problems associated with the starter, the cause lies in the solenoid relay. It is this (and not the starter itself, as many people think) that “clicks” when trying to start the car. It could be:
- The power wire that connects the traction relay and the starter windings is damaged. In this case, it needs to be replaced.
- The starter brushes or bushings are worn and need to be replaced.
- Using a meter, check for a short in the armature winding. To fix this problem you need to replace the starter.
- Check all starter windings for shorts and breaks. In case of malfunction, as in the previous case, the starter will need to be replaced.
- Mechanical failure or deformation of the Bendix fork. In such a situation, if possible, replace the fork, or, if this is not possible, the entire bendix.
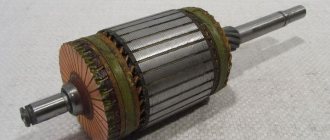
Stator problems
Staters of modern starters are mainly made using permanent magnets, but there are also units with classical windings. Insulation breakdowns, breaks and interturn short circuits are possible in it. To check the absence of the listed problems, it is recommended to use the diagrams presented in the image below.
The permanent magnet stator has virtually no problems. Despite this, in domestic units, poles may peel off or cracks may appear.
The starter does not turn over hot
A fairly common problem: the car starts up normally after parking, but problems arise “when it’s hot,” that is, in a car that has already traveled some distance and its engine has warmed up. The reason for this malfunction most likely lies in the starter bushings, which when heated expand and jam the shaft, which is why it does not rotate. This happens when the bushings are selected incorrectly, so use the bushings and bearings that are recommended in the instructions for your car.
In extreme heat, we advise you to go through all the contacts of the car’s electrical system: the main and starter solenoid relays, battery terminals and others. Degrease them thoroughly and clean them to avoid contact deterioration due to high temperature.
Planetary gear
If the starter shaft is difficult to rotate, a common cause is thickening of the lubricant in the planetary gear. At the same time, when the engine is cold, the electric motor turns the crankshaft worse than when the engine is hot. This is due to the fact that the lubricant changes its viscosity depending on the temperature. When hot, it liquefies and interferes less with the rotation of the shaft.
To solve the problem, you need to disassemble the planetary gearbox and clean out all the contents. After this, new lubricant should be applied.
The reasons why the starter does not work well and turns weakly are often related to the condition of the planetary gearbox gears. Therefore, it is important to inspect them for signs of wear and broken teeth.
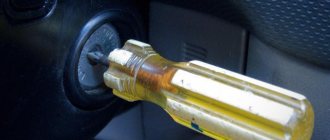
Methods for emergency engine starting if the starter does not work
If the starter does not show any signs of life - it does not click or make any sounds at all - you can start the engine directly. Not the best method, but suitable in an emergency situation when you urgently need to start the car.
Let's consider the algorithm of actions for starting the engine directly using the example of the popular Lada "Ten" (VAZ-2110). You need:
- Put the car in "handbrake" and set the gear to neutral.
- Turn the key to turn on the ignition.
- Open the hood - further work will take place in the engine compartment.
- Remove the air filter from the driver's seat to gain access to the starter contacts.
- Disconnect the chip that goes to the contact group.
- Using a metal object, you need to short-circuit the starter terminals. For example, a screwdriver or a piece of wire is suitable for this.
If other components are working properly and the battery is sufficiently charged, these simple manipulations will start the car. Replace the air filter and the chip leading to the contact group.
It's funny that after starting directly, the engine, as a rule, will continue to be started simply with the ignition key. But this does not mean that the problem is solved. The breakdown cannot be done anywhere and you need to identify it and fix it.
Key - ignition - Great Encyclopedia of Oil and Gas, article, page 2
Key - ignition
The CL warning lamp is powered by battery current when the engine is not running and the ignition key is turned on. The current path is shown by dotted arrows. When the lamp lights up, it indicates that the battery is low. During operation of the generator, when the voltage in the winding of the PC702 relay is 7 - 7 5 V, the contacts open and the signal lamp goes out.
To emergency stop the gas engine compressor, it is necessary to close the fuel gas valve on the engine and turn the ignition key to the Stop position (turn off the ignition), turn on the oil pump and turn it off after 20 minutes, unload the compressor cylinders, manually turn the lubricator and crankshaft.
So, making sure that the gearshift lever is in the neutral position, turn the ignition key (Fig. 13) clockwise until the starter operates. As soon as the engine starts, the ignition key should be released immediately.
The oil line contains a green indicator light on the pressure gauge, which lights up after the ignition key is inserted into the lock. When the engine is running with a working lubrication system, the light should go out.
Remember your first night trip in a newly purchased car: you had difficulty inserting the ignition key, in an attempt to switch from high beam to low beam, the wipers constantly turned on, setting up the radio turned out to be simply an insoluble task. Nothing happened automatically, without a hitch; I had to think about every action.
To avoid allowing unauthorized persons to drive the vehicle, the driver should not leave the vehicle with the engine running or the ignition key left in the lock unattended.
If the ignition switch is working properly and the indicator lamp 9 lights up fully when it is connected to terminal 50 of the ignition switch in the Start position of the ignition key, then you should check the starter relay. It must be disassembled and the contact disk and contacts cleaned.
Before filling, the filling operator must conduct a thorough inspection of the outer surface and fittings of the tanker, check the presence of residual pressure in the tank tank and the suitability of the gas in it for the purpose of the tank, and take the ignition key from the driver.
The ignition system (Fig. 12) consists of a battery 4 and a generator 8, an ignition coil 14 with a variator 17, a breaker 9 with a capacitor 10, a distributor 18, spark plugs /, an ignition key 2 and low and high voltage wires.
To calibrate the indicator scale, first supply it with power directly from the battery and use trimming resistor R4 to set the microammeter needle to zero. Then, with the ignition key turned off (in order to prevent the flow of uncontrolled battery current), the positive terminal of the battery is connected through a powerful (about 60 W) resistor with a resistance of 2 4 Ohms to the car body and the tuning resistor Y7 is set to the 5 A mark. After calibration, the positive terminal of the indicator power supply is connected to the positive wire of the vehicle's on-board electrical network.
So, making sure that the gearshift lever is in the neutral position, turn the ignition key (Fig. 13) clockwise until the starter operates. As soon as the engine starts, the ignition key should be released immediately.
The regulator works as follows. After turning on the power with the BI switch (ignition key), while the engine is running at low speeds and the generator voltage is less than the specified level (see Table 6), determined by the position of the potentiometer RZ slider and the stabilization voltage of the zener diode D, the latter is locked. Transistor T is also locked, and transistors Tu and G3 are unlocked. The excitation winding of the generator is connected through diode Dz and open transistor T3 to the positive pole of the battery E, and the generator receives full excitation. As a result, the generator voltage increases as the engine speed increases or its load decreases. When the generator voltage reaches a given level, the zener diode D ] and transistor T are unlocked, and transistors G2 and G3 are locked. The field winding is disconnected from the power source, and the generator voltage begins to decrease.
Let us, however, continue to consider the connection diagram. The remaining free end of the left electromagnet coil is connected through the ignition key to the positive pole of the battery. The negative terminal of the battery is connected to ground.
Pages: 1 2 3 4
Summarizing
It is advisable that the starter spins the engine crankshaft during an attempt to start it for no more than 10 seconds, then the device must be given a minute pause. Failure to comply with this rule will, at best, lead to a discharge of the power source, and at worst, it will completely disable the starter. Only replacing it can save the situation, since not every auto electrician will undertake the task of rewinding burnt windings, since it is not always possible to perform this procedure efficiently. In addition, the cost of this service is comparable to the cost of a new element.