Useful tips that will be useful for life.
Many men, when repairing a car, or simply in everyday life, have encountered “stuck” bolts and nuts. Sometimes you have to struggle with rusty fasteners for hours, and the technician often runs the risk of breaking everything and also getting a bunch of bruises. How to avoid this and learn how to easily and simply unscrew old bolts, see our review.
Answers (2)
I, as a left-hander, quickly remembered how to unscrew the bolts on the wheel, because for a left-hander it is normal to move the hand counterclockwise. Unscrew the bolts on the wheel counterclockwise
But I find it uncomfortable to twist clockwise with my left hand. Therefore, personally, I always have a problem with remembering where to twist. As a matter of law, there is a personal rule: it’s convenient - we unscrew it, it’s inconvenient - we tighten it.
For right-handers, the situation is the opposite - it is more convenient for them to move their hand clockwise, so right-handers quickly remember how to tighten the bolt on a wheel. However, when you need to unscrew it, it’s a stupor. Moving your right hand in a circle counterclockwise is extremely inconvenient. You can make a personal memory for a right-handed person (like I did for a left-handed person). Only for a right-handed person it will be like this: when moving the hand in a circle is uncomfortable, this is counterclockwise and this is unscrewing.
As a rule, the bolts on the wheels are tightened quite tightly, sometimes even extending the arm of the wrench with a pipe. And novice car enthusiasts can’t always figure out which way to unscrew? The bolts on almost all cars must be unscrewed counterclockwise, and naturally screwed in the opposite direction. And if the bolt becomes stubborn, then you can moisten it with the so-called “liquid wrench”, and then try to unscrew it by swinging.
Lubricate rusty threads
The famous product WD-40 and its analogues. | Photo: popularmechanics.com.
On nuts and bolts that do not come loose easily, you can use one of many lubricants. Penetrating oil like WD-40 is very popular among car enthusiasts. By the way, this is a very useful drug in solving other everyday problems.
Apply penetrating oil generously to the mating surfaces of the parts and leave for some time. If the bolt or nut is very rusty, you can leave the chemical to work overnight.
You can also moisten rusted parts with kerosene, solvent, plain water or Coca-Cola. These remedies also help a little.
How to unscrew a bolt: 45 practical recommendations
How to unscrew a bolt? An article about effective methods with an overview of the best and non-standard tools.
In this material we will look at how to unscrew a torn bolt (with torn edges), a rusted bolt, a crankshaft pulley bolt, a wheel, an exhaust manifold, a cylinder head and other components and assemblies.
The recommendations will also be useful in household work - when repairing faucets, toilets, garage equipment, prefabricated buildings, etc.
How to unscrew a bolt
Bolts are usually unscrewed with spanners or open-end wrenches, screwdrivers, sockets using a wrench, ratchet or pneumatic impact wrench. However, other options are also possible.
Before unscrewing the bolt, from the available tool you need to choose the one that suits best:
- thin short open-end wrenches, especially with a too loose (broken) jaw, are the worst option, which is better to immediately abandon in a situation with unscrewing rusty stuck bolts (this will lead to torn edges);
- ring wrenches are preferable to open-end wrenches, since they cover the perimeter of the bolt head more tightly;
- A 6-point socket wrench or socket is preferable to their 12-point versions, since hex ones have a larger area of pressure on the flat working surfaces of the head and are less likely to tear off the edges;
- a tool with an extended handle or additional attachment is preferable to a short one;
- Due to its simplicity and strength, a crank is preferable to a ratchet, because for the latter, the application of increased forces can lead to damage to the mechanism (this is especially true for ratchets with a large number of teeth, each of which is smaller and not so durable);
- an air impact wrench is better than a hand tool;
- in combination with a wrench or an air impact wrench, the best solution would be the Super Lock head, in which the force is applied not to the corners (edges), but to the planes, which prevents the edges of the bolt head from being licked off;
- a torque amplifier (multiplier) will help apply a force to a large stuck bolt that exceeds human physical capabilities;
- a screwdriver with a large handle of a typical shape or a T-shaped power one will do a better job than traditional compact versions;
- a suitable clamping tool (pipe (“gas”), wrench, clamp, vice, pliers, etc.) will be useful in the absence of keys or when the edges are licked;
- if the head height is sufficient, in rare cases a pin driver of the appropriate size can be used.
Further, when describing the methods, we will show how to unscrew a bolt from an atypical tool.
It is worth purchasing a durable Super Lock socket for wheel bolts and carrying it with you in the car at all times, since wheel fasteners often get damaged during seasonal tire changes and can cause serious difficulties for the car owner on the road in the event of a puncture.
Last resort
A professional impact wrench will help where other methods are useless. | Photo: club.dns-shop.ru.
If even heating does not help, then the rusted fasteners most likely cannot be saved. Pneumatic or electric impact tools are very effective, but impact wrenches often break off the heads of "difficult" bolts.
Unscrewing problematic nuts also often ends with their mechanical removal. To do this, cut the nut into pieces with a saw or grinder; you can also drill with a drill in several places. Sometimes two notches on opposite edges are enough, and the nut begins to rotate. And the easiest way to quickly split an old nut is to use a special device known as a nut cutter or nut splitter.
Set of steel pullers for stuck nuts. | Photo: zubr68.ru.
Nut cutter (nut splitter) at work. | Photo: drive2.ru.
When removing a stuck nut using the methods listed above, the thread is sometimes damaged. To “align” it, it is enough to drive away the damaged studs with a die.
You must be logged in to post.
Due to the lack of the required number of guarded parking lots, car owners install not only alarms on their cars, but also secret bolts on the wheels. Fastening elements with non-standard head shapes are called “secret”. They cannot be unscrewed with a balloon tool; fastening can only be done with the special tool that comes with the kit.
Location Features
To begin with, it must be said that in most cars the motors are located in the same position, due to which they spin correctly. And, the order of work will be general. To prevent the generator pulley from turning, many recommend using improvised metal means that are inserted into the hole of the pulley and the oil pump.
But it may also happen that the specified pump is placed in such a way that certain parts may be damaged during the process of dismantling the pulley.
Sometimes a crowbar or screwdriver is used
In addition, it is made of aluminum and has very small dimensions, but significant effort must be made in the work. So, you need to be very careful not to break the pulley.
Patience
The secret to success is to take your time. | Photo: popularmechanics.com.
The first and most important thing you need to have in such a situation is endurance and patience. If a stuck bolt does not give in, you should not use extra force to immediately move it. This way you can break off the head and delay the repair, as they say, with your own hands. There are many effective means that will help unscrew problematic fasteners. Read more about them in the following paragraphs of our review.
Classic methods
Essentially, standard dismantling methods involve two main methods.
You will need:
- jack to remove the wheel
- tool kit
- hydraulic jack to lift the engine, or replacing it with a “stump”
First way
In the first case, we will have to make significant physical efforts, therefore, you need to clearly focus on your own strength. We are talking about the need to put stones or special stops under the wheels that would not allow them to move during operation. The gearbox should, if possible, be set to maximum gear. The higher it is, the easier it will be for you to cope with the task. In third and lower gears, it will be almost impossible to make a turn with your hands. But everything is unscrewed by hand. To make this task easier for yourself, it is appropriate to use a lever that will reduce the necessary effort. In some cases, the length of the lever can reach one and a half meters.
Disk corruption
Before unscrewing the nut on the grinder, you will have to completely crumble the disc. If it is already destroyed, you can break it with your hands. Solid circles can be cut with a hacksaw or a metal blade. The abrasive wheel should leave an inner metal ring and pieces that are not susceptible to mechanical action. Then you need to clamp a metal profile or any unnecessary plate in a vice, the thickness of which is less than or equal to the thickness of the disk (but not more). Then turn on the grinder and grind off the remaining abrasive to the landing sleeve. After this, the flange can be easily unscrewed with a universal wrench for angle grinders.
Read also: How to insert a drill into a Bosch hammer drill
You can make sure in advance that the tool is not jammed in the grinder:
- cut washers from cardboard or plastic and place one under the disk, and the second between the disk and the flange. Even if the circle jams, the plastic washer will melt when heated;
- The face of the abrasive tool, on which the marking label is glued, should be in contact with the support flange, and not with the clamping nut. With this installation, the metal ring of the circle acts as a washer and protects against jamming;
- weld a standard hex nut onto the flange and unscrew it with a regular wrench;
- If possible, the angle grinder wrench should only be used to unscrew the clamping nut. When installing a new tool, it is better to tighten it manually or at least control the tightening force.
The clamping nut for the angle grinder is included in the delivery set. And the most radical solution to freeing a jammed disk is to saw it and install a new one. You can find such fasteners in all power tool stores.
View Queue
Queue
- delete everything
- Disable
Reverse motion can significantly complicate the dismantling process
But it also happens that the engine works, as they say, “in the other direction.”
We are talking about the fact that the motors are installed with belts to the right. So, they will spin in the opposite direction, that is, counterclockwise. This difference may seem insignificant, but it greatly complicates the search for an answer to the question of how to unscrew the crankshaft pulley.
Moreover, such a procedure may be required every hundred thousand kilometers. We are talking about the need to replace the timing belt. And this does not apply to emergency situations, such as replacing the oil seal or other repair work.
For example, a seventeen bolt can be tightened to a torque of up to one hundred and eighty-five Nm, which can be considered simply a huge indicator.
And to unscrew it you will need even more force. The second method described above will not work, since the starter will spin the motor in the other direction, only tightening the bolt more . Pressing the brake pedal will lead to a similar result, since the transmission will spring back, but the bolt itself will remain in place.
Some modifications of the car may have a window opposite the flywheel crown, through which many try to stop the system using a mounting tool or a regular crowbar with a thin tip. But this risks causing you to turn the crankcase or be very seriously injured.
In the pulley itself there is a special cutout for a proprietary hexagonal key. But such keys are quite expensive, since they need to be ordered, and not just purchased on the market.
After this, you can begin further work, for example, replacing the timing belt
More information about replacing belts for Lifan car models:
Warming up the part
If you cannot unscrew the fastener even with a head with a long lever, then the connection should be warmed up. Professionals use an acetylene cutter for this. But if you don’t have it at hand, a mini gas burner, which you can buy on the market, is also suitable.
We heat the nut only on one side. | Photo: popularmechanics.com.
By unscrewing the pin from the aluminum cylinder block, we heat the block itself around the threads. At the same time, periodically tap the pin in a circle. And if you need to unscrew the nut, then heat it on one side and also tap it with a hammer on all sides.
Tool making
But nothing is impossible, and you can make the appropriate tool yourself. You need to purchase a 54 heating lock nut so that the internal thread diameter is thirty-nine millimeters and the width does not exceed ten millimeters. Now it is important to grind off its edges by one and a half millimeters, and then weld a flat handle, the length of which is near the twenty-centimeter mark. That's all, the tool is completely ready for work.
This is how garage Kulibins do it to save money on buying original keys
Some pulleys have corners that have slightly rounded edges, so that the parts on the nut that are mating can be cut off a little.
Many drivers weld a pre-ground workpiece to a VAZ crankshaft nut wrench to obtain a universal tool suitable for most modern cars. In addition, such a handle is quite convenient to rest on the drive shaft of the front axle wheel.
Having unscrewed the bolt with a standard seventeenth head with an extension and a strong wrench, we continue to work. Don't forget about basic safety rules. So, to prevent the key from jumping off, you need to support the extension cord on a stand that will not jump out and break. Sometimes, even the wheel does not need to be dismantled for such work. Exceptions appear only when the car has tires with a large diameter (as indicated by the inscriptions on the tires) that exceed the standard dimensions. Then they take up more space in the arches. And, you will have to remove them, or use a wrench with a universal joint.
In which areas are left-handed threads used?
To prevent connections from loosening
Here are simple examples when the use of such non-standard fasteners is necessary:
- In units and parts that rotate to the right, the parts may unwind when the mechanism operates. The powerful rotational force of the mechanism unscrews the nut, therefore, to prevent unwinding, left-handed fasteners are used in the direction of shaft rotation.
- The nipple of the radiators of the heating system is equipped with multi-directional threads. The coupling, when twisted with a special wrench, causes the rubber gasket in the radiator sections to tighten.
- The wheels of GAZ, MAZ, ZIL trucks use left-hand mounts.
- The drill chuck with the drill rotates to the right. To prevent loosening of the connection of parts, the chuck is attached to the shaft with a left-hand thread.
- Home fan blades.
- The gearbox transmits torque from the engine to the blades of the brush cutter.
- Bicycle pedals.
- Fastening the cutter to the shaft, discs of grinding machines.
- Some details in miter saws and circular saws.
In tension structures
Let's imagine this picture: housewives hang wet laundry on a line to dry. The rope begins to sag from constant use. The tension for the laundry has to be adjusted frequently. In such cases, bolts with double-sided threading are used here. One side of the bolt goes to the right and the other goes to the left. That is, in this case, the left-hand thread is used to adjust the degree of tension.
Main stages of work
As it may seem at first glance, the work ahead is not very difficult; the main thing is to understand what will have to be done.
- First of all, we find access to the pulley so that we can access it with a key or ratchet.
- If the bolt cannot be unscrewed with a wrench, you can try to remove it using the starter.
- Alternatively, you can always use special removable devices.
Now about all this in more detail.
Pulley search
Obviously, your very first action is to find the location of the crankshaft pulley in the engine. As a rule, it is located on your right, less often on the driver's side. Sometimes it can be hidden in the lower front part of the engine.
You need to start looking for it by inspecting the place behind the generator. Most likely you will see something resembling a disk at the bottom of the engine compartment. This will be the part you are looking for.
Preparatory work for convenient access to the necessary components
You need to be prepared for the fact that, depending on the car model, you will have to remove the coolant reservoir, the air filter unit, possibly the radiator and almost always the wheel.
Quite often, such work has to be started by removing the right wheel. You also need to know the location of the ignition coil.
How to remove the crankshaft pulley bolt for starters
The main problem will be to fix the shaft, since its rotation coincides with the threads of the bolt.
On rear-wheel drive cars of the Lada family, the pulley is fixed with a nut (the element is known as a ratchet, due to the ledge for the crooked starter), on front-wheel drive cars with a bolt.
If you don’t have a special tool for removing a bolt in your arsenal, then this job will not be easy for you. The shaft will have to be locked using a fairly long wrench that rests on a hard floor. Head sizes, depending on the brand of vehicle, usually range from 14 to 38.
In some vehicle models, this function can be performed by screwing a bolt designed for this into a special socket. We disconnect the ignition wires or take out the fuse for the fuel pump so as not to accidentally start the engine. It is necessary to place special shoes, bars or any other objects under the wheels that will completely prevent the vehicle from moving.
Read also: Do-it-yourself wheels for karakat
We take all spectators, assistants and just friends to a safe zone. We ourselves send the gear knob to fourth speed and turn the ignition key with lightning speed. It didn't work the first time, let's try again. Until the bolt turns.
After a successful attempt, we go for the puller and get to work on the pulley itself. Unscrew it counterclockwise. If you are the happy owner of a Honda car, then there is a special ½-inch holder for you that will make your work much easier. It is available for purchase from many online stores.
It is not recommended to perform this operation with the ignition key on some Mazda family cars, since it will be quite difficult to put the unit back together. Also, under no circumstances allow the shaft to rotate in the direction opposite to rotation.
Removing the pulley using pullers
With the bolts removed, you can now remove the crankshaft pulley. To do this, remove the timing cover to give yourself complete freedom to do things like replace the timing belt or seals.
After removing the bolt, you can take on the pulley and this will not be easy. First of all, you will have to remove the belt. To do this, you need to loosen the generator locking bolt, then turn the tension bolt. The belt will loosen and you can remove it. You may find it uncomfortable to operate due to the power steering belt. Then we weaken him too.
The last step of the job is to find the bolt securing the pulley. You can almost always find it if you look under the car next to the right wheel. We go for a pneumatic impact wrench and remove the wheel.
An impact gun will be a great tool for removing a stubborn crankshaft pulley bolt. It has also been experimentally found that a torque wrench is a useful tool for securing it correctly.
All precautions must be taken before lifting and securing the front of your vehicle.
Next, a new stage awaits us - removing the pulley hub from the shaft. It is tightly fixed with a key. To do this, you need a set of inexpensive pullers.
Take the rod, screw it into the main part of the puller a few times and snap it into the end part so that it presses against it. The next step is to do the same on the other end so that it puts pressure on the crankshaft.
On a normal car you will probably notice 4 small threaded holes, which is an advantage as you can insert bolts into them. Once the puller assembly is ready, put it on, remove one bolt and nut and screw it into the small hole. After that, screw another bolt into the hole on the opposite side.
Now that you have both holes pressed tightly, take the socket and secure it using a wrench and keep turning it until it comes off.
Slippage can cause misalignment between the center hub and the drive ring. As a result, the crankshaft pulley will vibrate. This can lead to premature wear.
Never use a jaw puller to remove your vehicle's crankshaft pulley. Using this tool will only rupture the rubber o-ring through the tension of the outer edge of the crankshaft pulley. Use only the recommended pulley removal tool to remove pressure concentrated on the rubber ring.
Unscrewing the hub nut on a VAZ: “burn, hit and twist!”
Now let’s look at the methods that may be the only effective ones in your case, but that doesn’t make them any less radical, even barbaric.
Strong hammer blows
If you hit the hub, you hit the bearing! If you are going to make a replacement, then go ahead! If you value the bearing, avoid this method.
Warming up the hub nut with a burner. Not recommended!
Using the burner
The law of physics is guaranteed to work, and the body (read: hub nut) will expand. And this will make it much easier to remove the stubborn part. There is one “but”: not only this one part heats up, but also everything else in the area of the burner. For example, a bearing. And it’s better not to allow this. As a more gentle option, we can suggest using a soldering iron and... patience. You'll need it.
Jumping on a lever
A chisel will help you remove the hub nut.
The “method” is fraught with the danger of unexpectedly breaking off the edges of the nut, breaking the key, and so on. Just don't do it.
Take a chisel and make notches on the edges
An increase in diameter, of course, makes the hub nut unsuitable for further use, but it will be easy to unscrew it.
What to do if the wheel bolt does not come off
Some car enthusiasts do not know what to do if the fasteners do not move. The first step is to put the vehicle on the handbrake and make sure that the vehicle is stationary. A stuck bolt can be unscrewed in the following ways:
- Leverage method. Due to the insufficient length of the wheel wrench handle, it is not possible to turn the bolt with the required force. It's easy and safe to use a wrench handle extension or a long-handled tool. Such a device will increase the strength of the mechanical influence. Experienced motorists recommend using a metal pipe to lengthen the handle.
- Use your leg strength. If you cannot unscrew the bolt by hand, you need to try pressing the tool with your foot. The handle of the wrench should be parallel to the surface of the ground. You will need to press the key with your foot and turn it counterclockwise. In extreme cases, you will need to stand on the key with both feet and hold on to the car body with your hands.
- Use a hammer or mallet. You will need to pick up both tools, place the mallet in the right place and hit it with a hammer. This option will help move the threads of a frozen nut. In extreme cases, a hammer can replace a stone. Avoid glancing impacts that damage the bolt and key. The blows must be accurate.
- Using a wrench with a dynamometer. If the wheel fasteners have been secured too tightly, it is recommended to use a tool with a dynamometer. Recommended force parameters are indicated in the device instructions.
- Use of chemical compounds. If the bolts are too tight, use Liqu >
Security bolts and nuts made of titanium or steel can protect car wheels from theft. When choosing security bolts, you should take into account the budgetary possibilities and functional features of the products.
In which areas are left-handed threads used?
To prevent connections from loosening
Here are simple examples when the use of such non-standard fasteners is necessary:
- In units and parts that rotate to the right, the parts may unwind when the mechanism operates. The powerful rotational force of the mechanism unscrews the nut, therefore, to prevent unwinding, left-handed fasteners are used in the direction of shaft rotation.
- The nipple of the radiators of the heating system is equipped with multi-directional threads. The coupling, when twisted with a special wrench, causes the rubber gasket in the radiator sections to tighten.
- The wheels of GAZ, MAZ, ZIL trucks use left-hand mounts.
- The drill chuck with the drill rotates to the right. To prevent loosening of the connection of parts, the chuck is attached to the shaft with a left-hand thread.
- Home fan blades.
- The gearbox transmits torque from the engine to the blades of the brush cutter.
- Bicycle pedals.
- Fastening the cutter to the shaft, discs of grinding machines.
- Some details in miter saws and circular saws.
In tension structures
Let's imagine this picture: housewives hang wet laundry on a line to dry. The rope begins to sag from constant use. The tension for the laundry has to be adjusted frequently. In such cases, bolts with double-sided threading are used here. One side of the bolt goes to the right and the other goes to the left. That is, in this case, the left-hand thread is used to adjust the degree of tension.
Designation on the drawing of a left-hand thread
The principle of operation can be represented as follows: a right-hand thread is cut at one end of the nut, and a left-hand thread at the other, and the bolts are screwed in. When the nut is rotated in one direction, it lengthens, and in the other direction, it shortens.
The use of left-handed fastening in tie-down structures is a prime example.
Such a device used in rigging work - a lanyard is a type of screw tie. This design features a pair of load-handling elements. One of them has a standard thread, the other, respectively, a left-hand thread. When the structure rotates during operation, the element body rotates, the tie is weakened, and a change in the direction of rotation leads to loading (tension). That is, when rotating, the parts of the mechanism move away from each other or move closer together.
Reasons for self-unscrewing wheels
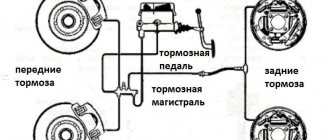
The dishonesty of tire service workers is a common cause of the problem of wheels unscrewing while driving. The driver rarely monitors its operation; you can hear that the wrench is working, and that’s fine. And this is no wonder; a large number of city car owners never change tires on their own. And it’s great if that tire shop has responsible employees who understand the importance of their work. What if not? You can understand what went wrong somewhere only if you yourself have an understanding of how the nuts are tightened correctly. The result of excessive gullibility is usually a situation where the wheel simply leaves your car at speed.
Installing the wheel and tightening the bolts
If the wheel is attached with 4 bolts, you should attach any bolt, and then the next one on the opposite side of the center hole.
- The wheel is installed on studs and secured with bolts.
- The security bolts are lightly tightened using a wheel wrench.
- The car is jacked up and the supports are removed.
- The car is lowered to the ground and all the wheel bolts are tightened in a circle. It is recommended that every effort be made to ensure that the wheel is securely secured. There is no need to be afraid of stripping the thread.
During installation, you need to make sure that the wheel lock parameters match and are suitable in length and diameter. When servicing the machine, the lock is always installed last. And this element should always be dismantled first.
What is a guitar truss rod used for?
Many beginning guitarists who do not understand how the instrument works generally misunderstand its structure. The neck of the guitar is not at all horizontally straight, as many people think. Moreover, it is not so much a perfectly even beam as an arc onto which the strings are stretched, like a string on a bow. If this part of the guitar were perfectly level, then the strings would lie on it and it would be impossible to clamp them. The anchor performs two tasks at once - it takes on the enormous load that a stretched string puts on the tree, and also keeps the neck in one position for more comfortable playing.
Accordingly, if changes occur to the guitar rod, this directly affects the ease of play, as well as the ability to perform songs in general. Two very common problems are directly related to a crooked neck
- This is one of the reasons why the strings rattle - that is, they ring against the saddles, and instead of giving an even, ringing sound, they get along, and sometimes don’t play at all.
- It becomes very difficult to clamp the strings - this is especially felt at the 5th fret and above. It becomes extremely difficult to play with the barre technique - the guitarist begins to spend much more effort than is required. This situation is also directly related to the fact that the guitar truss rod is overtightened and compresses the neck much more than required.
At the same time, the instrument may stop tuning and produce a note a little higher or lower than it should be.
How to fix this? This is exactly what this article is dedicated to.
Video on removing a pulley on cars from various manufacturers
Now let's talk about specific brands and a method that can solve the problem of removing parts.
VAZ car
In this video, auto mechanics managed to unscrew the bolt without any problems, but the pulley itself could not be removed and had to drill holes. We recommend that everyone use this method.
Read also: How to separate rear pads
Ford car
Here an expert talks about the difficulties with the damper option. Pays attention to working with the puller.
Renault car
A car mechanic shares the intricacies of fixing the crankshaft. Uses an 18 mm wrench and an old screwdriver.
Honda car
The recording talks about the shaft rotating in the opposite direction: not like most cars. The author also shows us a homemade device for work.
Chevrolet car
We learn that there is no way to lock the shaft. The operator found a way out of the situation using a belt.
Mazda car
As in the case of Chevrolet, a belt is used. For greater perception by the viewer, the situation is simulated on a workbench.
Conclusion: Now that we have discussed how to remove the crankshaft pulley in your car, we hope you can do it yourself. With proven tools, you can take anything apart.
Just follow this step-by-step guide the next time you're unhappy with the high cost of car repairs at a car repair shop. You no longer have to look for a mechanic to do the job for you.