1.2 liters of transmission oil is poured into the gearbox.
It is necessary to fill in transmission oil SAE 75W-85 or 75W-90.
For this work you will need a 12mm hex wrench, a container for draining the oil, and a syringe - supercharger.
Drain the gearbox oil immediately after the trip, before it cools down.
We install the car on a lift or inspection ditch.
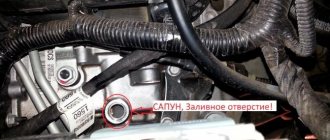
Cleaning the breather from contaminants
Use a 12mm hex wrench to unscrew the drain plug.
Drain the oil into a wide container with a capacity of at least two liters.
If the used oil is dark in color or there are visible metal particles in it, wash the gearbox by installing the drain plug in place, clearing its magnet of steel shavings
Using a 12mm hex wrench, unscrew the filler plug on the side of the crankcase.
Using an oil syringe, pour approximately one liter of a mixture of transmission or motor oil with 20–30% kerosene or diesel fuel into the box and replace the filler plug
Having placed stops under the front wheels, we hang up the entire rear wheel or axle.
Having engaged first gear, start the engine for 2-3 minutes.
After placing the car on the wheels, completely drain the flushing oil (draining time is at least 5 minutes).
Having cleaned the drain plug again, screw it into place with a key.
Having unscrewed the filler plug, use an oil syringe to fill the gearbox with fresh transmission oil (1.2 l).
Screw the filler plug into place.
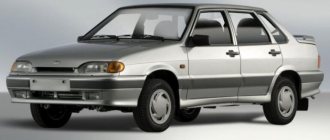
The Gazelle car is highly maintainable and unpretentious in maintenance. Thanks to these characteristics, the car has received recognition from many domestic motorists.
This cargo-passenger vehicle is common with manual transmission. Driving such a car you can easily overcome rough terrain. The necessary power is provided by the transmission system. In order to prolong the operating capacity of the transmission, the driver must periodically change the transmission oil.
Selecting transmission oil
Each individual generation of Gazelle has its own oil change period. In particular, with non-aggressive operation of the Gazelle Next car, using high-quality fuel, the oil change in the Gazelle gearbox is carried out at 60,000 km. Otherwise, the specified indicator will be reduced.
The modern market offers several options for oils. The cheapest of them is mineral oil. The manufacturer recommends that car owners purchase semi-synthetic and synthetic oils. They help reduce fuel consumption and quickly change speeds.
The use of all-season oils is also possible on this version of the car. Oil from the Castrol brand (75W-140 class GL 5) remains in demand. Option 75W-140 has optimal viscosity and does not lose its properties when driving at sub-zero temperatures. In addition to oil from the Castrol brand, you should pay attention to lubricants offered by Magnum or Total. These brands are excellent for business class Gazelles.
The use of oils from untested brands contributes to the malfunction of the automotive system.
How much oil should I put in the box? The oil volume in the Gazelle 3302 gearbox is approximately 1.2 (1.5) liters of fluid.
You can carry out the replacement yourself or entrust this process to the specialists of the service station. It should be noted that cars with gasoline engines must be checked every 15,000 km.
Thus, during the operation of the vehicle, the gearbox is subjected to significant loads. To extend the life of the transmission, you must adhere to certain rules (maintenance, oil change, filter, etc.). When choosing oil for Gazelle, you need to pay attention to the category of the liquid.
Choosing a lubricant
The smooth functioning of the gearbox, as well as the timing of replacement, largely depend on the quality and characteristics of the engine oil.
In the video from user Mechanic, you can learn more about choosing transmission fluid for a GAZelle car.
When choosing a lubricant for a GAZelle gearbox, you should take into account the following factors:
- Recommendations of the machine manufacturer for lubricants, which require certain requirements. It is best to use more expensive and high-quality oils, since by saving money on lubricants, you can spend a lot on repairing the unit.
- When choosing a brand of oil, it is necessary to take into account not only the operating conditions of the car (ambient temperature, road surface condition, total mileage), but also the manufacturer of the transmission fluid, as well as its reputation in the automotive market.
- You should purchase a “transmission” that is approximately 1 liter more than what is required for replacement. It will be needed later when topping up, and you only need to add the oil that was filled in earlier.
When choosing an oil, a lot depends on the climate in which the car is operated. In areas with low air temperatures, a liquid of lower viscosity is poured for the winter than in the southern regions.
Important Characteristics and reviews of owners of German-Chinese chainsaws of the Gardenlux brand (Gardenlux)
Car service books do not always contain recommendations regarding lubricant. For example, the operating instructions for a car with a UMP engine do not give specific instructions on the choice of oil; only a viscosity that meets the SAE 75W standard is recommended.
The following brands of oil correspond to these indicators:
- Castrol 75W140;
- Magnum 75W80;
- Total 75W80;
- Manol 75W80.
Cummins gear oil has also proven itself to be good, and is poured even into the boxes of business-class cars.
The presence of mineral additives in lubricants that meet the SAE 75W standard improves their characteristics, including density and viscosity. Such oils harden at a temperature of about -45°C, which allows them to be used in almost all regions of the Russian Federation.
The procedure for changing the oil in a Gazelle gearbox
The procedure for changing the oil in a Gazelle box is carried out in a number of stages. However, before doing this, you should prepare the necessary tools. In particular, this is a wrench, a spanner, a filling syringe, new oil, and a container for draining spent fuel. Also, rags, acetone, and gasoline are needed. As soon as all this is prepared, the vehicles must be placed on the overpass.
Main replacement steps:
- providing access to the gearbox;
- cleaning the breather from contamination (acetone);
- unscrewing the drain plug, which also needs to be cleaned;
- the liquid from the box is poured into a pre-prepared container. As a rule, this procedure takes the most time;
- unscrewing the filler plug;
- armed with a filling syringe, new liquid is poured inside. To flush the system, add a liter of liquid + about a third of the given amount of gasoline. Next, you need to flush the system, change gears one by one, and repeat this procedure several times;
- Finally, the oil is drained and 1.2 liters of new transmission fluid is poured;
- the motor is activated, the gears are switched again one by one;
- check the oil level. If there is a deficiency, it is necessary to top up.
It should be noted that if you do not have a syringe, you can fill in new transmission oil through the gear shift lever. However, in this case you need to remove the installed rubber boot and unscrew the lever. Before you start adding fluid, you need to warm up the gearbox.
Low oil level is dangerous. This is the reason that transmission elements begin to experience high loads. The consequence of this is their premature wear. In addition to this, a low level of transmission fluid leads to a sharp reduction in the life of the power plant.
When to flush the crankcase? Flushing the gearbox housing is important if metal particles were noticed in the drained used oil. You can check the oil level in the box yourself using a dipstick, which has several notches, which accurately determine the amount of oil in the gearbox. The dipstick has a maximum value, which shows the maximum permissible amount of fuel.
Adding new oil to the existing old one is allowed, but mixing oils of different brands will negatively affect the functioning of the transmission system.
The question of how much oil is in the gearbox is still a question, although the gazelle is not a new car for a long time. Indeed, there are technical parameters, it would seem, how much oil is not only in the box, but also in other units with which the gazelle is equipped is quite understandable, but in fact, this is a little wrong.
From the manufacturer’s point of view, all the necessary volumes are well documented, for example, the Gazelle 406 cooling system will hold exactly 11 liters (if it has not undergone modifications), and how much oil the Gazelle will use in the gearbox can only be found out at the service when replacing it.
Let's try to figure out how much oil is in a gazelle box, and at the same time let's try to figure out which oil is better.
9.3. Checking the coolant level in the expansion tank
Check the coolant level in expansion tank 2 (Fig. 9.4) only on a cold engine. The fluid level in the expansion tank must be no lower than the MIN mark and no higher than the upper edge of the clamp. Add coolant through the expansion tank hole, closed with a plug. When frequently adding fluid, it is necessary to check the tightness of the cooling system.
Rice. 9.4. Checking the coolant level in the expansion tank:
1 – plug; 2 - barrel
Why does the oil volume in a gazelle gearbox depend, and why are the numbers different?
In fact, according to technical data, the oil volume in a gazelle gearbox ranges from 1.2 to 1.6 liters, depending on the modification. But not everyone is aware that the gearboxes themselves differ even within the same version of the gazelle, and that is why the oil volume can vary within certain limits. In fact, no matter how much a new gazelle costs, the box on it will be one of three. And regardless of the other data, 2 liters for changing gearbox oil is enough for all options.
Fluctuations in volume depend on the number of gears, the size of the drive gears and some other factors; ideally, the volume approximately corresponds to what the manufacturer claims. But don’t be surprised if the service asks you to pay not 1.6 but 2 liters. You won't get rich with 400 grams of oil, even if it is very high quality oil. Speaking of oil, what is the best oil for gazelles?
A few notes on choosing oil for gazelles.
When servicing a gazelle yourself, there are several operations, for example, replacing the rear spring with a gazelle, during which, among other things, you can also service the rear axle (which will never be superfluous), and some particularly advanced “specialists”, realizing how much oil is in the gazelle axle, purchase one 4-liter canister directly to the checkpoint and bridge. This, of course, allows you to save money, but it is the wrong decision.
Firstly, there are manufacturer recommendations, and you should not neglect them. If GAZ recommended gearbox oil with certain characteristics, you can purchase a more expensive and high-quality oil, but not a cheaper one. Secondly, the gearbox and the bridge operate under completely different conditions, both in terms of load and thermal conditions. Thirdly, if the crankshaft can turn the gearbox shaft in cold weather, even if the oil has “frozen,” then the gearbox will definitely not be able to “turn” the axle.
What does it mean? This means that gearbox oil must be more durable, less viscous and resistant to sub-zero temperatures. Seems obvious. But axle oil should be even more frost-resistant and at the same time more viscous. There is no paradox here - these are units that work in the “counter direction” and we must keep in mind that the start of the checkpoint is not the start of the “bridge”, and a beautiful canister is not always a good thing. This is why gearbox oils must be chosen not from brands (it doesn’t work for a gazelle - we don’t have the same clearances yet), but from experience. Search forums on the Internet, chat, many will not refuse advice for a specific gearbox and mileage figures, and at the same time they will tell you which oil to choose for the axle. Well, if you find a colleague with exactly the same car, he will tell you exactly how much oil you need to pour into the gearbox.
Oh yes. When changing the gearbox oil, do not forget to leave exactly what you filled in for topping up - half a liter (or better yet, a liter, so that it will last for a long time). After 3-5 thousand kilometers you will have to top up, and it’s better to top up exactly what you filled in.
If you are the owner of a Gazelle, you should know that your car got its gearbox from a Volga. Everything would be fine if these vehicles performed the same tasks and carried identical loads. Unfortunately, it is not. The Volga is a passenger car aimed at transporting passengers, and the Gazelle is a freight vehicle that has to carry heavy loads. Of course, the manufacturer has subjected the Gazelle’s gearbox to minor modernization, but still you, as the owner, should worry about making its operation easier and maintaining conditions that ensure its normal functioning.
During preventive maintenance, it is necessary to check the oil level in the Gazelle gearbox.
One of these preventive actions is in the Gazelle at the checkpoint. It doesn’t matter if you don’t have the necessary information and have never performed such manipulations before. We will list all the main stages and help you figure out in what order you will need to take certain steps.
9.11. Tools and accessories
When selling the car, a tool kit is included, which includes: a wheel wrench, a wrench and a jack.
At the customer's request, it is possible to equip the car with a tool bag with an additional set of keys: a balloon wrench, a combination screwdriver, a key for adjusting the rear wheel hub bearings, a key for fastening the front wheel hub cap, a key for turning the engine crankshaft and adjusting the front wheel hub bearings, a socket key for fastening the housing thermostat, socket wrench “5”. The tool bag is located under the passenger seat.
The jack is applied to the car in a cardboard box and placed under the driver's seat.
In the cabin, on the floor between the driver and passenger seats, there are fire extinguisher mounting parts.
Transmission fluid replacement process
Inexperienced car owners often make serious mistakes by ignoring the process of replacing transmission fluid and believing that such actions are not important and only require unnecessary waste. Another category of car owners listens to the recommendations of specialists, but purchases oil from a car store at the lowest price, without taking into account the necessary parameters. In both the first and second cases, Gazelle owners often have to deal with gearbox failure. For this reason, we recommend that you not only agree with the importance of replacing the transmission, but also thoroughly study the sequence of actions and their features.
Oil change interval
You need to constantly monitor your car, but this does not mean that you need to check the oil in the gearbox every day. Experts recommend doing this by draining the waste and pouring new oil into the Gazelle’s gearbox after another multi-thousand-mile “run”. In particular, if the car has covered 60 thousand kilometers, then plan to carry out such an important technical task.
At the same time, it is recommended to check the oil level and its condition after a run of 20 thousand kilometers. If you find that the oil level has dropped to a critical level, you can take timely action to prevent the development of dangerous problems that disable important components of your vehicle.
Checking the oil level in the gearbox
Do not think that the Gazelle checkpoint is so difficult that it will be impossible to cope with such a task on your own. If you decide to check the oil in the Gazelle box yourself, please note that such a check must be carried out before driving the car or after the trip, but after a certain period of time (at least five minutes). Otherwise, the test result will be inaccurate. So, initially place the car on a horizontal surface, wipe the surface around the filler hole with a rag. After this, unscrew the plug and look where the upper oil level is.
Important
until it touches the bottom edge of the filler hole. If you find that the transmission fluid level is low, take care to add a small amount of oil.
Which oil to choose
It should be understood that it is strictly forbidden to pour any transmission oil into the box. Each gearbox needs to be filled with oil with certain technical characteristics specified by the factory. Manufacturer's recommendations can be found by turning the pages of the technical manual. It is clearly stated here which oil is best to fill in the Gazelle gearbox. It is recommended to choose oil brands that are marked with SAE 75W viscosity. Do not skimp on purchasing gearbox oil, because when the air temperature rises or falls, the transmission fluid can undergo significant changes, preventing the gearbox from rotating the crankshaft normally. Most car owners prefer to pour Castrol 75w-140 or Total 75W-80 transmission fluid into the Gazelle box. We also recommend that you choose this kind of oil.
How much lubricant to pour and what is needed to change
The next question that you may have actually causes difficulties for many Gazelle owners, since the manufacturer itself is silent in the technical documentation and does not specify how much oil is poured into the gearbox. It is for this reason that some car owners decide to purchase a certain amount of oil at random from the Gazelle gearbox. Unfortunately, this is not a good practice, because during the replacement process there may be a shortage of transmission fluid, as a result of which you will not be able to successfully complete the process. It would also be unwise to purchase a large amount of oil in reserve, since in this case you will have to incur serious financial losses. Depending on the modification of the vehicle, you may need 1.6 - 1.8 liters of transmission fluid.
We recommend that you purchase it with a small supply, at least 2 liters, then you will definitely not experience a shortage of oil during the procedure. Unfortunately, purchasing a TM alone is not enough; you also need to prepare some tools that will ensure the precise execution of your every action.
In particular, prepare:
- a set of keys;
- syringe for filling lubricant;
- acetone;
- rags;
- a container in which you can collect waste;
- diesel fuel or kerosene.
Changing the gearbox lubricant yourself
Before you proceed directly to the Gazelle box, you will need to warm up the unit to make the oil fluid more fluid. Start the engine and let the Gazelle run for a few minutes. If you don’t want to just waste time and waste fuel resources, then take a ride in a car and solve some of your pressing problems. After this, drive the Gazelle into the hole and use a hexagon to unscrew the drain plug.
Oil will immediately begin to flow out of it, so make sure that you can immediately place a container into which the old oil will flow. This process will take about half an hour, you still won’t be able to speed it up, so find some other activity during this time so as not to get bored. After the waste has drained, inspect it carefully. If you notice traces of metal shavings in it, then you will need to resort to flushing the gearbox. There is nothing complicated in this procedure. Just screw on the drain plug and, on the contrary, unscrew the filler plug. Using a filler syringe, pour about one liter of oil and 300 g of diesel fuel into it; by the way, it can be replaced with kerosene.
Next, start the engine, engage first gear and let the engine run for a few minutes. Don't forget to put something under the front wheels. After this, we repeat the draining procedure, which will last about fifteen minutes. We tighten the drain plug and through the filler hole. To allow it to spread well throughout the unit, we recommend not just driving the car at idle, but driving it for a certain distance. At the end of the trip, check the transmission fluid level. If you suddenly find that the level has dropped, then simply add a small amount of oil.
So, we hope that the process of replacing transmission fluid will not cause any particular difficulties, even if you do everything yourself. Concentrate and strictly follow the recommendations, in this case you will definitely succeed.
Monitoring the oil volume in the GAZelle gearbox is a mandatory measure necessary to ensure high-quality protection of parts from rapid wear, damage and increased friction. This will require knowledge of the sequence of work and the criteria for selecting a high-quality lubricant mixture for the gear shift system.
9.4. Checking the brake fluid level in the master cylinder reservoir
Check the brake fluid level in the translucent reservoir of the master cylinder visually using the marks on the reservoir body. With new brake pads, the fluid level should be at the MAX mark. If the hydraulic brake drive is working properly, then a decrease in the fluid level in the reservoir is associated with wear on the brake pad linings. A drop in the fluid level to the MIN mark indirectly indicates extreme wear of the linings. In this case, the linings must be replaced, but there is no need to add liquid to the tank, since when installing new linings, the liquid level in the tank will rise to normal.
The emergency brake fluid level warning light comes on when the fluid level in the reservoir drops below the MIN mark, which, with new or partially worn brake linings, indicates a loss of system tightness and a fluid leak. In this case, adding fluid must be done only after the system’s tightness has been restored. After adding brake fluid, it is necessary to tighten the reservoir cap with a torque of no more than 0.14 daN×m (0.14 kgf-m).
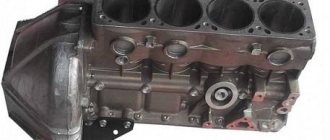
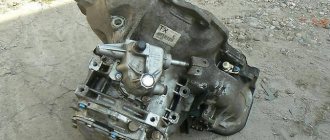
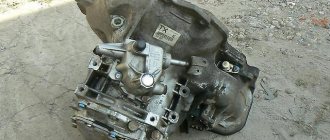
How the box works
GAZelles are equipped with 4- or 5-speed manual transmissions. Components of the device:
- 2 aluminum crankcases connected by 100 bolts;
- speedometer drive gear;
- primary and secondary shafts connected to the cardan and crankshaft;
- an intermediate shaft on which the cut reverse and 1st stage teeth are located;
- pressed gear block;
- inertial synchronizers;
- reverse gear is provided by a gear block;
- clutch for engaging 3rd and 4th gears;
- system for blocking simultaneous launch of several speeds;
- spring-loaded balls for fastening different levels of the box;
- mechanism of the damper device of the lever and control elements.
The design of the unit allows for timely diagnosis of the first signs of malfunction to prevent more dangerous failures.
Specifications
Key characteristics of the gearbox of GAZelle cars:
- 4- or 5-speed transmission;
- 5 speeds - 1 reverse and 4 forward.
For the transmission, the following parameters can be noted:
- three-way lever located in the assembly;
- the mass of the part is 56 kg;
- oil tank capacity - 3 l;
- gear ratios for five stages - 6.55; 3.09; 1.71; 1; 7.77.
- The fourth stage in the gearbox is direct.
Basic models of the device assume the presence of synchronizers in the mechanism to ensure reliable operation.
Gear shift diagram
The gear scheme on the GAZelle is distinguished by the presence of a synchronizer. Moving the lever from the neutral position to the left side causes its lower part to move the shift rod and fork. This causes the first stage gear to move backward and come into contact with the first gear element located on the intermediate shaft. When the clutch is running, torque is transmitted through gears and intermediate elements to the secondary shaft.
The inclusion of the third speed is due to the movement of the lever from the neutral position, first to the right side, and then forward. Under the influence of the fork, the clutch begins to move backwards and the structure impacts the synchronizer. The torque follows in the direction of: the input shaft, the permanently meshed gears, the intermediate and secondary shaft of the gearbox.
To start the fourth speed, you will need to move the selector to the right and back relative to neutral. The forward movement of the clutch helps to engage the synchronizer locking ring with the input shaft. After balancing the speeds, gears are engaged. Reverse speed is started by moving the lever to the right after overcoming the resistance of the safety system.
The synchronizer is a mechanism in the form of a hub mounted on the secondary shaft of the box. The coupling moves along the splines located outside under the influence of the fork. Other key elements of the synchronizer:
- retaining springs;
- "blocking" parts;
- side bronze rings for locking the mechanism;
The work of the synchronizer is involved in engaging 3rd and 4th gears and is expressed in ensuring a smooth transition from one level to another.
How much oil to fill
Before changing the oil in the 5th mortar, it is necessary to check the current level. It is recommended to carry out such an action every 20,000 km. If there is enough oil in the gearbox, fluid is added to the crankcase.
The technical documentation does not contain data on the required amount of oil in the GAZelle box. The figure varies depending on the modification of the equipment, ranging from 1.2-1.6 liters. During work, the mixture is poured into the hole with a syringe until oil flows out of it.
GAZelle Next, GAZelle Business and other modifications of the car cannot be started with a low level of oil fluid. Small volume is the cause of air pockets, which have a negative impact on bearings and other elements of the gearbox.
9.10. Cabin (body) care
The car body (cabin) is painted with single-layer synthetic enamel or two-layer enamel, consisting of base enamel and varnish. For anti-corrosion protection and to prevent abrasive wear, a plastisol coating is applied to the bottom and wheel arches of the body (cabin).
The basis for the durability of the paintwork coating (LPC) of the body (cabin) and its anti-corrosion protection is laid during manufacturing, however, the preservation of the protective and decorative properties of the coating largely depends on timely and proper care, which consists of:
- in timely washing of the body (cabin) and treatment with polishing compounds;
- in the timely elimination of damage to paintwork and plastisol coatings;
- in periodic treatment of the body (cabin) with protective compounds.
In this case, you must be guided by the following rules:
- The body (cabin) of the car must be washed periodically in order to remove industrial and chemical emissions, waste products of plants, birds and animals, deicing agents, road dust and dirt that fall on it during operation and storage, since they contain chemically active substances that can with long-term or short-term exposure, destroy the paintwork.
When washing it is prohibited:
- use chemically active compounds and substances that have a negative effect on paint, for example, soda, kerosene, gasoline, solvents, sea water;
- use water containing mechanical impurities;
- Carry out washing in the cold.
It is not recommended to wipe the dry surface of the body (cabin) from dust and dirt, use too coarse brushes when washing, or apply excessive force when washing or polishing, as this leads to abrasion of the top layer and loss of shine of the enamel or varnish.
It is especially necessary to wash regularly when operating on roads treated with salt-based anti-icing agents. In this case, it is also necessary to wash the underbody (cabin) and chassis parts, since mud and salt deposits lead to corrosive changes. Considering that the flanges of the doors, hood, flange joints of the body (cabin), as well as welds are especially susceptible to the aggressive effects of salt solutions, it is necessary to regularly wash and clean these areas from accumulated salt and dirt. If salt contaminants are not removed in a timely manner, they, together with moisture, penetrate into the crevice zones with the subsequent development of corrosion.
When washing, it is recommended to use car shampoos. After washing, the outer surface of the body (cabin) must be rinsed with water and wiped dry with a soft cloth.
In order to further protect the paintwork, it is recommended to periodically treat it with polishes intended for this purpose, in accordance with the instructions of the manufacturer of the polishing agent. It is especially necessary to carry out similar treatment for cars stored outdoors.
If aggressive substances come into contact with the paintwork, they should be removed immediately, and then the contaminated area should be washed with water or special cleaners for caring for the paintwork. If the paintwork becomes damaged, it must be restored by polishing using grinding and polishing pastes or painting, depending on the degree of damage.
The most common aggressive substances include
- products of plant origin (juice, tree resin, pollen, etc.);
- bird waste products;
- operating fluids (transmission oils, brake fluid, low-freezing fluids);
- battery electrolyte;
- bitumen;
- petrol.
Dust emissions from foundries and metal processing industries, sparks from electric vehicle wires, and sparks from cutting, welding and grinding of metal also have an aggressive effect on paintwork. At the same time, particles of iron oxides, which settle mainly on horizontal sections of the body (cabin), begin to oxidize at high humidity, destroying the top film of the paintwork, creating the smallest points of corrosion products on the painted surface.
During operation, the paintwork of the body (cabin), the bottom coating, and chassis components are constantly exposed to stones, crushed stone, gravel, sand, etc. This entails various mechanical damage to the anti-corrosion protection elements (paint chips, scratches, abrasive wear).
This primarily applies to wheel arches and arches, the edges of wings, doors and sills, the surface of the hood and chassis components.
Therefore, the car must be inspected after washing and if such places are found, as well as other damage to the paintwork, they must be repaired.
Failure to promptly repair such damage to the coating will lead to under-film corrosion with subsequent peeling of the paintwork and corrosion damage to the metal.
It is necessary, depending on the operating conditions, but no later than two years after purchasing the car, to treat hidden cavities and areas of the body (cabin) most vulnerable to corrosion with appropriate protective compounds, and then regularly check and restore the protective coating in accordance with recommendations for the use of protective composition.
It is recommended to store the car in a garage or under a shed.
It is forbidden to store the car under rubberized covers or cover it with rubber products, as dark spots may form on the coating that cannot be removed by polishing, and also to cover it with waterproof films or covers during storage.
The vehicle's onboard platform (for vehicles with a platform) is painted with synthetic enamels. The rules for caring for the platform coating are generally similar to the rules for caring for the cabin.
It is recommended to wash the onboard platform at the same time as washing the cabin. Considering that the platform coating is most susceptible to damage during the transportation of goods, special attention must be paid to the timely elimination of damage.
Rice. 9.9. Diagram of zones for additional anti-corrosion treatment of hidden cavities of the body (cabin):
1 — cavities of the front doors; 2 — cavities of the rear doors; 3 — cavities of floor thresholds; 4 — surfaces between the rear wings and the wheel mudguard; 5 — cavity of the rear side members; hood cavity around the perimeter; 7 — area of rear door hinges; 8 — front door hinge area; 9 - area of the lower guide of the sliding door; 10 — area where the front wings meet the mudguard; 11 — opening of the gas tank hatch around the perimeter; 12 - connection of the roof and sidewall along the perimeter; 13 — closed cavities of the footrests; 14 - area of the front attachment point of the middle guide of the sliding door; 15 — cavity of the middle spar
Interior floor of GAZ-3221 and mod. and GAZ-2705 and mod. with two rows of seats, covered with automotive linoleum, should be washed with a damp cloth or sponge using detergents. Carpeted floors should be cleaned with a vacuum cleaner or washed with a damp cloth, sponge, or vacuum cleaner. It is not allowed to wash the floor by spraying with water, as this will lead to warping of the flooring and the formation of corrosion in the body.
The diagram of zones for additional anti-corrosion treatment of hidden cavities of the cabin (body) is shown in Fig. 9.10.