Emergency stop and turn signals are one of the most important signaling and lighting devices in a car. They are necessary for safe movement on the road and coordination of motorists with each other. If it happens that the turn signals and emergency lights of the VAZ 2114 do not work, then you cannot continue driving the car (until the breakdown is fixed).
Below we will analyze the main reasons for the malfunction of the light alarm in a car, and also tell you how to eliminate them.
Emergency signal malfunctions
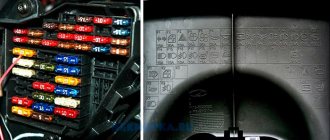
If the VAZ 2114 emergency light does not work, then troubleshooting should begin with the fuse box. To do this, you need to check and, if necessary, replace with a new one, 10 Amp fuse F2. Simultaneously with checking the fuse, you should inspect and clean the contacts in the mounting socket of the common unit (if they are oxidized, the emergency light may not work even with a working fuse).
The next step in finding a breakdown is to check the presence of voltage at contact X2/5, which is located on the mounting block (this is done using a multimeter and with the emergency button turned on).
The lack of power will indicate a break in the wire that goes from this contact to the alarm button.
If the wiring turns out to be working, then you should check the emergency light bulb and, if it is burnt out, simply replace it with a new one (the new light bulb must be suitable in power - you should not install weaker or more powerful lamps). At the same time, the contacts in the cartridge should also be cleaned.
You can do this:
- fine sandpaper;
- kerosene;
- refined gasoline;
- VD-40.
If the light bulb, wires and fuse are in good working order, then you should make sure that the button itself is working. To do this, you need to turn on the button and ring it using a multimeter.
If the button turns out to be broken, it should be replaced with a new one, since this element is not repairable.
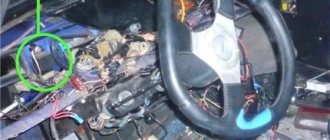
If a breakdown of the hazard warning button is discovered on the road, and the hazard warning light itself is urgently needed, then you can make do with “improvised means”. To do this, you need to dismantle the button, disconnect it from the block and connect the two sockets in the block using any metal wire, thereby closing the alarm circuit.
Another cause of failure may be the failure of relay K2. You can find out about this by indirect signs - if the relay is faulty, both the emergency lights and the turn signals will not work. In this case, the relay should be replaced with a new, similar one.
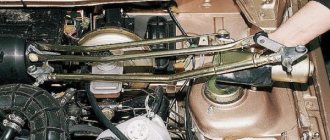
Removing the steering column
In this article we want to share with you such useful information as removing and installing the steering column. First, you should explain what a steering column in general is and what its functions are in your car.
The steering column is a specific plastic casing, inside of which the steering wheel shaft is located. One of the main functions that it performs is to guarantee safety for the driver and passengers in the car in the event of a collision with any obstacles, as well as transmitting the forces applied to the steering wheel, unhindered, simple and easy rotation of the steering wheel fork and directly ensuring strong fastening.
Diagram of VAZ 2110 steering column parts:
Let's proceed to a step-by-step description of the process of replacing this part. The work should be carried out when replacing parts and steering components of VAZ 2110, 2111, 2112 (Zhiguli) or when dismantling the instrument panel.
Turn signals don't turn on
Sometimes it happens that the turn signals of the VAZ 2114 do not work.
This may be expressed by the following signs:
- The turn signals do not turn on.
- The turn signals do not turn off.
- The turn signals don't blink.
- The turn signals light up with minimal brightness.
In the first case, there may be several reasons (they are almost the same as in the case of problems with emergency lights):
- fuse is blown;
- power buttons are broken;
- contacts have oxidized;
- there was a break in the wiring;
- the relay has failed;
- light bulbs burned out.
Checking the electrical system of turn signals in these situations, as well as eliminating detected problems, should be carried out in the same way as repairing emergency lights (how exactly is described above).
If the turn signals, on the contrary, do not turn off, then there can only be one reason - burnt out switches. They should be replaced with new ones of a similar model.
Sometimes the turn signals may turn on, but remain solid instead of blinking. The reason for this is the incorrect operation of the relay (sometimes this also happens when a device intended for other cars is installed instead of the original relay). To eliminate the cause, it is enough to replace the relay with a new one.
If the turn signals are on but not blinking, you can try gently knocking on the relay body - sometimes this can help, but the effect is usually short-lived.
In a situation where the turn signals are very dim, you should check the power of the lamps installed in them. If the lamps are suitable, then you need to clean the ground contact connected to the turn signals. This can be done with fine sandpaper or kerosene.
Replacing the steering wheel
VAZ 2110 steering column cover
To replace the steering column you need the following tools:
- long powerful knob;
- 17mm and 30mm heads;
- mount;
- ratchet handle;
- regular open-end wrench 17 mm.
Removing the steering wheel
The initial step in the process of replacing the column on a VAZ 2110 should be removing the old part. First you need to remove the steering wheel. In order to dismantle the steering wheel you will need the following tools:
- 24 mm socket wrench;
- flat screwdriver;
- 5mm hex wrench.
Work to remove the wheel is carried out in the following sequence:
The negative terminal of the battery is disconnected.
- then you need to turn the steering wheel so that the wheels are level;
- Next, you need to unscrew the screws securing the column casings (there should be seven of them) and remove the lower protection located under the steering wheel;
- then you need to unlock the steering column lever and lower the column down;
- moving upwards, remove the upper steering casing;
- use a screwdriver to pry up the decorative trim, unscrew the two screws and remove the horn button;
- Unscrew the steering wheel mount.
VAZ 2110 steering column
Before you finally remove the part, you need to remember or record with a marker its location relative to the shaft. Similarly, the position of the turn signal switch should be fixed in relation to the plastic ring. Next, sharply pulling the ring towards you with your hands, remove it from the grooves of the shaft. Unscrew the fastening nut (now completely) and finally remove the steering wheel.
Dismantling the column
VAZ 2110 knocking in the steering column
After the steering wheel is removed, you can continue replacing the steering column. You need to remove the steering column joysticks from the steering column, remove the ignition key and remove the ring trim of the anti-theft system transponder. Then, inserting the ignition key and turning it to the desired position, do the following:
- Use a thin screwdriver to tighten the locking pin through the ignition switch hole;
- remove the lock cylinder from the housing.
Next you need to do the following:
- remove the attached IMMB (transponder) block from the column;
- Disconnect the electrical wiring and transponder unit from the housing.
Removed VAZ steering wheel
After this, you need to carefully remove the speakers, covers and springs. Then remove the electrical wiring cord from the steering column, and then remove the air supply hose to the driver’s foot well and the lower sections of the instrument panel trim. Now you need to mark the position of the upper connection of the intermediate shaft in relation to the steering column, then unscrew and remove the clamp bolt. Next you need to remove the shaft from the splines.
Steering column cover VAZ 2110
To continue, you need to support the steering column and loosen the upper mounting bolts and the lower column clamp. If necessary, you can release the lower fastening without bending the grip. On models equipped with a stabilization system, pull the column up and unfasten the sensor that is installed in its lower part. Next, you should remove the column from the support bracket and remove it from the interior of the VAZ 2110 car.
Problems with turn signals: main reasons
Drivers often encounter the problem that turn signals do not work for certain reasons. This article will examine the causes of such problems using the example of VAZ cars: 2108, 2109, 21099, 2113, 2115. Each of these cars belongs to the SAMARA family, and therefore has similar electronics. In almost all cases, sign repair is an easy job. The most important thing is to determine the root cause of the malfunction. Heading 2: Turn indicators do not blink If the turn signals on a VAZ 2114 do not work - more precisely, they do not blink - then the cause of the breakdown is the indicator relay.
To fix this problem, in most cases it is enough to knock on the relay or replace it. This is usually caused by poor contact or large amounts of water getting inside. If even after replacement they do not function properly, then it is worth inspecting the contacts and fuse box. If the VAZ 2114 turn signals do not work, then you should know: the relay is located in the block. It is marked K2. It is imperative to check fuse F12, as well as inspect its contacts with the unit itself. The cause of the breakdown may also be hidden in the emergency button or switch.
When will dismantling be required?
First, you need to figure out in what cases it is necessary to remove the steering wheel. This will allow you to orient yourself in advance and prepare everything you need. It's worth noting that there are actually few reasons for doing this. This is probably the most reliable design element of VAZ cars. But such work may still be required.
First of all, the steering wheel must be removed if it is replaced. It is changed in the following cases:
- Malfunction;
Also, drivers often decide to replace the steering wheel due to loss of appearance. The reason is constant contact with the hands of the person driving the vehicle. Therefore, over time, the casing wears off, and not all drivers use the braid. In such a situation, the best solution would be to simply change the steering wheel or buy a steering wheel cover.
Another option is to replace it with another model. Essentially this is tuning, and we will consider this issue separately.
It is also often necessary to remove the steering wheel in connection with the repair of certain parts. The steering wheel is removed if it interferes with operation. For example, drivers often prefer to remove it when working on the dashboard. You will also need to remove this part when repairing the steering column.
Turn indicators do not turn on
If the VAZ 2109 turn signals do not work or one of them has stopped functioning, then there may be several reasons. It is recommended to consider each of them separately: 1. First of all, you need to check the lamp for operability. If necessary, it will need to be replaced with a new one; 2. Then you should check whether the connection contacts are working. It is recommended to pay special attention to the connections of the block, switches, and, last but not least, the indicators themselves; 3. Check if the switches are working properly; 4. Check the functionality of the relays, replace them and fuses. In the case when the turn signals and emergency lights of the VAZ 2114 do not work, the reason for this is almost always hidden in the relay. Heading 2: What to do if the turn signal does not turn off? If the indicators do not turn off on their own when turning the steering wheel, then the switch itself needs to be replaced. Heading 2: Fast Flashing If they blink too quickly, the cause is a burnt out light bulb. It is worth inspecting them and replacing them if necessary. Another factor in frequent blinking may be oxidation of the chips located on the taillights. Much less often, the cause of such blinking is the unsuitability of the tracks located in the additional block.
Problems when paying with bank cards
Sometimes difficulties may arise when paying with Visa/MasterCard bank cards. The most common of them:
- There is a restriction on the card for paying for online purchases
- A plastic card is not intended for making payments online.
- The plastic card is not activated for making payments online.
- There are not enough funds on the plastic card.
In order to solve these problems, you need to call or write to the technical support of the bank where you are served. Bank specialists will help you resolve them and make payments.
That's basically it. The entire process of paying for a book in PDF format on car repair on our website takes 1-2 minutes.
If you still have any questions, you can ask them using the feedback form, or write us a letter at l.com.
Dim burning
If the turn signals on a VAZ 2115 do not work or the light bulbs are dim, then you need to: 1. Check the light bulbs for compliance with their power; 2. Clean the mass. Heading 2: Clicking of the turn signal relay If you encounter frequent clicking of the indicators, then you should look for the problem in the additional unit, or even more precisely, in the relay contacts. They could oxidize over time and become unusable, or simply not fit tightly. Perhaps the relay turned out to be defective. In this case, it is recommended to install a factory relay.
Removing and installing the steering column
Remove the steering column only in the following cases:
- — The steering column requires replacement;
- — The steering and ignition lock housing requires replacement.
If you need to remove the steering wheel, be sure to use a puller.
Attention!
The tilt steering column is not serviceable. If the tilt steering column is defective, the steering column assembly must be replaced.
Before you begin to remove the steering column, carefully read the information about airbags in the “Vehicle Passive Safety System” section.
General description and operation of the system
The steering column consists of a steering shaft with universal joints and a steering wheel. The tilt steering column is equipped with a spherical joint that allows for tilt adjustment. The steering column also houses controls:
- — central light and turn signal switch;
- — windshield wiper/washer switch;
- — ignition switch with control blocking, ignition key blocking and engine immobilizer receiving unit. Ignition and control interlock prevents the car from being stolen.
In addition to the control function, the steering column also provides, along with the airbag, a safety function, since in the event of a frontal collision it collapses and absorbs the impact energy, thereby ensuring the safety of the driver.
Removal
Removing the steering wheel
Attention: to remove the steering wheel, be sure to use a puller. Do not try to remove it by force or impact.
1. Remove the airbag module from the steering wheel. See the section “Vehicle Passive Safety System”.
2. Disconnect the airbag module connector.
3. Unscrew the steering wheel mounting nut.
4. Remove the retaining clip.
Note. Before removing the steering wheel, place a mark on the steering column shaft and on the steering wheel where they connect to ensure correct alignment of the steering wheel when assembling and installing the steering column.
5. Using a puller, remove the steering wheel from the shaft.
6. If necessary, release the slip ring on the steering wheel.
Removing the turn signal switch and lever
7. Unscrew the screws securing the bottom cover of the steering column panel and remove the panel.
8. Remove the screws securing the top cover of the steering column panel and remove the panel.
9. Disconnect the horn and clock spring connectors.
10. Unscrew the fastening screws and remove the clock spring from the steering column.
11. Disconnect the switch electrical connectors.
12. Remove the center light and turn signal switch by pushing inward on the tabs on both sides of the housing.
Removing the windshield wiper/washer switch
13. Disconnect the switch electrical connectors.
14. Remove the wiper switch by pushing inward on the tabs on both sides of the switch housing.
Removing the ignition switch and immobilizer control unit
15. Disconnect the electrical connector from the immobilizer control unit.
16. Unscrew the fastening screws and remove the block.
17. Having inserted the key into the ignition switch, turn it to the ACC position and remove the lock cylinder, to do this, press the locking spring, for example using a screwdriver, and remove the cylinder.
18. Unscrew the ignition switch retaining screw.
19. Disconnect the wires and remove the ignition switch.
20. Remove the screws securing the key lock solenoid and remove the solenoid. Be careful not to miss the key lock solenoid spring.
21. Unscrew and remove the steering shaft terminal clamp screw.
22. Unscrew the nuts securing the steering column bracket.
23
Carefully remove the steering column
Installation
Installation is carried out in the reverse order of removal.
When assembling the steering shaft, lubricate its elements with lithium grease. Before installing the steering column, install a new steering shaft centering sleeve.
Tighten the fasteners with the following torques:
- steering shaft terminal clamp screw - 22 Nm;
- steering column bracket mounting nuts - 22 Nm;
- tilt adjustment lever screw - 4 Nm;
- key lock solenoid mounting screws - 2 Nm;
- ignition switch locking screw -2Nm;
- ignition switch housing mounting screws - 4 Nm;
- screws for fastening the immobilizer control unit - 2 Nm;
- clock spring mounting screws - 3 Nm;
- screws for fastening the upper and lower covers of the steering column - 3 Nm;
- steering wheel mounting nut - 38 Nm;
- airbag module mounting screws -11 Nm.
Source
Turn signals are dim
- Check the lamps for correct wattages and models.
- Clean the ground on the turn signals.
Checking the serviceability of the turn relay
And so let’s look at what to do if the turns of a front-wheel drive VAZ, except for the 2170 Priora, do not work. The operation and troubleshooting of which was discussed in the article “Prior Turning Relay”.
First, make sure that the measuring instruments and control lamps on the instrument panel are working. If they do not work, then check the fuse.
If the devices are working properly, turn on the hazard warning button and check that all the lamps in the direction indicators are blinking. This will allow you to divide the circuit into two parts and speed up troubleshooting.
If the alarm does not work when turned on, then it is necessary to check the serviceability of the turn and alarm relay and the presence of power at its terminal 49. The pin designation is marked on the bottom of the relay, next to the contact legs.
We remove the relay, which is marked in the form of a triangle on the top of the case, from the mounting block, and in the vacated socket, using a test paw, check for the presence of a plus on pin 49. We connect the test lamp to the ground or minus of the battery, and with the other end we touch pin 49, when If the hazard warning button is on, you do not need to turn on the ignition. Lack of power indicates a faulty fuse, alarm button or broken wires, contact tracks of the mounting block and poor contact in the connectors.
If there is a plus on the terminal, then connect terminals 49 and 49A with a copper wire. If the connecting wires and connectors are in good condition, all the direction indicator lamps should light up. This indicates that the turn signal and light signaling relay is faulty. If the lamps do not light up, but there is a plus on pin 49, then there may be a short circuit in the signal lamp circuit and the fuse has blown. A short circuit can also cause the relay to fail. In this case, check the serviceability of the fuse, and if it blows, eliminate the short circuit in the signal lamp circuit.
Checking the hazard warning button.
If the hazard warning lights are working, then the turn signal and hazard warning relays are working properly, but the fault may be in the hazard warning light button. First, check the plus, as described earlier at pin 49 of the relay, with the hazard warning button off and the ignition on.
If there is no plus, then you need to check the serviceability of the alarm button. To do this, you need to remove the button from the socket by prying it off with a thin screwdriver or remove the instrument panel visor. In the contact connector of the button, use a test lamp to check the presence of power at pin 2 (the numbering of pins on the button near the contacts) with the ignition on. If there is no power, repair the broken wire from the instrument panel to the button. If there is power, connect pin 2 to pin 5 in the button socket, with the ignition on, and turn on the direction indicators of either side. If the warning lights on this board light up, replace the faulty hazard warning button.
Removing steering column switches Renault Logan
Remove the upper steering column cover, overcoming the resistance of two clamps. Remove the lower steering column cover. Fastening elements for steering column covers: Therefore, the car uses a device with a so-called spiral cable, which works on the principle of a tape measure.
We first remove the upper part, unfastening the latches along the way. Then remove the lower part of the casing.
Here you should see why we turned the steering wheel 90 degrees. The electric switch itself is attached to the steering column using two Phillips screws. We unscrew them and remove the connector that is attached to the switch.
Having removed the lever assembly, we carefully inspect it, especially paying attention to the wires. I could immediately see that the black and red wires were broken, soldered to the pin, which is located inside the lever itself
This pin rotates when switching lights and dimensions. And the wires are breaking.
Check and replacement
Moreover, they are really rigid and not flexible. Switch Pin To remove the switch pin, you must first disassemble its housing. The figure below shows what needs to be unscrewed and which latches to unfasten: Switch body Then you need to remove the horn button.
Renault Logan replacement, repair (sound signal) of the left steering column lever with your own hands
In the body of the left part itself there is a so-called contact pin with wires, which also needs to be removed after all manipulations. Using a tester, it is necessary to identify an open circuit or other malfunction, and use a soldering iron to eliminate it, thereby bringing the part into working condition without replacing it. Let's summarize: As a result, the process of repair and replacement does not take much time, if you have sufficient skill to carry out repair work.
The simplest thing is to replace a failed Logan part with a working element. In order to remove it, you need to release the fasteners. Then the base of the part must be turned over and the terminal part to which the Renault Logan wires are connected from the lever is removed. There are five castles there. Inside the element there are two small sliders that turn on the turn signals and headlights.
It is secured with two locks. To remove it, you will need a thin object, such as a scalpel or knife, which should be inserted into the groove. Disconnect the negative terminal from the battery.
Remove the steering column cover. Unscrew the steering column switch from the base and disconnect the terminal by pressing the petals from the sides. We inspect the switch, determining the scope of work.
There are several wires coming out of the switch.
We need black and red. Because they most often fail. For example, my black wire broke off right at the switch pin. And it was not possible to solder it right away.
Therefore, we had to completely disassemble everything. In the photo, the wires are already soldered instead of the factory ones - the arrow indicates the location of the breakage.
Turn signals do not work on VAZ-2114
Problems with turn signals can occur both in VAZs with a carburetor engine and in models with an 8-valve injector. It gives more power to the engine and other benefits, while making troubleshooting more difficult.
A turn signal may not work well most often due to burnt out electrical contacts or if the integrity is damaged (a problem with the sealant). The instrument panel may indicate that there is a problem. You will notice a discrepancy between the signal and the turn button: the presence of a flashing headlight.
This malfunction is considered simple, but relatively common. If you figure out why this happened, then carry out the repair yourself and without any problems. The electronics here are simple and accessible to any driver who is minimally familiar with the operation of electrical circuits and has attended physics classes at school.
Dismantling and replacement
We have already decided on the reasons and available steering wheel options for the “ten”. Therefore, it’s time to get rid of the old device and install a new steering wheel in its place.
- Disconnect the negative terminal from the battery. This way you can avoid a possible short circuit in the steering wheel wiring.
- Check if your wheels are level. Place it as level as possible in order to simplify the reassembly process for yourself.
- Unscrew the seven fasteners that hold the steering column housing in place, and then remove the steering column lower housing.
- Unlock the column position adjustment lever.
- Lower the column down.
- Moving it gradually upward, remove the upper casing.
- There is a decorative trim on the steering wheel. You need to pry it off with a flat screwdriver.
- You will see two fasteners that hold the signal button.
- Unscrew them and remove the button.
- Use a socket wrench or socket to remove the retaining nut from the steering wheel. Do not unscrew it all the way, which will allow you to safely remove the element. It should be recalled that there is a hard landing here due to the associated qualities. If you completely remove the fasteners, you risk severely damaging yourself or the car itself with the steering wheel being removed.
- Before removing the steering wheel, be sure to apply the appropriate marks. You need to mark the location of the steering wheel relative to the shaft and the turn signal switch.
- Now apply several gentle but firm blows with your palm to the steering wheel in the direction away from the dashboard.
- After this, the device will be able to come out of the slots.
- Next, unscrew the fastening nut.
Reassembly
If you have selected a new steering element suitable for your VAZ 2110, there should be no problems with reassembly.
Otherwise, simply follow the dismantling instructions, working in reverse order. This will allow you to install the new element that you have chosen for yourself without any problems. To be more precise, for your car.