Ball joints are consumables that are difficult to dismantle without special equipment.
The landing unit is constantly under force pressure, as a result of which the metal parts literally stick to each other. Universal pullers are not always suitable; the design of suspensions on different cars differs from each other.
Even in the same vehicle, different mounting designs may be used on each suspension arm. Buying several sets of equipment is too expensive, so many craftsmen prefer to make a ball joint remover with their own hands.
What are ball joints used for?
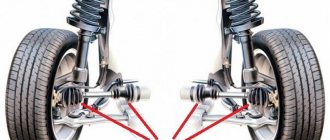
The configuration of the car's suspension (especially the front) must ensure a strictly horizontal location of the wheel rotation axis relative to the road. In this case, the hub is a turning unit.
Engineers are faced with a difficult task: the hinge must have freedom of movement of at least 180° in all planes. Ball joints serve precisely to give mobility to the suspension while maintaining strength characteristics.
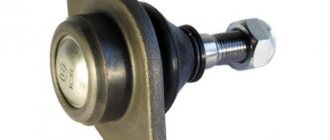
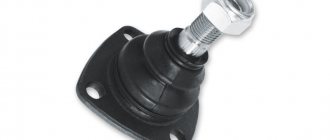
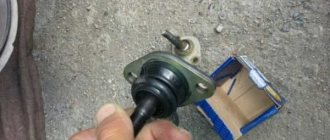
The unit is a threaded steel shank that is attached to the hub knuckle. At the end of the shank there is a hinge in the form of a ball in a spherical shell.
Puller design
In order to press the hinge out of the suspension, serious effort is required. Some car owners simply knock out the shank with a sledgehammer, which risks damaging the threads.
To facilitate dismantling, a ball joint remover has been invented, with which you can create force without shock load. To understand how to make a device with your own hands, consider various options:
The illustration shows a screw-type ball joint remover.
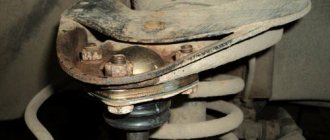
- The hinge pin (1) is tightly installed in the steering knuckle housing (2).
- The puller bracket (3) is placed on the fist.
- Using the screw stop (4), the necessary pressure is created on the finger.
The advantage of the design is that the puller’s uniform and directed pressure on the ball joint avoids distortions and damage to the unit. Disadvantage - the tool can only be used if there is free space above the fastening nut.
Despite the complexity of the design, such a ball joint remover can be made with your own hands. You will need:
- steel sheet with a thickness of at least 4 mm;
- bolt with a strength class of 9.8 and higher;
- a nut, or a threaded bushing turned on a lathe;
- welding machine, grinder.
The design and dimensions of the puller are developed for a specific ball joint; the device is not universal.
If the installation location of the ball joints is quite compact, you can make a puller from a piece of pipe by welding plugs with holes at the ends. A thrust nut is welded to one of them.
Alternative method
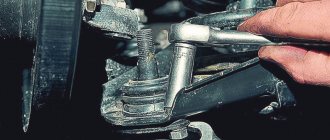
Finally, we note that it is possible to press out the support pin or tip even if it is not possible to make a removable mechanism. But this method should be used only in extreme cases. To remove the finger you will need a pry bar and a hammer.
The pry bar is used as a lever and must be installed in such a way as to create a force to press the support or tip, for example, place it between the steering rod and the rack eye.
After creating force with the mount, it is necessary to apply powerful blows to the body of the eye with a hammer. If everything is done correctly, then after 2-3 hits the finger will pop out.
The disadvantage of this method is that the eye can be damaged due to shock loads, so it is advisable to use pullers rather than knock out the support.
Source
Wedge type puller (or fork)
The illustration shows the factory version.
Working with such a puller requires physical effort. The longer the lever, the easier it is to dismantle the hinge.
The principle of operation is simple: a wedge is driven between the ball body and the suspension arm, then the lever is used to tear off the shank from the seat.
A serious drawback of the device is the possibility of damage to the suspension arm. The ball joint boot also breaks, so it cannot be reused.
Such a puller can be made from a 12-16 mm steel circle. You will need a welding machine and the work of a blacksmith. It is better to give the wedge-shaped “fork” using forging: if you simply grind off the metal, the strength will be lost.
After final processing of a homemade puller, it must be hardened. The steel is heated to a crimson color and immersed in water or oil.
Additional Tips
It is recommended to tighten the bolts and nuts with a certain force using a torque wrench. Information about tightening torques can be found on the Internet on thematic sites. If you don’t have such a key and don’t plan to buy it, just be careful. Excessive force can strip threads and loose threaded connections can compromise safety. Use moderation.
If necessary, clean the removed bolts and nuts with a metal brush, treat them with Liquid Wrench, and lubricate them with graphite lubricant. This will prevent souring and make work easier in the future.
After any intervention in the suspension system, it is recommended to have the wheel alignment done at specialized service stations.
| SHARE: |
Lever puller
Unlike a screw, the fixture uses both the force of the thread and the lever.
The operating principle is visible in the illustration:
The lever arm relative to the hinge axis increases the force on the thread at least twice. The ball pin breaks off more evenly. Thanks to the offset hexagon, the suspension elements will not interfere with the wrench handle when tightening the bolt.
You can make a lever puller for ball joints yourself, but this will require more materials. The simplest option is two thick steel plates held together with a bolt.
A sleeve is placed in the middle: as a spacer axis of rotation (by analogy with a clothespin). With some care, the device works normally.
If you have a welding machine, it is better to make a design similar to an industrial design. The dimensions are selected in accordance with the design of your pendant.
An old open-end wrench can be useful as a donor (20-30 years ago they didn’t skimp on the quality of the metal for the tool).
Homemade ball joint remover, drawing with dimensions - video
We buy spare parts
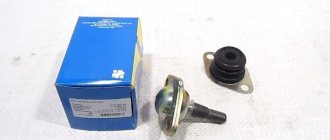
The selection of spare parts is carried out according to the VIN code of your car, which eliminates selection errors. But it wouldn’t hurt to play it safe and pay attention to the ball joint during diagnostics. On some vehicles, the left support is different from the right. When choosing a manufacturer, we listen to the seller’s recommendations. The price-quality ratio must be satisfactory. The ball joint is an important suspension element that affects driving safety, so you should not skimp on it.
Front left and right ball joints on Toyota Corolla EE90
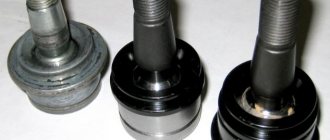
Depending on the manufacturer, a set of new mounting bolts and nuts may be included with the ball joint.
A very important point! Old fasteners quite often “sour”, which causes difficulties during dismantling. Sometimes, you can only unscrew them by deforming them. Cut threads, broken bolts, and torn edges can force you to go to the store in the middle of repair work, leaving the car disassembled. If the kit does not include new hardware, we ask where they can be purchased and whether it is possible to return the product if it is no longer needed.
How often should the ball joint be replaced?
The frequency of replacement of joints is determined in the maintenance instructions for any vehicle. However, taking into account the “quality” of roads, supports fail much more often than the established period of 40-60 thousand km.
In addition, if the rubber boot is damaged, moisture and dirt get inside the hinge. If you don’t notice the gust in time, the unit will fail after a few hundred kilometers.
Wear is diagnosed by the presence of play and the characteristic knock of the suspension. It is recommended to regularly check the condition of the joints, especially after driving on broken asphalt or in off-road conditions.
Tem. It is known who repairs a car on their own in a garage. that many types of work can hardly be done without devices, in particular without pullers. In stores they can usually be purchased by pre-order, the fulfillment of which sometimes takes quite a long time. The price of this mechanism is also considerable.
With the help of homemade devices offered to the attention of readers, you can remove the pins of ball joints from the conical holes of the levers and rods without damaging the parts. Moreover, the pullers are almost universal and are suitable for repairing the corresponding (and other) components of most cars. and not only cars.
The material for making pullers can be selected and purchased at any collection point for ferrous scrap metal.
Step-by-step manufacturing instructions
The device for removing ball joints is quite complicated, but if you follow the step-by-step instructions, you can do it yourself:
The finished device is suitable for emergency and planned replacement of ball joints on Zhiguli and Lanos, as well as some brands of foreign manufacturers.
The manufactured puller is not universal and cannot be used for different components, but if you succeeded in doing it the first time, then subsequent versions will be much easier.
For 15 years I have been repairing various types of cars, including brands such as VAZ, UAZ, Chevrolet, Mazda, Kia and many others. Everything related to the gearbox, engine or chassis. You can write me your question below in the comments and I will try to answer it in detail.
Source
Screw puller for removing ball pins
The main parts of the puller are made of steel strip with a cross-section of 18×3 mm and a total length of 460 mm. A round rod with a diameter of 18 mm is also suitable, but it needs to be modified: parallel edges with a distance of 13 mm between them should be milled or filed on opposite sides. To make a puller, you will need, in addition to the usual tools (a hacksaw, files, pliers, etc.), a grinder and a welding machine.
The design of the puller is simple and clear from the drawing and photographs.
The bar (upper part) is welded from two strips with a cross-section of 18×13 mm (although you can choose one of the same dimensions). The length of each strip is 95 mm. In the strip, almost in the center, there is a threaded through hole M12, and at the end there is a groove cut out 20 mm long, 13 mm wide and 2 mm deep for a fixing screw M12x55 (so that the strips do not rotate relative to each other). The wedge fork (lower part) is welded from three strips: two strips 95 mm long at the edges, in the middle there is a strip 55 mm long. On the workpieces at the welding points, we first remove a 3x45° chamfer along the entire length. Welds should be tapped and cleaned.
Puller drawings. Repair equipment. Tool
This topic will provide drawings of pullers and devices for car repairs, as well as drawings of special tools.
The following drawings are currently available:
Drawing of the front suspension strut rod nut remover.
Drawing of a universal screw puller for steering rod pins.
Drawing of spring ties for front and rear suspensions.
Drawing of a puller for pressing out the silent block of the rear suspension shock absorber.
Drawing of a puller for pressing in the silent block of the rear suspension shock absorber.
Drawing of a wheel bearing puller for the front and rear wheels.
Drills for knocking out wheel bearings
Photo of drifts for knocking out a wheel bearing
Mandrels for pressing in wheel bearings
Photo of mandrels for pressing in the wheel bearing of the front and rear wheels of VAZ-2108, VAZ-2109, VAZ-21099, VAZ-2113, VAZ-2114, VAZ-2115. The photo also shows rings from old wheel bearings, they also help with pressing.
Drawing of a puller for replacing rubber-metal hinges of the rear beam.
Replacement of rubber-metal hinges of the rear beam
Photo of the puller
Drawing of a puller for replacing the silent blocks of the front suspension arm.
Photos of the puller
Puller for replacing silent blocks of the front suspension arm
Device for compressing brake cylinders.
The brake cylinder compressor is made from old brake pads. Everything seems to be visible in the photo.
Photo of a device for compressing brake cylinders.
Drawing of brake cylinder compression device
Source
Fork puller
For those who don’t have money, machines, or even good metalworking skills, I suggest making a very simple and reliable puller yourself.
Material: steel rod with a diameter of 18 mm. The puller is welded from three parts in the form of a fork. For manufacturing you will need a grinder (although you can get by with a hand hacksaw for metal and a large bastard file) and a welding machine (if you don’t have one, you can turn to a welder even of low qualifications).
The operating principle of the puller is very simple. First, unscrew the nut from the ball pin. We insert the puller fork between the lever and the rod as far as possible (all the way) and hit the pin with a hammer. If necessary, repeat the blow until the rod of the ball pin comes out of the conical socket of the lever.
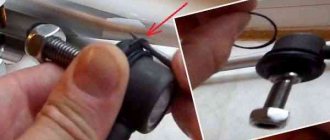
Homemade ball joint remover: 19 photos of step-by-step DIY production.
We bring to your attention a homemade device - a puller for ball joints made by craftsman Alexander Pankov.