Today, I bring to your attention step-by-step instructions for replacing ball joints on a VAZ 2107, with a detailed description of the process supported by informative photos. The replacement of ball joints by specialists has been worked out to the point of automation and has changed only slightly over the years thanks to new tools and capabilities.
The VAZ 2107 ball joint is replaced using an inspection pit or a lift in my case. When starting any repair work, take care of your own safety. If you are going to work in an inspection hole, install wheel chocks, tighten the handbrake and engage second gear. Working on a jack alone without the safety measures described above is strictly prohibited.
So, if you are ready, I suggest you start.
Purpose of ball joints VAZ 2107
A ball joint (BJ) is an ordinary hinge built into the VAZ 2107 suspension and allows the wheel to move only in a horizontal plane. At the same time, it limits the possibility of wheel movement in the vertical direction.
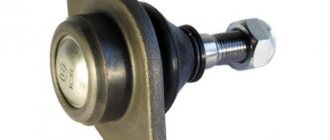
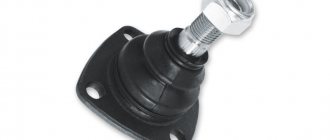
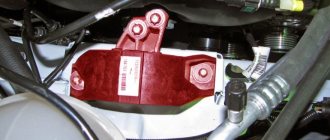
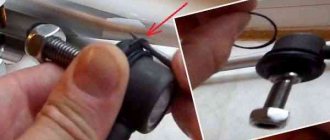
Ball joints on the latest versions of the VAZ 2107 have become more compact
Ball joints of the VAZ 2107 are very short-lived, so they have to be changed often.
Design of ball joints VAZ 2107
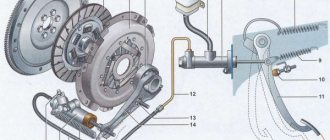
Previously, passenger cars did not have ball joints. They were replaced by bulky king pins that had to be lubricated frequently. The mobility of such compounds left much to be desired. This, in turn, negatively affected the car's handling. The designers of the VAZ 2107 abandoned the kingpins and installed ball joints. The first SHO consisted of:
- housings;
- ball pin;
- springs;
- anther
The finger was pressed into a fixed eye, fixed with a powerful spring and covered with a boot. This structure also needed to be lubricated periodically, but quite rarely (about twice a year). The lubricant on the pins had to be changed every week.
Modern ball joints do not use springs
Subsequently, the VAZ 2107 SHO was constantly improved:
- the spring disappeared from the structure;
- the steel boot was replaced with a plastic one;
- the fixed eyelet in which the finger was fixed became more compact and received a plastic external finish;
- SHOs have become non-separable, that is, practically disposable.
One driver I know assured me that he had found a great way to extend the life of plastic boots. Before installing new ball joints, he always applied a thick layer of silicone ointment to the boots, which car owners use to prevent the rubber bands on car doors from freezing in winter. From his words, it turned out that the anthers after such a procedure become practically “indestructible.” When I asked how an ointment intended for rubber could improve the quality of plastic, I was recommended to just try it and see for myself. Unfortunately, we never got around to it. So I leave it to the reader to check this driver’s find.
Reasons for failure of VAZ 2107 ball joints
The main reasons for SHO failure are as follows:
- Alternating shock load. As a result, the ball pin pressed into the suspension eye is destroyed. The support is designed in such a way that the shock loads on the pin ball are very high. When the quality of roads is poor, these loads increase manifold. In such conditions, even a high-quality SHO will not be able to fully exhaust its resource.
- Lack of lubrication. Under the influence of shock loads, the lubricant is gradually squeezed out of the SHO. In addition, over time, the lubricant loses its original properties.
- Anther destruction. The boot protects the hinge joint from dirt. If a crack appears in it, the dirt that gets into the joint turns into an abrasive material and grinds down the surface of the ball pin.
Dirt gets into the joint through a crack in the boot and wears down the surface of the ball pin.
Signs of malfunction of VAZ 2107 ball joints
The main symptoms of a VAZ 2107 SHO malfunction include:
- Extraneous sounds. While driving, a knocking or grinding noise begins to be heard from the wheel. This is especially pronounced on uneven roads at a speed of about 30 km/h and is usually a consequence of partial destruction of the ball on the support pin.
- Wheel rocking. When accelerating, the wheel begins to sway slightly in different directions. This happens due to the backlash that occurs in the SHO due to its wear. The situation is quite dangerous, and the backlash must be eliminated quickly. Otherwise, the wheel may turn at a right angle to the body at speed.
Play in the ball joint causes the front wheel to sway, which can spin out at speed. - Grinding and squeaking noise when turning the steering wheel left or right. The reason is the lack of lubrication in one of the SHOs (usually only one of the supports fails).
- Uneven wear on front and rear tires. This can happen not only due to faulty SHOs. The cause of uneven wear may be incorrectly adjusted camber and toe-in, insufficient or excessive air pressure in individual wheels, etc.
About other manufacturers
As mentioned above, the production of high-quality ball joints requires serious costs. And this cannot but affect the final cost of the product. Therefore, there are only four large manufacturers of supports for the VAZ 2107, and all of them are listed above. Of course, there are smaller companies that offer car enthusiasts ball joints at almost half the price. But any sane person understands: if a ball joint costs half as much, it means that the manufacturer saved on something during its manufacture. Most often, savings are made either on ultrasonic analysis of rod blanks or on heat treatment. Neither the first nor the second bodes well for the buyer of the support.
Cheap ball joints have a very short service life
And if the car owner is of sound mind, then he will not react to a temptingly low price and save on a detail on which his life literally depends. It is for this reason that little-known manufacturers of cheap supports will not be considered in this article.
Here we should mention another unpleasant thing: fakes. Recently, ball joints from well-known brands have begun to appear on the shelves of car dealerships, costing suspiciously cheaply. Upon closer examination, the vast majority of them turn out to be fake, and often the fakes are made so well that only a specialist can recognize them. For an ordinary car enthusiast, the criterion for selecting supports is still the same: price. It should be approximately the same as indicated above. And if a ball joint from a well-known brand costs half as much, then buying such a part is categorically not recommended.
Video: about fake ball joints
Diagnostics of ball joints VAZ 2107
You can make sure that the cause of the grinding or squeaking is the ball joint in various ways.
- Aurally. An assistant will be needed for this. Two people rock a car with the engine turned off, simultaneously pressing on both sides of the car's hood. If at the same time an uncharacteristic sound is heard from one of the wheels, the corresponding wheel is worn out or needs lubrication.
- Detecting the backlash of the sho. The wheel, on which the support has most likely failed, is raised with a jack by about 30 cm. An assistant from the interior presses the brake pedal as hard as possible. After this, you should forcefully rock the wheel, first in a vertical plane up and down, then to the right and left. When the brakes are locked, play will immediately appear. Even if it is insignificant, the SHO still needs to be changed.
To identify play in the ball joint, the wheel should first be rocked up and down, and then to the right and left. - Inspection of ball pins. This method is relevant only for the latest VAZ 2107 models, which have special inspection holes for monitoring ball pin wear without disassembling the support. If the pin wear is more than 6 mm, the ball joint should be replaced.
What is a shock absorber
A shock absorber is a component of the suspension that acts as a damper for vibration impulses. The scope of work tasks for shock absorbers includes the following:
- elimination of vertical swing;
- ensuring vehicle stability while driving;
- ensuring good grip on the road surface.
As you can see, this part is very significant, and when it fails, it has the most negative impact not only on driving comfort, but also on driving safety, because faulty shock absorbers invariably lead to an increase in braking distance and worsen traction, which becomes very dangerous along the way.
In addition, when worn out, they cause rapid wear of other parts and systems, in particular the brake system components.
That is why it is so important to carefully monitor the condition of the suspension, and, after the working period has expired or in the event of a malfunction, replace the defective part with a new one.
We'll talk about this later, but for now let's figure out what kind of shock absorbers there are, and, since we decided to talk about such a domestic model as the VAZ 2107, which of the existing components are suitable for this car.
Types of shock absorbers
Today, three types of shock absorbers are used for VAZ cars:
- Oily. This type of unit is suitable for calm, comfortable driving for drivers who primarily value order and regularity. They work well on city roads, where traffic speed is limited and there are no treacherous potholes or potholes. But, if you prefer speed or extreme driving on country roads, then you need to look for something else.
- Gas-oil classic option. This option is ideal for speed lovers. The design of the device itself provides better protection against impacts falling on the lower part of the car during high-speed driving. True, such units are thirty percent more expensive than just oil ones, but the quality is much higher.
- Gas-oil with variable hardness coefficient. When you want to drive on the roads of distant provinces without worrying that the road will turn into a nightmare, then you should give preference to a gas-oil shock absorber of increased rigidity.
It is also worth noting that both versions of gas-oil units guarantee better controllability and the ability to maneuver on sharp turns than oil units.
The quality of the components also depends on the manufacturer’s brand: each company tries to introduce technical innovations into one or another option that significantly improve the characteristics.
So, having decided to replace shock absorbers in order to improve the technical characteristics of the VAZ-2107 car, you can turn your attention to:
Replacement
Tools:
- spanners;
- spring tie;
- jack;
- hammer;
- mount;
- a device for removing the nuts securing the stand;
- mechanism for removing the steering tip.
Work order
- You need to remove the hub cap and rip off the CV joint nut while an assistant presses the brake using a wrench or socket.
- Raise the car using a jack and remove the wheel. The factory stand should also secure the vehicle.
- With the steering wheel turned in the opposite direction from the support being repaired, you need to release the cotter pin. To do this, use a hammer, a pry bar and a steering rod puller.
- Remove the 2 ball joint mounting bolts.
- The brake hose is removed from the holder.
- Next, the 2 caliper bolts are also loosened. It must not be allowed to hang on the brake hose; it must be taken to the side and hung on a wire.
- To make it more comfortable to work with the stand removed, the nut needs to be removed, but there is no need to unscrew it completely. Then the 3 support nuts are unscrewed.
- Unscrew the CV joint nut completely and simultaneously remove both the CV joint and the strut.
- Use the device to compress the spring evenly on both sides.
- You can easily disconnect the support from the compressed spring. A new support is installed.
- Assembly is carried out in reverse order.
How to distinguish a fake?
The company has well established itself as a manufacturer of equipment. Therefore, it is important to remember: there are a large number of fakes on the market. It is not so easy to distinguish them. Nevertheless, there are a number of signs that characterize a fake:
- there is no special protective hologram on the packaging;
- The quality of the cardboard box is low, it is falling apart at the seams, there is no polyethylene on the support itself;
- the kit is not complete - there are no bolts for installation, there are no other components;
- low cost – the price in the store cannot be less than that stated on the company’s official website.
Using counterfeit products can lead to serious problems. In 100% of cases, the resource of parts is an order of magnitude less. A breakdown while driving can lead to a serious accident. It is advisable to carefully read the signs of counterfeit. This will avoid serious troubles in the future.
Repair
Replacing ball joints on VAZ 2101, 2102, 2103, 2104, 2105, 2106 and 2107
Now these critical parts are considered consumables. But even relatively recently, during times of total shortage, balls were dismountable and craftsmen restored them for reuse. Such balls on classics lasted up to 40-45 thousand. Restored parts are slightly smaller. Modern ball bearings can last up to 60-65 thousand km, but this is in the factory version and on relatively good roads. But if you come across the wrong product, you will have to change the supports much more often. And in the worst case, you have every chance of standing in the middle of the road with a twisted wheel.
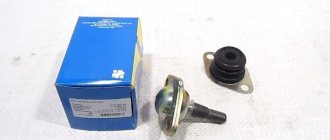
We bought products made by BelMag.
The company has been well known for a long time, and the packaging box with details and a security hologram gives hope for their authenticity. The standard tool for the job is quite enough: a jack, a hammer (weighing at least 0.8 kg) and a reliable stand. Those who oppose sledgehammer methods will also need a special puller (see below).
The main thing is to choose the most suitable replacement method for you.
When pressing out ball joints on a VAZ 2101-2107, it is possible to use the three most common methods.
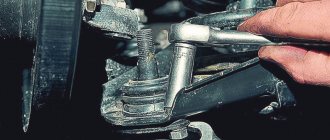
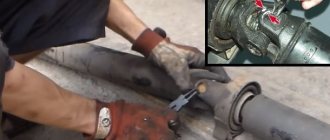
Using an x22 open-end wrench, unscrew the nut securing the ball joint pin.
Then, we apply several blows to the body of the steering knuckle, as a result of which the finger should jump out of the socket.
For safety reasons, the rationalization shown in this photo is unacceptable! Pieces of hardening from an anvil hammer can riddled your face like bullets!
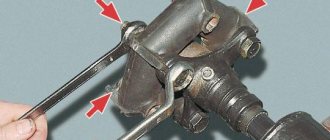
It is possible that working in the second way with a puller is easier than swinging a sledgehammer. But we didn’t like this option - it’s very inconvenient to turn the screws in a tight space.
But with such a device it’s both easy and pleasant. The third method turned out to be the most successful!
And the result was not long in coming.
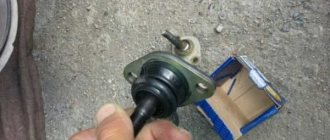
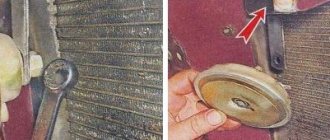
All that remains is to unscrew the fasteners using two x13 keys.
and remove the ball joint.
Attention! Do not forget to remove the additional plate from the upper support and put it back in place when reassembling, otherwise there will be a gap between the cover and the support body. We remove the lower support in the same way. But the pin nut cannot be unscrewed completely, since the rotary lever is in the way
Therefore, all remaining turns will have to be done after pressing out the finger. Remember that in a worn body, nothing holds the finger and, if the nut is screwed together with resistance (for example, the thread was not cleaned of dirt and rust before this work), the finger will rotate in the body, and it will be very difficult to hold it with anything. Now, even if you decide to clean the thread, you will face the problem of how to screw the nut back on? WD-40 won’t always help here either! In such a situation, it is most reasonable to hit the cone of the finger into the hole of the steering knuckle. Now you can return the nut to its original place. Do not tighten too tightly! And then a thorough cleaning of the thread, after which the nut can usually be unscrewed.
But the pin nut cannot be unscrewed completely, since the rotary lever is in the way. Therefore, all remaining turns will have to be done after pressing out the finger. Remember that in a worn body, nothing holds the finger and, if the nut is screwed together with resistance (for example, the thread was not cleaned of dirt and rust before this work), the finger will rotate in the body, and it will be very difficult to hold it with anything. Now, even if you decide to clean the thread, you will face the problem of how to screw the nut back on? WD-40 won’t always help here either! In such a situation, it is most reasonable to hit the cone of the finger into the hole of the steering knuckle. Now you can return the nut to its original place. Do not tighten too tightly! And then a thorough cleaning of the thread, after which the nut can usually be unscrewed.
We carry out assembly in reverse order. And do not forget to put grease in the case before installing the ball. The mileage will be longer.
Sources
- https://www.avtorem.info/stati/vaz-2101-vaz-2106-vaz-2107/zamena-nizhnej-sharovoj-opory-na-avtomobilyah-vaz-2101-vaz-2102-vaz-2104-vaz- 2105-vaz-2106-vaz-2107-zhiguli-klassika.html
- https://spike.su/index.php/Ball-joints-VAZ-2101-2106-2107.html
- https://remontysvoimirukami.ru/remont-vaz-svoimi-rukami/remont-sharovyh-opor-vaz-2101-svoimi-rukami.html
Checking the condition of the car suspension
To find out how the suspension is doing, you will need a jack. First, lift the front of the car. Grab the top and bottom of the wheel with both hands and rock it. If the ball joint needs to be replaced, it will make an unpleasant metallic sound.
For another method of checking, you will need an assistant. Adjust the hub nut and ask him to press the brake all the way, holding it for a while. Now swing the wheel. The rattling sound that appears will only confirm your suspicions.
What to do if the lower support nut rotates with the pin
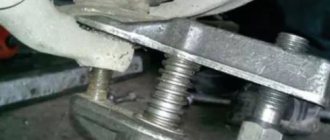
First way. We place a block or brick under the hub. We lower the car on a jack; there should be nothing under the lower arm. The car sits down until the hub is completely seated. When the jack is released lower, at this moment the trunnion warps relative to the lever. The ball pin is clamped like in a vice, this will be enough to unscrew the nut.
Second way. We insert the pry bar between the hub, shown in the photo below, and the edge of the lever, pulling it to the side, creating an artificial distortion. We do not put anything under it; it should hang freely in the air. As in the first case, the force to separate the two parts of the chassis should be enough; the hinge pin will jam in the cone of the steering knuckle. Unscrew the nut completely.
The third method is barbaric. Don’t want to bother with grinders and crowbars? Take a torch and heat the nut until the fluoroplastic ring melts. Once soft, it will not prevent unscrewing.
Replacement
Replacement is quite simple if you follow the step-by-step instructions below. To make the work easier and more trouble-free, you need to prepare the necessary tools in advance.
Required tool:
- Socket wrench or socket for 17 and 19 mm;
- Ratchet or crank;
- Hammer and pry bar (it is better to use a puller);
- Puller;
- Jack;
- Penetrating lubricant WD-40;
Step-by-step instruction
First of all, put the car on the handbrake and put the stops under the rear wheels of the car.
Raise the car with a jack and remove the front wheel.
Unscrew the two bolts securing the ball joint with a 17mm head;
We unscrew the pin securing the ball joint to the steering knuckle with a 19mm socket;