What to do if the oil seal in the rear axle gearbox leaks? Of course, change it. You can replace it without removing the gearbox. To do this, you need to drain the oil, remove the wheels with brake drums, disengage the axle shafts and disconnect the driveshaft.
Before starting work, you must clearly decide for yourself that everything must be done carefully and according to the instructions. Because the rear axle gearbox is a very complex mechanism that requires considerable experience, knowledge and special tools. It is generally recommended to repair such mechanisms only in specialized establishments. But if you are clearly confident in yourself and your hands, then let's start.
We take a strong nylon thread and wind it onto the cylindrical surface of the flange. We attach the dynamometer and pull it down. At the moment when the flange begins to rotate evenly, we remember the force value on the dynamometer and write it down.
Having written down the values, we proceed to disassembly. We insert two ordinary bolts into the holes of the flange and, having secured them with a pry bar from turning, unscrew the nut with a 27 wrench.
And remove the flange. We inspect it carefully; if there are holes or abrasions on the surface where the oil seal is attached, the flange needs to be replaced. Because when installing a new oil seal, it will quickly fail.
Using sliding pliers, tear out the worn oil seal.
We install the flange and tighten the nut. Now the puff, the most important moment.
And so, back to our recorded dynamometer reading. If the initial indicator was 2.9 - 3.1 kilograms, then the force of the torque wrench is approximately 6.5. A value of 4.3 on the dynamometer corresponds to 9 on the torque wrench. And so on. We tighten it to 6 and check it with a dynamometer as in the first photo. If the indicator is around 2.8 - 3.9 is considered normal. If the value on the dynamometer is 2.8, and the torque wrench indicator exceeds 9, then the spacer sleeve has exhausted its adjusting properties and must be replaced. To replace the adjusting sleeve, the gearbox must be completely disassembled. But if the indicators are normal, we put everything back together and don’t forget to fill in the oil.
On the roads of our country and neighboring countries there are still many cars produced by cars - this is what motorists call the Zhiguli model range - becoming less and less, but to this day all models of this series are popular due to their affordability and service, which in most cases motorists conduct themselves.
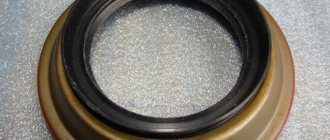
Among the “classic” models, the VAZ 2107 car represented a number of luxury cars and was once very popular; its production was discontinued in 2012. Due to the long service life of cars of this model, parts gradually wear out, especially for rubber products, which dry out over time. Diagnosis of oil leakage from the gearbox
The axle gearbox of the VAZ 2107 car is designed to increase engine torque and change angular speeds. It consists of a housing and the gearbox itself, into which the axle shafts are installed. Transmission oil is poured into the main gear housing, which is kept from leaking by the oil seal located at the base of the gearbox shank. The presence of oil stains on the ground under the gearbox and oiling of the gearbox itself indicate a malfunction of the cuff, and the reasons for this may be the following:
Defective product produced by the factory;
Wear of the working edge of the oil seal;
Broken tension spring;
Flange surface wear.
All of the above defects require replacement of the cuff. Only if the oil seal “fogs up” is there no need to replace it, but you should monitor the oil level in the gearbox from time to time.
Replacing the cuff of the VAZ 2107 axle gearbox
To ensure a high-quality replacement of the oil seal on the rear axle main gear shank, you need to know some conditions and rules that must be observed when carrying out repair work carried out independently.
For the convenience of work related to gearbox repair, the car must be placed on an inspection pit (car overpass), and for safety reasons it is better to install special shoes under the wheels. Having prepared the required number of wrenches and sockets, proceed directly to the repair, observing the following sequence of actions:
1. Before removing the cardan, make installation marks on the hinge fork and the end of the gearbox shank flange. Using a socket head and a 13-mm open-end wrench, unscrew the four bolts connecting the propeller shaft and the flange, move the driveshaft to the side and attach it with a rope or wire to the exhaust pipe.
2. Measure the turning torque of the axle main gear reducer shank. This operation is performed using a dynamometer. The hook of the device is hooked to the upper hole and then the dynamometer is smoothly pulled clockwise; at the moment the flange begins to rotate, the value is recorded on the device and remembered.
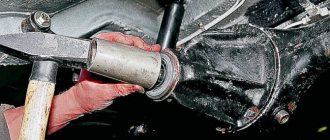
3. Having inserted bolts into the two nearest holes of the flange, fix the pry bar between them and, using a 27-mm spanner, unscrew the nut securing the flange to the gearbox shank.
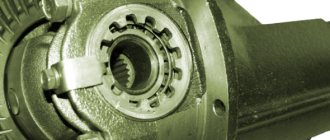
4. Using a puller or two pry bars, remove the flange. Examine its working surface mating with the oil seal; if there is severe wear and voids, the flange is replaced with a new one.
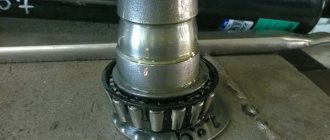
5. Using a wide screwdriver, pry the oil seal from the inside and push it out of the gearbox housing. Clean the vacated area from dirt and cuff residues.
6. After dismantling the worn oil seal, a new cuff is installed in its place. To do this, first select a mandrel corresponding to the diameter of the oil seal - usually this is a section of a suitable pipe. Then the cuff is lubricated at the end with any lubricant such as grease, installed in the shank socket and pressed in using an adapter.
7. The final step in replacing the oil seal is to install the flange and tighten it with a locking nut.
Important condition:
Since the nut, in addition to the fixing nut, also performs an adjustment function, it must be tightened using a torque wrench. The tension when tightening the nut should be no more than 60 Nm.
After completing all of the above operations, install the driveshaft in place, aligning the previously made marks.
Although all the work associated with replacing the classic rear axle gearbox seal is not very complicated, it is still better to contact a mechanic about this problem.
It is necessary to replace the shaft seal of the VAZ 2106 when there is an oil leak from under the tail of the gearbox. This breakdown looks like this: drops of lubricant appear on the outside of the surface of the gearbox housing. It sometimes happens that an oil film is mistaken for damage. Only when there are drops on the surface is this an indicator for replacing the rear axle tail seal. You can easily repair such damage yourself.
Necessary tools for replacing oil seals:
If you decide to start replacing the oil seals yourself, prepare the following tools first:
- Screwdriver Set;
- Set of wrenches;
- Hammer;
- A small container for oil;
- A socket wrench or a 24mm socket;
- To unscrew the drain plug, take a hexagon;
- Two-jaw puller;
- Torque wrench;
- To fill the lubricant with a syringe;
- Jack;
- Body stands.
Important:
All work on replacing oil seals on a VAZ 2106 should be done efficiently. Otherwise, any oversight and carelessness may lead to unpleasant consequences and lead to repair of the axle gearbox. If you doubt your abilities, it is better to contact the service. This way you will protect yourself from unnecessary costs and unexpected car repairs.
The VAZ 2107 gearbox is adjusted, author Nikolay Vladimirovich Zhdankin
Adjusting the VAZ 2107 gearbox on the rear axle...
We welcome car enthusiasts of classic VAZ models to the autoblog RtiIvaz.ru! In these videos we will look at the VAZ 2107 gearbox and adjustment. Nikolai Vladimirovich dedicated the video to the owners of rear-wheel drive cars, since today the trend is towards rear axle gearboxes. As a visual aid for repairs and adjustments, we showed the rear axle gearbox of the VAZ 2107, a common domestic car. Let's look at the rear axle gearbox...
The main elements of the gearbox are helical gears of the main gear, the so-called “conic” and “planetary gear”, which make up the main gear pair. The plant produced four versions of the main pairs:
- Low-speed, installed on the VAZ 2102. The pair has 9 teeth on the bevel gear and 40 on the planetary gear. The torque transmission number is 4.44, this is a low-speed option. Out of production;
- On the VAZ 2101 - the famous “kopek”, the main pair had 10 teeth on the “point” and 43 on the “planetary”, with a gear ratio of 4.3, discontinued;
- VAZ 2103, respectively, 10 teeth on the tip and 41 on the planetary gear;
- VAZ 2106 - 11 teeth on the “pivot” and 43 on the “planetary”, gear ratio 3.9, is considered a high-speed gearbox.
It should be noted that the main pair with a gear ratio of 4.44 for the VAZ 2102 was, generally speaking, not produced as spare parts and was intended only to complete the VAZ 2102 gearboxes on the factory assembly line.
How to change the gearbox seal on a VAZ 2106:
1)
Treat the seating surface with a lubricant, namely sealant. The working edge of the oil seal is also well lubricated;
2)
The seal should be driven in with light hammer blows. Apply blows through an attachment of a certain diameter, while avoiding distortion of the parts;
3)
Collect all parts removed from the ponytail;
4)
The flange locking nut will need to be replaced with a new one;
5)
It is necessary to hang the rear of the car;
6)
Disengage the differential gears and axle shaft;
7)
Secure the tail flange using the bolts that are inserted into the flange hole;
Using a special torque wrench, tighten the tail nut;
9)
Change the oil in the gearbox.
How to check the rear axle gearbox of a VAZ 2106?
- Turn the flange by hand. In this case, the resistance should be small and uniform.
- The flange should rotate without clicking, sticking or jamming.
- If defects are found, send the flange for repair to a specialized workshop.
- There should be no axial play in the tail bearings. There should not be even the slightest play here.
- If play is detected, then the tightening torque of the tail mounting nut should be increased by 20-30 N.m. After this, check again for smooth rotation of the flange.
Important:
The total tightening torque should be 225 N.m and no more. Otherwise, damage to the special spacer sleeve may occur.
It happens that the backlash cannot be eliminated by tightening the flange. Here it is worth asking for help from a workshop so that the craftsmen can repair the axle gearbox.
When the spacer sleeve is seated, the torque of the fastening nut does not increase, even if additional tightening is done. It remains slightly below the desired value. Therefore, it needs to be changed, while disassembling the gearbox. This procedure is done in a car repair shop.
Replacing the VAZ 2106 shank oil seal will be completed only if no damage is found that requires professional help or repairs.
Tell us, how did you change the oil seal on your car?
#gear_rear_axle_oil seal #transmission #VAZ-2106 #VAZ-2103
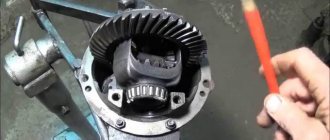
Differential device
The planetary gear is mounted on the differential housing. The differential consists of two axle gears, two satellites and a pin. The main, most common differential malfunctions are wear of the pinion pin (play) and wear of the splines on the axle gears.
On a car, the play of the pin of the satellites can be determined by turning the driveshaft by a quarter or more; if there is no play, then the shaft practically remains in place when you try to turn it in one direction or another.
It's also worth noting that there is never any noise coming from the differential. When moving forward (in a straight line), the differential rotates as one unit and it turns out that there is simply nothing to make noise there.
The cause of noise from the rear axle gearbox when gas is added and the noise disappears after releasing gas is (almost 99.9%) wear of the teeth of the main pair. This is clearly visible on the removed gearbox. The forward side of the teeth has significant wear, while the reverse side shows little wear.
If, after disassembling and troubleshooting the parts of the main pair, wear of the teeth is detected, then no repair will help and it will simply be a waste of time and money. Only the main pair needs to be replaced.
Home-couple
The gears of the main pair are selected at the factory based on contact patch, noise and other parameters and are marked. For example, on the planetary gears it is stamped - VAZ 2103 (model), 10 41 (gear ratio), 4091 (pair number). The main pair number 4091 is also marked on the bevel gear.
After marking these parts, they became the “main pair” and are not installed one without the other, that is, “family”. “- 6” is also marked on the “tip”; this is an amendment for assembling the main pair in the gearbox. When troubleshooting a differential, its bearings are also checked for wear and, if necessary, replaced. Bearing wear is often caused by unprofessional replacement of the gearbox seal.
For example, after replacing the oil seal, tighten the shank nut without observing the tightening torque (pull as much as possible) and the force is transferred not to the spacer sleeve, but to the differential bearings.
These are supports on rotating axes and shafts, which receive loads and transfer them to various structures...
As a result, after a short run after replacing the shank oil seal, noise from the gearbox appears. Only in this case, the “hum” noise in the gearbox is constant and unlike the noise from worn teeth of the main gear. In this case, the hum is constant, regardless of whether gas is added or released.
Rear axle gearbox assembly video
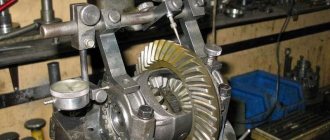
Adjusting the gearbox using special devices and control devices...
During assembly, the gearbox is adjusted according to 4 parameters:
1. Selection of the adjusting ring
Parameters from 2.6 to 3.5. The ring serves to adjust the depth of engagement of the teeth of the “tip” and “planetary gear”, which is strictly specified. This is where the “correction -6” is needed for this main pair, which was mentioned above. Of course, this amendment will be individual for each main couple.
In this video, the main pair will be adjusted using a special device. It is clear that the vast majority of motorists do not have such a device and this is just a clear example of adjusting the engagement depth parameter. An option will also be given for adjustment without a “device”.
A “device” with a micrometer is also installed on the device, simulating the gear of the main pair. The indicator shows zero. Then the indicator leg is transferred to the bearing bed and in this case the indicator shows a value of 3.25, which is not good, since it should be within the range of 3.0. On the second landing plane it turned out to be 3.45. The arithmetic mean is 3.3. To adjust, we will use the correction at the “tip” - “-6”. In this case (– 3.3) + (-6) = 3.36. The thickness of the adjusting washer required is 3.36 mm. Using a micrometer, select the washer of the required thickness.
Note. When the shank bearing wears out, it begins to rotate on the “tip” body. As a result, the bearing end, adjusting washer and shank gear bodies wear out. It turns out that when replacing the shank oil seal, even with the correct tightening torque, the adjustment of the depth of engagement of the teeth of the gears of the main pair is lost and the “howl” of the pair is ensured, as is its early failure.
Let's return to the gearbox assembly...
2. Adjusting the preload of the shank bearings
The shank bearing sits on the “tip” and a NEW spacer sleeve MUST be installed. The video clearly shows that the new bushing is smooth without any deformation, while the previously installed one is deformed. What happens is this: When the shank nut is tightened to the prescribed torque (from 12 to 26 kgf), the bushing takes on the tightening force and, when deformed, works like a spring, creating tension. The tightening force for the VAZ 2107 gearbox nut is significant and the shank must be secured against turning.
In the video we see what kind of “device” the master uses. It is necessary to tighten the shank nut until there is no play. When the nut is tightened correctly, the shank should rotate with a resistance force of 0.3-0.4 kg, therefore, the bearing preload is correct. This assembly rule applies to old (used) bearings.
The differential with bearings is installed and secured with covers (tightening torque is about 8 kgf) and the adjusting nuts of the differential bearings are tightened.
3 and 4. Simultaneous adjustment of the thermal clearance of the main pair and the preload of the differential bearings
For these purposes, another “device” with two indicators is needed. Using the adjusting nuts in the video and everything is shown well, we move the planetary gear towards the teeth of the “cone” to achieve the required clearance. Factory clearance adjustment data is from 0.08 to 0.12 mm. However, such a gap is provided for the new main pair (“tips” and “planets”). The gap is checked in 4 planes by turning the gear. The gap for the working main pair after adjustment is 0.13-0.14 mm.
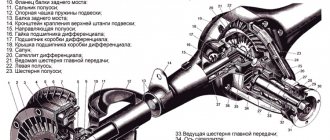
What is the rear axle made of?
The design of the rear axle of the “seven” includes a fairly large number of elements, including:
- Brake drum mounting bolts.
- Guide pins.
- Axle bearing oil deflector.
- Brake drum.
- Drum ring.
- Rear brake cylinder.
- Brake bleeding fitting.
- Axle bearing.
- Bearing lock ring.
- Bridge beam flange.
- Stuffing box.
- Spring support cup.
- Bridge beam.
- Suspension bracket.
- Axle guide.
- Differential bearing nut.
- Differential bearing.
- Differential bearing cover.
- Breather.
- Satellite.
- Driven gear of the main gear.
- Left axle shaft.
- Axle gear.
- Gearbox housing.
- Drive gear adjusting ring.
- Spacer sleeve.
- Drive gear bearing.
- Stuffing box.
- Mud deflector.
- Flange-fork of the cardan joint.
- Screw.
- Oil deflector.
- Main gear drive gear.
- Axle of satellites.
- Axle gear support washer.
- Differential box.
- Right axle shaft.
- Axle shaft brackets.
- Axle bearing thrust plate.
- Rear brake shield.
- Rear brake pad.
- Friction lining.
- Axle shaft flange.
- Locking plate.
- Bearing cover mounting bolts.
The rear axle consists of the components of axle shafts, gearbox and final drive
Frame
All working mechanisms of the rear axle are located in the beam, as well as in the gearbox housing. The beam is made of two casings connected by longitudinal welding. The bearings and seals of the axle shafts are located in flanges at the ends of the beam. In addition, the suspension fastening elements are welded to the beam body. In the middle the beam is widened and has an opening in which the gearbox housing is fixed. A breather is installed in its upper part, through which the connection between the bridge cavity and the atmosphere is maintained, so that the pressure in the cavity does not rise above the permissible level and dirt does not get inside the part.
All working mechanisms involved in transmitting torque are located in the axle beam and gearbox housing
Gearbox
The main gear consists of drive and driven gears that have hypoid gearing, i.e. the axes of the gears do not intersect, but intersect. Thanks to the specific shape of the teeth, simultaneous engagement of several of them is ensured and, as a result, the load on the teeth is reduced and their durability increases . A two-satellite bevel differential, in addition to the satellites located on a common axis, includes a box and two gears, while the satellites are in constant mesh with the gears.
The rear axle gearbox of the VAZ 2107 contains a differential and final drive
Half shafts
The “Seven” is equipped with so-called semi-balanced axle shafts of the rear axle, which take on bending forces in both the horizontal and vertical planes. The axle shaft, in essence, is a shaft made of 40X steel, with splines on the inner end and a flange on the outer end. The inner end of the axle shaft is connected to the differential gear, the outer end is located in the flange of the beam, to which the brake drum and wheel are attached. The axle shaft is held in place by a thrust plate of the bearing, which is also fixed to the beam.
The VAZ 2107 is equipped with semi-balanced axle shafts of the rear axle, which take on bending forces in both horizontal and vertical planes
Signs and malfunctions of the classic rear axle gearbox
Replacing a gearbox with your own hands is a labor-intensive process, which includes not only the purchase of a new unit (quite expensive), but also time costs. Therefore, before you start, you need to make sure that the gearbox is faulty. You can define the signs like this:
- gradually accelerating the car, listen carefully and remember at what moment the noise appears;
- while driving, start engine braking (remove your foot from the gas pedal at speed), at this time listen to the gearbox and note the moment the noise appears;
- accelerate the "seven" to hundreds, switch to neutral and turn off the engine - listen to how the gearbox behaves while coasting.
Rear axle gearbox design of a VAZ-2107
If the axle is noisy both in neutral and at speed, the gearbox has nothing to do with it. If the hum occurs only at speed (regardless of the number), repairs, or, as a last resort, replacement of the gearbox are inevitable.
When the signs are identified, it is necessary to carry out another check:
- park the car, secure the front wheels with shoes;
- jack up the rear so that the bridge hangs over (it is necessary that the wheels come off the surface);
- start the engine and accelerate the “seven” to the point at which noise occurs, while the wheels should spin without load.
If the noise has not changed, then the gearbox is clearly in good working order and it is not the cause of the trouble. Here other drive units are checked. Well, if there is no noise when driving without a load, then we are talking about worn gears of the gearbox, which make noise only when driving with a load.
The “seven” gearbox itself is a fairly reliable unit that can withstand a period of 100 to 300 thousand mileage, and there is no need to even look into it. Gears, gear spacer, differential adjustment - all these problems arise during improper operation:
- the use of oil with a low viscosity level, as well as failure to comply with the terms of its replacement;
- operating the “seven” with an amount of oil insufficient for this;
- During movement, the bridge is subject to extreme loads (frequent and unsuccessful slips).
Functions of the rear axle VAZ 2107
The seventh VAZ model completes the line of rear-wheel drive cars produced by the Volga Automobile Plant: all subsequent models, starting with the VAZ 2108, were equipped with front-wheel drive or all-wheel drive. Thus, the torque from the “seven” engine is transmitted to the rear wheels through other transmission elements. The rear axle is one of the components of the transmission, including the differential and final drive . The differential serves to distribute torque between the axle shafts of the rear wheels when the car turns or moves on an uneven road. The main gear amplifies the torque, which is transmitted to the axle axle shafts through the clutch, gearbox and cardan shafts. If the resulting torque is taken as 1, then the differential can distribute it between the axle shafts in a ratio of 0.5 to 0.5 or in any other ratio, for example, 0.6 to 0.4 or 0.7 to 0.3. When this ratio is 1 to 0, one wheel does not rotate (for example, it fell into a hole), and the second one slips (on ice or wet grass).
The seventh VAZ model completes the line of rear-wheel drive cars produced by the Volga Automobile Plant
Differential device
The planetary gear is mounted on the differential housing. The differential consists of two axle gears, two satellites and a pin. The main, most common differential malfunctions are wear of the pinion pin (play) and wear of the splines on the axle gears.
On a car, the play of the pin of the satellites can be determined by turning the driveshaft by a quarter or more; if there is no play, then the shaft practically remains in place when you try to turn it in one direction or another.
It's also worth noting that there is never any noise coming from the differential. When moving forward (in a straight line), the differential rotates as one unit and it turns out that there is simply nothing to make noise there.
Symptoms of a problem
As soon as the driver notices any changes in the operation of the rear axle (for example, extraneous sounds appear that were not there before), he must respond to these changes as quickly as possible so as not to aggravate the possible malfunction. The most typical sign of such problems may be increased noise levels:
- coming from the rear wheels;
- during operation of the rear axle;
- when accelerating the car;
- when braking with the engine;
- during engine acceleration and braking;
- while the vehicle is turning.
In addition, a knocking sound when the car starts moving and an oil leak may indicate a malfunction of the rear axle.
Oil leakage indicates a malfunction of the rear axle of the VAZ 2107
Grinding noise when moving
The causes of a grinding noise from the rear axle when the vehicle is moving can be:
- wear or destruction of axle or differential bearings;
- deformation of the beam or axle shafts;
- incorrect adjustment, damage or wear of gears or bearings of the gearbox and differential;
- wear of the spline connection with the semi-axial gears;
- incorrect adjustment of the gear teeth of the main gear;
- insufficient amount of oil.
The cardan spins, but the car does not move
If the driveshaft rotates while the vehicle is stationary, the cause may be a failed axle spline or wear on the teeth of the differential or final drive gears. In any case, if the cardan spins, but the car does not move, this indicates a fairly serious breakdown and, most likely, replacement of the axle shafts, bearings or gears will be required.
Oil leakage from the housing and from the shank side
The most likely causes of oil leakage from the rear axle housing:
- wear or damage to the drive gear seal;
- wear of the axle shaft seal, determined by oiling of the brake shields, drums and pads;
- loosening the bolts securing the rear axle gearbox housing;
- damage to sealing gaskets;
- axial play of the shank;
- breather jamming.
Wheels are stuck and won't rotate
If the rear wheels are jammed, but the drum and pads are in order, the cause of this malfunction may be failure of the bearings or the axle shaft itself. Most likely, in this case, the bearings have crumbled or the axle shaft has become deformed (for example, due to an impact) and the parts need to be replaced.
A little leaked oil from the axle through the axle seal + dust from the pads = good “glue”. Bottom line: remove the drum and look. If all the springs are in place and the block is not torn, then take sandpaper and clean the drum and shoes. Pre-wash them with carburetor cleaner or similar liquid. Sold in cylinders.
underwater snake
https://auto.mail.ru/forum/topic/klassika_zaklinilo_zadnee_koleso_odno/
Adjustment and installation of the VAZ 2107 gearbox
Main pair engagement depth adjustments
In this case, it is necessary to select the thickness of the adjusting washer.
So: Instead of the device, we install the “original” shank and tighten the nut until it stops lightly, leaving a gap. The differential with planetary gear assembly, bearing caps are installed and their mounting bolts are tightened.
When replacing the shank oil seal, a number of incorrect actions are allowed, which ultimately lead to premature failure of the gearbox. Before releasing the shank nut, according to the technology for performing the work of replacing the oil seal, it is necessary to remove the axle shafts (which is almost never done, since the amount of work will increase many times). Although according to the price list, the removal of the axle shafts will most likely be included in the list and a fee will be charged for this, since this is required by the plant’s technology for replacing the oil seal. This is a necessary condition, since the axle shaft will create resistance when tightened and correct adjustment will simply be impossible to achieve.
Before releasing the shank nut, it must be secured against turning and the tightening force of the nut must be checked with a torque wrench, around 12 kgf. Before installing the oil seal, if its outer surface is not rubberized, then you need to use a sealant to guarantee it. Thus, a mark of 0.15 mm on the gearbox stocking will be sufficient to pass oil through the outer surface of the oil seal.
The adjusting nuts are installed, and the gap on the main pair is pre-selected (the final working gap is 0.08 to 0.12 mm). Then paint is applied to the teeth of the planetary gear from an aerosol can and, using a shank, it is necessary to make several movements in different directions in order to fix the contact spots in the paint.
Now, having turned the planet gear back, you can clearly see the contact patch on its teeth with the teeth of the pin. The contact patch (in this case) shows that the adjusting washer on the shank is thicker than the required thickness. We slightly tighten the shank nut, thereby moving its bearing, which makes it possible to move the gear teeth towards each other, that is, as if “reducing” the thickness of the adjusting washer. Using the differential bearing adjusting nuts, we set the approximate gap (reducing it slightly).
Then we again apply paint to the teeth of the planetary gear and again begin to rotate the shank (or gear) in different directions to print the contact patch between the teeth. It can be seen that the contact patch has risen a little, but still not enough and it is necessary to tighten the shank nut a little again. Similar actions with paint and turning the gear must be carried out until the contact patch is located exactly in the middle of the teeth, and the sound of the turning teeth becomes quieter.
After correct (final) adjustment, the sound will be almost inaudible.
Remember to tighten the differential bearing adjusting nuts every time you tighten the shank nut. As a result, the contact patch was located exactly over the entire surface of the teeth. It should be noted that this is the condition for the location of the contact patch for old (working) pairs. For new main pairs, the contact patch, as mentioned above, should be located in the center of the teeth.
Further. The planetary gear mounting covers are released and the differential is removed. The shank nut is unscrewed and removed. Since the shank was installed only with a bearing without an adjusting washer, there was a gap between the bearing and the shank gear where the washer would fit. This gap is measured with a set of feeler gauges, thereby calculating the required thickness of the adjusting washer.
It turns out, as in the case of using instruments and accessories, the size for the required adjusting washer was also 3.36 mm. The shank bearing is removed, an adjusting washer (3.36mm) is installed, the bearing is put in place and the gearbox is assembled. The shank is installed, the shank nut is tightened, min. 12 kgf. The differential with planetary gear is installed, the covers and bolts are tightened, but not completely.
By the way, the lids should not be mixed up. The adjusting nuts of the differential bearings are installed and the gap on the main pair is pre-set. Then the differential cover bolts are finally tightened. The gap in the main pair is finally adjusted and the adjusting nuts are secured.
The gearbox parts are assembled in the reverse order of disassembly. You can press in the bearing rings using a hammer and a special tool (a socket wrench head will do).
Adjusting the VAZ 2107 gearbox
Checking the serviceability of the shank oil seal
The first sign that it is necessary to replace the shank oil seal on a VAZ 2107 is the presence of traces of lubricant, dust and dirt on the outer part of the rear axle. Determining the presence of leaks on the rear axle is not difficult. To do this, you need to climb under the car and inspect the bridge.
If the oil seal is worn significantly, a puddle of oil may be found under the car. If the problem is not resolved in a timely manner, oil may leak out of the bridge, which will lead to its rapid breakdown. Despite the fact that the cuff is a small part in a car, its serviceability plays a very important role.
“Quiet, the operation is underway!” or Replacing the rear axle gearbox seal on a VAZ 2107
The sequence of work when replacing the gearbox seal is as follows:
- We measure and record the moment of resistance to rotation of the flange (the axle shafts must be removed!).
- Unscrew the flange nut.
- Remove the flange from the shaft splines.
- Using expansion pliers, remove the oil seal. If you don't have pliers, you can pry it off with a screwdriver. Be careful not to damage the surface of the socket.
- We inspect the flange. If its surface has a pronounced groove in the place where the working edge of the oil seal rubbed, then before installing the new oil seal, insert a washer 1 mm thick into the socket. If the flange is damaged on the working surface, replace it with a new one.
- Lubricate the outer surface of the oil seal with lithol and carefully drive it into the crankcase socket using a mandrel of suitable diameter. If there is no mandrel, press in the oil seal by evenly tapping the end along the circumference of the outer diameter. Make sure that there are no distortions - the working edge should be strictly perpendicular to the shaft axis.
- We inspect the lead-in chamfer on the flange. It should not have defects that could damage the working edge. We install the flange, avoiding sudden movements and impacts, so as not to knock the spring off the oil seal. Before installation, you can lubricate the flange chamfer with transmission oil to make the process easier.
- We tighten the nut, periodically checking the moment of resistance to rotation of the flange. Remember that at the end of the tightening the resistance in the bearings increases much more intensely than at the beginning. The moment of resistance to rotation should be 1–2 kgf.cm greater than what we recorded before unscrewing the nut. In any case, if the moment exceeded 9 kgf.cm, and the bearings in the bridge were still old, remove the flange again, take out the inner ring of the bearing and change the spacer sleeve. If the bearings are new (new means they have not traveled a single kilometer, because after a hundred kilometers they can be considered old for adjustment purposes), then the normal moment of resistance to rotation after tightening the nut for them should be in the range of 16–20 kgf. cm. Replacement of the rear bearing affects gear alignment, so please refer to the appropriate instructions for this procedure.
To prevent self-loosening, the flange nut has a special plastic insert, which, when crushed against the thread, creates additional resistance both when screwing and unscrewing. As a rule, such nuts can withstand up to ten unscrewings without losing their locking properties. If in doubt, get a new nut.
We reinstall the axle shafts and brake drums, screw on the driveshaft, and fill in the oil. We make a test drive and if everything is in order, we enjoy life, until we suddenly find a treacherous spot under the bridge again...
How to remove the shank oil seal on a VAZ 2106:
To make it convenient to change the tail seal, place the car in an inspection hole or on an overpass. Pre-prepare new tail seals. The old oil seal has a worn appearance and excess oil. It must be removed immediately. To do this, proceed with the following steps:
1)
Unscrew the drain plug on the gearbox housing using a hexagon. Here you need to place a container for oil;
2)
Wait until the lubricant has completely drained from the gearbox. Screw the plug back in;
3)
Disconnect the reverse drive gear flange and the driveshaft;
4)
Put the car on the handbrake;
5)
Using a
24mm
, begin to unscrew the nut that holds the tail flange.
It is not necessary to use a hand brake to prevent the flange from rotating.
6)
Insert several bolts into the hole in the final drive gear flange;
7)
Using special tools, try to hold the flange by these bolts. At the same time, unscrew the nut;
Take a two-jaw puller and use it to remove the tail flange from the splines;
9)
If you do not have a puller, remove the flange by hand. This will require some effort, but it is not difficult to remove;
10)
Remove the washer and flange from the tail of the main gear at the same time as the dirt deflector;
11)
Take a flathead screwdriver and pry off the seal. Remove it from the hole in the gearbox housing using a bracket. The oil seal has been removed and you can begin replacing.
Important
Note: Before installing a new tail seal, you should check the surface of the flange that directly contacts the seal. It must be undamaged and free of rust. If any defects are found, eliminate them by polishing the surface.
Self-locking differential
The most common way to increase a car's cross-country ability is to install a self-locking differential. The main advantage of this device is that it prevents wheel locking “forever”. This is important because preventing lockup from engaging when not required helps protect the axle shafts from critical loads.
There are the following types of differential locks:
- Disc - implemented through the use of friction clutches. These clutches come into action as soon as the wheels begin to rotate at an uneven speed. The disadvantage of this mechanism is that it requires the use of expensive gear oil, and also requires quite frequent adjustment work to set up the unit. This is far from the best mechanism for a VAZ 2107 car.
- Viscous coupling blocking - the operation of such a device is based on the use of sticky discs immersed in a special liquid. It hardens when heated, allowing the gears to engage—that is, the differential locks. The liquid heats up when the angular speed of the wheels on the axle changes (when the speed of rotation of the wheels becomes different). The disadvantage of this mechanism is that they require complete sealing of the assembly, and work effectively only during short-term slipping.
- Screw locking or worm locking is the best option for automatic locking for the VAZ 2107. The mechanism is implemented using worm screws, which rotate when the car drives in a straight line, and when the angular speed of the wheels changes, they shift into grooves, thereby locking the differential. As soon as the car gets out of the mud captivity, the blocked mechanism resumes its normal operation by moving the worm screws to their places.
- Planetary - the operating principle is similar to a worm circuit, only instead of gears, balls are used. Due to the balls, the wheels are blocked, and they come into operation when the traction force between the engines and the axle changes. Compared to a self-locking worm gearbox, a planetary gearbox costs about 2 times less.
In addition to automatic differential locking, there is also a forced one, which is activated if necessary.