Nowadays, StarLine car alarms have ceased to be stupid beepers. Today it is already a whole security complex. It is very important to correctly set the time on the Starline A93 key fob using buttons in order to use the security and autostart systems at 100%. For example, to start the engine on a schedule or use a turbo timer. But this is a very useful feature. In addition to it, there is also an alarm clock built into the keychain. All these are quite useful functions, but without setting the time, you will not be able to use them. On the other hand, not everyone can do this quickly. But with the help of my instructions, I think you will succeed!
Controlling the Starline A93 alarm using key fobs
Control, switching operating modes, programming, and setting up the complex are carried out through direct action on individual keys of the main key fob. The combined effect on a group of control keys also takes part in the system settings. Key presses can be short, long, double or sequential.
- A short “click” on a key implies a single impact lasting up to half a second;
- Long-term exposure is caused by holding the key pressed until a melodic notification is received on the pager;
- Double impact. The duration of each press should not exceed half a second.
- Consistent. One button or several in one block are pressed twice. The first press should be slightly longer than subsequent ones.
| Mode | Impact on the keys | State | |
| Main keychain | Duplicate keychain | ||
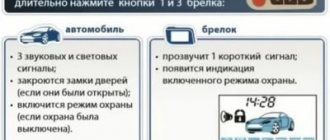
| "Panic" | No. 1, then No. 3 for a long time, until the acoustic notification | No. 1, then No. 2 for a long time until a sound notification is received | The ignition is turned off. There are any icons on the screen, with the exception of “service”. |
| Calibrating the sensitivity level of the shock sensor. | Press key No. 3 twice in succession. | — | Security is disabled. |
| Calibrating the slope sensor status. | Click on key number 4 twice in succession. | — | Security is disabled. |
| State of the complex, voltage and temperature data. | Briefly press key number 3 | — | |
| The location of the car in the parking lot. | Twice on key number 4. | Key number 3 briefly. | |
| Unlocking doors. | Briefly press key #1. | Ignition active, disarmed. | |
| Locking the locks. | Briefly press key No. 2. | ||
| Selecting the cursor control mode. | Key No. 2 or No. 3 for a long time until acoustic notification. | — | |
| Disabling pager keys | Pressing keys No. 2 and No. 4 simultaneously. Disabling through influence on No. 1 and No. 4. | Press No. 1 and No. 3 simultaneously. Switched off by influencing No. 2 and No. 3 | |
Indication of modes and functions
Secrets of the display on the display of the main key fob of the StarLine a93 security complex:
- Automatic engine start on alarm clock.
- Starting and disabling the remote engine start function in periods based on a timer.
- Autostart based on ambient temperature level.
- Enabling or disabling the service state of the complex.
- Starting or deactivating the turbo timer.
- Automatic activation of protection.
- The immobilizer system is active.
- Locking control keys on the main pager.
- A pictogram reflecting the temperature value of the power unit.
- Remote control battery level indicator.
- Pictogram of a running engine.
- The anti-robbery function is active.
- Indication of the included additional GSM module.
- The trunk lid is open.
- The car doors are open or their locks are faulty.
- The hood of the car is not closed.
- If the symbol lights up together with the DAT-1 indication, this indicates that one or all levels of sensor sensitivity have been tested. In a situation where the icon is highlighted with the dY icon, the first or second safety zone of the impact sensor is being tested.
- Screen of graphic messages with data on engine or outside air temperatures and current time. Additionally used to configure parameters for remote engine starting.
- Timer started
- The alarm is active.
- Icon of the purity of the signal between the pager and the system receiver.
- Access to the car is blocked, security is activated.
- The open lock icon indicates that the door(s) is open and the protection has not worked.
- Security is active, alarm signals are in acoustic mode.
- The speaker is crossed out - the silent accompaniment function is working.
- The parking brake system is not active or the main brake pedal is pressed.
- The status of coded access to emergency disabling/enabling anti-theft is active.
- Condition with manual transmission operating algorithm.
Table: setting up the main key fob function menu
| Target. | Control. | Manipulation. | Information from the key fob. |
| Setting the current time. | |||
| Time correction. Changing the hour value. | Press and hold key No. 4 until one melodic alert and two short beeps | The time indications are changed by pressing keys No. 2 and No. 3. | The parameter being changed flashes on the screen. |
| Correction of minutes. | Click on key number 4. | The values are changed using keys No. 2 and No. 3. | The parameter being adjusted flashes on the display. |
| Setting an alarm. | |||
| Clock correction. | Click on key number 4 to go to the alarm settings. | The readings change by pressing keys No. 2 and No. 3. | The alarm setting indication is highlighted. |
| Correction of minutes. | Click on key number 4 again. | The readings change by pressing keys No. 2 and No. 3. | The alarm minutes are flashing. |
| Enable/disable alarm clock. | Briefly click on key number 4. | Key No. 2 - ON, key No. 3 - Off. | There is a pictogram on the display. |
| Setting the timer time. | |||
| Timer clock value. | Briefly press key No. 4 to enter mode. | The readings change by pressing keys No. 2 and No. 3. | The timer clock value flashes. |
| Timer minute value. | Click on key number 4 again. | The readings change by pressing keys No. 2 and No. 3. | The minute value is flashing. |
| Enable/disable the timer. | Briefly click on key number 4. | Key No. 2 - On, key No. 3 - Off. | There is an alarm on the display. |
| Set the alert volume. | |||
| Either a signal or a vibration response. | Pressing key No. 4 switches to the signal volume adjustment mode. | Mode selection using key No. 2:
| The corresponding mode flashes. |
| Type of alerts. | |||
| Select one of the options. | Briefly click on key number 4. | Key No. 3—siren. Key number 2 - trill. | The display is illuminated with either SIG1 - siren, or SIG2 - trill. |
Video
The video presents the main functions of the A63 alarm key fob, which are identical to the A93 options. Provided by the channel "AutoAudioCenter".
Do you have any questions? Specialists and readers of the AUTODVIG website will help you ask a question
Was this article helpful?
Thank you for your opinion!
The article was useful. Please share the information with your friends.
Yes (75.00%)
No (25.00%)
X
Please write what is wrong and leave recommendations on the article
Cancel reply
Rate this article: ( 4 votes, average: 4.75 out of 5)
Discuss the article:
Initial alarm setup
The instructions for preliminary adjustment of the StarLine a93 automobile security system provide for the following stages:
- Installation of a personalized access code for the facility and emergency change of states;
- Adjustment of the level of perception of external influences by shock and slope sensors;
- Changing software settings for interaction via CAN and LIN buses;
- Entering identification codes for radio-equipped power unit blocking relays.
Recording key fobs in the complex memory
Adaptation of A93 car alarm key fobs with remote start is carried out in a state of inactive protection.
- The VALET key must be pressed seven times. Then the ignition system is turned on. The system notifies with seven acoustic signals that the control unit is in program change mode;
- On the key fob, keys No. 1 and No. 2 are pressed simultaneously. The siren gives an audible warning and the pager responds with a short sound. The second key fob is registered using the same method. The time interval between communicator adaptations should not exceed five seconds;
- Once the adaptation of all communicators is completed, the ignition is turned off. Dimensions respond with three flashes.
Entering the main menu for programming functions
To enter the settings correction mode, a combined action is taken on the service button and the communicator buttons.
- Turn off the ignition, press the service button five times, turn on the ignition;
- Select the AF icon on the pager display, then press button No. 3 twice. The first press is long until there is an acoustic notification. The second is short;
- By briefly pressing buttons No. 2 and No. 3, the mode number is selected in accordance with the list of options;
- The required mode is selected by briefly pressing button No. 1;
- To return to the main menu, press button No. 3. Long until the sound alert, then short;
- After completing the work, turn off the ignition, which will allow you to exit the mode.
Table: programmable security and service functions
| Functionality options. | Option 1. | Option 2. | Option 3. | Option 4. | |
| 1. | Period for closing/opening door locks. | 0.8 seconds. | 3.6 seconds. | Two lock signals 0.8/0.8 seconds. | Comfort mode activation 30/0.8 seconds. |
| 2. | Auto mode for controlling locks. | Closed by pressing the brake pedal. They open when the ignition is turned off. | They open manually, close from the ignition with a pause of 10 seconds. | Closed from the ignition system with a pause of 10 seconds. | The mode is not active. |
| 3. | Bypassing the operation of the interior light, delaying the activation of control units when the protection is turned on. | Before turning off the lights inside the cabin (60 sec.) | Pause is not active. | 30 sec. | 5 sec. |
| 4. | Locking door locks when the protection is automatically turned on. | Door lock block. | Door lock block. | No blocking. | No blocking. |
| 5. | Secondary activation of protection. | Door lock block. | No blocking. | The mode is not active. | The mode is not active. |
| 6. | Siren control. | Siren. | Siren. | Steering signal. | Steering signal. |
| 7. | Identification during remote and autostart of the engine (Slave is not active). | The entire launch period. Security is disabled. | Protection is disabled from the pager. | When turning off object protection. | When turning off object protection. |
| 8. | Blocking when the “Anti-robbery” mode is turned on. | By pressing the brake pedal in cars with automatic transmission, releasing the parking brake on cars with manual transmission. | The blocking is activated by alarm beeps. | The mode is not active. | The mode is not active. |
| 9. | Personal code for immediate deactivation of security, “Anti-robbery”. | Factory firmware code "3". | Single code. | Two character password. | Three character password. |
| 10. | Engine blocking test. | Normally closed option. | Normally open option. | Normally closed, in parallel with relay R2. | Normally open, in parallel with relay R2. |
| 11. | Two stages of engine blocking removal. | The mode is not active, the blocking is removed when the system is disarmed. | Shutdown via Valet. | Shutdown via Valet. | Shutdown via Valet. |
| Slave identification. | The state is not active. | Identification via radio tag. | Identification via Valet. | Engine blocking by entering a password. | |
| 12. | Operation of the 4th additional channel without a CAN bus. | 20 sec. when protection is enabled. | Reptilian changes on the way out. | The central locking is blocked according to the signals from section No. 1. | 20 sec. when the protection is disabled. |
| Operation of the 4th additional channel with the CAN bus. | Variable central locking control. | Variable central locking control. | Variable central locking control. | Variable central locking control. | |
| 13. | Operation of the 1st additional channel. | 0.8 sec. to open the trunk. Pager control. | Reptilian changes on the way out. | In parallel with code relay R3. | Latch status. Turn on and off using the communicator buttons. |
| 14. | Operation of the 2nd additional channel. | 0.8 sec. two stages of removing door locks. | Reptilian changes on the way out. | In parallel with code relay R3. | Interaction with the ignition system |
| 15. | 3rd additional channel. | Sound lasting 3 seconds. after 2 seconds have elapsed. from the moment the engine is turned off. | Signal 1 sec. 1 second after the motor is turned off. | Duplicated by size flashes. | Duplicated by size flashes. |
| 16. | Alert management. | Disabled. | One after a period of 3 minutes. | The period is 5 minutes. | The period is 7 minutes. |
| 17. | Differentiation of polarity of locks. | Minus. | Plus. | Plus. | Plus. |
| 18. | Working with the GSM module. | Connection of M20 and M30 with program generation not higher than A9. | Connection of M20 and M30 with a program higher than A9. Connection M21, M31, M32, CAN. | Connection of M20 and M30 with a program higher than A9. Connection M21, M31, M32, CAN. | Connection of M20 and M30 with a program higher than A9. Connection M21, M31, M32, CAN. |
| 19. | Operation of channel 5 without CAN. | Starter block. | Reptilian changes on the way out. | The central lock is unlocked. | Latch status. Turn on and off using the communicator buttons. |
| Operation of channel 5 with CAN. | Variable lighting control. | Variable lighting control. | Variable lighting control. | Variable lighting control. | |
| 20. | The work of Channel 6. | 0.8 sec. | Reptilian programming. | In parallel with code relay R3. | Latch status. Turn on and off using the communicator buttons. |
| 21. | Selecting a channel for working with a mobile application. | Channel No. 1. | Channel No. 2. | Channel No. 4. | Channel No. 5. |
| 22. | Anti-theft function. | Slave is disabled. | Slave is active with 15 second authentication. | Slave is active with 20 second authentication. | Slave is active with 30 second authentication. |
| 23. | Starting the authentication protocol. | Protection is disabled. | The locks are unlocked. | The ignition is on. | The ignition is on. |
| 24. | The work of Channel 7. | The central lock is unlocked. | Reptilian programming. | Reptilian programming. | The locking relay is not active. |
| 25. | The work of Channel 8. | The central lock is unlocked. | Reptilian programming. | Reptilian programming. | The locking relay is not active. |
Table: programmable trigger functions
| Functionality options. | Option 1. | Option 2. | Option 3. | Option 4. | |
| 1. | Car engine starting mode. | Not active. | Active. | Active. | Active. |
| 2. | Duration of engine operation after autostart. | 10 min. | 20 minutes. | 30 min. | No limits. |
| 3. | Operation of shock and tilt sensors when the engine is running. | Sensors are not active. | Sensors are active. | Sensors are not active. | Sensors are active. |
| 4. | Engine shutdown at 50ºС. | Inactive. | Active. | Active. | Active. |
| 5. | Remote motor start. | Security is on. | Security is on. | Security is on. | Security is on. |
| 6. | Light warning during remote start. | Headlight flashing. | Disabled. | Disabled. | Disabled. |
| 7. | Control of locks during remote start. Protection is active. | Does not work. | Blocking after starting from a distance. | Block after stopping the engine at a distance. | Block after the start-stop cycle of the motor. |
| 8. | Output of the power unit when starting at a distance. | Repeat the “accessories” signal. | Repeat the ignition signal. | Simulates pressing the brake pedal in cars with keyless entry. | With key access. |
| 9. | Starter cranking time. | 0.8 sec. | 1.2 sec. | 2 sec. | 6 sec. |
| 10. | Type of power unit according to the power supply system, remote start delay. | Gasoline, delay 2 sec. | Diesel, delay 5 sec. | Diesel, delay 10 sec. | Diesel, delay 20 sec. |
| 11. | Control of the operation of the power unit. | By voltage. | Plus from the generator. | Minus from the generator. | According to the tachometer. |
| 12. | Activating ignition support while the engine is running. | Ignition is turned off. | Pressing button #2 | When the parking brake is applied. | Inactive. |
| 13. | Bypass management. | Active during the engine operating phase, but turns off during the turbo timer operation. | Activates for 30 seconds. while the engine is running, it is switched off for the duration of the turbo timer operation. | Active when both the engine and the turbo timer are running. | For 30 sec. when the engine is running and remains active when the turbo timer is running. |
| 14. | Starting the engine (options 1,2,4 modes No. 8). | Key access. | Key access. | Key access. | Key access. |
| Option 3 mode No. 8. | Keyless 1 pulse. | Keyless 2 pulses. | Keyless 3 pulses. | Keyless 6 second pulse. | |
| 15. | Transmission type and program neutral option. | Manual transmission, disabling program neutral with active protection. | Manual transmission, disabling program neutral when the doors are locked. | Manual transmission, disabling program neutral when the doors are locked. Pause 20 sec. | Automatic transmission |
| 16. | Power block output. | Ignition system repeat. When the starter is running, the output does not turn off. | Repeat the “accessories” signal. | Ignition system repeat. When the starter is running, the output is switched off. | Repeat the “starter” signal. |
| 17. | Stops the motor when the protection is turned off. | The mode is not active. | The mode is active. | The mode is active. | The mode is active. |
Personal code programming
The following sequence is required, as provided for in operating instructions A 93:
- Turn off the ignition, press the service button five times, turn on the ignition;
- Select the AF section on the remote control, then press button No. 3 twice (the first before the sound alert, the second briefly).
- Buttons No. 2 and No. 3 select the number of the corresponding option in the list. When registering a personalization code, you need step 9. If parameters No. 2, 3 or 4 are configured, the “PIN code” icon will be highlighted on the communicator screen;
- Four clicks on Valet go to the service mode for setting up a personal access code. The LED blinks with each press;
- Turn off the ignition. The system will respond with 4 acoustic signals;
- Press the service button once. The siren will notify you with one beep. Enter the first character of the code. Brief clicks of buttons No. 1,2,3 correspond to code values 1,2,3. Double pressing the buttons (long, followed by short) respectively 4,5,6. Between the entries of individual password characters, the service button is pressed;
- To complete the process, turn off the ignition. Three flashes of dimensions will follow.
Setting the sensitivity of the shock and tilt sensors
The method for changing the sensitivity parameter is provided in the software manual for StarLine a93:
- The ignition and protection are first turned off on the car. Then button number 3 is pressed twice. The first press is before an acoustic notification, the second is short. The siren operates, accompanied by three flashes of the dimensions, signaling the readiness to configure the warning area of the shock sensor;
- Use buttons No. 2 and No. 3 to select the required level;
- To enter the alarm zone adjustments, press button No. 3 twice (long and short);
- The required sensitivity level of the alarm zone is selected;
- Settings are saved by double pressing (long, short) button No. 3.
Resetting the slope sensor sensitivity threshold:
- Ignition and protection are not active. Press button No. 4 twice (long and short);
- Using buttons No. 2 and No. 3, the required sensitivity level is set;
- To record settings, double press (long until the signal and short) on button No. 4.
Programming the CAN + LIN interface channel
In vehicles equipped with fast digital communication technology, there are additional capabilities for monitoring and controlling peripheral actuators. There are options for opening and closing windows, and separate control of door locks.
Entering programming mode
The setup is carried out in stages:
- The connector is removed from the complex control unit, digital communication is disconnected;
- While holding the VALET button, apply power to the unit connector. In this case, the system responds with five consecutive acoustic alerts;
- VALET is released - four long beeps;
Selecting a car number
- After entering the state of changing settings, pressing the service key selects the required sub-item;
- By a certain number of presses, corresponding to the numbers of the car number, on the service key, the vehicle number is entered into memory;
Setting CAN+LIN interface parameters
A93 systems are configured according to the following algorithm:
- We enter the mode for changing program settings;
- Select a section in the list of settings using the service button;
- The function is activated, and therefore the alarm responds with the number of beeps corresponding to the sub-item number in the menu;
- The service button changes the selected parameters. The system uses short pulses to indicate whether the mode is on (one - on, two - mode off);
Recording digital engine locking radio relay codes
- Adaptation of the radio relay to the unit occurs as follows:
- With the ignition off, press Valet five times and turn on the ignition;
- On the pager screen, select the AF item, after which button No. 3 is pressed twice (the first for a long time before the beep, the second briefly);
- By briefly pressing buttons No. 2 and No. 3, a function is selected according to the table;
- The GND wire is thrown like a mass onto the car body;
- Turn off the ignition, press Valet seven times;
- Turn on the ignition - seven beeps;
- After which you have five seconds to connect the black conductor marked +12V to the ignition.
- Turn off ignition
Problem solving
If problems arise, first of all we check the serviceability of the alarm radio path; we must at least make sure that the cable connectors are securely connected to the antenna module and the central alarm unit. Be sure to turn off third-party energy consumers (recorder, navigator, emergency xenon) during the test.
A radical solution to the problem is to software disable anti-robbery in the alarm settings. For example, on the A91 this is done in the first settings table, function 8 is set to value 3 or 4 (anti-theft mode is turned off). On the A63/A93, the function number and values are the same; the AF settings menu is used.
On alarms with activated Super Slave, special attention should be paid to interference. At the same time, the alarm constantly communicates with the key fob, monitoring the fact that it is in the car - in conditions of strong interference or problems with the antenna module, the locks will begin to operate without any external reason.
Something else useful for you:
Setting up security and anti-theft functions of the complex
- The list of actions and security states consists of:
- Security with sound alerts;
- Protection without sound;
- Silent operation state;
- Activation of safety when the power unit is running;
- Trigger the security state automatically;
- Disable protection;
- State of "panic".
Table: security mode management
| Mode. | Manipulation. | Circumstances. | Data on display. | Complex alerts. |
| Enabling acoustic protection. | Click on button #1 briefly. |
| · 1 beep; icons will appear on the communicator screen . | · 1 beep; · 1 gloss dimensions; · Access blocking; · the diode flashes. |
| Silent protection mode. | Press button No. 1 long and short. |
| · 1 beep; · Icons will appear on the communicator screen . | · 1 beep; · 1 gloss dimensions; · Access blocking; · the diode flashes. |
| Activation of silent state. | Button No. 1 before the beep, button No. 2 briefly. |
| · 1 beep; Icons are highlighted on the display . | · 1 beep; · 1 gloss dimensions; · Access blocking; · the diode flashes. |
| With the power unit running. | · The handbrake is turned on, the door opens, button No. 2 is pressed; · The key is removed from the ignition switch; · Doors are closed. Press button No. 1 on the remote control. | · Manual transmission in neutral, automatic transmission in parking; · Turbo timer is turned off; · The hood is tightly closed and the engine is running. | · 1 melodic, 1 alarm beep; · The screen shows the motor running and the protection is on. | · 1 siren whistle; · 1 gloss dimensions; · Door block; · Protection works; · Shock sensor is disabled. |
| Security is turned on automatically. | · Pointer to the “Auto” icon; · When the doors are locked, the ignition is turned off and the driver leaves the cabin; · After 10 sec. object protection is activated. | The handbrake lever is raised. | · Notification with 1 beep; · Picture on display | · 1 beep; · 1 gloss dimensions; · Access blocking; · the diode flashes. |
| Turn off protection. | Press button No. 2 of the key fob. | · Ignition is turned off; · Parking brake is on; · Access blocked; · Security is working. | · Two beeps per pager; · Picture display | · double siren signal; · Two headlight flashes; · The diode does not light up; · Access is unlocked. |
| State of panic. | Buttons No. 1 and No. 3 are pressed simultaneously. | Ignition is turned off. | · The pager emits one signal; Icons are highlighted on the screen | · Three siren blasts; · Three flashes of headlights follow; · Access will be blocked; · Protection is activated. |
Activation and deactivation of security mode without a communicator
You can activate the protection mode without using a communicator. Why is it necessary:
- Open the door, turn off the ignition;
- Click on Jack three times;
- Get out of the car, close the doors, the car will be armed.
Disable:
- The door opens with a key;
- Within 20 seconds, turn on the ignition and enter your personal identification code.
Table: immobilizer mode
| What to do. | Information from the machine. | Information from the key fob. |
| Enabling the immobilizer. | ||
| Press key No. 3 until you receive one melodic notification and one short beep. | — | The communicator will beep twice, then the icon on the display will light up. |
| Briefly press keys Nos. 2,3,4 to select the “Immo” mode. | — | The display lights up the “Immo” icon |
| Turning off the immobilizer | ||
| Either key No. 2 or Jack is held for 2 seconds. After the button is released, the ignition must be turned on no later than 2 seconds later. | The motor is unlocked. | — |
Table: anti-robbery mode
| What to do. | Information from the machine. | Information from the key fob. |
| Enabling the anti-robbery mode. | ||
| When the engine is running, keys No. 1 and No. 3 are pressed simultaneously. | · The alarm signals of the siren and head lighting are turned on; · Access to the salon is blocked;
|
|
| Turning off the mode | ||
| · When the door is open, a personal access code is entered; · When the ignition is on, key No. 2 is pressed. | · Two siren blasts; · Two glimpses of optics; · Access is unblocked; · Protection is disabled. | · Two beeps per pager; · The picture looks like this: |
Controlling the anti-robbery mode without a key fob
Without a key fob, this can only be done through a personal access code:
- Open the car with the key;
- The ignition turns on. Valet enters the first digit of the code;
- The ignition is turned off;
- The algorithm is valid for entering all code characters.
To enable:
- The doors close;
- When the ignition is on, the Valet is clamped for 2 seconds;
- The door opens. Waiting is activated with a period of 60 seconds;
- After 60 sec. all alarms are activated;
- After 30 sec. the unit is blocked;
Possible causes of failure and their elimination
Reasons for resetting the clock:
- The battery has run out. Modern StarLine key fobs themselves notify the user when the battery capacity drops to a critical level. At this moment, an icon in the form of an empty battery appears on the pager display, and the device itself emits characteristic sound signals. To replace the battery, you need to turn the remote control upside down, carefully remove the battery compartment cover and insert a new battery. This device runs on AAA batteries with a voltage of 1.5 V (pinty batteries).
- Battery replacement. After replacing the old battery with a new one, all configured time, date, alarm and timer parameters are automatically reset. Therefore, after each battery replacement, the car owner needs to re-enter the “Functions Menu” and adjust all values.
- Software failure. To resolve this problem, it is recommended to use the function of resetting all settings to factory settings, and then re-enter the necessary parameters. If this does not lead to the desired result, you need to flash the device.
- Mechanical damage. If the case is destroyed, cracks appear on the display, or part of the board breaks, the element will need to be replaced with a new one. Malfunctions such as keys sticking, defects or cracks appearing on them can also cause the key fob to malfunction. The problem will require, depending on the degree of damage, a solution in the form of replacing the button or resoldering it.
- Short circuit. For this to happen, even a small amount of liquid gets on the control panel, for example, raindrops or a spilled drink. As a result, some important parts of the pager may burn out - the system board, transistor, diode, etc. To return the device to working condition, it is necessary to replace the non-working part with a new one.
- Manufacturing defect. Such a key fob initially works with errors, the number of which will increase during operation. Therefore, if a manufacturing defect is suspected, it is necessary to replace the faulty key fob with one that works under the warranty card.
Setting up the service functions of the complex
Setting up service functions of the a93 is characterized by simple and accessible operations with an intuitive interface.
Table: management of service modes
| Mode. | Impact. | Circumstances. | Key fob information. | System information. |
| Shock sensor guidance. |
|
|
| · Two short beeps before setting sensitivity; · One flash when going to zone settings; · Exit - three flashes. |
| Disable the shock sensor. |
| Security is turned off. |
| Each shutdown stage is accompanied by a flash of light. |
| Managing the operation of auxiliary sensors | · Button No. 4 for a long time until notification, then briefly; · Keys No. 2 and No. 3 change sensitivity values; | Ignition is on, security is disarmed. |
| · The dimensions will flash three times; · The siren will sound twice. |
| Remote control of door locks. | · Lock by clicking on the first key; · Open by clicking on the second one. | The ignition is working. |
| — |
| Search and level of coolant temperature. | Press key number 4 twice. | — |
| Six flashes of headlights, siren. |
Alarm View Function
- Simultaneous pressing of buttons No. 2,4;
- Press and hold button #4 again. Information about the last alarm is displayed on the screen. Navigation through the list of all using the same button;
- Key No. 3 will allow you to view the date and time of the alarm in the list.
Table: programming and activation of the turbo timer
| What to do. | System. | Pager. |
| Turbo timer and duration of operation of the option. | ||
| Cursor to icon: . Then click on the first key. | One flash of headlights. |
|
| Select the value by clicking on the first button. | — | — |
| To select, hold down key No. 1. | — |
|
Programming table
The Starline A93 alarm system has a huge range of functions that are available for configuration. The car owner can set the auto start time, turbo timer parameters, starter operating time and many other options.
Below are programming tables for the Starline A93 car alarm, which will help you understand how to set the functions.
Which is better Starline A61 or A91?
Remote engine start
StarLine a93 conveniently and effectively introduces a remote start function for the power unit, which creates additional convenience when operating the vehicle.
Setting the software neutral
· The handbrake is activated when the engine is running, the driver leaves the cabin, closing the doors. Pressing the second button turns on the mode;
· The ignition is turned off. Depending on the program neutral conditions, the motor either continues to operate or not;
· The car is armed.
Table: starting, extending operation and stopping the engine from the key fob
| What to do. | Keychain. | System. |
| Start the power unit from a distance. | ||
| Button No. 1 to notify with two melodies. | · One siren signal; · One flash of headlights; · Doors are locked; · The motor will start. |
|
| Extension of work. | ||
| Press and hold the first button until two tunes are played on the remote control. | · The headlights will blink once; · The engine is running. |
|
| Stop the engine from a distance. | ||
| The first button is long, the fourth is short. | · Four flashes of optics; · The engine stalls. |
|
Table: instructions for setting autorun by time
| What to do. | Keychain. | System. |
| Setting a timed trigger | ||
| Cursor to icon: Click on the first key. | The headlights will flash once. |
|
| Select the period with the first key. | — | The period change is shown on the display: |
| Recording into memory with the first key before the melody. | After a few seconds, the engine warm-up cycle begins. |
|
| Disable the function. | ||
| Cursor to icon Click on the first key. | Two flashes of headlights. | · One remote control melody; · The icon will disappear |
Table: temperature trigger setting
| What to do. | Keychain. | System. |
| Setting the start based on outside air temperature. | ||
| Cursor to icon: Click on the first key. | The headlights will flash once. |
|
| Select the period with the first key. | — | The change in the start temperature value is shown on the display: |
| Recording into memory with the first key before the melody. | After a few seconds, the engine warm-up cycle begins. |
|
| Disable the function. | ||
| Cursor to icon: Click on the first key. | Two flashes of headlights. | · One remote control melody; · The icon will disappear: |
Table: autostart on alarm clock
| What to do. | Keychain. | System. |
| Setting the alarm to start. | ||
| Cursor to icon: Click on the first key. | The headlights will flash once. |
|
| Disable the function. | ||
| Cursor to icon: Click on the first key. | Two flashes of headlights. | · One remote control melody; · The icon will disappear: |
How to set up the Starline A93 key fob after replacing the battery
Correct setting of the Starline key fob after replacing the battery is directly related to the battery itself. There are two ways to do this. In the first case, the battery is changed as usual - the cover is removed at any time, the old one is pulled out and a new one is inserted. After which all the necessary settings are made again. But before that, you need to arm the car.
Setting up Starline A9 autorun
In the second option, the power source is replaced at exactly zero hours zero minutes. In this case, additional time settings are not needed, since the device will automatically start counting from this value on its own.