A car's fuel system loses its functionality over time. The occurrence of contamination leads to a change in the operating mode of the engine. Loss of power and exhaust smoke are only a small part of the problems that arise. To correct this situation, you will need to replace the injectors or service them. The use of special additives can help prevent contamination, but is not a panacea. Figuring out how to change a clogged injector is quite simple; you only need to partially disassemble the fuel system.
Symptoms of a problem
Injectors can be faulty not only on a gasoline injection engine, but also on diesel units. The main symptoms of failure of these parts are identical, therefore, regardless of the type of fuel on which the engine runs, the following signs may indicate a malfunction of this part:
- Increased fuel consumption;
- Unstable engine operation in idle mode;
- Difficulty starting, reminiscent of “overflow” of a carburetor engine;
- Jerks during uniform movement, and dips during sudden acceleration.
These are the main signs of a malfunction, but the injectors should be checked only after other possible causes of such manifestations have been completely excluded. The engine may operate unstably if the fuel pump malfunctions, when the hoses are leaking, or when the lumen of the pipe becomes clogged with various deposits. A clogged fuel filter can also negatively affect engine performance. Jerking on a gasoline engine can also be caused by a faulty ignition system. All of the above options for engine breakdowns must be completely excluded before proceeding with a full diagnosis of engine injectors.
What else could cause an injector malfunction?
Unstable operation of the injector can also be associated with other mechanisms of the fuel system:
- IAC or idle air control - this type of sensor opens the air channel;
- Spark plugs are the elements responsible for spark formation.
Faulty sensors and spark plugs must be replaced promptly. Well, the injectors need to be cleaned and repaired/replaced regularly. They usually last at least 200-250 thousand kilometers on foreign cars.
You learned how to wash the injectors without removing them from the engine . If you properly clean the injector, the car will start to drive faster and pull well at speeds of 2000-3000 per minute. Fuel consumption will also be reduced.
What is an injector sprayer
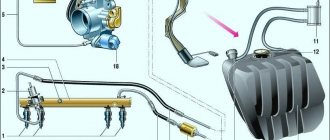
An injector is a necessary element of the Common Rail fuel system; it serves for:
- creating fuel injection (ensuring the required dose and angle of fuel supply);
- sealing the injection system from the internal combustion chamber;
- fuel efficiency.
The nozzle nozzle is the part that is directly involved in the injection process. In this case, the part located at the front end of the nozzle is constantly in contact with the combustion chamber, and therefore is subjected to thermal and mechanical treatment. Thanks to the fuel that flows through the nozzle, the atomizer is cooled. However, during long-term operation such cooling is not enough, so the nozzle tip body is always made of heat-resistant materials.
In a fuel system with high pressure Common Rail injection (injectors can operate under pressure from 250 to 1000 atmospheres), the atomizer is a built-in element of the injector assembly. This is the only way to achieve its long service life.
What types of injector nozzles are there?
All parts, regardless of the prestige of the manufacturer and cost, must comply with the minimum list of job requirements:
- Supply a strictly defined amount of fuel.
- Ensure calculated injection time.
- Ensure the injection cycle specified by the manufacturer.
- Form fuel droplets of the required size.
- Maintain a certain torch shape.
Pin atomizer allows you to create one spray
Thus, on diesel engines equipped with a Common Rail fuel system, injectors with two types of nozzles are used . Pin ones are considered standard equipment, since they form only one fuel torch. Multi-jet engines are designed to create two or more torches, due to which the engine power is significantly increased.
A more complex nozzle model is equipped with a new generation atomizer, which forms several torches at once
Spray device
The design of the nozzles of all types of nozzles is similar. So, this part of the nozzle always consists of a body and a needle. The body is made in a cylindrical shape, along the axis of which the needle is inserted (in Common Rail nozzles the needle is inserted inside the channel). The system part has ultra-precise processing: the gap between the needle and the channel does not exceed 1–2 microns.
The most important unit of the entire structure is considered to be the point of contact between the needle cone and the body cone. In a new and working one, the needle cone is always in close contact with the body, and as it wears out, a gap begins to form between them.
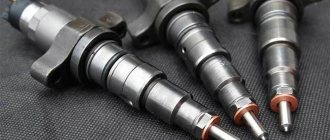
These two parts perform the main function of the injector - metered fuel supply
Principle of operation
The operation of the nozzle (and with it the sprayer) on diesel engines is divided into four cycles:
- The injector is completely closed, that is, the valve is at rest. In this case, the injection pump presses on its wall, but the sprayer chamber counteracts this pressure, so the valve is closed.
- The beginning of fuel injection - the nozzle valve begins to open, as the external pressure becomes stronger than the internal resistance of the atomizer.
- The injector is fully open - depending on the fuel consumption, the nozzle needle will rise at different speeds. At maximum torque the needle rises quickly, at low speeds it rises more slowly. After it is completely raised, a dose of fuel is injected into the internal combustion chamber.
- Closing the valve means lowering the spray needle. The electronic control unit commands the injector to complete the cycle. As soon as the needle drops into its channel, fuel injection stops completely.
Removing injectors from the engine for diagnostics
On modern injection systems, the element is an electromagnetic device that opens upon command from the ECU to allow some of the fuel to pass through. On most cars, the injectors are installed on the fuel rail (rail). The removal process may differ slightly depending on the type and design of the internal combustion engine, and different tools may also be needed. Often, to remove fuel injectors, you need to prepare:
- Screwdriver Set;
- several keys;
- pliers or pliers;
- carburetor cleaner;
- rags or suitable rags;
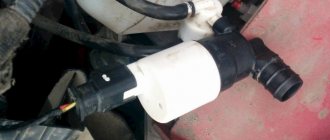
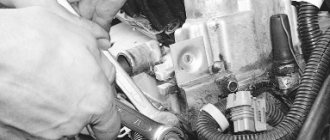
Now let's take a closer look at the process and answer the question of how to remove injectors on a VAZ or any other fuel-injected car. First you need to reduce the pressure in the fuel system. Many car models have a pressure regulator on the fuel rail. This regulator is a valve that needs to be pressed. As a result, fuel will flow out of the ramp and the pressure will drop.
Next, you need to remove the fuel rail on which the injectors are attached. To dismantle it is necessary to disconnect the connectors with wires that are secured using a special clamp. The specified latch is a spring clip that must be pressed. Then you will need to use a screwdriver to move the clamp along the ramp. The injectors can now be removed.
How to check an injector
Injector malfunctions are not numerous, but any of the breakdowns can lead to unstable operation of the cylinder in which this part is installed. After removing the injector, it is necessary to carefully check and, if necessary, clean or replace the part that does not meet the conditions for uninterrupted delivery of fuel to the cylinders. Correction of injection engine injectors consists, first of all, in eliminating tarry deposits in the area of fuel spray. Diagnostics and repair of parts installed on a diesel engine are carried out in a similar way. The diesel engine cylinder injector has a design that allows only the nozzle to be replaced. If the injector is not dirty, but there is no fuel combustion in a given cylinder, then the injector winding may have burned out. A broken injector is a fairly rare malfunction, but if there is no other damage, it is necessary to measure the resistance between the contacts of this part using a multimeter. If resistance is completely absent, then the faulty part must be replaced.
Removed injectors can be checked directly on the fuel rail. To do this, connect the control unit by connecting the wires in the sequence in which they were connected to the running vehicle. The fuel rail must be secured in such a way that containers of the same volume can be placed directly below them.
Plastic cups that are placed under the spray nozzle of each nozzle are ideal for this purpose.
Then you need to turn on the ignition and run the engine starter for 7 - 10 seconds. When performing diagnostics, you should pay attention to the quality of atomization of the fuel flowing from the injector. If fuel flows from the nozzle in a straight stream, then this nozzle needs to be replaced or cleaned of carbon deposits formed on its nozzle. You should also pay attention to the amount of fuel in the containers that were placed under the injectors. If, when performing diagnostics, there is a complete absence of fuel in any container, then there may be no power to the injectors. This problem can be caused by a lack of contact between the cable and the terminal, as well as a simple break in the wiring. If the wiring is intact and there is good contact between the wire and the injector winding terminal, then the control unit of the vehicle's power system may be faulty. If the electronic control unit is faulty, then in order to continue diagnostic measures, it must be replaced with a known good part.
Checking the injectors yourself using this method allows you to fairly accurately determine the faulty parts of the car’s power system. When performing such diagnostics, you should remember the heavy load on the battery when the starter is turned on, as well as the dangers of rotating the crankshaft without sufficient oil flow into the engine line, so it is advisable to carry out the diagnostics in one step. When the problematic injector is identified, you can begin to repair it.
Diagnostics and replacement of the injector
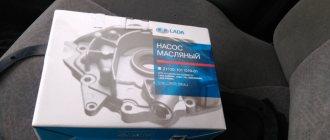
Injectors have a huge service life, and in some cases, cleaning is enough. When replacing them with non-original ones, registration of the injectors will be required; such information is entered into the electronic control unit and is necessary for engine operation. It is also important to maintain the tightening torque of the injectors, which ranges from 40–90 Nm and depends on the specific model.
The operation of the injector, although it seems complicated, upon closer examination becomes clear to every car enthusiast. A modern injector ramp has its own maintenance features that cannot interfere with disassembly and replacement of parts.
If you have any questions, leave them in the comments below the article. We or our visitors will be happy to answer them
Basic injector malfunctions
Almost all malfunctions that occur in both diesel and gasoline injectors are associated with their clogging. And the question comes down to how exactly the blockage occurred in the sprayer.
Knock
The so-called knocking sound is a malfunction that occurs due to coking of the nozzle holes. The fact is that this part is regularly exposed to high temperatures. If the driver constantly uses low-quality fuel, tar deposits accumulate on the nozzles.
Common Rail injector nozzle failed due to poor quality fuel
Gradually, the surface of these deposits becomes covered with hard soot, and interruptions in the fuel supply begin. It is at this moment that the mechanism begins to “knock.” Here are the signs of his knocking:
- engine power is significantly reduced;
- an increase in engine speed leads to jerks and dips;
- at low speeds the engine is unstable and often stalls;
- The toxicity of exhaust gases increases two and sometimes three times.
To eliminate this, the device must be washed. Here are the main cleaning methods:
- flushing with special fuel additives;
- washing on the stand (for this the parts will have to be removed).
Flow
An injector leak usually occurs due to the destruction of the o-ring located under it. Any, even the smallest crack in this part leads to a leak, since the pressure in the fuel line is very high. In addition, due to the collapsed ring, the fuel system loses its tightness and air begins to leak into the engine combustion chamber.
Due to the destruction of the sealing ring, the Common Rail injector may leak
Here are the signs that the injector is leaking:
- When inspecting the engine, characteristic oily streaks are visible around the part;
- the engine is very difficult to start;
- a running engine operates intermittently and with characteristic popping noises.
Replacing injectors on a Ford Focus car
Before we move on to describing the process of removing the injectors, you need to select everything you need for the job. Here is a list of tools and consumables:
- Phillips screwdriver;
- set of hex keys;
- set of open-end wrenches;
- pliers;
- wrench and set of socket heads;
- flat screwdriver.
Step-by-step instructions for removing and replacing Ford Focus fuel injectors
We remove the fuel rail to check the operation of the injectors and replace them, as well as when dismantling the intake pipe.
In order to remove, check and replace fuel injectors on a Ford Focus, you must perform the following steps:
- Relieving pressure in the power system
- Using a screwdriver, move and remove the rubber tip of the crankcase ventilation tube from the cylinder head cover pipe.
- Use a screwdriver to pry up the plastic retainer on the tip of the fuel supply tube and move it outward.
- Use a screwdriver to press the spring clamp and remove the tip of the fuel supply tube from the fuel rail pipe.
- Using a screwdriver, press the lock of the outer injector block and, lifting it slightly, remove the block of blocks from the connector of this injector.
- Sequentially remove the block of blocks with the wiring harness from the remaining injectors.
- Using a 10mm head, unscrew the two self-tapping screws securing the fuel rail brackets to the intake manifold.
- We pull the fuel rail along the axes of the injectors and, overcoming the resistance of the injector sealing rings, remove the injectors from the holes in the cylinder head. Remove the fuel rail with injectors.
- To remove the injector, use a slotted screwdriver to pry up the retainer and remove the injector.
- Slide the clamp along the grooves of the nozzle and remove it.
- Using a thin slotted screwdriver, remove the O-rings from all other injectors.
- Using a screwdriver, remove the spring clamp and remove the fuel pressure pulsation damper from the hole in the fuel rail.
- Remove the sealing ring from it.
- Install the injectors into the fuel rail and the rail onto the intake pipe. Connect the pipeline to the ramp, start the engine and check the tightness of the connection of the pipeline and the injector seals.
We replace the sealing rings of the injectors and the fuel pressure pulsation damper in the rail with new ones. Before installing the injectors and fuel pulsation damper into the rail and cylinder head, apply a thin layer of engine oil to the sealing rings. It is not allowed to wash the injectors by immersing them in a detergent composition to avoid damaging their electrical parts.
Disassembling the nozzle
In most cases, injector repair can be done by replacing the filter, which is installed at the top of the injector where it connects to the fuel hose. To remove the filter, the main tool is to use a self-tapping screw, which is screwed 2-3 turns into the mesh filter and removed from the nozzle body.
Then, in place of the removed filter, a new mesh filter and o-ring are installed. In this way, it will be possible to ensure stable filling of the injector with clean fuel, which will have a positive effect on the operation of the injection engine.
Adjusting nozzles at home is a completely doable task if you have minimal experience in handling tools. For home craftsmen who have at least once disassembled the carburetor and eliminated engine overflow, it will not be difficult to clean the injectors.
Restored injectors can last for a long time, and if all cleaning and repair actions were carried out according to the rules, then the vehicle will be operated without serious deviations in the fuel supply system.
Replacing Hyundai fuel injectors
If such a procedure as cleaning the fuel injectors of a Hyundai engine does not help, the specialists of the Bers-Auto auto repair center will offer you to replace them. If the machine has a diesel engine, work will be required to replace the injectors for each cylinder. After all, the presence of new and old injectors in different cylinders is the fastest way to disrupt the uniformity of their operation, and, as a result, disrupt the normal operation of the entire engine. In addition, replacing the injectors individually will cost you a decent amount of money, since you will have to disassemble the internal combustion engine several times. In order to avoid negative consequences, the inability to repair Hyundai fuel injectors due to their worn-out service life, we strongly advise you not to neglect such a process as replacing Hyundai injectors, even though their service life is usually 100,000 km mileage for cars with a diesel engine, and 200,000 km for cars with a gasoline engine.
Replacing the injector nozzle
During the operation of a diesel car, situations may arise when fuel consumption increases noticeably and engine power decreases until it stops completely. This is often caused by faulty nozzles. In these cases, it is advisable to carry out repair work as quickly as possible.
The cause of decreased engine power and increased fuel consumption is often a faulty injector nozzle.
Symptoms of a faulty injector nozzle
The need to replace the sprayer can be determined by the following signs.
- Fuel is supplied in excess volume. It continues to flow into the engine even after the end of the operating cycle. Smudges appear.
- The engine is unstable, starts poorly after a long stay and the idle speed fluctuates. The reason for this is a lack of fuel in the system.
- Due to incomplete combustion of fuel, the exhaust becomes black and denser.
As a result, engine power is reduced. In this case, replacement of the nozzles is required.
Required Tools
Typically, injectors are installed in the cylinder head on a thread. To dismantle them, you should not use open-end wrenches. Even if you manage to remove the injectors in this way, you will not be able to install them back - it is impossible to tighten them with a wrench with the required force.
The main part of the injector body is a hexagon. To remove them, you can use standard 24 and 27 socket heads and a wrench. They should be elongated. In addition, you will need a container with fuel to flush the injectors.
Video: dismantling and repairing injectors
Procedure for replacing an injector
After removing the injectors, washers and contaminants are removed from the injector channels. The washers are pulled out using self-made hooks. After cleaning the channels, be sure to crank the starter for 10 seconds. This will ensure that the channels are completely clear of debris. In addition, it is recommended to check the functionality of the glow plugs and control system.
After removing the injectors, their performance is checked according to the following criteria:
- when fuel is supplied under a certain pressure, the injector must open;
- before opening the injectors, fuel should not flow out of the nozzle;
- spraying should be uniform;
- When the fuel supply is stopped, the pressure inside the injector must remain unchanged for some time.
When disassembling the nozzle, it is convenient to use a vice, but you should not use excessive force
If the nozzles are faulty, protective caps should be put on the nozzles and the work area should be prepared. The surface must be clean and level. You will need:
- vice;
- container with clean fuel;
- spanners.
Japanese car injectors that have a return through a ramp should not be clamped in a vice, as the part may be damaged. The key is secured in a vice and the nozzle is placed in it.
The injectors of German engines can be clamped in a vice. It is not recommended to use open-end wrenches - only socket wrenches and extended heads.
The procedure for replacing the nozzle is as follows.
- The union nut is loosened and unscrewed. Sometimes it is removed along with the sprayer. In this case, it is knocked out with any suitable attachment, cleaned of dirt and washed.
- The intermediate housing is removed and washed in a container with fuel.
- The remaining fuel is drained from the injector body.
- Remove the new atomizer from the packaging and wash it.
- The intermediate body is removed from the container in such a way that contaminant particles are removed along with the fuel.
- The nozzle is assembled, the nut is tightened.
- The performance of the injector is checked at the stand.
- Before installing the nozzle, the seat is lubricated with graphite lubricant. Tightening is carried out with a force of 6–7 kg-m. Screw the nozzle into the channel by hand - it should go easily.
The assembly process does not present any difficulties if the tubes and fittings were marked during disassembly. Before installation, high-pressure pipes are washed with fuel both outside and inside. After connection, clamps are installed on the tubes to prevent vibration and premature failure. Air is then removed from the system and the engine is started.
Video: DIY injector replacement
Removing and replacing injectors
A car's mileage of more than 100 thousand km requires diagnostics and maintenance of the injector. You can carry out the entire cycle of replacement work yourself or remove the injectors along with the ramp and transfer them to a service center for further diagnostics and washing. In any case, the main disassembly process is much cheaper to do yourself and such work will have the following order:
- Turning off the car's power is done by removing the negative terminal from the battery;
- Relieving pressure in the fuel system - the pressure regulator is usually located on the fuel rail and is a valve, pressing which will drain excess fuel, for which you will need to place a collection container;
- Disabling the connecting block will allow you to gain free access to the fuel system. This disconnection of the injector wiring is also necessary for dismantling the injectors and is carried out with care so as not to damage the clips;
- Disassembling the fuel line - you need to disconnect all the equipment to get to the fuel valve and use a screwdriver to move the clamp, which is located along the ramp. Such operations will help free up space where the injectors are located and carry out dismantling;
- Removing the intake manifold - you will need to unscrew the bolts, which is most conveniently done with a ratchet wrench. Then the manifold will need to be pulled out, which will provide access to the place where the injectors are installed. When removing the ramp, you should inspect it for obvious defects;
- Removing the injector - use a screwdriver to move the clamp and release the sealing rings on the injector being replaced. They should be pulled out extremely carefully, rocking them in the connector, so as not to damage the ramp body.
A diesel engine or direct injection power unit has a more complex fuel system. To carry out such maintenance work, special pullers may be needed. To understand how to install injectors in such a machine, minimal knowledge of direct injection technology is required. In this case, fuel from the injector enters directly into the engine, which complicates the maintenance process.
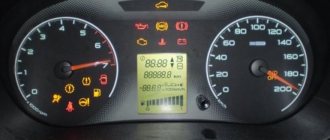
How to diagnose and repair injectors
In the event that the owner suspects the unstable operation of the internal combustion engine is a failure of the fuel equipment, in particular, faulty injectors, he will have to go for computer diagnostics . When it shows errors in the operation of the injectors, they will all be removed from the engine as a set and sent for diagnostics on a special stand. Bench diagnostics will show whether the injectors are bleeding fuel back into the drain line, and if this happens, at what pressure.
The next stage will be testing the operation of injectors on equipment that simulates operation on an engine, with the participation of injection pumps and fuel pipes. Electronic sensors will one by one measure all the operating parameters of each injector, and this will provide direction for diagnosing the causes of the problem. After inspection, the injectors are sent to an ultrasonic bath and cleaned of carbon deposits and other deposits.
After diagnostics, the stage of inspecting each injector on the stand begins. The master carefully disassembles all the smallest elements of the nozzle (can only be done with electromagnetic injectors) and examines them under a microscope. The advantages of such a meticulous approach are that most manufacturers produce all the necessary “spare parts” for repairing and restoring the injector. Having identified a problem, for example, with a non-working injector nozzle, you can replace it with a new one, thereby returning the element to operability using a budget method.
- True, for injectors from those manufacturers whose components cannot be found on sale, there are only two strategies left - replacing an expensive element with a new assembled one, or looking for a budget analogue of the required part, but from a different manufacturer.
After all the injector elements that need replacement have been replaced, the technician assembles the element together . The most important step is adjusting the assembled nozzle, and this is a difficult task: each assembled part is measured with an indicator; if the size does not correspond to the required range, the part is again disassembled and adjusted with a washer or a locking ring. And so on with each element until the injector is completely assembled.
It is also important to tighten the upper and lower parts of the injector with a maximum regulated tightening torque using a torque wrench.
After collection, the repaired injector is again sent to the diagnostic stand , where it is checked in all operating modes.
Examination
There are many ways to check an injector. These are homemade methods, as well as testing methods using special equipment. If you check it yourself, you can only evaluate the opening/closing of the injector. You can also make sure that the injector is not leaking or overfilling fuel. You can also evaluate the quality of the spray during self-testing. Not many people know how to check a removed injector, but all you need to do is connect the power and pass fuel or a cleaning agent through it.
As for diagnostics using professional stands, this equipment allows you to determine more parameters. This is the accuracy of operation, as well as the efficiency of operation of all injectors and each individually. This allows you to accurately and objectively evaluate the performance of the injection system.
Adjustment after self-repair
It should be noted that in some cases the part will not immediately function correctly - calibration is necessary. This is done by changing the adjusting washers; it is advisable to stock up on washers of different thicknesses in advance. For example, if the response pressure is lower, we install a thicker washer and vice versa. You can take it as a rule that to increase the pressure by 10 kgcm, take a washer 0.1 mm thinner. The diameter should be the same as those previously installed.
It is also worth noting that at the stage of disassembling the nozzle, you need to carefully inspect the pressure spring and, if it has exhausted its service life, replace it. Otherwise, fuel leakage can be expected. Also, all O-rings must be changed. Without this work, calibration will not make sense. After adjustment, the product can be put back on the engine.
Cleaning
We know how to remove injectors from an engine. You should also find out how the process of washing and cleaning them is carried out. You can wash them in two ways - with removal and without removal. A greater effect can only be achieved by washing and removing.
The most common method involves the presence of keys for dismantling, a charged battery, two wires and terminals for them, as well as a cleaning fluid. The fuel rail is removed, and then the injector. The wires are connected to the latter. A can of cleaner is connected to the nozzle through the inlet. Then they press on the sprayer and close the wire to the battery, thereby activating the solenoid valve. You can also assemble a stand for cleaning injectors. But it is very long and expensive.
Some tips
Particular attention should be paid to the quality of the sealing rings - not only the tightness of the unit depends on them, but also possible overheating. They act as a barrier that prevents excess heat from the cylinder head from affecting the injector. The rings must be changed after each dismantling. The fact is that after tightening the element, the rings are compressed, they are deformed, etc. Please note other points:
- When asked whether it is possible to repair a Common Rail diesel injector on your own, the question will be - yes, it is possible. But only with the use of special equipment, which costs a lot of money. It's easier to go to a workshop.
- Check in advance whether you need to re-register a new injector into the unit’s memory. Sometimes this can be a problem.
- O-rings from different manufacturers and for different models may be indistinguishable by eye. In this case, even the slightest deviation will cause a seal failure. Only use rings that match your car brand.
- Buy spare parts not on the market, but in specialized stores. Otherwise, there is a high risk of running into a low-quality part.
- Special fuel additives will significantly extend the service life of not only injectors, but also other components of the car. However, this is more of a preventative measure and not a panacea.
Cleaning injectors
At the moment, experts use two methods of cleaning injectors, and each method has its own nuances. Next we will describe both methods, and you will choose the one that seems easier and more correct to you.
First cleaning method
For this method, you will need injector cleaner, carburetor cleaning fluid (spray), a spare O-ring and a pump with a pressure gauge. The first thing you need to do is remove all the nozzles, because if you decide to clean it, you need to do this with all the nozzles, and not just one. Find a suitable container and pour the injector cleaning fluid into it. Place all the injectors in a container and leave them there for a while to allow them to acidify. While the injectors are in the container, take the prepared carburetor spray and clean the idle air control with it. Now inspect the area around the injector nozzle; carbon deposits form there - coke, which in its consistency resembles resin. You will have to take some kind of metal object and tinker with this type of contamination. In order to carry out internal cleaning of the injectors, you need to prepare a power source (from 3 to 12V) and a foot-operated mechanical pump equipped with a pressure gauge.
Remove the tip from the hose and pour injection cleaner into the resulting hole. After this, put the end of the hose on the nozzle. Pump up the pump to 6 atmospheres and apply a voltage of 3V to the injector. If you do not hear the injector click, then you need to add voltage. You need to apply voltage periodically, while not forgetting to pump up the pump to six atmospheres. Clean all injectors in this manner.
Second way
For this method you need a carburetor cleaner spray and also a pump with a pressure gauge. We repeat all the operations indicated in the previous method, only change the injector cleaner to a carburetor cleaner. It is mandatory to carry out external cleaning to remove carbon deposits. To do this, take a clean cloth and apply the cleaner to it. Treat all fuel units with this cloth. Gradually, under the action of the cleaner, the coke will soften and be cleaned off without any problems. You can help yourself with a screwdriver or toothpick.
Both operations should take an average of two hours of your time, but you will save a lot and learn how to clean injectors.
Injector repair
Gasoline engine injectors cannot be repaired; they only need to be regularly looked after and serviced (washed). However, some mechanical type diesel injectors can still be restored.
For example, if you repair engine injectors, only on the atomizer. Usually the needle cone does not fit tightly to the seat on one side. Because of this, the seat and needle tip wear unevenly, and the shape of the spray circle changes. Therefore, the injection turns out incorrectly. What can you do here? First of all, check the injector, then remove it. Then unscrew the nut and replace the sprayer, pressure pin and spacers.