Steering rack - simplicity and reliability
The steering mechanism of a car is designed to change the direction of its movement. It has been tested and tested for more than a hundred years, but meticulous designers still find new solutions to improve its performance.
The steering rack is no exception - a relatively simple and reliable mechanism, the operating principle of which is based on the interaction of the “rack-and-pinion steering shaft worm” pair, which converts the rotational movement of the steering shaft into the reciprocating movement of the steering rods.
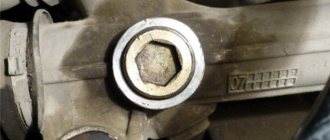
Wrench size for adjusting the Kalina steering rack
To adjust the steering rack clearance, hex and octagonal keys with a range from 10.0 (mm) to 55.0 (mm) are used.
A steering rack wrench is a special wrench that is inserted into the adjusting nut in the steering gear housing.
As a standard, wrenches with the following characteristics are used to tighten steering racks:
- Key for adjusting the gap (hexagon): from 10.0 (mm) to 55.0 (mm);
- Key for adjusting the gap (octahedron): from 17.0 (mm) to 24.0 (mm);
- Key for locking the locknut (open-end): from 24.0 (mm) to 54.0 (mm).
According to GOST 2838-80 ('Spanners') and GOST 11737-93 ('Wrenches for hexagon socket screws'), the tolerance dimensions for steering rack keys are:
- Key for adjusting the gap (hexagon): ±0.15;
- Key for adjusting the gap (octahedron): ±0.15;
- Key for locking the locknut (open-end): +0.72.
The strength of open-end wrenches is determined by the torque. Thus, according to GOST 2838-80, the test torque of keys 24.0-54.0 (mm) must be at least 143.5-858.0 N/m.
Important: before it needs to be tightened with a wrench, the new steering rack can move without knocking from 20,000 (km) to 40,000 (km).
| General view General parameters of keys for steering racks | Key for adjusting the gap (hexagon) Key for adjusting the gap in the gearing of the steering rack of a car |
Data are presented in millimeters.
| Parameter Description of parameter |
| Make and model of the car Name of the make and model of the car |
Caution: The above data are official figures from manufacturers, but please note that the information is for reference only and is not guaranteed to be completely accurate.
Comments. Have questions? We will answer everything.
Source
Signs that your steering rack needs to be tightened
First, you need to turn down the radio volume and listen to the suspension work. If at low speeds there is a knocking sound over small irregularities, there may, of course, be several reasons, but the most likely is a loose steering rack. Secondly, you need to constantly monitor the steering play; its presence also indicates that the steering rack is not working in normal mode.
Moreover, the presence of play is an unpleasant signal; it makes the steering wheel’s reaction unpredictability in response to your actions, and even with a play of 10 degrees you will not pass the state inspection.
Wrench size for adjusting the Kalina steering rack
- To the beginning of the forum
- Forum Rules
- Old design
- FAQ
- Search
- Users
there is a key for the 08 model, and there is a key for the 10 model, and on the old tens they installed only the mustache from the tens from the 08 model
Well, it costs 80 rubles somewhere, so why strain your brains?
45 rubles in auto49, it’s nonsense to save in this way. crazy
I saw someone who likes to save money. himself - the housekeeper - that one, but such
yes do it, who is against it?)
I found that the key goes to 24, but I’m also interested in the diameter of the shaft at the steering rack, since the key comes with a hole for the shaft
What are you writing about, about the rack tightening nut or the steering shaft housing cover? On the 10th there is no threaded cap for a hexagon, there is a cap for 2 screws with an internal hexagon.
All this can be found in the directory of designer ANURYEV
Source
Tightening process, video
There are several ways to tighten. One of them is the method of removing the slats. The removed rail is clamped in a vice and then, using a special wrench, the nut is tightened 10-15 degrees by turning it counterclockwise.
This is followed by a check for backlash and, if necessary, the procedure is repeated, since the backlash can be more or less. It is not advisable to overtighten, it will be difficult to rotate the steering wheel. The advantage of this method is the ease of adjustment, but the disadvantage is that you have to remove and then put the steering rack back in place, and this requires time, certain knowledge and skills.
The second method is simpler, it does not require removing the steering rack, you just need to remove the battery and the platform under it with four bolts, but it is much easier and faster than removing and installing the steering rack. This way we gain access to the steering rack and steering rods.
We take hold of the rod with our hand and begin to shake it with force. A characteristic knock will immediately indicate the presence of play. The stop nut is located on the rack behind the left link from the bottom; you need to feel it with your finger. Now the task is to get the wrench into the nut and then turn it counterclockwise. We check for play and, if necessary, tighten it further.
But in the video there is another tightening option, even without removing the battery:
Steering rack (“Kalina”): removing the part from the car
So where to start? The first step is to jack up the front of the car and secure the rear wheels with a special stop. Next, we sit in the cabin and unscrew the bolt of the splined connection of the column. On Kalina it is located in the area of the pedal block, so get ready for unforeseen difficulties.
We continue repairing the steering rack. "Kalina" after dismantling the front wheels undergoes removal of the steering knuckle nuts. You should also carry out preparations in the engine compartment. Here we remove the terminals from the battery and remove the battery along with the platform and heat reflector. Next, you need to unscrew the nuts that hold the rack fastening to the body. That's it, now the steering rack (Kalina VAZ) has been successfully disassembled. We take it out of the car and place it on a flat area.
Now the second part of the renovation. Here we cannot do without a vice, since we will clamp the steering rack casing in it. After this, you should move the rack left and right, in this way we will diagnose it for the presence of play. If there is one, try tightening the spring nut. Be careful - you need to tighten it no more than 10 degrees, and then check the device again for play. We continue this way until we completely eliminate the problem. Remember that if the spring is too tight, it will become very difficult to rotate the steering wheel, even with power steering.
Repair, price
A lift is a fairly simple and quick way, but often it is only a partial, temporary solution to the problem. After all, the appearance of play can be caused by various reasons - the boot may be damaged, gaskets may leak and who knows what else, that is, there is a high probability that the steering rack is running dry. In this case, there is a risk that a short time after tightening it may simply jam. Therefore, troubleshooting the rack will be very useful, at least an external inspection, it will make sure that the anthers and corrugated casing are not damaged.
If you suspect the need for repairs, consider whether you can handle it yourself. Get ready for the fact that you will have to spend the whole day in interesting positions, and you will also need an assistant to perform some operations. Do you know how to install the rack so that the steering wheel is level? If not, you risk having to do the installation again.
An alternative is a service station. They will charge you around 3,500 rubles for repairs, 200 rubles and another 200 will be spent on anthers and so on.
How to put the steering wheel straight on Kalina?
After repairing or replacing the steering rack, it is not always possible to position the steering wheel so that it faces straight, so many car enthusiasts have a question: how can Kalina place the steering wheel straight? Indeed, when the steering wheel is straight when driving in a straight line, it is not only pleasant, but also convenient. It's just easier to hold on to.
To then set the steering wheel straight, first, while driving in a straight line, make a mark at the top point of the steering wheel, and when you arrive at the repair site, place the steering wheel so that this point is at the very top. Next, pull the central part of the steering wheel towards you, it will detach and end up in your hands.
The horn terminals must be disconnected, the central part of the steering wheel can be put aside.
Using a 24mm wrench, unscrew the nut securing the steering wheel to the steering shaft.
Don't forget to mark the position of the steering wheel relative to the shaft with a marker.
Now we take the steering wheel with both hands (at 9 and 3 o’clock) and, alternately shaking each hand towards and away from us, carefully remove the steering wheel from the splines of the steering shaft. As soon as the steering wheel is removed from the splines, turn it to the position you need (that is, put it straight) and put it back on the splines. Now, when driving straight, your steering wheel will also point straight.
My steering wheel was slightly skewed to the right, so I moved it one slot to the left, like this:
A little theory: front suspension design
Before attempting to fix any problem, there is a tendency to look at the blueprints or repair manual. It is known that the VAZ-2192 parts catalog contains the following object:
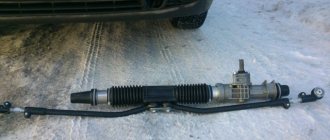
This is what the steering rack looks like in the drawing
Whether the knock will remain in the steering rack of Kalina-2 depends on the following: how accurately element “14” is adjusted. The adjusting nut, marked “14”, looks almost invisible here. But first impressions are deceiving. In the catalog, by the way, the element is called “Stop Nut”.
It is important to know that the thrust nut has external threads. And it spins clockwise. And the words “tighten the rack” mean screwing in the specified nut, and nothing more.
Now let's move on to practice and see what the node in question looks like in reality:
If you remove the rail, it looks like this
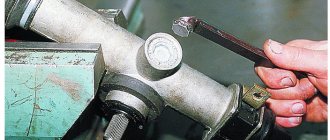
The nut has a non-standard notch, and it can only be rotated with a special tool. By the way, the recess will be closed with a cap. In the catalog it is designated by the number “15”, and now, let’s look at the appearance of the special key:
Rack adjustment key
The thrust nut is turned at small angles. We are talking about values of 10-15 degrees. What happens if you overdo it with tightening the rack? The knocking noise will disappear, but the steering wheel will turn with difficulty. Therefore, if necessary, the nut can be pulled back.
Repair of electric power steering rack Lada Kalina: photo, video
Every Lada Kalina car owner will sooner or later be faced with the problem of steering rack failure and repair. Of course, experts and auto mechanics recommend changing this element, but not everyone can buy this element, so repair is the way out.
about repairing the steering rack on Lada Kalina:
The material will tell you how to repair the steering rack, give basic recommendations and assembly features.
Signs of a faulty steering rack
Steering rack repair kit
Before you begin repairing an element, you need to accurately determine that it is the steering rack on your car that has failed. For this, there are indirect and direct signs that will indicate the detail
Of course, it is best to carry out diagnostics at a specialized car service center, but you can try with your own hands, for example, tighten the steering rack, but here you need to act carefully
So, let's look at the main signs of a faulty steering rack:
All these signs are direct if the steering rack is faulty, which will be the first signs that the element needs to be diagnosed and repaired.
Causes of malfunction
General view of the steering
There are not many reasons for steering rack failure, but you need to know them. Timely maintenance, as well as diagnostics of the unit, can extend the life of the element.
Let's consider the main causes of steering rack malfunctions:
- Wear of elements that make up the rack.
- Damage due to an accident when the impact hit the wheel.
- Other reasons that caused the rack to start leaking.
All these reasons become the reason for repairing the steering unit.
Design characteristics
In order to repair the steering rack, you need to know its design and the elements that make up it. Let's look at the design diagram of the unit:
Steering rack diagram
Steering rack parts: 1 – rack bushing ring; 2 – rack support sleeve; 3 – steering gear housing; 4 – roller bearing; 5 – drive gear; 6 – ball bearing; 7 – retaining ring; 8 – protective washer; 9 – sealing ring; 10 – bearing nut; 11 – lock washer; 12 – boot; 13 – rack; 14 – protective cap; 15 – rack stop; 16 – sealing ring; 17 – retaining ring; 18 – stop nut; 19 – clamp; 20 – protective cover; 21 – inner tie rod end; 22 – connecting plate; 23 – locking plate; 24 – bolt securing the rod to the rack; A - mark on the boot; B - mark on the crankcase
What will be needed for repairs?
The steering rack repair kit can be purchased either individually or as an assembly.
Repair kit for steering rack manufactured by Ricardo
2110-3403090-11 is the catalog number of a complete steering gear repair kit for the Lada Kalina. You can buy bushings and plastic inserts separately, but it is not recommended, since the quality of the products may be different, and accordingly, the wear on the left and right sides may differ.
Dismantling and disassembling the rack on Lada Kalina
When all the materials for repairing the steering rack have been collected and purchased, you can proceed directly to the repair operations.
Before you begin, you need to completely clean the steering rack. This can be done manually, but it is best to use a steam mechanism under pressure, which will efficiently remove dirt and dust from all elements without damaging the parts.
Now, let's proceed to sequential operations to repair the steering rack:
- We place the brake shoes under the rear wheels and remove the handbrake. We put the shoes under the wheels
- Unscrew the bolt that secures the steering shaft. Removing the coupling fixing bolt
- Remove the cotter pins from the nuts securing the tie rods to the steering knuckle. We remove the cotter pins using pliers
- Unscrew the pin nuts and press them out. If you can’t remove it by hand, you should use a pry bar and a hammer. Removing tie rod ends using a hammer and crowbar
- Disconnect the EUR from the on-board network. Disconnecting the EUR connector from the on-board network
- We unscrew the fastenings of the rack housing to the car body. Removing the steering rack mounts
- Without dismantling the steering rods, we pull out the rack through the arch. We dismantle the steering rack through the wheel arch
- We unscrew the bolts securing the rods to the rack and dismantle them.
- Cut off the boot clamps. Cut off the boot clamps using wire cutters
- Unscrew the EUR mechanism and remove the cover. Most likely, the picture will not be the best, since dirt got into the boot and spread all over the rail.
- Unscrew the bearing cap and pull out the spring. Removing the rack crankcase cover
Lyrical digression
In Lada Kalina, the steering rack never makes a knock when we are talking about a new car. This is also true for the break-in period. Let's say in your case this is not done. Then, do not try to repair anything, but go straight to the dealer. According to reviews, the defect in question is covered under warranty, and most car dealers do this: the steering rack assembly is replaced with a new one.
This is what the replacement unit looks like, the rack assembly
There is a logic here. At the factory, adjustments are made correctly (this is true in 99.9% of cases). If a defect appears, the dealer replaces the assembly without expecting that adjustment will solve the problem. The owner does not need to hope for this either. The choice is yours.
We change other details
We also pay attention to how the steering rack looks externally. “Kalina” can keep many secrets regarding maintenance, so if there is the slightest doubt about the serviceability of the rack elements, we replace them with new ones. Otherwise, you will have to remove this part again. The components themselves can be purchased in a repair kit. This will not pose much difficulty for the modern car enthusiast. Having replaced and adjusted all the necessary components, we assemble the rack in the reverse order. That's it, the repair has been successfully completed.
Making adjustments yourself
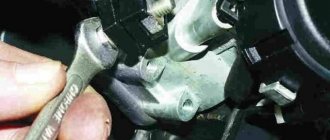
You can access the adjusting nut from the engine compartment, but to do this you will need to remove the battery, as well as the battery mounting pad. It is better to drive the car into a pit and then remove the crankcase protection (engine mudguard). If you look from under the bottom, the required element is immediately visible:
You need to turn this nut
And when you open the hood, you can feel the nut, but not see it. Its location is marked in the figure:
To make adjustments, place the key here
Before adjustment, remove the rubber cap from the recess. Its appearance is shown in the photo:
Remove the cap and install the key
If it is not entirely clear what exactly needs to be done, it is better to contact the service. The key is installed in the recess and then rotated 10-15 degrees.
When looking at the rack from above, turning the key clockwise corresponds to unscrewing it. The handle of the key comes from the center of the car - which means tightening is being done. By the way, the latter is true provided that the handle faces forward.
Steering adjustment: when necessary
What does steering gear repair involve? All you need to do is adjust the steering rack. What factors can cause repair of the steering mechanism?
- Severe wear of the bushing in the area where it meets the rack and steering rods.
- The steering rack lock has become weak.
- Steering racks are worn.
- Gears are worn out.
- The pair's gears are set poorly.
You will need to tighten the steering racks in order to remove or reduce the backlash that has formed in the vehicle's motion control system. This manipulation will improve Kalina's control under different road and weather conditions. You will also need to tighten the rack if it was initially adjusted incorrectly. After this process, the steering wheel moves easier and the car becomes more enjoyable to drive.
In addition to adjustments, if difficulties are identified in the operation of the mechanism, it is advisable to lubricate it. You can tighten the steering rack both on the car itself and while removing the rack. If the latter is removed, this indicates significant damage. In such a situation, replacement of worn elements of the steering mechanism is required.
It turns out that the steering rack can be repaired (video example)
According to the manufacturer of the domestic Lada Kalina, its steering rack should last at least 10 years with proper use. But we all understand perfectly well that difficult road conditions in our country make their own adjustments to the duration of operation of all elements and components of the car without breakdowns. Because of this, car owners need to know how to tighten the steering rack.
In general, on the Lada Kalina, the so-called steering system, if it fails, is mostly caused by driving on bad roads with potholes and pits. All this forces vehicle owners to spend additional money on repairs, especially when the steering rack requires tightening, but this procedure can be performed independently, which we will talk about today.
We solve the problem of knocking steering rack of Lada Granta, Kalina or Priora
Lada cars are famous for their “sores”, one of them is related to the steering mechanism. A knock in the steering rack of a Lada Kalina, Grant or Priora may appear after the first thousand kilometers. Next, we will look at the main reasons for this knocking noise and how to eliminate them.
A knocking sound when turning the steering wheel, or when driving on an uneven road, may come from the steering mechanism (rack). Most often, to eliminate it, it is enough to adjust (tighten) the steering rack using a special wrench.
If the knocking noise remains after adjusting the steering mechanism, you should pay attention to the steering shaft crosspiece. To make sure of this, you should lift the car on a lift and shake the steering wheel from side to side with one hand, and hold the steering universal joint with the other.
If the car has high mileage, then the steering rack may need repair. Diagnostics in this case is quite simple, you should open the hood and grab the steering rod with your hand in the area where it is attached to the rack. If you pull the steering rod up and down, there should be no play.
A knock when turning the steering wheel may not always be caused by the steering rack; sometimes extraneous noise is produced by the electric power steering.
How the control system works in Kalina
In the model of the domestic automobile industry we are considering today, the steering rack, if disassembled from a technical point of view, is a mechanism that structurally looks like a gear, which in turn is installed on a shaft and is associated with special rods and a rack. Thanks to these elements, the car turns when moving the steering wheel in a certain direction allows the front wheels to move in the same direction.
Modern cars have 3 variations of the rack and pinion mechanism:
- Electric steering mechanism;
- Hydraulic modern mechanism;
- Mechanical mechanism.
So, the car control system is an electric drive. This is what helps reduce the load on the driver. In this case, the increase in turning force is carried out due to a special electric motor built into the column, so to speak. This device is used exclusively on premium and, accordingly, luxury cars. For example, in our Lada Kalina, the electric mechanism can be obtained as an additional option for an additional payment for the TOP configuration.
The next option is a hydraulic mechanism. Viburnums of the first and second generation are equipped with this mechanism. Owners of such cars receive sharpness and lightness of the steering wheel. And not only Russian cars, but also many modern foreign models are equipped with the popular and most convenient hydraulic drive.
The mechanical mechanism is the simplest in its design and is also found on many machines. In this case, as you understand, the rods will be turned only through the use of the driver’s physical force. It is clear that such a car is extremely difficult to drive.
In addition to the above mechanisms, there is also a mixed version - electrohydromechanical. It combines all the best qualities of an electric and hydraulic amplifier. You can find it on the Kalina Sport model.
Let us note that each of the systems we have listed has its own advantages, and to some extent disadvantages, but they all break down with the same frequency. If a breakdown of a mechanical control rack will lead to insignificant costs for repair work, then electrical and hydraulic breakdowns will force you to spend a fair amount of money on repairs. It follows that it would be nice to know how to tighten the steering rack on the car we are considering with your own hands.
Electrical faults of the electric booster
When troubleshooting electrical problems, be sure to remove the terminal from the battery. This procedure must be performed during any electrical work in the car.
Operation failure
It happens that when you turn the key in the ignition switch, the icon indicating a malfunction in the EUR turns on again. A possible malfunction is a breakdown of the amplifier drive motor. It is possible to fix such a malfunction yourself if you have electrical knowledge. If you are unable to repair the electric motor, it is recommended to replace it with another one.
Operation failure may also occur in the following cases:
- The fuse has blown. However, it is recommended to replace the fuse only after eliminating the cause of its blown. The fuse is designed to protect the electrical circuit from short circuits. When the wires are shorted, they heat up and the fuse link melts, breaking the electrical circuit. There is probably an overlap of wires in the circuit and their further short circuit. Eliminate the cause and only then change the fuse.
- Poor contact at the connections, resulting in a lack of power in the amplifier circuit. Correct the contacts or clean the wire connections.
Speed sensor
One of the most vulnerable elements of the system is the speed sensor. This is an electrical device that is designed to control the electric drive of the amplifier at various speeds.
The fact is that using ESD at high speed can cause an accident, since the slightest rotation of the steering wheel will lead to the car being driven off the road. This sensor reads the speedometer and, as speed increases, weakens the power steering effect. Thus, it turns out that at high speed the power steering operates in the same way as when using a mechanical amplifier.
The main malfunction of the sensor is its failure. If the sensor fails, the amplifier circuit does not receive speedometer readings and the amplifier is turned off. After this, a special icon on the instrument panel lights up (steering wheel with an exclamation mark). In this mode, the amplifier operates without an electric drive and does not interfere with the steering. In this case, you just need to remove fuse F31 in the block to the left of the steering wheel to completely disconnect the circuit before replacing the speed sensor.
Ultimately, to fix this problem, you just need to change the speed sensor.
Mechanical problems
Mechanical failures of the power steering include various damage to the amplifier structure, jamming, deformation and fracture. In cases with mechanical faults, the electric amplifier must only be replaced.
When is it necessary to adjust the steering mechanism in Kalina of all years of manufacture?
How to repair the steering mechanism? All that is required is to adjust the steering rack. On a regular Lada Kalina you can adjust the rack yourself without any problems, but on the sports version of the car it’s not so simple, and you’ll probably have to turn to specialists.
Reasons that may prompt you to repair the steering mechanism:
- When the bushing is heavily worn in the place where it connects to the steering rods and the rack itself;
- The steering rack fastener is loose;
- The pair's engagements are poorly adjusted;
- Severe gear wear;
- The steering racks are heavily worn.
Direct tightening of the steering rack is most often required in order to remove or at least reduce the backlash present in the car's directional control system.
This manipulation will significantly help improve vehicle control in a variety of weather and even road conditions. In some cases, tightening the rack is required if it was initially adjusted incorrectly. In this case, you need to loosen the screw that makes the adjustment. After this manipulation, the steering wheel begins to move easier, and driving becomes normal.
In addition to adjustment, when difficulties in the operation of the mechanism are identified, it can be lubricated. The Russian Lada Kalina, like any other car, has an instruction manual, which indicates how to properly lubricate and how to tighten the steering rack. In this official manual you will find a description of the structure of the rack itself, as well as the type of lubricant used recommended by the factory.
Important! Adjustment is carried out in 2 ways:
• On the car itself;
• When the rack is removed.
When the rail is removed, the damage is significant. In this case, it is always necessary to replace worn parts of the LADA Kalina steering mechanism, therefore, not every car owner can do everything on their own without certain knowledge and experience and the proper tools.
But everyone can independently eliminate knocks and even play, and, if necessary, loosen or tighten the rack. In this case, you do not need to dismantle the steering mechanism. However, if you understand that you cannot cope, then it is better to consult a specialist. Or follow strictly the instructions we provide below.
Operating principle and design of rack and pinion steering mechanism
When the steering wheel rotates, torque is transmitted through the column shaft through a helical gear to the rack, which is connected to rods that change the angle of rotation of the wheel hub. The working pair in the rack and pinion mechanism is the helical gear located on the column shaft and the PM rack.
Kalina's steering rack is placed in an aluminum housing (case), which includes a helical gear connected to the column shaft. The helical drive gear meshes with a rack and is supported by two bearings and a bushing on the crankcase. The rack also has an oblique tooth with a variable pitch, with a smaller pitch on the peripheral part. As a result, the driving behavior becomes more natural and comfortable, and the steering wheel angles are reduced. In a car with a variable ratio rack, the steering range of rotation is 720°. In this case, the driver, turning the wheel one revolution, reaches the right or left stop. During linear motion, the gear shaft is in the zone of straight teeth. When cornering or maneuvering, the steering responds more dynamically. In the area of the rack, which has oblique teeth, the gear ratio decreases rapidly as the steering angle increases.
For fans of fast driving, a Kalina Sport steering rack can be installed, which has a gear ratio of 3.1, unlike other models, in which this figure is 4.02. This shortened version allows you to feel the car better, but increases the risk when driving at high speeds.
How to independently adjust the steering rack on Kalina
For self-adjustment you will need only 15-20 minutes. All you need to have with you: a 13th wrench, a special wrench and a 10th socket with a wrench. The procedure at first glance seems quite simple, but you will still have to remove some nodes. So, nothing can be done if you do not remove the battery from the LADA Kalina car. You also need to remove the special platform on which the battery is installed.
After this, you get access to the desired mechanism. And feel free to start solving the problem. The only thing is that it will not be very convenient for you to make adjustments, because you have to crawl under the very bottom of the rail, where the plug is installed, in order to remove it.
After this, place the special key on the nut located inside the mechanism. It is this nut that needs to be either loosened or tightened. To begin with, it will be enough to turn the key half a turn. Remember that all manipulations are done carefully, without effort, so as not to overtighten anything. Next, you can test it by driving the car a little to find out if you have done everything to the level required.
When everything is ready, you need to put everything back in reverse order.
Installation of the Kalina steering mechanism
Before installation, check that the rail is installed in the middle position. To do this, using sliding pliers, use the flat on the gear shaft to rotate the shaft in any direction until it stops, then turn the shaft in the opposite direction two full turns and turn the shaft so that the flat on the shaft is located vertically on the right side along the direction of the car. Otherwise, the installation of the rack is carried out in the reverse order.
Thus, it will take at least 1 hour to replace the steering rack on Kalina. If it is not possible to repair it, then you will have to buy a new one. The steering rack of the Lada Kalina is the same as the rack of the Priora or VAZ 2110-2112 of the new model and has a catalog number: 11183-3400010 (rasp inside 21100-3401068). Price approximately 3500 rub. For Kalina Sport:
- 11183-3400010-10 inside rasp 11183-3401068-00 (3.1 turns)
- 11183-3400010-12 inside rasp 11183-3401068-01
- 11183-3400010-01 without EUR inside rasp 21100-3401068-00 (4.1 turns)
- 11183-3400010-10 with EUR inside rasp 11183-3401223-00
If the steering rack is knocking, how to tighten it
Tools: from a special tool you will need a wrench for tightening the steering rack for Kalina (also suitable for a Ten), as well as a wrench for 10, a wrench for 13 (or a corresponding socket).
Disassembly, tightening of the rail and assembly:
- First of all, remove the battery, remove the terminals (to remove the mount, unscrew the two nuts at the edges).
- Then we lift the plastic stand and unscrew the four bolts located under it. We move the metal plate that was attached to them.
- Now we have access to the rail, we crawl up to it from below with our hand, find the rubber cap, and carefully remove it.
- We take the key to tighten the rack and tighten it (not all the way!) so that the rack does not bite when maneuvering.
- Ready. Now we carefully assemble everything and try to drive it, pay attention to how the car behaves when turning, whether there are any problems with turning the steering wheel all the way. If the knocking still persists, take it to a car service center.
Preparatory actions, dismantling unnecessary parts
To remove the crankcase protection, you need to unscrew 4 screws located in one row near the bumper. Also, unscrew two screws having a standard size of M6x16. In some configurations, the protection consists of two parts, but in this case they are attached only with self-tapping screws. These words are illustrated by the following photo:
First, unscrew the “10” screws, and then the two “18” screws. In the second case, there will be more screws (eight).
Now let's look at how to remove the battery. First of all, disconnect its terminals. Then, you need to move the additional fuse box to the side. In general, actions are performed according to the photo:
You also need to remove the mounting platform itself, for which you unscrew 4 screws. You will need a 13mm wrench, as well as a 10mm spanner. We will repeat the entire sequence again:
- Unscrew the nuts holding the battery terminals using a wrench 10;
- Remove both terminals;
- Move the fuse box to the side by unscrewing 2 fastening screws;
- Unscrew the nuts with a 10mm wrench and remove the battery;
- Unscrew the screws with a 13mm and remove the metal plate.
Just in case, here is a look at the fuse box mountings:
How to tighten the rack on a viburnum with eur
Steering rack knocking on Kalina is a fairly common occurrence. About a year ago, small tapping noises began to appear on broken primer or crushed stone. And over time, the knocking became stronger. I've been meaning to do this repair for a long time, but never got around to it. Although, it’s difficult to call it a repair, since you won’t have to disassemble anything, you just need to tighten the nut. Now about everything in order and in more detail. And for starters, as always, a list of necessary tools:
- Head with a knob or regular 10
- Wrench 13 (the head will be most convenient)
- Special wrench for tightening the steering rack of Kalina (VAZ 2110)