During engine operation, all parts change their geometric dimensions due to thermal expansion, which is not always precisely predictable. This problem also concerns the valve drive of the gas distribution mechanism in four-stroke engines. Here it is important to very accurately and timely open and close the intake and exhaust channels, acting on the end of the valve stem, which is difficult in conditions of expansion of both the stems themselves and the entire head of the block.
Designers are forced to leave thermal gaps in the joints or resort to installing units for their mechanical compensation.
What is valve adjustment?
The operation of an internal combustion engine is based on the supply of fuel into the cylinders and its removal after its ignition and combustion of exhaust gases. The camshaft controls these processes. Its design contains cams that themselves or through special rocker arms press on the lower parts of the valves.
As the internal combustion engine warms up during operation, the temperature of its components increases, the metal expands and the parts increase slightly in size. To compensate for this expansion of the metal, thermal clearances are required, which must be checked from time to time for compliance with the requirements of technical documentation and, if necessary, adjusted.
This event is called “valve adjustment,” although it would be more correct to call it “thermal clearance adjustment.”
Operating principles
To understand why adjustment of engine valves is needed, you will have to delve deeply into the operation of the valves of an internal combustion engine (ICE). The first thing you need to know is that there are always two types of valves in an engine:
- inlet;
- high school graduation.
Second: the standard, full engine operating cycle consists of 4 sequential movements:
- Inlet of the air-fuel mixture into the cylinder;
- Compression of the mixture and its ignition;
- A working stroke performed by pressure force;
- Discharge of the spent mixture from the cylinders.
Moreover, in each individual phase (stroke) the valves occupy a strictly defined position:
- at the inlet (1st movement) the inlet valve opens;
- during compression (2nd movement), the intake and exhaust valves are closed;
- the working stroke (3rd movement) is similarly performed with the valves closed;
- at the exit (4th movement) the exhaust valve opens.
Third: the operation of the valves is possible due to the rotation of the camshaft: its modification (mainly the design of the “cams”) structurally determines the duration and completeness of the phases (their sequence is always the same!) of gas distribution in the cylinders.
Why is adjustment necessary?
Correctly adjusted clearances decrease after the engine warms up, providing precise adjustment of valve timing, which contributes to a long service life of the parts. As operation progresses, the depth of valve subsidence in the seats increases, the rocker arms and the cams themselves wear out, which means that the valve timing is disrupted and wear increases.
Large gaps lead to the appearance of extraneous noise during operation of the internal combustion engine and, if they are not brought back to normal in time, they will continue to increase, which will negatively affect the condition of the components and parts of the power unit, for example, valves or pushers may be damaged.
The opposite situation is even more dangerous, when there are no gaps or are critically small. In these cases, serious interruptions in the operation of the internal combustion engine occur with the possible occurrence of malfunctions, such as broken parts. If there are no gaps, the valves are not completely closed, the fuel mixture does not burn completely, and hot gases break into the resulting space, damaging the parts. These processes are irreversible. Even if you adjust the gaps after this, sooner or later a major overhaul is inevitable.
All malfunctions that may arise due to incorrect clearances can be summarized in a table.
Table of gaps and faults
Gap size Consequences Large gaps - reduced service life of parts; – riveting; – appearance of chips at the ends; – damage to the pushers. Small gaps or their absence - burnt valves; – depressurization of cylinders; – damage to the plates; – increased loads on the timing belt; – activation of corrosion and oxidation processes.
What types of adjustments are there?
Automatic gap setting
Most modern cars are equipped with hydraulic compensators. These are devices that are responsible for maintaining the thermal gap by using engine oil pressure. The hydraulic compensators themselves do not require any adjustments. The main thing is to ensure that they are not clogged with dirt and are always in working order. You must understand that if the malfunction of this device was not detected in a timely manner, then it is assumed that the gap adjustments could have gone wrong, so it is better to check them and, if necessary, restore them.
Adjustment with screws
A method of adjustment using special screws without using any additional parts, and in the vast majority of cases, disassembling the cylinder head is not required.
Adjustment with washers and pushers
A common, but rather complex method of adjusting gaps. The problem is that in order to set a new gap, the pusher must be removed and a new one of the appropriate size installed in its place. This may require disassembly and removal of the camshaft.
How does a camshaft work?
If we compare the operation of the camshaft with the speed of a Kalashnikov assault rifle, then the speed of the latter’s shots will be 10 times less. The crankshaft produces 6,000 or more revolutions per minute, with one working cycle consisting of two revolutions, ensuring the intake and release of the air-fuel mixture.
Thus, the frequency of opening and closing of each valve (intake and exhaust) in one minute is at least 3000 times. Moreover, the frequency of the so-called “dead spots” of the valves (i.e., when they occupy their extreme positions in the cylinders) is even greater - 6,000.
Whenever manipulating the crankshaft, valves and cylinders, it is necessary to take into account even hundredths of a second of engine operation, which significantly affects its operational capabilities and durability.
How often should the gaps be adjusted and what size should they be?
Valve adjustment intervals are not defined. They depend on many factors: car and engine make, operating mode, mileage, etc. For each engine, the automaker indicates their value in the technical documentation or on its official website.
As an example, here is a table of clearances established for HONDA GX engines
The gaps are small. They do not exceed tenths of one millimeter. Usually they range from 0.09-0.4mm. They are determined using a probe. As a rule, these are sets with increments of five hundredths of a millimeter. It should be borne in mind that the clearances on the intake valves are usually smaller than on the exhaust valves. This is explained by the fact that the latter heat up much more, therefore the gaps in them are larger.
As for the frequency of inspection, there are average intervals accepted by the practice of operation and maintenance of engines. For screw adjustment, an interval is taken every 10-40 thousand km, and for adjustment using washers and pushers - 20-100 thousand. Check intervals depend on many circumstances, for example, when the engine operates under heavy loads and in extreme conditions, it is better to make adjustments more often .
Screw adjustment procedure
In order to explain how valves are adjusted, you can turn to the classics and consider adjusting the valves of the VAZ2107.
Typically, the need to regulate valves arises when there is a sharp drop in the power of the internal combustion engine and the appearance of characteristic metallic knocks at low or high speeds. Allow the engine to cool before starting the activity. All work must be carried out on a cold internal combustion engine. The valves in the power unit of this model are opened by transmitting pressure to the lever rod, which is moved by the camshaft's eccentric cam. The gap that is subject to regulation is the gap formed between the cam in the place opposite the eccentric and the lever itself.
When carrying out work, follow the table.
Direct adjustment begins with setting the piston of the fourth cylinder to TDC. This is a state of compression. At this point both valves are closed. Then the crankshaft is rotated until the mark on the sprocket meets the mark on the body. For control, a 0.15mm probe and two keys are used - 13 and 17.
Work order:
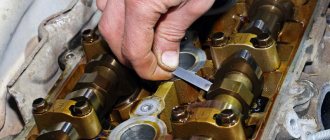
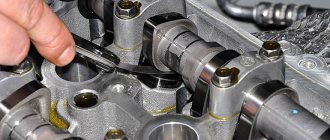
– the probe is inserted into the space between the cam and valve lever No. 6 in turn; – if it is inserted with force, then this is normal; – if it dangles or, on the contrary, gets stuck or it is impossible to push it in at all, then adjustment is required; – decreasing or increasing the size of the gap is carried out by fixing the adjusting bolt, releasing the lock nut and turning the bolt. In this way, valves No. 6 and 8 will be adjusted.
The same manipulations are carried out for each valve by turning the crankshaft each time at an angle of 180° from the previous point, which corresponds to turning the camshaft by 90°. At each such turn, the following valves are measured and, if necessary, adjusted:
– 180° – №№4, 7; – 360° – №№1, 3; – 540° – №№5,2.
The regulation procedure is observed in strict sequence. If it is violated, then all settings of the gas distribution system will be lost. If you have sufficient skills, adjusting the valves yourself does not cause any difficulties. The issue price is 0 rubles.
Methods for providing thermal clearance
With an overhead design, the camshaft acts on the valve stem either directly or through a rocker arm. The use of a rocker makes it possible to reduce the difference in the camshaft profile relative to the maximum valve movement when opening. When the camshaft directly impacts the valve stem, the stem experiences significant lateral force, which leads to increased wear. To avoid this, the end of the rod is covered with a special glass, which takes on the lateral force, moving in its own guide seat, and transmits the axial force to the valve. Adjusting washers are installed between the cup and the camshaft cam. If the design has rocker arms, then special adjusting screws with locknuts are installed on them.
Many modern engines, especially those with more than two valves per cylinder, are equipped with hydraulic valve lash adjusters. In these designs, adjustment of thermal gaps is not required.
The hydraulic compensator allows you to have zero clearance in the drive at any valve temperature
Adjustment with washers
In cases where adjustment should be carried out not with a screw, but with a washer, which is typical for most front-wheel drive cars, the operations are similar to adjusting VAZ valves. Those. the crankshaft is rotated until the marks coincide. The gap is selected using a washer with the appropriate marking.
Depending on the need to increase or decrease the gap, a washer of a certain size is selected. If there is no marking, then a caliper or micrometer is used.
Useful tips
To avoid “pinched” valves on classic VAZ models, you need to take into account that the back surface of the camshaft cams may not be ideal. This shaft runout is sometimes about 0.04 mm. For this reason, it is necessary to additionally check the gap. This is done when the cam is in the following positions
- before the valve opens;
- after the moment of its closure;
To solve the problem, you will need to install the camshaft in a position where the mark on the gear is in the upper direction. Then the clearances at valves 4, 6, 7 and 8 are checked. Then you need to rotate the crankshaft 180 degrees, that is, the camshaft will rotate 90 degrees. After turning, you can check valves 7, 4, 3 and 1. The 3rd, 1st, 2nd and 5th valves are checked in the same way, and then the 2nd, 5th, 6th and 8th. Please note that all valve measurements must have the same end result. If the results differ, then when setting the gap it is necessary to take as a basis the place where the gap is minimal (the most “squeezed”).
I would also like to know that VAZ has a special device with a dial indicator for adjusting the valves. It is assumed that such a tool makes it possible to achieve higher accuracy compared to using a feeler gauge, and also allows you to easily adjust the valves “hot”. Unfortunately, in practice such solutions have certain disadvantages and errors. As a result, the measurement accuracy is often far from ideal and may even be inferior to the usual method using a probe.
Some craftsmen can easily adjust valves on imported cars using special tools for VAZ, making certain changes to the design of the device. It is also common practice to use only one pusher clamp, which is selected according to size. The procedure boils down to cranking the crankshaft until the pusher “sinks” the camshaft cam.
Then the clamp is inserted, after which the camshaft rotates until the cam comes off the washer. After removing the old washer and checking/replacing it with a new one, the camshaft rotates back again. Note that the camshaft must be rotated using a wrench that turns the camshaft gear. The crankshaft should not be turned, since the timing belt must be properly loaded when rotating.
Adjustment by rack with indicator
There is also a way to adjust the gaps using an indicator and a rod. He was very popular in the USSR. This method allows you to take into account the production of parts, therefore it is used on power units of cars with high mileage.
Work procedure
– the crankshaft is scrolled until the marks coincide; – a special rack is fixed to the cylinder head; – the indicator is attached to the rail, and its tab is installed on the cam; – a special grip catches the camshaft cam and pulls upward, while the indicator arrow at normal temperature passes fifty-two divisions; – if the arrow passage value is deviated, then it is necessary to make adjustments with a screw or washers depending on the model of the power unit.
The main task of normal operation of an internal combustion engine is to maintain the design size of the thermal clearances of the valves, create absolute tightness of the cylinders, protect parts from premature damage, and ensure high efficiency of the power unit.
All these measures are relevant both for cars and motorcycles, and for large vehicles, such as KAMAZ trucks. You just need to follow a number of rules, which include measures aimed at eliminating malfunctions leading to incomplete combustion of fuel. It is necessary to use only high-quality motor oil, change oil and fuel filters in a timely manner, monitor the condition of the timing belt, and trust engine maintenance to trusted technicians. Believe me, it is better to once again make sure that the valve clearances are normal and, if necessary, adjust them, than to get serious problems associated with major work on the engine, which requires a lot of money and time.
If you have questions related to the use of oils and other Suprotek products, please call. Our specialists will always answer them, provide professional advice and help with the choice.
Preparatory work
So, the engine is cooled down, and the car itself is placed on a flat surface and immobilized. You can start working:
- Remove the carburetor air filter cover and remove the filter;
- We unscrew the filter mounting bolts and remove it, having first disconnected the pipes going to it;
- We remove the cable for manual control of the air damper (choke) and disconnect the throttle linkage;
- Unscrew the bolts securing the valve cover and dismantle it;
- Check the chain tension (it must be normal, otherwise you will have to adjust the tension first);
- Remove the distributor cap.
Now you need to set the TDC of the piston in the 4th cylinder and the marks on the knees will help with this. camshaft drive shaft and cover. shaft, as well as on the camshaft gear and its cover.
To do this, you can use a key of appropriate size, which you need to rotate the knees. shaft for the drive pulley bolt. Or use one of the drive wheels. To do this, you need to hang it with a jack, engage 4th gear and slowly turn the raised wheel. In this case, the transmission will ensure rotation of the crankshaft. But with the second method, you will need an assistant, since it will be difficult to check the coincidence of the marks.
