March 20, 2019 Lada.Online 11 797 0
According to the maintenance regulations on Lada Granta, Kalina and Priora cars, inspection and testing of the steering must be performed every 15,000 km. mileage The article describes possible steering malfunctions, their causes and solutions.
Steering components Lada Granta, Kalina
Steering of Lada Kalina/Granta VAZ-2190 cars with electric booster and tilt-adjustable steering column.
The steering wheel is mounted on the splines of the steering shaft and secured with a self-locking nut. On vehicles equipped with a driver's airbag, an airbag module is installed in the steering wheel instead of a pad.
The steering shaft is composite. It consists of an upper and intermediate shaft. The upper shaft rotates in two bearings pressed into the steering column tube.
An ignition switch with an anti-theft device is installed on the top of the column pipe. The intermediate shaft is collapsible and has two cardan joints at the ends.
The Lada Granta/Kalina steering column is assembled with a gear motor and an electric power steering control unit. The efficiency of the electric booster depends on the speed of the vehicle.
The electric booster only works when the engine is on. The steering column brackets are attached to the body on four studs with self-locking nuts. The brackets are pivotally connected to the steering column pipe.
The upper bracket is equipped with a steering column fixation mechanism. By moving the locking lever to the lower position, you can change the angle of the steering column. When the lever is raised, the column is fixed in the selected position.
The steering mechanism of the Lada Kalina/Granta VAZ-2190 is rack-and-pinion type, consisting of a crankcase, a drive gear and a rack in gearing. The mechanism is secured to the partition of the engine compartment with two brackets on rubber supports.
When the steering wheel is turned, rotation is transmitted through the upper and intermediate shafts of the steering column to the drive gear, which, when turning, moves the rack.
Steering rods, which consist of the rods themselves, tips and adjusting bushings, are bolted to the Lada Granta/Kalina steering rack. At the inner ends of the steering rods there are eyes with rubber-metal bushings pressed into them.
Ball pins are installed in the outer rod ends, with which the steering rods are connected to the swing arms of the front suspension struts. When the rack moves, the rods rotate the front suspension struts.
The length of the tie rods can be changed by rotating the adjusting bushings and thereby changing the toe-in of the front wheels. The bushings are secured against spontaneous rotation by tightening bolts wrapped in the flanges of the tie rod ends.
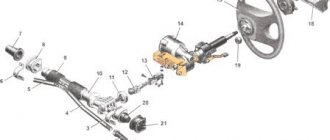
Fig.32. Steering Lada Granta/Kalina
1 — tie rod end; 2 — adjusting sleeve; 3, 6 — brackets for fastening the steering mechanism; 4, 5 tie rods; 7 right protective cap; 8 — right steering gear support; 9 — protective cover of the steering mechanism; 10 — steering mechanism; 11 - seal; 12 — intermediate shaft with lower universal joint; 13 — upper universal joint; 14 — steering column with electric power steering; 15 — steering wheel; 16 — contact ring; 17 — steering wheel fastening nut; 18 — steering wheel pad (driver airbag); 19 steering shaft bearings; 20 left protective cap; 21 left steering gear support
Checking the steering of Lada Granta/Kalina
Visually check the condition of the protective covers of the tie rod ends and steering mechanism. Damaged covers (torn, cracked) must be replaced.
Make sure that the steering column locking lever is raised all the way. Trying to move the steering wheel in a vertical plane, we check that the steering column is securely fastened with the locking mechanism.
If the steering column of the Lada Kalina/Granta VAZ-2190 moves, remove the steering column lining and use a 13 mm wrench to tighten the nut of the steering column fixing lever axis.
Trying to move the steering wheel along the axis of the steering shaft, we make sure that there is no play in the steering wheel on the splines of the shaft and shaft in the steering column.
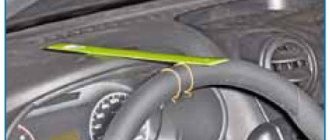
To check the play in the steering, turn the steering wheel to the position corresponding to straight forward movement. We place a slotted screwdriver on the instrument panel so that its blade is located next to the rim of the steering wheel (for reliability, it can be secured with masking tape).
Turning the steering wheel to the right until the wheels begin to turn (selecting play), and then to the left and using the blade of a screwdriver as a guide, use chalk, pieces of wire, or otherwise mark these positions on the rim. The play should not be more than 5″ (or 18 mm) when measured along the outside of the rim.
Increased play indicates the need to troubleshoot and fix the problem. As a rule, the tie rod ends in the Lada Granta/Kalina steering system are the first to fail.
To check that there is no play in the tie rod ends, an assistant slightly rocks the steering wheel from side to side. We place our hand at the junction of the steering rod with the swing arm of the suspension strut so that the palm touches them at the same time.
When play appears in the tie rod end, a displacement of the steering arm relative to the rod will be felt. Check the tightness of the nuts on the steering column universal joint bolts. We repeat the check on the other side of the car. We replace faulty hinges.
When rocking the steering wheel from side to side, listen to the operation of the steering mechanism. A knocking sound from the right edge of the steering gear indicates wear of the support sleeve. We remove the faulty steering mechanism and repair or replace it.
Turn on the ignition - the electric power steering fault indicator light on the instrument panel should light up. Let's start the engine.
The warning light should go out and the steering wheel should turn easily with one hand. If the lamp lights up while the engine is running, it indicates a malfunction of the electric amplifier and the need for repair.
Replacing the steering column of Lada Kalina/Granta VAZ-2190
Depending on the purpose of the work, the steering column can be removed as an assembly with the steering wheel and steering column switches. The operation is described with partial disassembly of the steering column.
— Turn the steering wheel to the position corresponding to straight movement. Removing the steering wheel
— Remove the decorative lining of the steering column.
— Using a Phillips screwdriver, unscrew the three screws and remove the lower trim of the instrument panel.
— Disconnect the wiring harness blocks from the steering column switches and the slip ring.
— Loosen the coupling bolt and remove the connector assembly with the steering column switches and the slip ring.
— Disconnect the ignition switch wiring harness connectors.
— By releasing the clamps, we disconnect the two wiring harness blocks from the electric power steering of the Lada Granta/Kalina.
— You can remove the steering column complete with the intermediate shaft. However, it is more convenient to remove and install the steering column if you disconnect the intermediate shaft.
— The connection of the intermediate shaft universal joint flanges is possible only in one position, so you don’t have to mark their relative position.
— Unscrew the nut of the coupling bolt connecting the universal joints of the intermediate shaft. We remove the bolt.
— Loosen the tightening of the two nuts of the lower mounting of the Lada Granta/Kalina steering column.
— Using the same wrench, unscrew the two nuts of the upper mounting of the steering column.
— Remove the steering column assembly.
— Unscrew the nut of the coupling bolt of the flange of the lower cardan joint of the intermediate shaft. We remove the bolt.
— Using a slotted screwdriver, we open the flange and remove the cardan joint from the splines of the steering rack mechanism shaft of the Lada Kalina/Granta VAZ-2190.
Where is the Lada Vesta steering wheel adjustment mechanism located?
To adjust the steering wheel position, you must:
- Sit in the driver's seat, take the position in which you usually drive the car.
- Pull down the plastic lever located under the lower steering column housing.
- Lock the lever in the down position.
- Adjust the steering wheel to the desired vertical position and reach depth.
- After adjustment, return the steering column position lock lever to its original position.
Conclusion The process of adjusting the angle of inclination (reach) of the steering column on a Lada Vesta car is simple. Along with the column settings, be sure to set the position of the driver's seat. It shouldn't be too far back, but you shouldn't tuck your legs in front either.
Steering of Lada Granta
It is designed to control the car while driving. Structurally, it consists of the following main elements:
The work of the mechanical part is that the driver acts on the steering wheel, the impulse through the steering mechanism and rack transmits force to the front wheels through the levers, and the car turns in the desired direction. A characteristic feature of a passenger car steering wheel is its smaller diameter (compared to a truck). The design of the mechanism also differs. The steering of the Lada Granta is complemented by an electric booster. The steering wheel can be adjusted in height. Unfortunately, there are no settings for departure.
The steering mechanism of the Lada Granta is rack-and-pinion type, the simplest and most inexpensive option.
The drive is mechanical, structurally consisting of levers, rods and hinges. For more efficient and convenient control, the Lada Granta is equipped with an electric amplifier. This is a complex mechanism that provides force through the use of electricity. An electric power steering, or simply EPS, is used to improve dynamic characteristics and controllability. And, according to some data, it allows you to save fuel by increasing the vehicle’s maneuverability.
Reviews
| № | Positive |
| 1. | Vasilyevich , 44 years old (drive2.ru): the range of adjustment of the steering column vertically and in depth is sufficient for comfortable control and monitoring of dashboard readings. |
| 2. | Vladislav , 45 years old (prom.ua): for my small height (169 cm), the angle of inclination is not enough. I contacted the official dealer and decided to raise the front seat a few centimeters. |
| 3. | Mikhalych , 40 years old (autotoday.com): unlike the Lada Grant, Priora, the steering wheel adjustment for reach and visibility of the dashboard on the Lada Vesta are better implemented. |
| 4. | Kirill Alekseevich , 45 years old (rozetka.ua): one of the factors why I chose Vesta instead of Grant was its functionality and multifaceted settings. |
| 5. | Nikolay , 44 years old, (avtoflit.com): my positive review of the car. A good model, multiple tinctures, domestic cars are “at their best.” |
| 6. | Vasilievich , 39 years old, (autotoday.com): before Vesta there was Priora, there is something to compare with. The model has been improved, the functionality is much wider. |
| 7. | Dmitrievich , 44 years old, (drive2.ru): I bought a Lada model myself and recommend it to others. These are no longer the crude models that were several years ago; the engineers took into account numerous comments from the owners. |
| Negative | |
| 8. | Sergey , 30 years old (prom.ua): the standard settings are not enough for me, I have to use a foam rubber layer. My friends advised me to raise the front seat a couple of centimeters. |
| 9. | Semenovich , 35 years old, (avtoflit.com): I’m no longer glad that I purchased the model, after a year of active use it began to crumble. It was necessary to take Grant, my comrades recommended it. |
| 10. | Sanek , 33 years old, (drive2.ru): the standard backlight is not enough to read instrument readings in the sun. In addition, there is still limited travel of the steering column. |
| 11. | Sergey Vasilyevich , 42 years old, (autotoday.com): I am over 200 cm tall. The range of adjustments is not enough. I contacted the service station, the technicians said they couldn’t help. |
Read more: Logan jerks at idle
Steering mechanism malfunctions and their elimination
The steering mechanism of the Lada Granta is quite reliable and rarely causes problems for the owner. However, this does not mean that problems do not occur at all. There are problems. And you need to know how to eliminate them.
| Cause of problems |
Elimination
Like the braking system, engine operation and other important components and assemblies, the steering system must be periodically inspected for malfunctions. If there are no signs, protective boots and other smaller structural parts must be inspected. The steering rack of the Lada Granta is a key control mechanism. It is thanks to this that the car is controlled by turning the wheel.
Not only the comfort of control, but also the safety of the driver and his passengers depends on the serviceability of the steering mechanism. Unit problems must be diagnosed and corrected in a timely manner.
Basic steering rack faults
The main sign of a breakdown is a knocking sound when turning. At first it is almost invisible and appears when hitting potholes. If you ignore the first symptoms, the noise will not go away and will constantly get worse. Then the knock will be transmitted to the steering wheel. If you ignore this symptom, the rack will simply jam, and this risks getting into an accident due to loss of control. The rack knocks due to wear of the hinges, teeth or rubber-metal bushings (damper).
Diagnostics
First you need to make sure there is a problem. To do this, you need to turn off the engine, having first placed the car on the inspection hole. Then you need to turn the steering wheel several times until it stops in one direction and the other.
At the same time, at least two people are needed to determine the malfunction. One will turn the steering wheel, the other will evaluate the work of the rack from below. This will allow you to check for any gaps in the hinges. If the knocking noise remains even after disconnecting the rods and levers, the unit will have to be replaced.
There can be many reasons why the steering rack knocks. Therefore, diagnostics plays a huge role in repairs. The most common knocking noises are the tie rod ends and rods. The main sign of a torn tip is a damaged boot. It is because of this that the ball joint becomes unusable. Diagnosing a broken rod is much more difficult.
This is interesting: Replacing brake fluid: how much to pour, how often to change
Unfortunately, it is difficult to verify that the steering rack is knocking precisely because of traction, because if the car was purchased with mileage, then the previous owner could easily replace the torn spare part without bothering with more serious repairs.
Important! To understand that the steering rack is knocking precisely because of the traction, you need to remove the boot and check the traction for any play
In most cases, the reason why the steering rack knocks is the bushing. This is part number 7 in the picture. It does not have a rigid fixation and is pushed forward by a spring, which is adjusted by a bolt with a lock nut.
Important! Most service centers, instead of replacing only the bushing, offer to install a new unit. Most often, such a policy of service centers is associated with a banal desire to make money from a motorist
Indeed, there are parts that change only during assembly. But this is not the case. The bushing for Honda cars is available for public sale. Moreover, you can do it yourself if you have the drawings.
Most often, such a policy of service centers is associated with a banal desire to make money from the motorist. Indeed, there are parts that change only during assembly. But this is not the case. The bushing for Honda cars is available for public sale. Moreover, you can do it yourself if you have the drawings.
Noise when turning
If you hear a hum when the steering wheel is turned to its extreme (or close to it) position, it means that you need to check the condition of the hydraulic or electric booster and the components of its working system. In this case, a hum may occur even if the fluid level is normal. You need to check the condition of the pump blades (often, over time, the pump’s performance decreases), the condition of its bearings, and the tension of the drive belt.
Power steering fluid leak
Regular leakage is a reason to check the power steering system and its seals. In particular, if the car owner is forced to frequently add fluid to the system’s expansion tank. In this case, a concomitant symptom of a faulty steering rack will be a fluid leak from the line. It can drain directly onto the ground under the car (usually right under the expansion tank) or streaks can be seen on the steering linkage boots.
Often, when a liquid leaks, air enters the system (the system is “aired”). It can be seen by the bubbling liquid in the expansion tank. As stated above, the cause of the leak may be rust on the rack. To get rid of it in the future, it is advisable to use non-standard plastic clamps to tighten the anthers, and their metal counterparts, which provide a higher level of tightness.
Knock when driving in the front axle
In fact, such a knock may also indicate a malfunction in the vehicle’s chassis, so additional diagnostics must be performed. The knock can be either in the center or on the left or right side. In the best case, a knock may indicate a torn traction boot; in the worst case, it can indicate problems with the rods, levers or other elements.
To understand exactly why such a malfunction occurred, it is better to remove and disassemble the rack. After all, the most harmless thing may be a loose adjusting nut or wear of the bushing (when there is a knock on the right), but a more serious problem is wear of the worm pair.
Torn boot on traction
When checking the performance of the rack, it is necessary to pay attention to the integrity of the traction boot. Ideally, it should be intact and the rubber should be elastic
If it is torn and dirt has gotten inside, it must be replaced, lubricant must be added after removing dirt, moisture, and debris from the mechanisms.
Electric power steering rack
To localize faults in the electric steering rack, it is necessary to check the following elements.
Steering rack adjustment
The unit knocks for various reasons. In fact, this is a real disease of the control mechanism, inherited from the Lada Kalina, since the components are identical on these cars. You can adjust the rack yourself.
To do this you will need a minimum of tools:
- steering rack calibration key;
- socket heads for 10 and 13;
- shaped screwdriver.
To tighten the slats, you can use two methods. The first involves using a special key that can be inserted into the gap of the arch on the left side. The second method is more labor-intensive and is suitable if it is not possible to stick your hand into the gap. To do this, you will need to dismantle the battery and its platform; this is the only way to get to the nut for tightening the gearbox. The first method is simple, so it’s better to consider the second option.
To do this, you need to disconnect the battery terminals and remove it, and then remove the platform under it. Now you can get to the nut located on the inside of the gearbox housing. You can buy a combination wrench for tightening, on the one hand - for tightening the rack, on the other - for tensioning the timing belt.
To tighten the nut, turn it clockwise.
Steering wheel tuning on Lada Granta
There are few options for upgrading the steering wheel on the Lada Granta. The most popular of them is installing a sports version. Such a steering wheel will not only make the interior more attractive, but will also increase the comfort of control, especially if it is selected correctly. You can install a multi-steering wheel, but only if the configuration is maximum, in other cases there will be nothing to control with its help.
The sports version must be injury-proof, that is, in the event of an accident it must be deformed without causing damage to the driver. Among the shortcomings, it can be noted that although there is an airbag in the standard steering wheel, the sports one does not have it. You can also modify the steering wheel by installing braid. More advanced ones install a heating thread under it.
To install the sports steering wheel, you will need to carry out the following operations.
- Align the front wheels straight (you can drive a little forward and back so that the trajectory is straight).
- Disconnect the battery terminals by de-energizing the vehicle's on-board network.
- The airbag control module must be disabled (if the Granta equipment is equipped with it). If you do not turn it off when removing the factory steering wheel, it may shoot out.
- Remove the steering wheel and install a horn on the adapter. The wiring must be stored in the adapter; to do this, carefully inspect all contacts.
- Connect the adapter to the shaft, but do not secure it with a nut.
- A sports steering wheel is installed on the adapter and secured with special screws.
You cannot throw away or sell the factory product; the sports version will raise questions when passing inspection.
Power steering and power steering: do-it-yourself installation
The electric booster first appeared on Kalina, then on Grant and on the new Priora. You can drive a car without an ESD. But if a car owner previously owned a car equipped with a hydraulic or electric booster, then, at a minimum, he will experience great inconvenience. On the Lada Granta in the minimum configuration, the manufacturer does not install electric power steering, so many owners of such cars decide to install the power steering themselves. This procedure is not the easiest, and the unit is not cheap. But its presence means a comfortable ride, maneuverability and safety.
Installation does not require any special knowledge or skills; minimal experience and a set of tools are sufficient. If, nevertheless, the question arose about installing electric power steering on the Lada Granta, then when purchasing an electric power steering unit, you should pay attention to its number.
The set of numbers contains a definition of the place of production, these are the last two digits:
- 00 – made in Makhachkala (not the highest quality, has many negative reviews);
- 04 – Korean amplifier, you can buy it in a store, a rare copy at auto wrecking yards;
- 02 – made in Kaluga, a good medium option.
To install the amplifier you will need a set of wrenches, screwdrivers and an angle grinder (grinder). Before proceeding with installation, the steering wheel, all steering column switches, the ignition switch, and the steering column with cardan must be removed. The further algorithm of actions is as follows.
- Knock out the bolts from the removed bracket in the form of a plate and cut off about 3 cm from the top with a grinder.
- Drill holes in the plate to mount the electric amplifier.
- Fix the cardan to the EUR.
- Place washers under the bracket (where the electric booster is mounted), and you can use them to adjust the steering wheel.
- Attach the electric booster, and then install the cardan into the rack.
Let's get started
First you will need to disassemble the steering wheel housing and remove the reverse threaded retaining bolt. Height adjustment is carried out using a special bracket. In the factory configuration, the width of the hole for the bracket is small, which explains the small steering wheel adjustment stroke.
In the absence of this limitation for the bracket, you can lower the steering wheel all the way to the seat.
In order to lower the steering wheel as much as possible without interfering with the mechanics and without using an angle grinder, you will need several washers that fit the size of the bracket mounting bolt.
We place washers under the main bracket, depending on how much you need to lower the steering wheel. To do this, you will first have to unscrew the two front nuts. Particular attention should be paid to the fact that it is the front nuts that are unscrewed; if you unscrew the rear ones, the bracket may fall off the steering wheel, and you will have to spend additional time installing it back. If you need to lower the steering wheel very low, you can place several washers under the second bracket.
After the desired level of the steering wheel is reached, we assemble everything in the reverse order and install the steering wheel cover in place.
The disadvantage of this method is that the lowered steering wheel will partially cover the instrument panel, which will reduce visibility, but the resulting comfort while driving will completely cover this disadvantage. In addition, you can adjust the seat, perhaps this will help solve the problem.
If you want more drastic changes, you can either independently enlarge the slots for the steering wheel bracket, but this will require an angle grinder and some skills, since you need to act very carefully. Or you can simply contact a car service center, where specialists will do this.
Some car owners suggest simply buying a complete steering column, with an initially high-quality adjustment mechanism, but this will require a very good knowledge of all the parameters of the mechanism or you will have to involve expensive professionals in the work. You can also replace a regular steering wheel with a sports steering wheel, including the entire mechanism, and initially install it individually for yourself.
Rack and pinion steering
If we talk in general about the steering mechanism of the Lada Grant, then the following are its main characteristics and features.
- The steering column provides the ability to adjust the tilt of the steering wheel. And the steering wheel itself can be locked by installing an anti-rotation device connected to the ignition switch.
- The steering mechanism is of a rack and pinion type, where it is possible to change the gear ratio in different operating modes.
- The mechanism is mainly equipped with electric power steering.
- The electric amplifier is equipped with a unit that allows you to independently diagnose the technical condition of the device, and, if necessary, exclude the amplifier from operation.
The schematic diagram of the Lada Granta steering device is quite simple. The rack-and-pinion type mechanism is fixed in the engine compartment on a special shield through rubber supports. Reliability of fastening is ensured by bolts welded to the body. Steering drive is provided through two separate tie rods, which interact with the steering arms of the front wheel struts.
Reliability of engagement of the gear pair on one side is ensured by a special gap set at the factory. On the other hand, the precision of engagement is maintained by a spring stop, which presses the rack itself against the gear teeth.
The above gap under normal conditions is 0.1 mm, but during operation it may be violated due to wear of individual parts. Thus, one of the main reasons why an extraneous knock appeared in the steering mechanism is a violation of the set gear clearance. It should be noted that there are other malfunctions that can lead to an unpleasant knocking sound in the car:
- loosening of the steering rack itself on the mounting bolts;
- loosening of the tie rod ball joint;
- wear or destruction of mechanical transmission teeth.
Removing the steering gear
If a knock does occur, the car owner will have to dismantle the mechanism. It is more convenient and faster to carry out this work when the vehicle is on a lift. To carry out the work you will need the necessary tools, which in this case include:
- socket wrench or socket wrench 13;
- flat screwdriver;
- durable knife;
- special 24mm wrench for the steering rack;
- hexagon 6 with wrench.
Before starting work, the battery is disconnected, thereby taking the necessary safety measures. At the initial stage, you need to first loosen the bolts securing the front wheels. The wheels themselves should be left in the “straight” position before lifting the car onto the lift. Next, the steering wheel driveshaft is disconnected from the rack and pinion drive shaft.
This work is carried out from the salon. Therefore, the car is not raised high. The swing rods can now be released by unscrewing them from the swing arms. And as soon as this work is completed, you can begin to dismantle the steering mechanism. Using a 13mm wrench, unscrew the nuts securing it and remove the mounting clamps.
The steering mechanism is removed along with the disconnected steering rods. The next stage of repair work is disassembling the removed device. Here you should free the steering rack from all protective covers that are put on the mechanism. For this purpose, cut off all the fixing clamps, which will subsequently need to be replaced with new ones.
Trapezoid and front wiper motor
Note
: For clarity, the hood has been removed in the photographs, although work can be done without dismantling it.
1. Open the hood and disconnect the wire from the negative terminal of the battery.
2. Use a flat-head screwdriver to pry up and remove the cap of the nut securing the windshield wiper arm.
3. Using a 13mm wrench, unscrew the nut securing the windshield wiper arm.
4. Mark with a marker and, lifting the lever up and rocking it up and down so as not to damage the paintwork of the hood, tear the lever off the splines.
5. Similarly, remove the second windshield wiper arm.
6. Using a TORX T20 bit, unscrew the two screws securing the air intake grille.
7. Carefully disengage and remove the left part of the air intake grille.
8. Using a 10 mm socket wrench, unscrew the nut and two bolts securing the front windshield wiper trapezoid.
9. Carefully remove the trapezoid of the front windshield wiper assembled with the electric motor from the niche, slightly turning the structure upward.
Diagnostics, repair and reassembly
Before determining why there is a knock in the steering, you should completely disassemble the rack and carry out diagnostics for wear, destruction of components and connections. Disassembly is carried out in this order. Secure the steering rack in a vice, having previously installed spacers made of soft metal or other material. Unscrew the nut securing the mechanism crankcase pipe. The crankcase tube is removed. Remove the clamps securing the pipe bushings and remove them.
Unscrew the adjusting nut. Here you need to use a special 24mm wrench, which has external edges for unscrewing. Sequentially remove the rack stop spring, the sealing ring and the rack stop. Remove the crankcase cover. After removing the bearing cage and sealing ring, remove the rack. The second element of the steering mechanism pair - the gear shaft - is dismantled.
Now you can diagnose the condition of the bearings and sealing rings. After thorough cleaning, the wear of the gear sectors and the condition of the surface of the rack and shaft are assessed. After all, this is where the reason lies that causes the knocking that appears. If necessary, select the necessary parts and replace them.
Before reassembly, all critical connections are lubricated with a special compound. Very often, it is the insufficient amount of lubricant that leads to rapid wear of loaded parts, which violates the previously established clearance. Therefore, even a recently installed rack knocks again.
Assembling the steering mechanism is carried out in the reverse order. For correct and easy installation of dismantled bearings, you should select the required diameter of pipe cutting, which will help to correctly install the bearings in place. The assembled steering mechanism must be adjusted, since the size of the gap can also determine whether a knock will appear after reinstallation.
Rack adjustment
Before installing the rack and rods back, it is necessary to set the gaps of the gear connection. Please note that it is better to immediately replace the thrust nut with a new one. Set the rack to the middle position, as if the wheels were straight. For adjustment, a special clock-type indicator mechanism is used. We start rotating the gear shaft and measure the indicator readings.
If the value is 0.05 mm, then the adjusting nut should be tightened to the same amount. After the steering rack adjustment is completed, check the ease and uniformity of movement along the entire length of the rack stroke. Provided that everything is done accurately, you should fix the position of the adjusting nut by performing special core punching with a punch. When all the work has been completed, you can begin to reinstall the steering mechanism on the Lada Granta.
After the mechanism has been installed back on the car, you should, even before starting to drive with the car stationary, turn the steering wheel, checking the uniformity of rotation. A check that will reveal that there is no knocking can only be done while driving on a rough road.
Steering malfunctions usually occur due to insufficiently frequent preventive inspections. If the owner has missed the appearance of minor leaks in the steering mechanism, loss of integrity of the protective covers, then the likelihood that a knock will soon appear in it is quite high. Therefore, it is important to carry out annual diagnostics.
| Large steering wheel play | |
| The fastening nuts on the ball rods have become loose. | The cotter pin may be missing. Tighten the fastening and install a cotter pin if necessary. |
| The clearance in the ball joint rods is too large. | Replacement of steering tips for Lada Granta. |
| The silent blocks of the hinges are worn out. | Replace the rods. |
| There is too much clearance between the rack and nut. | Worn elements must be replaced, and after replacement the mechanism must be adjusted. |
| There is a knocking sound when turning the steering wheel | |
| The tie rod nuts are loose. | Tighten the fastening nuts. |
| There is a large gap between the rack and the nut. | Replace worn elements; after replacement, the mechanism should be adjusted. |
| The steering mount is loose. | Tighten the fastening nuts holding the mechanism. |
| Steering wheel turns too hard | |
| The support bearing of the shock absorber strut is faulty. | Replace the support bearing. |
| The support sleeve is worn, the rack stop is worn. | Worn elements need to be replaced. |
| Tire pressure is too low. | Inflate tires to optimal pressure. |
| Ball joint parts are worn or damaged. | Replace elements. |
| The shock absorber struts or their elements have expired. | Repairing the shock absorber strut or replacing it. |
| The shaft bearings are worn out. | The shaft bearings need to be replaced. |
| The electric power steering is faulty. | Replacement of the EUR together with the shaft. |
Nuances
It is worth noting that even after such a minor modification, it is worth paying special attention to the quality of driving. Despite the fact that nothing important was removed or even unscrewed, it never hurts to be on the safe side. So after everything is assembled, you should take it for a short test drive at a slow speed. You should also pay attention to how much the lowered steering wheel covers your control panel, since the speedometer is most often covered, and then decide how much of this modification you need. If everything suits you, then good luck.
Read more: Pin code stalker 600
It has been repeatedly noted that AVTOVAZ constantly saves on production, due to which absolutely every model has its own minor flaws, and sometimes even lacks some elements that are not vital, but important from an aesthetic point of view. It’s difficult to even call this flaw a flaw, since the steering wheel level is adjustable, and sometimes even foreign-made cars do not have such a function. Therefore, there is very little hope that anything will be fixed soon, so car owners will have to continue to solve minor problems with the car on their own. That is why you can find many articles on these topics, where car owners share their experiences, post photographs and a full description of the process, we hope that this article will help you.
Even 5 years ago, few car enthusiasts could imagine that domestic cars would have vertical adjustment of the steering wheel and reach depth. With the arrival of Lada Vesta, adjustments became available in two directions.
