Comments: no Published: 07/14/2017
Rating:
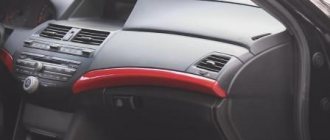
Automotive plastics quite often require painting, be it an interior element, a bumper or external body kits. This is due to many reasons. It happens that a car manufacturer, even a premium one, does not pay enough attention to the aesthetics of plastic interior parts, insufficiently covering them (or not covering them at all) with varnish. But most often the reason for the loss of their appearance is operational flaws. To restore aesthetics, such a part needs to be painted.
See also:
How to paint a car fender with your own hands?
Rules for painting plastic
It should be noted that not all types of plastic lend themselves equally well to coloring. For example, if a material such as polypropylene or polyethylene was used for manufacturing, high-quality painting becomes impossible.
Before painting ABC plastic, before carrying out a set of measures, it is necessary to carry out priming.
Many citizens are wondering whether there is a need for priming.
To have an accurate idea, you need to pay attention to the following aspects:
- If the plastic sinks in water, then there is no need for priming, but if not, priming is mandatory;
- It is also permissible to set fire to part of the part, and if black smoke does not emit during its combustion, it is necessary to carry out priming.
What kind of plastic can be painted?
Before painting plastic, you need to understand whether such an update is possible or not. After all, not every type of this material can be painted.
It will not be possible to visually distinguish one type of plastic from another; to do this, you need to find the marking on the item itself. The following types of material are suitable for the job: ABS and PVC; painting plastic will be successful, but it will be necessary to prime the surface before applying paint.
Plastic car parts can usually be painted; most often the priming step is skipped. But first make sure whether it is necessary to apply a primer to the material, the determination is as follows:
- The product is immersed in water; if it floats up, the surface must be primed;
- Set a small area on fire and look at the flame; if black smoke appears, then there is no need to treat it with a primer mixture.
It will not be possible to visually distinguish one type of plastic from another; to do this, you need to find the marking on the item itself.
Features of painting plastic with your own hands
It is extremely important to take into account that when painting, certain rules must be followed, the main ones being the following:
- It is necessary that the plastic is cleaned and dry;
- The plastic must first undergo a priming process (based on rubbing or spraying). Only after the primer has completely dried should you begin the process of painting it.
In order for the paint to dry well and adhere, it is extremely important to follow the rules, the main ones of which are:
- Painting should be carried out only if the humidity is at least 80% and the air temperature is at least +18;
- Both the dye and the plastic surface must be at the same temperature;
- The paint layer should be of medium thickness, since the drying process of a version that is too thick occurs over a long period, and one that is too thin will crack very quickly;
- The complete drying process takes, on average, about 5 days: the lower the temperature and the higher the humidity, the longer the drying takes;
- For painting soft plastic, it is more acceptable to use elastic enamels, which contain a plasticizer that prevents the corresponding layer from cracking;
Painting hard plastic must be done using acrylic paints.
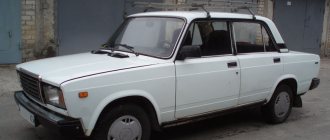
If all that remains of the bumper is the name: damage repair
If your plastic bumper is full of cracks and holes, then do not rush to throw it away and buy a new one. Even if the bumper falls to pieces, it can be fixed if desired.
You will need:
- everything that is required to paint an old bumper
- industrial hair dryer with narrow nozzle
- soldering iron with a wide tip (1 cm or more)
- flat electrodes (take several types in stock)
- putty for repairing plastic
- heat-resistant tape
- drill
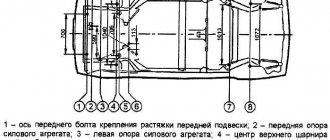
A flat electrode is a strip of polypropylene suitable for repairing cracks in plastic bumpers. Electrodes are divided into several types depending on the thickness and type of plastic. Find the material markings on the inside of the bumper, and in the store select the types of electrodes suitable for this plastic.
Just like when painting an old bumper, we remove the coating with a grinding machine with a P120 wheel. In places where there are cracks, remove the coating completely, down to the plastic. We remove dust and degrease the area of the crack, connect both parts and glue them to the outside of the bumper with heat-resistant tape. We turn the bumper over and work on the inside. At the crack site, we use a soldering iron to make a groove into which we will place the electrode. Do not press the soldering iron too hard, do not hold it in one place for a long time, so as not to tear the bumper. Make the groove 2–3 centimeters longer than the length of the crack. When the groove is ready, select an electrode of suitable thickness, apply it to the beginning of the groove and start heating it with an industrial hair dryer. When the electrode “floats”, pressing it, place its beginning in the groove, and thus, heating it at the base and pressing it, place the entire electrode. Wait until the plastic hardens and cut off the excess.
Photo of the restoration part
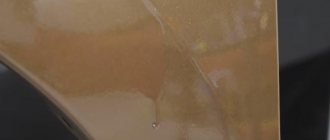
Will be needed for soldering the bumper Will be needed for soldering the bumper The problem we will deal with
This is what a sealed bumper looks like inside
The working process
This is what the bumper looks like from the outside This is what the bumper looks like from the outside It will turn out like in the photo
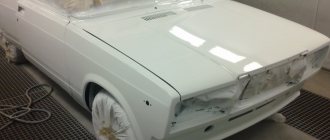
Then we work as with a regular bumper Putty Sanded, all that remains is to prime
We get this result. We cover it with paint - the first layer is shown in the photo. All that's left is the varnish
We coat it with varnish, put it on the car and drive
Remove the tape and repeat the same operation on the outside of the bumper, choosing a thinner electrode. When the plastic is dry on the outside, use a special attachment on a drill to cut off the excess, go through the sander again, blow off the dust, degrease and start filling with a special putty, which is then sanded with a block of P120 sandpaper. After you have treated all the cracks in this way, continue to work as with a regular whole bumper that requires painting.
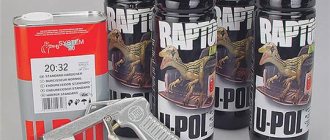
Tools and materials for painting plastic
To paint a plastic surface, you must acquire the following items:
- Paints for plastics;
- Acrylic varnish (the best option, in aerosol form), which will be applied at the final stage of the work;
- Special protective equipment, for example, a respirator and goggles; if possible, it is necessary to carry out a set of relevant works on the street;
- Newspapers and films used to protect objects that cannot be painted;
- Paper or masking tape;
- Bucket of water and detergent;
- Alcohol or solvent.
- Sandpaper;
- Putty or primer material.
Surface preparation
To get the desired result, you should carefully prepare the material. How to prepare plastic for painting? Perform the steps below:
- Remove the old coating; solvents and sandpaper are suitable for this purpose.
- The surface is cleaned.
- Degreasing stage.
- Application of antistatic agent.
- Putty is applied if necessary.
- Processing with sandpaper, then cleansing again, removing fat.
- Padding.
- Grouting, cleaning.
To get the desired result, you should carefully prepare the material.
Main types of paints for plastic
Initially, it should be noted that painting a plastic surface should never be done using paint containing acetone. As for other options, the most acceptable among them are:
- Water-based paints;
- Matte paints;
- Aerosol paints.
Each of these options has its own characteristics that must be taken into account when painting.
Expert advice
Expert advice can help make the process simpler and easier. When working with a brush, there are several important nuances: it does not need to be immersed entirely in the coloring composition, only the tip can be immersed; the layer should be made thin, reduction is done by pressing; The slope of the brush remains the same over the entire surface.
The layer should be made thin, reduction is done by pressing.
The article described in detail how to properly paint plastic. Here it is important to choose a paint and varnish that is suitable for the material. Thanks to modern technologies, a large number of paints are produced that will help you get a durable result that looks beautiful in appearance.
Specifics of water-based paints
Many people call this type of material acrylic enamel. Its main components are a hardening agent and a hardener. The main advantage of this option is durability.
The plastic coating treated in this way does not fade over a long period and is not destroyed under the influence of ultraviolet radiation.
Before starting work there is no need to carry out priming, it is enough to just clean the surface well. This option is suitable only for external use.
Matte paint for plastic
To give the surface an aesthetic appearance, it is extremely important to use matte paint, before using which the surface must be treated with a primer.
This type of paint contains substances that are prone to wear resistance, which makes them suitable for painting cars.
Aerosol paints for plastic
It should be immediately noted that this option is excellent for those who independently carry out painting work.
The following types of aerosols are currently distinguished:
- Soft touch - after all the necessary actions have been carried out, the surface acquires a pleasant roughness; Also, with the help of this paint it is possible to eliminate existing shortcomings;
- Modal enamel provides a glossy shine to the treated surface.
The main advantages of the spray can be considered:
- No costs associated with the purchase of painting materials (for example, brushes and rollers);
- Ease of application;
- Uniform surface coverage and creation of a smooth layer;
- Creation of any texture;
- Preservation and protection from tarnishing for a long period of time;
- Economical paint consumption;
- Ease of painting surfaces of a different color.
Regardless of what type of paint is chosen, to give the surface an ideal look, after drying it must be coated with polishing wax paint, which will help hide minor defects.
In the event that an independent dyeing process is carried out for the first time, it is extremely important to first obtain comprehensive consultation from a specialist.
Painting step by step
If they work with a brush, then they move with different levels of pressure, at first they make it weak, then stronger, in order to create a thin layer. The strokes are made wide and even. Usually 1 layer of brushing is enough.
Using an aerosol involves applying the composition in 2-3 layers. The distance from the object to the can should be left at 20-30 cm. We hold it straight and treat the entire surface in this way, each layer is applied only after the previous one has completely dried. Drying time varies by brand and can be determined by reading the directions on the package.
Next, you can apply varnish to the dried paint in the same way.
Using an aerosol involves applying the composition in 2-3 layers.