The Lada Largus model is loved by many owners of this car. The designers made the car quite roomy, which allows it to be defined as a “family” car, and the budget price of the car was liked by a large number of commercial organizations that use it as a traveling vehicle.
Therefore, it will be useful for drivers to know how to replace the timing belt on a Lada Largus. This is important, because when the belt fails, the pistons meet the valves and damage the valve mechanism.
How to check the condition of the belt on Largus
A broken timing belt on Largus leads to the fact that the valves remain open, and the pistons hit the “plates”, bending them. Such a breakdown leads to a major overhaul of the cylinder head and replacement of the pistons.
To prevent this from happening, you need to be able to recognize increased wear on the timing belt. Currently there are two ways to assess its serviceability:
- visual inspection;
- extraneous sounds.
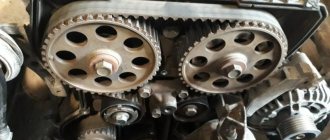
An external inspection helps assess the visual condition of the belt. There should be no cracks or protruding burrs on it. It should be smooth and neat. An external assessment of the product can only be carried out with the protective screens removed.
Extraneous sounds can only be discerned by an experienced driver. If there are burrs on the old belt, they will hit the gears and other mechanisms with a characteristic soft sound. This may be a reason to inspect the timing belt.
Purpose of the timing belt and design features
To supply the fuel mixture into the combustion chamber and exhaust gases, valves are used, which are part of the gas distribution mechanism. There can be 8 valves for engines with one camshaft, or 16 for engines with two camshafts, depending on the model.
Valves
An important element in the timing belt is the valves, which are divided into intake and exhaust. The diameter of the intake valve is made larger than the exhaust valve. This allows you to reduce the time it takes to fill the combustion chamber with the fuel mixture and increase the filling ratio. The inlet valve controls the flow of low-pressure mixture, hence providing a lower filling rate. The exhaust operates under high pressure conditions, which allows you to quickly empty the combustion chamber. Therefore, for optimal operation of the internal combustion engine, the intake valve should have a diameter of about 45% of the piston diameter, and the exhaust valve should have a diameter of about 38%.
In order to optimize the operation of the valve mechanism, a chamfer is made on the outer side of the valve at an angle of 45 degrees. There is a similar chamfer, or seat, at the hole that closes the valve on the head of the block. To ensure the tightness of the valve and seat, they are ground in using special abrasive powders.
There are special requirements for the materials from which valves are made. This especially applies to exhaust mechanisms that have a higher operating temperature. As a rule, these are alloys of chromium, nickel, manganese and nitrogen compounds.
Exhaust valve stems are often hollow and filled with sodium, which has high thermal conductivity and can effectively dissipate heat.
Camshaft and drive
The opening of the valves at the right time is carried out by the camshaft using a lever or rocker (rocker arm). The rocker rests on a ball joint or hydraulic compensator at one end, and on the valve stem at the other. The eccentric - the camshaft cam - presses on the rocker approximately in the middle of its length, transmitting force to the valve. The valve is returned to its original state by a spring located on the axis of its stem. Torque is transmitted to the camshaft through a chain or toothed belt drive.
The engines installed on the Lada Largus use two design solutions for the gas distribution mechanism: with one camshaft and with two. Twin camshaft engines are increasingly used due to their greater power output due to better mixing and combustion of the fuel mixture. Despite the advantages of dual-head motors, single-head motors are also widely used due to their simple design, reliability and low cost.
Drive unit
Torque is transmitted to the camshaft via a belt drive. It does not require lubrication, the belt is easily installed on the pulleys, has less inertia, and is quieter. The disadvantages include a limited resource: about 150 thousand km. However, such a mechanism is increasingly used due to its lower cost and ease of maintenance. Further we will consider only a timing drive with a belt drive.
Its elements should also include a tension roller used to tension the timing belt. The drive of the gas distribution mechanism is greatly influenced by its tension force. Excessive force leads to intense wear of timing parts, bearings, pulleys, water pump, generator, tensioner. Strong tension causes the belt to stretch, which also shortens its service life.
Weak tension can lead to the belt slipping along the timing pulleys of the camshafts, disruption of the valve timing and, as a result, deterioration of engine performance.
Timing belt tensioners, depending on the type and design, have a different service life and require replacement at the mileage specified in the vehicle’s operating manual. The most common, simple and, therefore, reliable tensioners are mechanical rollers, which are divided into eccentric and slider ones. On cars of the domestic automobile industry, eccentric tensioners are mainly installed. Their service life is comparable to the service life of the timing belt, so it is recommended to change them at the same time. Often timing belts and tensioner pulleys are sold as one repair kit. When replacing the timing belt, it is advisable to replace the water pump, regardless of its condition.
How to select components for replacing the timing belt on a Lada Largus
The most important thing when selecting this product is the manufacturer. The car owner must be able to distinguish between manufacturers from whom timing belts can be purchased. Below is a list of trusted manufacturers you can trust:
- Renault;
- Lada;
- Gates;
- Contitech;
- Bosch;
- Dayco;
- Lemforder.
Often, original kits may contain belts from manufacturers such as Gates or Contitech. Therefore, there is no point in overpaying. It's better to get a cheaper set.
Another important point when choosing a timing belt is its shelf life. Since this is a rubber product, it has a limited time during which it can be stored.
Special numbers on the belt itself, for example, “5-30”. The number 5 means the year - in this case 2015, and 30 is the number of the week in which the product was manufactured. The permissible storage period of the belt is 5 years. If its age is higher, it is clearly not worth installing such a spare part.
If you install a timing belt on a Lada Largus with an expired expiration date, its breakage may occur even earlier than the required replacement according to the regulations - after 10 or 20 thousand kilometers. By the way, it is after this that bad reviews about the best manufacturers may appear.
To find out the expiration date, just pay attention to the special inscriptions placed on the packaging. For example, “Install < 08.2021”, as in the photo above. This means that this belt can be installed no later than August 2022.
Spare parts and tools
The car, equipped with a K4M gasoline engine, has an original timing belt. It provides maximum service life. Look in the manual to find out the article number of the belt and other drive parts: rollers, bearings, pulleys. For the Lada Largus car - article number 130C17529R , 16-valve K4M engine. The recommended analogue is Gates K035671XC , and for Renault Lada Nissan - Gates K016PK1823XS .
In addition to spare parts, you will need:
- garage tools - set of sockets, screwdrivers, wrenches, ratchet, jack, hammer, pliers
- device for fixing pulleys RV
- marker
- penetrating lubricant WD-40.
Necessary kit for replacing the timing belt
To perform this procedure, the car owner will need a set of tools for repairing the Lada Largus, as well as the corresponding spare parts. The timing belt consists of a kit that includes:
- the belt itself;
- tension roller;
- guide roller (if equipped).
In addition to the rubber product in this mechanism, it is strongly recommended to replace the pump. Despite the fact that it has a service life and replacement schedule twice as long as the timing belt, it still needs to be replaced.
Belt sets with pumps and corresponding articles are presented in the table below:
| Engine | Number of valves | Article number of the original (factory) kit | Analogue from Gates | Pump catalog number |
| VAZ-11182 | 8 | 21116-1006040-00 | 5670XS | 21116 130701075 |
| VAZ-11189 | 8 | 21116-1006040-00 | 5670XS | 21116 130701075 |
| VAZ-21129 | 16 | 21126100604086 | K015631XS | 21129130701020 |
| K7M | 8 | 13 0C 174 80R | K015662XS | 8200146298 |
| K4M | 16 | 130C17529R | K035501XS | 210105296R |
Largus engine line
Under the hood of the Togliatti station wagon, which in its maiden days was known in Europe as the Dacia Logan MCV, one of two powertrain options can currently be installed:
- 8-valve 11189 with a power of 87 hp. s., familiar to domestic car owners from Kalina and Grant;
- 16-valve French K4M with 102 hp. pp., produced by AvtoVAZ under license.
The 1.6-liter engines are equipped with an injection power system and comply with Euro-5 standards.
Unfortunately, the design of both engines is such that if the belt teeth break or are cut off, the valves of the gas distribution mechanism bend. Therefore, it is necessary to carry out preventive work on time to replace the timing drive of the Lada Largus.
Replacing the timing belt on a 16-cl VAZ-21129 engine
You can change the timing kit on this engine only in a garage. To do this, you need to perform several complex and responsible actions. If you are doing such an operation for the first time, it is better to do it under the supervision of an experienced specialist.
Dismantling the old product
To do this, follow the following procedure:
- Disconnect the negative terminal of the battery.
- Hang up the right wheel and remove it.
- Remove the right fender liner.
- Remove the drive belt.
- Remove the crankshaft pulley.
- Suspend the engine using a rolling jack and remove the right engine mount.
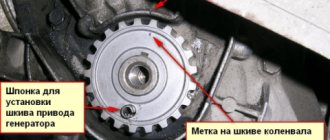
- Set the PB marks in accordance with the photo above by turning the crankshaft.
- Loosen the tension pulley and remove the old timing belt.
- Drain the antifreeze and remove the old pump.
- Remove the old tension roller.
Installing a new belt
To install a new timing belt, you first need to install a new pump and tension pulley. After this, the following procedure is performed:
- Install the new belt starting at the crankshaft.
- Make sure that the camshafts do not rotate and maintain the position of the marks. You can use clamps for this.
- Tension the belt using a roller. To do this, it must be tightened to a torque of 5 Nm. The tension will occur automatically after one revolution of the crankshaft.
- Turn the crankshaft two turns and check that the marks match.
- If all marks match, the timing belt was installed correctly. Otherwise, you must repeat all procedures from the beginning.
- Reassemble all other parts in reverse order.
Attention! Do not turn the crankshaft until the belt is on! Otherwise, there is a risk of bending the valves.
Features of service provision
Before talking about the services we offer and their relevance, you should pay attention to the design features of the engines installed on this station wagon, its pseudo-off-road version and van. There are four in total
Initially, the model, which is essentially a modernized version of the Dacia/Renault Logan MCV of the first generation, was equipped with engines installed on Renault Largus cars. It received K4M and K7M gasoline engines, both in-line “fours”, the first has 16 valves, the second has 8 valves. A further development of the model was the installation of motors of our own production, adapted for French gearboxes. The K7M engine was replaced by the VAZ 11189 (a slightly modified version of the VAZ 11186); this power unit is not found anywhere else on other Togliatti-assembled models. The K4M was replaced in 2022 by the VAZ 21129 (a modernized version of the VAZ 21127 brought into compliance with Euro5 environmental standards), this engine is also installed on the Lada Vesta and Lada X-Ray
There are four of them in total. Initially, the model, which is essentially a modernized version of the Dacia/Renault Logan MCV of the first generation, was equipped with engines installed on Renault Largus cars. It received K4M and K7M gasoline engines, both in-line “fours”, the first has 16 valves, the second has 8 valves. A further development of the model was the installation of motors of our own production, adapted for French gearboxes. The K7M engine was replaced by the VAZ 11189 (a slightly modified version of the VAZ 11186); this power unit is not found anywhere else on other Togliatti-assembled models. The K4M was replaced in 2022 by the VAZ 21129 (a modernized version of the VAZ 21127 brought into compliance with Euro5 environmental standards), this engine is also installed on the Lada Vesta and Lada X-Ray.
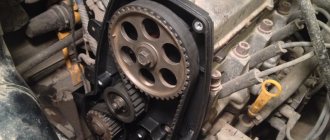
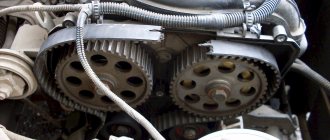
On the timing belt of all Lada Largus engines there is a belt, or rather a timing belt of the Lada Largus, there are toothed pulleys for the crankshaft, camshaft (if there are 16 valves, then there are two pulleys, according to the number of camshafts, that is, one pulley for the intake camshaft, the second for the exhaust), water pump . A Largus timing tension roller is also used (if there are 16 valves, then the tension roller tensions the belt, and a second Largus timing support roller is also used).
Our specialists carry out both replacement of the timing belt for 16 Largus valves and replacement of the timing belt for Largus 8 valves.
In addition to the timing belt, the Lada Largus uses a belt that drives auxiliary units. This is the so-called Lada Largus generator belt or the second name is the Largus drive belt. We replace the Largus drive belt. The specifics depend directly on the design of the drive that ensures the operation of the auxiliary units, or more precisely, the configuration of the car. A number of configurations are “empty”. This is the simplest diagram, there are two pulleys, one for the generator, the other for the crankshaft, between them is the Lada Largus generator belt. In this case, we offer such type of work as replacing the Lada Largus belt.
The second scheme is a little more complicated. A number of trim levels include the installation of power steering (power steering). Then a power steering pump pulley and a belt tensioning roller (it’s called a tensioner) are additionally installed. This Largus drive belt differs from the generator belt, it is longer. In other words, a diagram with three pulleys and one roller.
Our craftsmen are replacing the Largus drive belt.
The richest trim levels come with not only power steering, but also air conditioning. In this case, an additional drive pulley for the air conditioning compressor and a bypass pulley for the belt, that is, four pulleys, two rollers and a Lada Largus air conditioning belt.
We replace the Largus air conditioner belt, and also offer to purchase the Lada Largus spare parts necessary to provide this type of service.
Replacing a toothed belt on an 8-valve VAZ 11189 and 11182 engine
Despite the fact that this is the weakest Largus motor, it has a number of advantages. And one of them is simplicity and reliability. The timing belt on this engine can be changed while in the field, even if it breaks along the way.
Removing the old timing belt
To do this you just need to follow a few simple steps:
- Remove the drive belt.
- Lift the right wheel, dismantle it and remove the wheel arch liner.
- Break off the crankshaft pulley mounting bolt, unscrew it and remove the pulley.
- Relieve the engine mount by slightly lifting the engine with a jack (optional).
- Unscrew both timing belt protective covers.
- Set the marks in accordance with the photo by turning the crankshaft clockwise.
- Loosen the tension roller and remove the old belt.
Installing a new timing belt
Installation is carried out in reverse order:
- The tension roller is changed.
- A new timing belt is being installed.
- The tension roller is tensioned until the marks on it coincide.
- Turn the crankshaft two turns and check that the marks match.
- If everything is in order, tighten the roller to a torque of 33-40 Nm.
Features of service provision
Before talking about the services we offer and their relevance, you should pay attention to the design features of the engines installed on this station wagon, its pseudo-off-road version and van. There are four in total
Initially, the model, which is essentially a modernized version of the Dacia/Renault Logan MCV of the first generation, was equipped with engines installed on Renault Largus cars. It received K4M and K7M gasoline engines, both in-line “fours”, the first has 16 valves, the second has 8 valves. A further development of the model was the installation of motors of our own production, adapted for French gearboxes. The K7M engine was replaced by the VAZ 11189 (a slightly modified version of the VAZ 11186); this power unit is not found anywhere else on other Togliatti-assembled models. The K4M was replaced in 2022 by the VAZ 21129 (a modernized version of the VAZ 21127 brought into compliance with Euro5 environmental standards), this engine is also installed on the Lada Vesta and Lada X-Ray
There are four of them in total. Initially, the model, which is essentially a modernized version of the Dacia/Renault Logan MCV of the first generation, was equipped with engines installed on Renault Largus cars. It received K4M and K7M gasoline engines, both in-line “fours”, the first has 16 valves, the second has 8 valves. A further development of the model was the installation of motors of our own production, adapted for French gearboxes. The K7M engine was replaced by the VAZ 11189 (a slightly modified version of the VAZ 11186); this power unit is not found anywhere else on other Togliatti-assembled models. The K4M was replaced in 2022 by the VAZ 21129 (a modernized version of the VAZ 21127 brought into compliance with Euro5 environmental standards), this engine is also installed on the Lada Vesta and Lada X-Ray.
On the timing belt of all Lada Largus engines there is a belt, or rather a timing belt of the Lada Largus, there are toothed pulleys for the crankshaft, camshaft (if there are 16 valves, then there are two pulleys, according to the number of camshafts, that is, one pulley for the intake camshaft, the second for the exhaust), water pump . A Largus timing tension roller is also used (if there are 16 valves, then the tension roller tensions the belt, and a second Largus timing support roller is also used).
Our specialists carry out both replacement of the timing belt for 16 Largus valves and replacement of the timing belt for Largus 8 valves.
In addition to the timing belt, the Lada Largus uses a belt that drives auxiliary units. This is the so-called Lada Largus generator belt or the second name is the Largus drive belt. We replace the Largus drive belt. The specifics depend directly on the design of the drive that ensures the operation of the auxiliary units, or more precisely, the configuration of the car. A number of configurations are “empty”. This is the simplest diagram, there are two pulleys, one for the generator, the other for the crankshaft, between them is the Lada Largus generator belt. In this case, we offer such type of work as replacing the Lada Largus belt.
The second scheme is a little more complicated. A number of trim levels include the installation of power steering (power steering). Then a power steering pump pulley and a belt tensioning roller (it’s called a tensioner) are additionally installed. This Largus drive belt differs from the generator belt, it is longer. In other words, a diagram with three pulleys and one roller.
Our craftsmen are replacing the Largus drive belt.
The richest trim levels come with not only power steering, but also air conditioning. In this case, an additional drive pulley for the air conditioning compressor and a bypass pulley for the belt, that is, four pulleys, two rollers and a Lada Largus air conditioning belt.
We replace the Largus air conditioner belt, and also offer to purchase the Lada Largus spare parts necessary to provide this type of service.
Replacing the timing belt on a 16-valve K4M engine
Everything is much more complicated here. To replace the timing belt on K4M engines, special shaft clamps are required, as well as camshaft plugs, since they are disposable. To access the plugs, you will need to remove the intake muffler housing.
Removing the old belt
To do this, follow these steps:
- Lift the right side of the Lada Largus and remove the front wheel.
- Unscrew the fender liner to expose the crankshaft pulley.
- Loosen the accessory belt and remove it.
- Remove the crankshaft pulley.
- Remove the right engine mount by lifting it up.
- Unscrew the timing belt protective covers.
- We fix the crankshaft using a special device. Pre-set the timing marks. To do this, you need to remove the rear camshaft plugs and turn the CV so that the marks on them are horizontal. We fix it.
- Loosen the tension roller and remove the old rubber product.
Installing a new product
Before installing a new belt, it is recommended to check the condition of the crankshaft oil seal. If necessary, it is recommended to replace it. Next, the following list of actions is performed:
- Replace the tension and guide roller. The tension roller bolt must be tightened by hand.
- We put the timing belt on from top to bottom.
- To tension the belt, you need to insert the hexagon into a special hole and turn the eccentric until the flag is aligned with the slot.
- After tensioning the belt, tighten the pulley bolt.
- Pull out the clips and turn the crankshaft two turns.
- Check that the marks match. If everything is in order, reassemble in reverse order.
Attention! Do not reinstall the old camshaft plugs. Be sure to replace them with new ones to avoid oil leakage!
Need for replacement
The function of the timing belt is to communicate between the crankshafts and the camshafts. Thanks to it, the operation of the shafts is synchronized. Manufacturers of Lada Largus 16 valve recommend changing the timing belt along with the tension roller every 60,000 kilometers. But unscheduled replacements are possible due to the condition of the strap.
If you do not monitor its condition, the belt may break, which will have serious consequences for the Lada Largus with 16 valves. When a break occurs, the synchronization of the shafts disappears and the valves meet the pistons. As a result, valves bend, pistons deteriorate, and there is a high probability of damage to the surface of the cylinders.
This requires a major engine overhaul or replacement.
For this reason, it is advisable to inspect the components of the gas distribution mechanism after 10 thousand kilometers. The timing belt needs to be replaced if the following defects are found:
You need to inspect the belt, as well as the tension roller and water pump, replacing them if there are defects or play.
How to change the timing belt on an 8 valve Largus - K7M
The engine is similar to the 8-valve VAZ engine. Replacing rubber products is also easy, but with the use of special tools.
Removing a worn timing belt
By analogy with K4M, we perform the following actions:
- Lift up the right wheel and remove it.
- Remove the belt and fender liner protection.
- We loosen and dismantle the belt of auxiliary units.
- Raise the engine and remove the right engine mount.
- Remove the timing belt protective cover.
- Break off the crankshaft pulley bolt and remove the last one.
- Remove the lower timing cover.
- Turn the crankshaft until the mark in the photo matches.
- Make a chalk mark on the crankshaft sprocket and cylinder block.
- Unscrew the nut securing the tension roller and remove it by removing the old belt.
Installation of a new rubber product
If the pump is replaced along with the replacement of this part, then first you need to remove the old sealant and thoroughly clean the mating surface of the cylinder block. Install the new pump using sealant. Don't forget to install the gasket. Then follow these steps:
- Install the new tension pulley onto the stud and tighten the nut by hand. The roller should stand in such a way that the direction of rotation coincides with the direction of the arrow on the roller body.
- Install the new rubber product so that its bottom mark coincides with the mark on the KV sprocket.
- We put the belt on the RV so that its mark coincides with the mark on the gear.
- Using a wrench, tighten the tensioner nut until the mark matches. The same as on the VAZ engine. Fully tighten the nut to 30-40 Nm.
- Check the alignment of the marks by turning the crankshaft clockwise several times.
Attention! Weak belt tension will cause the teeth to jump and shift the valve timing. This is fraught with problems with valves and pistons! Be careful!
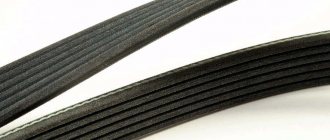
Alternator belt types:
Depending on the specific modification of Largus Cross or another model, the following types of Renault or Lada alternator belts are used:
- Four-stranded. On Lada or Renault cars without power steering and air conditioners, equipped with engines with 8 valves, products of the 4RK715 series are used.
- Five-rakes. Drive belts for 5RK generators with a length of 1110 mm are intended for generators installed on vehicles without air conditioning or power steering, which are equipped with K7M engines with 8 valves.
- poly-V-type belts : Belts with a length of 1200 are used on models equipped with K4M engines with 16 valves and power steering, but without air conditioning.
- Products with a length of 1820 mm are suitable for generators installed on engines with 8 or 16 valves together with power steering and air conditioners.
- Belts 837 mm long (analogues of Renault 117200593R) are used for generators installed in conjunction with 8-valve engines on cars with air conditioning, but without power steering.
Checking and tensioning the belt
A few words about the process of belt tensioning. On a 16-valve engine, tension is checked by inspecting the tensioner.
There are indicators on it that must be aligned during normal tension of the drive element.
If the upper pointer moves to the side, this indicates a loose or overtightened belt.
To adjust the tension, you need to loosen the roller nut and use a hexagon to turn the roller so that the pointers align.
In 8-valve units, tension is checked by hand. To do this, we take the belt with our fingers in the middle of the area between the camshaft pulley and the pump (K7M) or the crankshaft gear (VAZ) and try to rotate it around the axis.
For a normally tensioned belt, the rotation angle should not exceed 90 degrees. Below is shown using the example of a VAZ 2110.
If the angle of rotation is too small or large, we tighten it by loosening the nut of the tension roller and turning the roller itself with a special wrench.
Preparatory stage
The initial stage of work is the same for both methods and boils down to providing access to the drive belt.
For this:
- We place the car on the inspection hole, immobilize and de-energize the on-board network by removing the “negative” terminal from the battery;
- For the convenience of work, remove the right front wheel from the car (in the direction of travel), dismantle the protective elements of the engine compartment - the lower one and the mudguard;
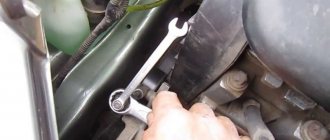
- Remove the accessory drive belt. To do this, using a spanner wrench, press the belt tension roller, remove the drive element, and then completely remove it from the equipment pulleys;
- We unscrew the spark plugs and cover their mounting holes with a rag;
- We remove the load from the upper right support of the power plant. To do this, install a pry bar between the subframe and the pan, squeeze the motor up a little and fix it in this position with a block;
- Let's move on to the engine compartment. There, first we pull out the fuel lines from the holders located on the support and take them to the side;
- We disconnect the support bracket from the top cover of the timing drive, for which we unscrew the three fastening bolts (these fasteners are different in length, so you should mark which one was located);
- We unscrew the two bolts that secure the support to the car body and remove it;
- We unscrew all the fasteners of the top drive cover (3 bolts and 2 nuts), after which we remove the cover. Please note that if you check the condition and tension of the belt, there is no need to disassemble anything further. After removing the cover, the belt will be clearly visible, so to assess its condition, all that remains is to turn the crankshaft a few turns and inspect the drive element. To adjust the tension, there is a special hatch on the bottom cover through which access to the tension roller is provided. If the belt is replaced, then we continue to disassemble the power plant further;
- We unscrew the bolt securing the auxiliary units pulley. To do this, ask an assistant to engage 5th gear in the gearbox and depress the brake pedal to block the crankshaft. If this is not enough to remove the bolt, then proceed as follows: remove the crankshaft position sensor from the flywheel housing. We insert the pry bar into the resulting hole so that it fits between the teeth of the flywheel ring (starter ring). The teeth that are used by the crankshaft position sensor (they are larger) must not be used as a stop; they must not be damaged under any circumstances. Thus, resting the pry bar against the flywheel housing, stop the crankshaft from turning and unscrew the bolt, and then remove the pulley;
- We install the pulley bolt back, but first you should put a small bushing (a piece of pipe) or a pair of larger nuts on it;
- We dismantle the bottom cover of the drive by unscrewing its 4 fasteners.