There are a huge number of tuning options. But often our compatriots prefer external tuning, which involves changing the appearance of the vehicle in every possible way. There is a complex option for changing the appearance of a car, which requires significant financial investments and a complex workflow. But there is also a simple but effective way to modify the car. One such example can rightly be the installation of eyelashes on headlights. Small changes to the optics can achieve superior visual effects. Moreover, it is quite possible to make these eyelashes yourself at home. You just need to figure out how they are made and installed correctly.
Method of installing eyelashes on headlights.
What is it and why are they used?
Not everyone really knows what eyelashes are. This is an interesting and unusual element of external tuning, which is presented in the form of narrow small overlays. They are installed on the head optics. Such a small change can significantly change the external perception of the vehicle. But here the correct choice of size is of great importance. If you install eyelashes that are too large, they will disrupt the correct operation of the light, which is why the headlights will not be able to function fully. Using cilia, rectangular headlights can be made semicircular, and semicircular headlights can be turned into rectangular ones. You should not perceive eyelashes purely as a decorative element. The materials used to make the linings form an additional protective layer for the vehicle's optics. Yes, they will not protect against strong mechanical shocks, but they can easily prevent the negative impact of small gravel, stones and other debris.
Eyelashes are not large in size and are not pronounced elements. But sometimes you are surprised how strong the effect is after installing them. That's why they are widely popular among tuning fans. Moreover, even those who hold more conservative views and are afraid to make any significant changes decide to put on eyelashes. Little things like eyelashes on the head optics actually significantly affect the appearance of the vehicle. And the main advantage here is that a similar result can be achieved with minimal financial investment. But before making and installing such an external tuning element on your car, it is recommended to become better acquainted with the types of eyelashes, as well as take an objective look at their strengths and weaknesses.
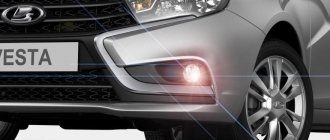
Simple stylish headlight tuning
With the help of eyelashes you can emphasize the individuality of your car with minimal investment. The stylish and simple accessory began to be used after manufacturers applied a new hood design, which is called “Bed Boy”.
It involves creating an aggressive appearance for the front of the car by covering the upper cut of the headlights with the protruding part of the hood. During the tuning process, changing the hood configuration is quite difficult. It is much easier to install plastic covers on the headlights - cilia, which you can make yourself. They are easy to install and can be removed at any time if necessary. With the hood, such manipulations cannot be performed so quickly and cheaply.
Varieties
Having decided to do a little tuning for your car, you should start by choosing the material itself. There are several types of products on the market. At the same time, the eyelashes for car headlights differ in the material of manufacture and functional purpose, but all of them can be easily installed with your own hands. When choosing eyelashes from film or plastic, you should determine in advance what effect you want to get and what you are striving for when doing such tuning yourself. Some eyelashes for headlights can serve a purely protective role, others a decorative one. As a result, all products are divided into 3 categories.
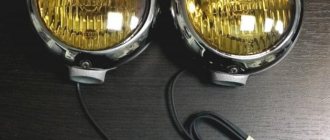
- Protective eyelashes. These products serve a more practical than decorative role. Their main task is to provide additional protection for body elements and the headlights themselves. They take on mechanical loads, impacts from various small stones and debris flying from the road and from cars in front. This is a great way to extend the life of head optics and prevent damage to the housing. Eyelashes should not be seen as a panacea for all attacks, but they can make their contribution to protection. For the manufacture of such elements, transparent thermoplastic is used. It is easy to apply different patterns and designs to the material, which will add decorative properties to the eyelashes.
- Chrome plated. Their main function is to give the car an exclusive and unusual appearance. Chrome parts always look good inside and outside the car. If the car itself already has some chrome-plated parts, the eyelashes will harmonize perfectly with them. For the linings, a different base is used, which is coated with chrome. And here it is extremely important that the coating is done with high quality and using good materials. Otherwise, the chrome layer will quickly wear out and lose its original appearance.
- Plastic elements. The most common eyelashes are in the form of dense extensions or thinner films. Plastic is very affordable, versatile, and varied in appearance. This reveals the main advantages of plastic or polymer eyelashes. For novice tuning fans, these elements will be the optimal choice. They can be easily selected for different cars to achieve the desired result. Already painted eyelashes are available for sale, as well as unpainted structures, which the car owner can decorate at his own discretion.
Each motorist will decide which eyelashes to choose individually. Plastic products are rightly considered the most universal. Their huge range and low price explain their high popularity. Chrome eyelashes are not suitable for everyone and not in all situations, so chrome should be used with extreme caution. As for protective eyelashes, even plastic products also provide good protection from mechanical damage. But they are superior to them in the decorative component. And since we are talking about tuning elements, the issue of appearance comes first.
Introduction
Retrofitting headlights is a fairly common occurrence that modern vehicle owners subject their movable property to. Thanks to optics tuning, you can radically change the basic features of the car. Along with an improved appearance, the car enthusiast, by improving the optics, receives a vehicle with improved operating features in the evening and at night. However, anyone who decides to tune headlights should be aware of a number of permits and measures that apply to car owners who have made a prohibited upgrading of optics. The beautiful appearance of headlights sometimes affects a negative change in the optics settings, affecting the dazzle of oncoming drivers.
Advantages and disadvantages
It is a mistake to believe that installing eyelashes gives only a visual effect, and this is where the benefits or advantages of such tuning elements end. In fact, we can highlight several strengths of cilia installed on vehicle optics:
- The gap between the headlights and the hood is visually reduced. Although this largely depends on the automaker who carefully connected the parts, the effect is still noticeable;
- The use of eyelashes gives the car an unusual, non-standard and original appearance;
- A variety of solutions allows you to modify the external perception of the car. Eyelashes of different types and shapes look completely different on the same car;
- An additional protective layer is created. Moreover, it is not necessary to use special protective structures based on transparent thermoplastic. More affordable plastic eyelashes also do a good job of protecting the headlight unit from damage;
- Affordability and wide range. This is a fact of tuning that requires minimal financial investment with a very decent effect from installing eyelashes.
This cannot be considered an advantage, since the fact has not been proven, but some are sure that the presence of cilia makes the light from headlights less dazzling. This supposedly has a positive effect on the comfort of drivers of oncoming cars. There are quite a lot of arguments in favor of eyelashes on headlights. But there is also something that speaks against such an element of finalizing the appearance of the vehicle. It is difficult to find any significant flaws in eyelashes. Yes, with their installation you will have to work a little and try hard to achieve a high-quality result. Some turn to specialists for help. But with the right approach and the use of high-quality materials, everything can be done independently at home. Another conventional disadvantage is the sail effect that occurs when the car moves at high speed. Strong air currents begin to flow under the eyelash, which can lead to damage to the decor. Or the eyelash will simply fall off. But this can be avoided. It is enough to properly fix the eyelash and adhere to the basic rules of installation. Then nothing will fall off.
How to beautifully make eyelashes on headlights yourself - ideas and photos
Women's eyelashes. This option is considered a very unusual and original version of car tuning. Today they have become popular among women. They are shaped like real human eyelashes and are made of durable plastic that is very elastic. On different car models, eyelashes are attached as follows: the edge of the hood, the glazing of the headlight unit.
Making your own eyelashes
There is a category of motorists who prefer to do many things themselves. For them, there is no problem in making eyelashes for headlights with their own hands. The procedure is not the most complicated, but it requires attention, accuracy and consistency in the actions performed. If you are also interested in how you can make eyelashes on the headlights of your vehicle, listen to a few recommendations and follow step by step.
- First you need to determine what shapes and contours the tuning element will have. To do this, you can take a regular marker and draw the expected eyelash on the body. If you are not satisfied with something, you can erase and reapply the lines. It is extremely important that the result satisfies the car enthusiast.
- To transfer the line you like to the second headlight to get identical lines, you can use a template pattern. Simply take masking tape, stick it along the contour of the drawn lines, and then transfer it to the second block. Try to match the template as accurately as possible with the contours of the wings and radiator grille. Now draw a line again on the second headlight.
- There is no need to dismantle the optics. You can install the eyelashes directly on the headlight assembly. But first it is recommended to cover all areas of the body around with protective material. This can be polyethylene or the same masking tape.
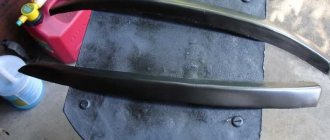
- Based on the template, you should make markings on the fiberglass from which the eyelash itself will be made. It is important to draw straight lines and make a cut along them. Fiberglass is not difficult to process, so you can easily handle this material with your own hands. The work uses polyester resin.
- The adhesive tape applied to the headlight is treated with resin, then glass mat 300 is applied. It should also be impregnated with resin.
- While the resin has not hardened, apply another mat of the same type and go over the resin again. The last layer is applied to the previous ones. Try to collect all excess polyester resin. To do this, use a brush or other convenient tool.
- Once the fiberglass has hardened, it will be easy to remove from the tape. All that remains is to saw off the material along the line that you applied as a marking.
- Next comes the decorative stage. It is necessary to process the resulting overlays with fine-grained sandpaper, achieve perfectly smooth edges, and also apply a layer of paint and varnish. The driver chooses the decor option himself. You can apply it yourself, or entrust the work to a professional painter.
- If you decide to paint it yourself, first apply universal putty to the workpiece, sand it and lubricate it with putty. The treated surface should be perfectly flat and smooth. Therefore, always keep sandpaper at hand. And use only sanding blocks. If you work with your fingers, you are more likely to wear off the leather than be able to work the fiberglass properly.
- When the putty has dried, a layer of primer is applied on top. This will allow you to further use layers of the selected paint material, or apply some patterns.
- Having made the eyelashes, they should be installed on the head optics of your vehicle. You will need fairly thin, but definitely double-sided tape. It is applied along the entire length of the headlight. Next, remove the second protective layer and carefully place the eyelash on top. Press firmly and hold for 15-20 seconds. Once the glue sets, the tape will not let go of the overlay just like that.
Tow bar for Renault Captur: which one to buy, installation options
- fiberglass;
- masking tape;
- brushes;
- epoxy;
- primer;
- rags;
- putty;
- spatulas;
- sander;
- paint (preferably acrylic);
- sandpaper;
- varnish;
- set of tools.
Get ready for quite a long and careful job. But if you put in the effort, the result will fully justify itself.
The essence of the procedure is as follows:
Important design details
Before you paint the manufactured eyelashes yourself, you should think about the design of the blank itself, which will work in tandem with the headlights. After making shells from fiberglass and polyester resin, many people rush to cut the workpiece into pieces without thinking through their steps in advance. To avoid common mistakes, listen to a few useful tips:
- Check in advance how the eyelash will look on the surface of the car's head optics housing. To do this, always make templates, apply them, correct mistakes, and only use a sample that satisfies all parameters to make the eyelashes yourself;
- Use good, sharp pruning tools. If you work with dull knives, the edges will turn out uneven and a large number of burrs will form. You start correcting them, and in the end you can cut out unnecessary things, break the shape and get a completely different result than you originally expected;
- Putty, sandpaper and primer. These are extremely important stages that largely determine the appearance and service life of a hand-made eyelash. Be sure to wrap the sandpaper sheets around a wooden block with a smooth surface. By pressing the sandpaper with your hand, you risk ruining the workpiece, creating an uneven and uneven surface. This is due to the fact that your fingers press with different forces on the sandpaper. Therefore, the putty is removed in different layers;
- If irregularities appear, do not rush to skip them and move on according to plan. It is better to spend more time, but re-putty, sand and prime the surface;
- The primer plays a big role in the quality of application of paints and varnishes. Primer allows the paint to adhere better and provide a long-lasting visual effect. If you simply apply paint over fiberglass or unprimed putty, it will soon peel off, begin to bubble and fall off.
By following these recommendations, you will be able to achieve the desired result. Those who do not want to bother making eyelashes themselves can easily purchase them ready-made from various manufacturers. Considering the current assortment, it will not be difficult to find exactly those elements that will fully satisfy your taste and match the appearance of the vehicle itself.
How to make fiberglass eyelashes for headlights with your own hands
- We prepare the necessary material for this work.
- We take the necessary measurements, they will allow you to make an accurate template for the headlight.
- First, wash the headlight thoroughly to remove dirt and dust. We peel off the headlight with tape so that the surface is not damaged.
- Cut the fiberglass into small pieces.
- We apply a special resin to the surface of the headlight and lay fiberglass blanks on top.
- Then we cover the surface with another layer of resin. The work must be carried out in a respirator, because the fumes released are toxic.
- We make several such layers. After each, let them dry for 50 minutes. Thus, blanks for two headlights are obtained. We cut out the eyelashes we need from them.
- We attach the blanks to the headlights with masking tape and thereby determine the shape. We take measurements and get rid of the excess.
We recommend:
Do-it-yourself painting of alloy wheels: detailed instructions
Installation recommendations
Since eyelashes are small and lightweight structures, regardless of the material used for their manufacture, there is no need to use any serious fastenings here. The best option for installing eyelashes on car headlights is to use double-sided tape. This is an affordable material that can be purchased at any office supply store. All that remains is to figure out how to properly stick the eyelashes on the headlights.
- You can glue the element to the headlights immediately after the homemade eyelash has completely dried, or after purchasing a product you like. Gluing two surfaces together is extremely simple. Even beginners in this matter should not have problems with how to decorate headlights;
- First you need to stick the tape to the headlight unit itself. It is advisable to apply the material along the entire contour of the future eyelash in order to obtain a stronger adhesion;
- This option of gluing tape will also prevent the creation of empty cavities under the eyelash, under which a head wind can blow and cause the decor to simply fall off at some point;
- Then the top protective layer is removed from the tape, and the eyelash itself is applied. Do this carefully and precisely along the contours so that no displacement occurs.
There are alternative types of fastening. You can use various fasteners and screws. But they involve drilling the car body or the headlight unit itself. And this is an extremely undesirable event, since problems can arise if the seal in the optics is broken. The minimum is the formation of condensation. Water in headlights has never led to anything good.
Eyelashes are an interesting, original and fairly easy to install tuning element for any car. They do not require large financial expenditures, but they allow you to achieve excellent results in changing the external perception of the car. Buying ready-made eyelashes or making them yourself is a purely individual question. If you are somehow not satisfied with the existing assortment, and you want to do something unusual, then try making eyelashes yourself.
Kremen trailers: manufacturers, characteristics, owner reviews
- PVC or other plastic about 2-3 mm thick;
- hair dryer (a construction hair dryer is better; a household hair dryer won’t do the job);
- screwdrivers;
- sandpaper (coarse, medium and finishing);
- degreaser (regular alcohol will do);
- clean, lint-free rags;
- sealant;
- or double-sided tape;
- pencil;
- additional tools.
First you will need to remove the headlight, and work with it in a dismantled state. Unlike the use of films, plastic lashes require removal of the optics.
Typically, headlights are held in place by a few bolts at the top and a mount at the bottom. How exactly they are removed depends on the specific car.
After dismantling the element, follow this algorithm:
- cut a piece of plastic, the dimensions of which will cover the surface of the optics with allowances on the sides;
- give the material an approximate shape of the future eyelash;
- attach plastic to the headlight;
- turn on the hairdryer and start heating the material;
- gradually the plastic will become softer and more flexible;
- give the workpiece a shape;
- wait for it to cool down;
- remove the workpiece from the headlight;
- Mark the desired geometry of the eyelash with a pencil, adding an allowance of literally 0.3 mm;
- trim off excess;
- sand the edges;
- degrease the headlight itself and the plastic blank;
- Use sealant or tape to secure the eyelashes.
I recommend that you provide protection for the glass of the headlight itself in advance so as not to damage it during the heating process with a hairdryer. Cover with some thick material and gently move the hairdryer over the surface without touching other areas.
Also, the plastic will then need to be cleaned, primed and painted if it does not exactly match the color of the body.
Adhesive tape
Today you can find any colors and textures of self-adhesive film to make eyelashes for headlights from it.
The easiest way to make eyelashes is to use “self-adhesive”. To work with the film, no special skills or tools are required, it is cheap, you don’t have to paint it, you can choose any color, you don’t need to remove the headlights, and the entire process of making eyelashes will take you no more than 40 minutes.
It would seem that these are continuous advantages, but they are also disadvantages at the same time. The film is inexpensive, but it looks cheap on the car, does not require painting - and does not exactly match the body color, it is easy to use - and therefore anyone can do the same.
In addition, the service life of the film on the headlights is limited: the edges of the “self-adhesive” after washing lift up and tear, dirt gets clogged into scratches from stones, and after only 3 months of driving on Russian roads, such tuning will not improve, but will spoil the appearance of the car. Keep in mind that 10 years ago, when stores were not yet overflowing with car accessories, tuning studios were developed only in the capital, and ordering tuning via the Internet was just becoming a reality, eyelashes made from film could cause admiration and a desire to “do the same.” Today it is difficult to surprise anyone with them.
Chevrolet car tuning element - stickers made of self-adhesive paper
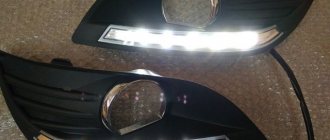
LED inserts
If you want to place LED inserts in the head optics of your car, you can also make them yourself. The process cannot be called complicated, but it requires attention and accuracy. It can be represented step by step as follows:
- We remove the lamp from the car and disassemble it. To do this, you will need to heat the joints so that the adhesive resin melts.
- We try not to touch the reflectors with our hands - this will negatively affect the performance of the flashlight.
- We cut off a fragment of the LED strip and glue it to the top visor. It is important that it is high-quality automotive glue, since the surface of the tape is coated with a special compound that is difficult to glue.
LED headlight inserts
- We connect the wires with the side lights circuit. We ensure correct polarity and careful insulation of connection areas.
- We check the operation of the new device, and if everything is in order, we assemble the optics in the reverse order. To do this, you will need to reheat the sealant that glues the body together.
- We do the same with the second head lamp.
At this point, the work on tuning the car’s head optics can be considered complete. The time has come to show your achievement to others, get behind the wheel and drive out of the garage.
See also:
How to do your own bumper tuning
Reflection type
The classification of automotive optics and types of headlights vary depending on the parameters of the reflection of the light beam from the source. A reflector or lens is used. Each class of lamp has its own type of reflector.
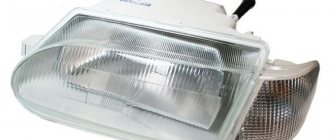
Reflex
Car reflector headlights are most in demand in all classes from trucks to luxury sedans. Simple designs, which include a lens of a certain shape, a headlight unit and a light source, provide the necessary brightness of all light elements of the car. The reflector is made of glass or plastic coated with aluminum.
The main function of a reflector is to reflect and amplify light rays. The package includes a corrector to limit the luminous flux. Reflectors are classified according to their design type:
- Free. The reflector has demarcation zones, each of which reflects a separate light beam. A headlamp with a free reflector provides a static, clear light with minimal loss.
- Parabolic design. A simple and common type of reflector. The design is completely static; the brightness, direction and intensity of the light flux cannot be adjusted.
- Using the lens. A light beam from a source passes through two foci. The light from the lamp hits the reflector, is amplified, refocused, and scattered onto the lens. Lens optics eliminate light loss (coefficient of no more than 1%), blinding oncoming drivers, and provide maximum illumination of the roadway.
Spotlight
Spotlight structures, or spotlights, are considered additional special equipment for a car. The finder headlamp produces a powerful but narrow beam of light due to the absence of a reflector in the unit. The most common are Chinese spotlights. They are mounted on cars in two ways:
- Spotlight. The optics unit is installed on the roof or fenders of the car on a rigid bracket and cannot be adjusted; the beam hits only one direction.
- Seeker. The lamp is mounted on a flexible bracket, the light beam can be directed in different directions.
For additional lights, both lensed and reflector headlights can be used, depending on the technical characteristics of the lamp.
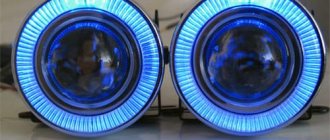
Angel eyes
Installing angel eyes in headlights is not easy. This will require dismantling the optics with complete disassembly and connection to the standard wiring. With such a serious intervention, it is better to replace the incandescent lamp with a modern bi-xenon lens, around which to make a backlight of diodes.
The fashion for the luminous eagle eye in optics was set by BMW, which invented this type of illumination back in the early 1990s. “Evil” headlights are valued among car enthusiasts, so conventional optics are often subject to similar modifications.
Making from scrap materials
The easiest way to make glowing rings is from plexiglass. To do this, you need to purchase 3-4 mm thick tubes, glue, LED lamps, a drill and wires. Before starting work, you should dismantle the headlights, disassemble them and measure the diameter of the reflector.
Manufacturing process:
- Cut out a stencil from cardboard.
- Using a hair dryer, bend the tube according to the template.
- Glue the edges with clear glue.
- The diodes are fixed on the reverse side in neatly drilled small recesses.
At first glance, it is very difficult to perform this work and improve the appearance of your vehicle. However, with step-by-step execution of actions, everything becomes logical and understandable.
When choosing parts, you should not save, because a burnt-out element will require complete disassembly of the headlight, dismantling the eyelash and re-soldering the light element. As protection, you can also install a resistor and a voltage regulator, which are sold in car stores.
Installation
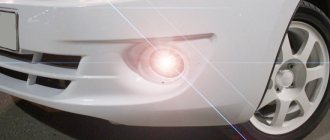
Light tuning of headlights increases attractiveness, and the appearance visually becomes more expensive.
To install the peephole:
- Glue the finished plexiglass product to the reflector.
- Secure the wiring and connect it to the side lights.
- Glue the glass and install the headlight in place.
Tuned optics look better with the combined use of cilia and eyes. White or blue headlights look great during the day and at night.
DONK
Example of car tuning in DONK style
North American style, which uses rims with a large radius (over 26). This solution raises the suspension, and is most often used when upgrading large sedans and ATVs.
RAT LOOK
An example of car tuning in the RAT LOOK style
An original direction, the essence of which is the artificial aging of a vehicle. A car that has undergone such a procedure can be absolutely flawless in technical terms, but have, for example, a rusty body that only looks so.
VIP (BIPPU)
Example of car tuning in VIP style (BIPPU)
Another option for improving the car, which came to Russia from overseas. It is aimed at E and S class cars, on which a full body kit and wheels with large “shelves” are installed, changing the appearance of the vehicle beyond recognition.
HOOT RIDE
An example of car tuning in the HOOT RIDE style
A style that has similar features to the RAT LOOK direction. It involves changing the exterior so that the car seems old, but retains its original technical and operational characteristics.
DRAG
An example of car tuning in the DRAG style
Modernization aimed at creating a powerful lightweight car for maximum speed performance, regardless of how this affects the appearance. In the exterior, only aerodynamic indicators are taken into account, which are also improved.
DUB
An example of car tuning in DUB style
A direction that is characterized by the use of large rims, minimal body kit and lowered suspension. Many chrome elements are also used. The most important feature is the opening of various parts of the body in different directions.
W.R.C.
An example of car tuning in WRC style
As a result of such tuning, the car takes on the appearance of a rally car. Most often this is just a visual design, but there are examples that are technically prepared for racing due to a forced engine, reinforced suspension, additional lighting, an installed turbine and mounted roll cages.
LIMO
An example of car tuning in LIMO style
A style that involves lengthening the base of the vehicle in order to increase the interior and create a luxurious interior. This direction allows you to remake a car of any type, class and year of manufacture.
DTM
An example of car tuning in DTM style
Cars designed in this style have rolled wheel arches or a body, and are also equipped with a large spoiler, which makes them similar to cars participating in DTM racing.
FITMENT
An example of car tuning in FITMENT style
A distinctive feature of this style is the modification of large Japanese cars through the use of wheels with negative camber and the installation of an aggressive body kit.
DRIFT
An example of car tuning in the DRIFT style
Creating a powerful and lightweight car that has rear-wheel drive, a large body kit and spoilers, a turbocharged power plant and a locking differential.
Domestic auto tuning specialists are able to perform any work to transform the car. Some of these masters take part in special competitions and exhibit their “masterpieces” at exhibitions, where they receive well-deserved awards. Let's watch a video from one of these exhibitions.
Bubbles on tint film
Tinting by itself is unlikely to make the design of your car more presentable. And yet, a properly applied film can decorate glass. Another thing is that the work can be done frankly poorly. Bubbles appear on the tint film if it is applied incorrectly. It can also swell due to high humidity. What to do if bubbles appear on the film? Just remove it from the windows. A poorly applied film will ruin the design of even a luxury car. It also significantly interferes with the view of the windows.
Miracle or legend: Samara local historians conducted an investigation into “Zoya’s Standing”
They have money and power: types of men prone to cheating in relationships
Just water and a shovel: how white coral, popular in decoration, is mined