I ran into a problem that on the Internet all the articles on replacing the fuel pump were made with a fuel pump completely different from mine. And since I climbed there for the first time, it was a little boring... I had to do everything using the method of scientific knowledge. I took photos for myself so as not to forget what, where and how later.
First you need to relieve the pressure in the fuel pump. To do this, just pull out the fuel pump fuse, which is located behind the plastic partition on the passenger side, near the “brains”. In theory, the fuse will be the first on the right (closer to the engine compartment, mine was 15 A). We pull it out and start the car until it stalls.
We recline the rear seats. We see a black hatch. Unscrew its two screws and remove it.
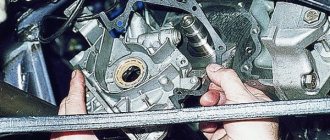
Judging by the abundance of dirt, I am the first to climb here. We disconnect two pipes, I had to tinker with the second one, because it did not want to come off, resting against the back wall. When disconnecting the pipes, prepare a cloth; a little gasoline may leak out of them. Disconnect the power plug. Using a 10mm wrench, unscrew the 8 nuts.
After that, I vacuumed and washed there so that when pulling out the pump, dirt would not get into the gas tank. We remove the piece of iron, which was held by 8 nuts, and remove the seal under the piece of iron.
After this, we pull out the fuel pump module, carefully tilting it so as not to tear off the fuel level measurement float. We let the gasoline flow back into the tank) And then we carry the patient to the operating table. Let's start to sort it out. First I unscrewed the spring from the first metal rod.
Then, from the second rod, carefully prying it with a screwdriver, remove the metal ring.
Then we disconnect the pipe by simply pulling it to the side.
Then I disconnected the electrical plug.
To remove the fuel pump from the housing, you need to bend the latches and carefully pull it up along the plastic “rails”
We gained access to the filter mesh. Having looked at the state of my mesh, I doubted whether it was even capable of letting anything through itself... We simply remove it by pulling it towards us.
The next stage was the most difficult for me. It was necessary to remove the old corrugated tube and then put on a new one. These tubes are crammed in so hard that you can't even take a horseradish away. I had to use an industrial hair dryer. First heat it up and then pull it out.
I took a new BOSH motor bought for 1300 rubles and a corrugated tube for 50 rubles. Putting the tube on was a pain in the ass... First I warmed it up, then put it on. To be sure, I tightened one end with a zip tie.
It turned out to be a little easier to put it on the motor. We put the fuel pump in place. We turn on and turn off the ignition a couple of times so that it sucks in gasoline)) And that’s it. let's start.
Bottom line: firstly, the terrible squeaking noise when I turned on the ignition disappeared, secondly, the car began to behave much more cheerfully,
A gasoline pump is a part of a car that is responsible for supplying fuel from the gasoline tank to the nozzles.
For the first time, an electric gasoline pump was invented in the USA in the 70s of the 20th century. In the mid-90s, almost all automakers switched to this system, abandoning the mechanical one. Replacing a gasoline pump on a VAZ-2112 is quite easy and does not require special knowledge or skills.
Video on replacing the fuel pump on front-wheel drive VAZs, including the VAZ-2112:
The video material will tell you how to replace a gasoline pump, and also give some recommendations and tips.
The process of replacing a fuel pump on a VAZ-2112
General view of the fuel pump module
The gasoline pump on the VAZ-2112 is located in the fuel tank.
The type of part is called submersible. Therefore, to replace it you will need to pull it out from the gas tank. It contains the FLS (fuel level sensor), which transmits readings.
- Disconnect the battery.
Removing the battery terminal for repair - We are dismantling the rear sofa.
Pull the loop to remove the rear sofa - Unscrew the two screws securing the top plate.
- Remove the hatch cover.
Unscrew the fastening screws and remove the fuel pump hatch cover. - Disconnect the power connectors on the fuel pump.
Disconnect the power cable connector - Using a 17 wrench, unscrew the fuel supply pipes.
Unscrew the fuel supply pipes - Now, release the pressure ring and dismantle it.
Remove the sealing ring - We carefully lift the fuel pump and remove the float from the tank cavity.
Remove the fuel pump from the tank - We dismantle the gasoline pump.
- We change the rubber o-ring, which is located on the lower seat.
- We carry out the assembly in the reverse order.
Now the gasoline pump has been replaced and you can continue driving. The average service life of a new product is 150,000 km.
Reasons for fuel pump failure
So, let's look at the main ones:
- Low-quality fuel leads to clogging and failure of the mechanical parts of the gasoline pump.
- Wear of internal parts of the fuel pump.
- The appearance of scuffs and shells, which occur mainly in winter, when the water in gasoline turns into ice.
- In the summer, when the heat is intense, gasoline loses its lubricating properties, which can lead to failure.
Choice
The choice of an electric fuel pump should be approached responsibly, because if it fails on the road, the car will not be able to continue driving. When assembled, this part has the article number - 2112-1139010
. It is used both for the original product produced by AvtoVAZ and for analogues.
The second most popular manufacturer is Pekar
, which has been producing fairly reliable spare parts for VAZ family cars for many years.
The pricing policy for electric submersible gasoline pumps of the 10th-12th generation fluctuates around 1,200 rubles.
How to clean the fuel pump yourself
Let's start with the fact that the mesh filter for the fuel pump is a coarse filter and is designed to capture large particles and deposits that are in the fuel and inevitably accumulate in the fuel tank. It turns out that the fuel pump has its own additional fuel filter mesh, which prevents debris from entering the fuel system from the tank parallel to the usual fuel filter. The process of cleaning or replacing the fuel pump mesh is almost similar to the general scheme for replacing the pump itself:
- The fuel pump is installed directly into the gas tank. You can get to the pump from the passenger compartment, as it is located under the rear seat. To gain access to the fuel pump, you need to remove the rear seat cushion or fold down half of the sofa (if possible).
- The fuel pump is usually located on the right and covered with a special plastic cover. The specified cover must be removed.
- Before removing the fuel pump itself, it is necessary to relieve the fuel pressure in the system. To do this, you will need to disconnect the power connector from the fuel pump, and then turn the engine with the starter.
- The next step is to remove the negative terminal from the battery, after which the tubes from the fuel pump are disconnected. These tubes are “supply” and “return”, they are secured with clamps that need to be pressed out. You should be prepared for the fact that a certain amount of gasoline may spill after removal. For this reason, safety precautions must be observed!
- Next, you need to unscrew the special pressure ring-cover of the fuel pump. It is very difficult to unscrew this cover manually. There is a special fuel pump cover puller for removal. If there is no such puller, then you can try to carefully unscrew the ring using improvised means. We strongly recommend that you first study on specialized auto forums how to remove the fuel pump cap on a specific car model.
- After unscrewing the cap, you can remove the fuel pump. Before complete removal, the remaining gasoline should be drained from its body, and the sealing ring should be removed.
- Now you can begin disassembling the fuel pump housing. To clean, you will need to remove the bottom part. There is often dirt in the indicated lower part of the housing.
- After this, remove the fuel pump screen. To remove the mesh, just pry out the filter at the place of attachment to the pump body using a regular screwdriver. The fuel pump strainer usually becomes completely clogged, especially on cars with high mileage.
- Then the fuel pump mesh can be replaced with a new one or cleaned. It is better to wash the fuel pump mesh first with carburetor cleaner. Mechanical cleaning is done with a soft brush. Then the mesh should be dried and blown. The bottom of the pump housing and the cleaned mesh are finally washed again with gasoline.
- The final step is to reassemble the fuel pump and install the device in the gas tank. To facilitate installation, it is better to invite an assistant, as it may be necessary to ensure high-quality pressure of the pump to the tank. The fact is that many gasoline pumps have a special spring, the force of which must be overcome. At the same time, you need to make sure that the rubber seal is in place and at the same time screw in the pressure ring-cover of the fuel pump. When tightening the clamping ring with a puller or improvised means, do not exceed the tightening torque. If you tighten it too tightly, the fuel pump cap may burst; if you tighten it too weakly, the fuel pump will wobble due to poor fixation.
Please note that when installing a fuel pump on many car models, you need to be careful not to bend the fuel level sensor in the gas tank
It is also important to adhere to the position in which the pump was originally located.
In order to determine the correct position of the fuel pump, there are special indicators. Such indicators are made in the form of arrows and are located on the fuel pump, the gas tank body and the pressure ring. The correct installation of the fuel pump can be considered when all the arrows are in the same line. We would like to add that if the gasket is installed incorrectly, gasoline may leak out if you fill the tank full.
Now all that remains is to connect the fuel supply and return pipes to the fuel pump, while simultaneously checking that the clamps are securely fastened. The completion is to connect the electrical power connector to the fuel pump, after which you can start the car for testing.
conclusions
Replacing a gasoline pump on a VAZ-2112 with your own hands is not difficult. The total time of the operation is about 1.5 hours, unless force majeure occurs in the form of a break in the power contact group or a breakdown of the pipeline connector.
Good afternoon. Today a VAZ 2110 came to our service center. The car stopped starting. Checked the spark plugs, excellent spark. The owner said that he had dried it out several times before. In this situation, we need to check the functionality of the fuel pump. We removed the fuel filter to see if fuel flows. But it didn't work. In this article we will show you how to remove and replace the fuel pump on a VAZ 2110, 2111, 2112. The instructions are suitable for all models of the tenth family.
| Article: Fuel pump - 2112-1139009 |
| Tools: To replace the fuel pump you will need wrenches and a set of sockets |
| Removing and replacing the fuel pump VAZ 2110, 2111, 2112: |
| First of all, disconnect the terminal from the battery, then tilt the rear seat to the side and unscrew the fuel pump cap. |
| Next, remove the connector from the fuel pump. |
| After this, loosen the clamp on the fuel line. |
| Then unscrew the 2 fuel lines. |
| Next, remove the gaskets on the fuel pump lines. |
| After this, unscrew the 8 bolts on the fuel pump. |
| Then remove the O-ring. |
| After that, pull out the fuel pump with the float. |
| Next, remove the rubber seal. |
| After this, insert the new fuel pump so that the arrow points to the rear of the car. |
| Connect the lines and close the fuel pump cover. |
| So we learned how to change the fuel pump on a VAZ 2110, 2111, 2112 with our own hands. The whole procedure took us about 20 minutes. Sometimes it’s enough just to wash the filter on the fuel pump and it will work like new. After this, the engine started, but not the first time. First he pumped fuel into the line. Try not to drive with an empty tank! Good luck on the roads! |
One of the most important tasks in the fuel system of a car is performed by the fuel pump or, as it is called, the fuel pump. It is he who supplies fuel through the fuel system and a lot depends on him. On injection VAZs, an electric fuel pump is installed, located in the tank. We will tell you in detail how to replace the fuel pump on a VAZ 2110-2112 in this article.
Important points
The procedure outlined above seems quite simple, but, nevertheless, there are a couple of nuances that should be mentioned.
Firstly, gasoline. When the gas lines are unscrewed, it begins to flow directly onto the cap (this happens especially often if the car owner forgot to relieve the pressure in the gas line using the breather, as mentioned above). Yes, a little gasoline leaks out, but the smell of gasoline in the cabin is not what a car owner needs, right? Therefore, before removing the fuel lines, you should put a cloth on the pump cover and carefully insert it with a screwdriver into all the cracks. The rag will absorb the leaked gasoline, then you can throw it away, which will help get rid of the smell in the cabin.
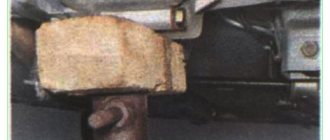
Secondly, the fuel pump retaining plate. As practice shows, this is a fragile thing, and breaking it by carelessly prying it with a screwdriver is not just easy, but very easy. But it’s difficult to find this part on sale; it is only sold complete with a complete fuel pump, and this is a waste of money. The matter is further complicated by the fact that it is not always possible to move this plate out of place with just a flat screwdriver (especially if the car owner is trying to disassemble the pump for the first time), so sometimes you have to resort to using a hammer and chisel, and this, in turn, increases the risk many times over plate breakage.
As you can see, there are no difficulties with independently replacing the pump grid on the Lada Kalina, and if you strictly follow the above instructions, even those who are doing it for the first time will not have any problems. The main thing is to be patient and follow safety precautions. It is imperative to remove the terminal from the battery! Otherwise, a banal mesh replacement can turn into a fire.
Replacing the fuel pump mesh on Grant
I think there is no need to explain once again that the design of the fuel pump on Kalina and Grant cars is not at all different. That is why the entire process of replacing the components of the fuel pump on the above cars will be the same. Also, it is worth noting that when compared with the models of the 10th VAZ family, there are some points that differ.
Signs of a malfunctioning fuel pump (gasoline pump)
One of the main signs by which you can safely determine that the fuel pump should be replaced is poor engine draft, in the absence of other visible reasons. Over time, the fuel pumps less efficiently, as a result of which the pressure in the system drops, hence the poor engine thrust.
To make sure that the fuel pump is faulty, you should measure (the ramp). If the pressure is weak, then the cause is either the fuel pump or the check valve, which is responsible for the pressure in the system.
A faulty fuel pump may make a loud noise, and you will clearly hear the sound of its operation. This may be another sign that characterizes a “dying” pump.
Is it possible to damage the fuel pump?
Yes, you can, the fuel pump is constantly immersed in fuel, if there is very little gasoline in the tank or it runs out, the fuel pump will run “idle”, as a result of which there is a high probability of its failure.
Mechanical replacement
If you find problems with the fuel pump, you can try to repair it yourself, or replace it with a new one. In the first case, it is better to buy a repair kit. It includes all the elements of the device that can fail: valves, gaskets, diaphragms and pusher.
If you decide to replace the pump assembly, it is even easier.
After dismantling the faulty device, you need to:
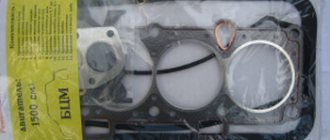
- Install new gaskets and pusher.
- Place the pump in place and secure it with nuts.
- Connect the fuel line hoses and secure them with clamps.
- Press the manual primer lever several times to fill the pump with fuel.
- Start the engine and check its operation.
A new fuel pump is installed on new gaskets
Which fuel pump to choose for replacement
BOSCH fuel pump 580454138 is installed from the factory.
. Its service life depends on the quality of the fuel used, as well as on operating conditions. It is also worth noting that this pump is suitable for most other cars, including imported ones. The cost of a BOSCH fuel pump at the moment is from 1,700 rubles. Cheaper analogues are also offered on the market:
- WEBER FP 453-453 from 600 RUR
- ATS 2112-1139010 from 550 RUR
- PEKAR 2112-1139010 from 600 RUR
- FENOX EFP35005O7 from 700 RUR
- HOFER HF 830 301 from 550 RUR
- StartVOLT SFP 0153 from 750 RUR
- VOLTON VLT2112-1139010 from 650 RUR
Any of the above fuel pumps will be suitable as a replacement for the original one, however, not all of them are of the same quality as the original. In addition to the pump itself, you may need a corrugation to replace it, and if the fuel pump mounting ring is damaged, you can order it or purchase it using the following article number:
- Electric fuel pump ring /2110/ metal price from 120 rub.
- Fuel pump corrugation /2110/ 1.5 white from 50 rubles per piece
- Fuel pump corrugation /21101/ 1.6 long from 60 rubles per piece
If you decide to replace the entire fuel module assembly, you can select one of the suggested modules below.
- Electric fuel pump module /21101/ V=1.6 assembled PEKAR price from 2500 rub.
- Electric fuel pump module /21101/ V=1.6 assembled “UTES” price from 3200 rub.
- Electric fuel pump module /21102/ V=1.5 assembled “UTES” price from 3000 rub.
- Electric/fuel pump module /21102/ V=1.5 assembled HOFER price from 2000 RUR
If you decide to change only the fuel pump, we recommend that when replacing it, you immediately carry out a complete inspection of the module - check the check valve and both corrugations, and also, if necessary, replace the fuel grid.
Safety precautions
Before unscrewing the nuts, you need to disconnect the two hoses. But first try starting the engine. The power supply to the fuel pump is not connected. Please note - the power is turned off here!
Everything is ready for dismantling if:
- External connector is disabled;
- It is impossible to start the engine, although the on-board network is not de-energized;
- It is better if the tank is filled less than 50%.
You need to unscrew two fittings from the module cover (top photo). Then use a socket wrench to unscrew the nuts from the studs and remove the retaining ring. There is very little left to the internal connector. Having gained access to the internal connector, you need to clean its contacts.
Instructions for replacing the fuel pump
To begin, move the rear seat to the side and fold back the piece of carpet that covers the fuel module hatch.
A fuel module with two tubes will be visible in front of us.
Before unscrewing the pipes, it is necessary to relieve the pressure in the fuel system. To do this, you will need to remove the fuel pump fuse, or turn off the power to the module and start the engine. After the remaining fuel in the system has been used up, the car will stall and you can begin replacing the fuel pump.
Our fuel module can be of different types - quick-release and screw-on, depending on the year of manufacture of the car. If the fuel pipes are on nuts, unscrew them with a 17mm wrench; if they are on quick releases, then simply tighten the clamps and remove them from the module.
Now, using a 7mm wrench or tube, unscrew the 8 bolts securing the fuel module clamp.
We move the fuel pipes to the sides, lift the clamp and carefully, so as not to spill gasoline, pull out the fuel module.
Disconnect the fuel pump plug
Remove the lock shown in the photo
To install a new fuel pump and perform assembly, you will need to put a new corrugated hose on the pump. To ensure that this hose does not allow air to pass through, it must be heated when it is put on the pump.
Then we reassemble in reverse order.
The fuel pump is the main element of the car's fuel system. Its role is to select gasoline from the tank and supply it to the engine under pressure. Any malfunction of this unit leads to interruptions in the operation of the power unit, or its stop. Replacing the pump on VAZ 2110–2112 cars is possible without a trip to a car service center.
Repair of VAZ 21099 injector
In most cases, you can get by by simply cleaning the injector. This procedure can be done at every car service center. To prevent serious damage, have your car diagnosed in a timely manner. You can do the cleaning yourself using chemicals, but it will not be complete. If you decide to clean the injector yourself, you need to buy a repair kit for rubber O-rings for injectors and injector cleaning fluid.
Before performing this procedure, you need to remove the terminals on the battery and disconnect all power supply connectors near the injector. Then we proceed to remove the manifold, carefully unscrew and disconnect the pipes from it. After this, we release the pressure in the fuel rail of the injector by pressing the nipple on the left side of the rail.
Next, carefully move the sealing clamps from the injectors and, by swaying in different directions, remove our injector. It is not difficult to see whether the injectors are dirty. After disconnecting each nozzle, place them in a jar with a pre-prepared chemical mixture for 30–40 minutes. Once you have completed this procedure, we proceed to reassemble our fuel system in reverse order. Be sure to remember to change the o-rings on the injectors that come in the repair kit.
VAZ 2109 fuel pump malfunction, types of VAZ gasoline pumps
On a VAZ 2109, signs of a fuel pump malfunction are a complete or partial cessation of the supply of gasoline to the carburetor, this entails the inability to start both a cold and hot engine, it will start and stall, in addition, unstable idling is possible. If you suspect that the fuel pump in the VAZ 2109 is not working, then you should check it. It's not difficult to do it yourself, just read this article.
What kind of fuel pumps are installed on VAZ 2110/2112 cars
VAZ 2110/2112 cars, depending on the year of manufacture and the type of engine installed, may differ in the method of supplying fuel to the cylinders.
Table: features of fuel supply systems to engine cylinders depending on vehicle modification
| Model/ modification | Year of issue | Engine volume, cm3 | Number of valves, pcs | Injection system |
| VAZ 21100 | 1996–2000 | 1500 | 8 | Carburetor |
| VAZ 21101 | since 2004 | 1600 | 8 | Injection |
| VAZ 21102 | since 2004 | 1500 | 8 | |
| VAZ 21103 | since 2001 | 1500 | 16 | |
| VAZ 21103M | since 2001 | 1500 | 16 | |
| VAZ 21104M | since 2001 | 1600 | 16 | |
| VAZ 21120 | 1999–2008 | 1500 | 16 | Injection |
| VAZ 21121 | 1999–2008 | 1600 | 8 | |
| VAZ 21122 | 1999–2008 | 1500 | 8 | |
| VAZ 21124 | 2004–2008 | 1600 | 16 | |
| VAZ 21128 | 2004–2008 | 1800 | 16 | |
| VAZ 21123 | 1999–2009 | 1600 | 16 |
Only the first modifications of the VAZ 2110 were equipped with a carburetor injection system. From the factory they were equipped with mechanical fuel pumps of the DAAZ brand (catalog number 2108–1106010). Previously, they had proven themselves well on cars of the Sputnik and Samara series.
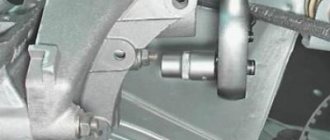
A mechanical fuel pump was installed in the engine compartment of the VAZ 2110 to the right of the engine valve cover, and was driven by the camshaft.
All injection VAZ 2110/2112 are equipped with submersible fuel modules. The design of such a module includes:
- electric fuel pump;
- coarse filter;
- fuel level sensor.
The fuel module is installed directly into the vehicle tank. In other words, the gas pump is completely immersed in gasoline. Injection VAZ 2110/2112 were and are equipped with electric fuel pumps of domestic, joint or imported production. These are products of the Utes, Pekar, Saratov plant, as well as the world famous one, the pumps of which are equipped in all modern VAZs. The catalog number of the stock electric pump is 2112–1139009. There are also modifications whose numbers have two additional digits: 02 or 03. Depending on them, products may differ in length and diameter.
Installation
So, carefully remove the structure from the tank. To dismantle the old element, you will need to remove the anti-drip glass. The pump itself lies tightly in the grooves with latches. To remove it, you do not need to use keys or other equipment. It's easy enough to pull it with your hand and remove it from its seat. Also replace the mesh (coarse filter). Then install the new element into the same grooves and do not forget to put on the plastic cup. Carefully place everything in the tank and tighten it with bolts, sealing everything with a rubber band. This completes the entire replacement.
Design features of fuel pumps for carburetor and injection fuel injection systems
Mechanical fuel pumps, which were installed on the first modifications of the VAZ 2110/2112, have a simple design. It is based on a set of membranes made of special rubberized fabric that is resistant to the chemical action of gasoline. The pump body has two valves: inlet and outlet. The membranes are driven by a rod (pusher). It is driven by a cam mechanism rotated by a camshaft.
Such a mechanical fuel pump can serve for decades until the drive rod wears out or one of the membranes breaks. And even then, if this happens, you can replace these elements in half an hour.
The first modifications of the VAZ 2110 with a carburetor injection system were equipped with mechanical fuel pumps
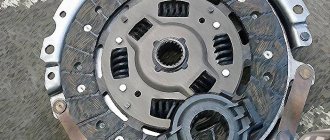
With an electric fuel pump, things are much more complicated. Its design is based on a small electric motor. It is no different from a regular one, although it works completely immersed in gasoline. The pressure in the system here is created not by a membrane (although there are such pumps), but by a specially shaped impeller mounted on the electric motor shaft.
The service life of the electric fuel pump is 150–200 thousand km. But it can fail much earlier. The main cause of breakdowns when the resource is not used up is additives added to gasoline, as well as various kinds of mechanical impurities. The former destroy the brushes and commutator, while the latter clog the valve mechanisms.
In the injection VAZ 2110/2112, the fuel pump has an electrical design and is part of the submersible fuel module
Ground contact
Next to the ground, under the dashboard, is located
. After turning on the ignition, the operating relay allows the pump to create the required pressure in the system in a few seconds, after which it turns off. When you turn the key in the ignition, you can hear a soft click, which means that
turned on, and exactly the same when it was turned off. If the relay does not make a click, then the problem is in it or in its contacts. Then it is advisable to replace it with a new one.
When looking for the cause of a non-working fuel pump, you need to check the fuse. It is located under the hood and has a resistance of 15 A. It must be carefully inspected; if it is not working, it should be replaced with a new one. The fuel pump in the VAZ-2110 car is immersed in gasoline for active cooling, and the bad habit of driving a car with a minimum amount of gasoline in the tank can very soon cause the fuel pump motor to become inoperative due to burning.
There is a special offer on our website. You can get a free consultation with our corporate lawyer by simply submitting your question in the form below.
Signs of a faulty fuel pump VAZ 2110/2112
Signs of pump malfunction appear the same, regardless of its design and type of injection system. These include:
- difficulty starting the engine;
- unstable engine operation at idle speed (vibration, tripping, stopping of the power unit);
- failures during acceleration in motion;
- reduction in power and traction qualities of the engine;
- absence of the characteristic sound of a fuel pump starting (for injection engines);
- presence of traces of fuel leakage (for carburetor power units).
Determining a fuel pump malfunction on your own is quite problematic, because the first three signs, which are the main ones, may indicate other problems in the fuel system, such as:
- fuel filter clogged;
- problems with sensors for mass air flow, throttle position, oxygen level, etc.;
- clogging of one or more nozzles;
- failure of the pressure regulator.
In addition, similar symptoms are observed when problems with ignition occur. It can be determined that the cause of the listed symptoms is the fuel filter by checking the device.
Main causes of malfunction
If the fuel pump fails, the VAZ 2114 may stall after a short drive or may not start at all when the starter and battery are functioning normally.
The main signs of breakdowns are described below:
- Vehicle failure is one of the main signs, but it can be evidence of malfunctions of many devices, so you should first check the current condition of the spark plugs and make sure that they are not oily.
- You can also judge device malfunctions by pressure indicators: a normally functioning gas pump should provide a pressure of 3.2 bar. Normal values for a 1.5-liter fuel rail are in the range of 285-325 kPa, and for a 1.6-liter volume – 375-389 kPa.
- There is no characteristic vibration in the pump, which is usually felt after turning the key. This is usually the result of faulty wiring, which does not allow the ignition signal to reach the device. In this case, wiring diagnostics is required: they are disassembled and checked using special equipment.
- Lack of activation of one of the engine cylinders, which is accompanied by a significant decrease in power, the formation of vibrations at idle and the release of unburned gasoline into the catalyst. This is a fairly common problem that can occur with a variety of vehicle malfunctions, but in some cases it is a sign of a malfunction of the fuel pump, which leads to improper combustion of fuel inside the cylinders.
- Twitching of the engine at low speeds or before it starts in most cases indicates problems with the fuel pump: the device itself has failed or there are problems with the low-purity filter.
Many inexperienced car owners, after a pump failure, purchase a fuel module that includes this device. This is a common mistake, since it is enough to purchase a separate fuel pump, which costs 2-3 times less than a common module: it is not necessary to replace the remaining parts of the system.
The fuel pump is characterized by increased wear resistance, so it most often fails due to the fault of drivers; among the most common reasons are refueling with fuel of questionable quality or driving a car with a half-empty tank.
All such factors can lead to the following breakdowns:
If the pressure system fails, for diagnosis you will need to measure its indicators: at idle they should be 2.5; at the moment of ignition - 3.5; after removing the pressure regulator tube – 3.3; after squeezing the drain - 7; when you press the gas, vary from 3 to 2.5.
Malfunction of the wiring, consisting of a negative and positive wire, as well as a fuel level indicator. Power failure is one of the most common problems, so you should check the wiring immediately if it has been determined that the pressure readings are normal. For initial diagnostics, the negative and positive wires are connected to a 12V light bulb, after which the ignition is turned on: blinking of the light bulb will indicate the presence of contact. In this case, checking the internal contacts is required.
If there are no problems with pressure and wiring, the motor is checked - the main part of the pump responsible for distilling fuel
Diagnostics is carried out using an already used 12V light bulb.
Insufficient fastening of the fuel pump mass; the connection may be broken if the hand brake is used carelessly. Troubleshooting the problem is not difficult; it is much more difficult to get to it, since you will need to remove the grounding contact
Relay failure
It is located in the same place as the mass of the fuel pump; the presence of problems with it may be indicated by the absence of a characteristic click after turning the ignition key.
Fuse failure. You will need to inspect its contacts: if they are burned out, then this element must be replaced.
The cost of replacing a fuel pump in a car service center for a VAZ 2114 is about 500 rubles.
How to Test a Mechanical Fuel Pump
To check a mechanical fuel pump, you will need the following tools and tools:
- slotted screwdriver;
- key (head) 10;
- key to 13;
- 2 clean dry plastic bottles with a volume of 2 liters;
- a piece of hose (50 cm) of the same diameter as the fuel one;
- 1–1.5 liters of gasoline;
- caliper (ruler);
- stopwatch (clock).
Let's start with performance. A working VAZ 2110 mechanical fuel pump with a obviously clean filter should pump at least 1 liter of fuel per minute. The verification algorithm is as follows:
If the amount of fuel pumped per minute is less than a liter, the pump is faulty. The reasons for this may be:
- faulty valves;
- rupture of one or more membranes;
- clogging of the pump grid;
- wear of the drive rod (pusher).
We carry out further checks in the following order:
- Disconnect both fuel line hoses from the pump.
Disconnect the inlet and outlet hoses - Checking the intake valve. To do this, plug the corresponding fitting with your finger and press the manual fuel pump lever several times. You should feel the vacuum (suction) with your finger. If it is not there, the valve has failed.
- Checking the exhaust valve.
Place your finger on the outlet fitting and press the lever. The air pressure should be felt at the outlet. Otherwise, the exhaust valve is faulty. When you press the manual pumping lever, you should feel a vacuum at the inlet fitting, and a pressure of air at the outlet - If everything is in order with the valves, check the condition of the filter mesh.
Using a 10mm wrench, unscrew the pump cover. We remove it from there and inspect the mesh for clogging. The grid is fine - let's move on. The mesh filter should not show signs of damage or deformation - Using a 13mm wrench, unscrew the pump mounting nuts.
- Carefully, so as not to damage the gaskets, remove the device from the studs, drain the gasoline from it, and remove the pusher.
Unscrew the two nuts and remove the fuel pump from the studs. - Using a slotted screwdriver, unscrew the 6 screws connecting the 2 parts of the pump housing.
We disassemble the device, remove the rod with membranes. Unscrew the top nut with a 10mm wrench and remove the membranes from the rod. We assess their condition. They should not have cracks, breaks, or signs of deformation. To disassemble the pump you need to unscrew 6 screws around the circumference of the housing. - Using a caliper or ruler, measure the length of the fuel pump drive rod.
It should be 82.4 mm. If it is less, or the rod has signs of wear on any of its ends, it is unsuitable for further work. The length of the pusher should be 82.4 mm
When and why you need to change/clean the fuel pump screen
Let's start with the fact that general problems with the fuel system (fuel pump in particular) should be divided into the most common groups:
- the fuel pump mesh and fuel filter are clogged;
- the fuel pump itself has failed;
- injector problems;
Let us add that we should also not exclude the possibility of air leaks, that is, airing of the power system. Another culprit of problems may be the pressure regulator in the fuel rail. In this case, engine malfunctions may be partially similar to some of the symptoms mentioned above. For example, a slight ingress of air into the fuel system results in the engine not starting for a long time after parking.
Article on the topic: The end of the world: why did drivers start driving without low beams?
Let's go back to the fuel pump. Its malfunction means that the performance of the fuel supply system is reduced. If the fuel pump breaks down, then the car becomes unsuitable for normal use. Signs of a fuel pump malfunction are as follows:
- It is impossible to start the engine, the fuel pump does not pump;
- the engine starts, but runs with serious interruptions;
In this case, the service often recommends diagnosing, repairing or replacing the fuel pump. It should also be taken into account that the fuel pump mesh filter may become clogged inside the device. Let us immediately note that it is impossible to accurately answer the question of when to clean the fuel pump stack. Some car enthusiasts clean/replace the fuel pump mesh as needed or as a preventative measure every 50-70 thousand km. mileage, while others are faced with the need to clean the fuel pump grid for the first time at mileages of 150 thousand km or more. and more. Let us add that the operating manual for some models specifically states that it is recommended to replace the fuel pump stack once every 120 thousand km.
It should be added that the loss of dynamics and the appearance of symptoms of a clogged mesh occurs gradually. For this reason, each driver decides to clean the fuel pump himself. On powerful naturally aspirated engines, the gradual deterioration in acceleration is not felt as strongly as compared to highly accelerated engines with a small displacement. For this reason, many owners of large-volume trucks begin to solve the problem after noticeable complications appear. Also, the condition of the pump grid is greatly influenced by the quality of the fuel being filled and a number of other factors and individual operating conditions, which we will talk about a little later.
Article on the topic: On-site engine diagnostics
Checking the electrical circuit
Unlike a carburetor engine, where the fuel pump is mechanically driven, on the injection VAZ 2110/2112 a special relay and fuse are responsible for the operation of this device. Therefore, before moving on to diagnosing the pump itself, it is necessary to check the indicated elements. If any one of them is faulty, the pump will not work at all.
Turn on the ignition without starting the engine and listen. When the fuel pump is running, it emits a characteristic “whistle” when started. If it is not there, it means that either the pump itself has failed, or one of the elements of its power supply circuit has failed.
The pump relay and fuse are located in an additional mounting block located inside the vehicle's center console. It can be accessed by removing the plastic trim (near the front passenger's left foot). It is secured with several screws. Under the cover you will find three relays and three fuses. Typically, the fuel pump circuit protection elements are located centrally.
The relay and fuse are located in an additional mounting block under the cladding
To check the fuse, remove it from its socket and “ring” it with a tester. If necessary, replace it, observing the rating (15 A). It is unlikely that it will be possible to check the relay for functionality without special equipment. But you can take another relay, for example, the radiator fan (far left), and install it in place of the one being diagnosed. Turn on the ignition and listen to see if the fuel pump starts working. If yes, buy and install a new relay. If the problem persists, continue diagnostics.
To check the fuel pump relay, you can install the radiator cooling fan relay in its place.
The fuel pump does not turn on, what is the reason?
If your car has an electric fuel pump, then there may be problems with the discharge section of the device. The electric motor rarely fails. Only after a car has driven more than 200 thousand kilometers can the brushes and then the commutator wear out. Wear of supercharger parts occurs due to:
- Low quality gasoline, which contains very small particles of mechanical impurities, which leads to wear of the gasoline pump after a year of operation.
- Pump performance decreases when operating clearances increase.
- In winter, when water gets into gasoline, which turns into ice, scuffs and cavities occur. In addition, pieces of ice can jam the VAZ fuel pump. This is accompanied by an increase in current in the electric motor, causing it to quickly overheat, which can lead to ignition in the fuel tank.
- In hot summer weather, at elevated temperatures, the density of gasoline decreases, and this reduces its lubricating properties, which leads to wear of parts.
Tip: Do not allow the gas pump to operate without supplying gasoline, which serves as a lubricant for the device, to prevent jamming.
If the wear of the discharge section has reached a critical value, which is associated with a decrease in engine response and a decrease in its power, the pump may jam at any time. In this case, immediate repair of the device or a quick replacement of the VAZ 2112 fuel pump is needed. So:
- When the discharge section of the pump jams, the fuse trips, which leads to the breakdown of the clutch fork, made of plastic, which connects the shafts of the electric motor and the discharge section. This design prevents damage to the electric motor.
- A lack of gasoline in the tank negatively affects the operation of the gas pump. When accelerating or braking, and even more so when turning, moments may arise when gasoline does not enter the pump and it picks up air.
Tip: If the light comes on, indicating that there is not enough gasoline in the tank, you need to top it up as soon as possible. Frequent trips with a light bulb can increase the frequency of replacing the fuel pump.
- Proper operation of the fuel pump prevents fuel fire or explosion. Even in the absence of gasoline, there is a high concentration of gasoline vapor in the tank and a moment may come that will become a precondition for a fire.
Advice: Before turning on the ignition of a VAZ 2112 car that has been sitting for a long time without use, you need to fill its tank with gasoline, which will prevent possible ignition and explosion.
- You can extend the operation of the gas pump by using a filter mesh when filling gasoline, which will trap small debris, prevent filter clogging and extend the period between cleaning the tank.
Diagnostics of fuel pump operation
To determine the condition of the fuel pump, you need to know its performance and developed pressure. The pressure gauge is connected to the fuel system through a special adapter. It is better to diagnose the node at a service station or approximately at home. So:
- The pump does not work if, when the ignition is turned on, there is no characteristic hum indicating that the pump is starting. It's bad if it makes a lot of noise. This indicates greater overload, which means a reduction in its service life.
- When driving on a flat road in third and fourth gears, you can see that the pump's performance has decreased. A deterioration in the parameters of the fuel pump is indicated by the lack of reaction of the car when you press the gas pedal.
- In winter, testing is as follows: increasing the density of gasoline reduces the pressure for pumping fuel, and if the pump is worn out, gasoline does not flow through a dirty filter, the engine does not start. For a temporary solution, you can replace the filter.
Checking the fuel rail pressure
But even the fact that the fuel pump starts pumping when the ignition is turned on does not mean that it is working properly. The main indicator of its operation is the pressure in the system. You can check it using a regular pressure gauge with a measurement limit of 5–7 atmospheres, which is used to measure tire pressure. In addition, you will need a piece of gas-resistant hose with an internal diameter of 9 mm and two clamps of the appropriate size.
The verification procedure is as follows:
For engines with a volume of 1500 cm 3 it should be 2.8–3.2 atmospheres, and for power units with a volume of 1600 cm 3 – 3.6–4 atmospheres. If the device indicators are lower, the pump is unsuitable for further use.
Fuel pump for injection engine
With the advent of the injection engine, the need for a mechanical element disappeared. It did not produce the required pressure in the system. Therefore, an electric fuel pump was developed, located directly in the fuel tank.
As the name suggests, this type of element operates using electricity. It consists of a filter and a housing. The latter contains a diaphragm with discharge and suction valves. An electromagnetic valve is located under the diaphragm. The fuel system of an injection car is more complicated than a carburetor due to the presence of an additional pressure regulator, which, when sufficient pressure is created in the fuel rail - 2.8-3.2 kilopascals, turns off the supply of electricity to the fuel pump.
Performance check
Checking its performance will help make sure that the fuel pump has failed. For this you will need:
- screwdriver with Phillips bit;
- a piece of gas-resistant hose (50–80 cm) with a clamp;
- key to 17;
- empty 2 liter plastic bottle;
- a piece of insulated wire;
- stopwatch.
Performance testing is carried out as follows:
- We remove the back seat. We lift the carpet and find the gas tank hatch under it. Unscrew the two screws (diagonally).
- Once you remove the hatch, you will see the top of the fuel module. Using a 17 wrench, unscrew the nut of the outlet fitting. We put a hose on it and secure the connection with a clamp. We lower the other end of the hose into an empty bottle.
- Disconnect the pump power connector. Using a piece of wire, we supply power to the positive contact of the device from the corresponding battery terminal. We connect the negative one to ground.
- We begin counting the time from the moment the pump starts.
A working fuel injection pump for a VAZ 2110/2112 should pump 1.5 liters of fuel in one minute. If this indicator is lower, the pump must be replaced.
Connectors under the hatch, disconnecting them
You need to remove the hatch under the rear seat: two screws are unscrewed with a Phillips screwdriver. Next you need to disconnect the connector on the module, and then move on to the block under the dashboard. First, turn off the fuel pump!
Replace the fuse. Let's move on to the fuel pump: connect the probe (zero cord) to any of the mounting studs. Voltage should appear on the “gray” wire when the ignition is turned on.
And also check the potential difference between the “gray” and “black” wires - it should be equal to 12 volts, and also at the moment the ignition is turned on. Wiring:
- The two outer cords are the FLS sensor;
- “Black” – minus power supply;
- "Grey" is a plus.
The "black wire" sometimes loses contact with ground.
There are reviews from owners that say: the fuel pump on a VAZ-2112 does not work if the electric motor is working properly and there is voltage in the connector. This happens when the contacts of the internal terminal block oxidize (see photo). Internal connector - yellow It is not easy to get to the connector on the motor - you need to remove the fuel pump module by unscrewing 8 nuts around the perimeter.
Common mistakes
You can use our instructions in one case: when the fuel pump does not work, but other systems are working properly. Sometimes the engine does not start for several reasons at once. And then you need to reduce the pressure like this: wait 5-6 hours, and do not turn on the ignition.
You can find out about the presence of pressure in the standard way:
- Open the hood;
- There is a fitting on the fuel rail, closed with a plastic cap. It is turned away (photo 1);
- Using the nipple cap (photo 2) you can unscrew the fitting plug. This action is performed carefully: the residual pressure has not disappeared anywhere.
Even if gasoline starts to gush out, do not try to tighten the fitting right away. Let the pressure drop a little. Diagnostic fitting and plugTrying to repair the fuel pump is commendable.
It will be possible to change its mesh. But the cause of the problem may also be a clogged fine filter. The replacement filter (“can” 2112-1117010) fails gradually. On all fuel-injected cars, including the VAZ-2112, the fuel pump will not stop working even if the filter is completely clogged. Fuel is not pumped, but the engine does not burn out.