The exterior of a car worries owners no less than its appearance, so they spend a lot of time, effort and money to maintain the interior in its original condition. Since the main material in the interior is plastic, car owners should pay enough attention to its restoration. If you know the basic methods, then you can do this work yourself. It is possible to replace a worn part, but some plastic parts are quite expensive, so it will be much more profitable to restore the interior plastic . More details about the methods of blackening the plastic of a car interior will be discussed in this article.
Plastic recovery methods
There are several ways to improve the appearance of plastic parts, thereby extending the life of the car interior. The most effective of them include a plastic restorer, the use of a polish, a plasticizer gel or a special film. You can also restore the appearance of plastic by heating it with a hair dryer. Now in more detail about each of the methods.
How to restore interior plastic
Plastic restorer
Used to restore surfaces such as vinyl and plastic. The principle of operation of the restorer is to completely fill existing scratches. The substance penetrates deep into uneven areas and displaces the dirt accumulated there. Immediately after the restorer has dried, you need to clean the surface using special wipes. If necessary, the procedure can be repeated.
Doctor Wax - plastic restorer
Application of polish
Polish is great for covering up minor scratches. It is also used as a final step after using other means. Depending on the color of the plastic, you need to purchase a certain type of polish. Such products contain coloring pigments that additionally mask damage.
Polish for car interior plastic
Heating with a hairdryer
Heating with a hairdryer is excellent for restoring the interior dashboard. The essence of this method is the prolonged exposure of high temperature to the damaged surface, as a result of which the plastic melts slightly and, as a result, becomes level. The required temperature can only be achieved using an industrial hair dryer.
Hairdryer for scratches on plastic
Note! It is not recommended to use a hair dryer on painted surfaces. Also, this method will not be effective in removing large scratches.
Gel plasticizer
After application, the gel imitates the texture of the surface, thereby restoring the damaged area. The gel plasticizer is used as follows:
- the product is applied to an undamaged plastic surface;
- a texture pattern appears on the gel after complete hardening;
- the resulting helium cast is applied to the area to be restored;
- the impression is pressed tightly against the plastic;
- a texture pattern is “imprinted” on the surface.
Gel plasticizer
Gel plasticizer gives the desired result only when restoring a small area of damage. If the plastic is worn out enough, then you need to choose another method.
Restoration of car interior elements
Main causes of wear:
1. When driving a car for a long time, parts quickly wear out from contact with passengers and the driver himself:
- Leather seats and steering wheel are subject to mechanical friction.
- The interior trim becomes covered with a coating of dust, smoke and dirt.
- Plastic coated surfaces are scratched.
2. The condition of the car interior is affected by external weather conditions:
- Low and high temperature differences.
- Ultraviolet healing.
3. An accident is the most destructive cause, as it leads to severe damage to the interior.
Plastic restoration products
You can restore the interior plastic using degraders. These are special products for restoring plastic elements. Below are the most effective blackeners from different manufacturers.
Plastic restoration products
Table. Review of plastic restoration products.
| Product name, photo | Description |
| DoctorWax | An excellent ink designed to restore not only plastic interior elements, but also the car body. DoctorWax can be applied to paintwork. |
| Sonax | German restorer for rubber and plastic surfaces from a German manufacturer. Sonax also has a glossy effect. |
| Runway | Polish in the form of milk from the famous American manufacturer NOWAX. The product is very easy to use. It is enough to spray it on the surface to be restored and treat it with microfiber. |
| Meguiar's | Another representative of the American market. Meguiar's can be used for restoration of plastic and rubber. The product is also effective in restoring vinyl. |
| QuickWax | Black polymer for plastic restoration. In addition to the blackening effect, QuickWax is also able to protect the surface from moisture. |
On a note! The average cost of a reducing agent in a 500 ml container is 600-750 rubles. But if you buy 330 ml, the price will be lower - within 300 rubles.
Possible damage
Direct sunlight and excessive heat will dry out leather trim. It dries out, cracks, and tears.
The most common defects in leather upholstery:
- punctures;
- burns;
- cuts;
- spots;
- ingrained dust;
- ruptures;
- abrasions;
- scratches;
- loss of color;
- cracks.
Fixable upholstery problems are caused by the leather losing its elasticity due to drying out.
DIY plastic ink
There are various recipes for making ink at home. Such products cost little, around 80 rubles, but some of them are as effective as store-bought products. To prepare plastic ink, you need to prepare 6 tubes of glycerin, clean water and a small bottle with a spray bottle.
DIY plastic ink
The instructions for preparing the interior plastic restorer are as follows:
- water is mixed with glycerin in a plastic bottle;
- the bottle is tightly closed and shaken;
- a sprayer is installed;
- The ink is applied to the cleaned surface.
How to prepare plastic ink
The finished product does not have a rich black tint, but it can be used to mask small scratches on the surface of the plastic. If necessary, home restorer can be reapplied.
Car leather interior repair
Making it yourself is not that difficult. Liquid leather is used for minor cuts and tears. For larger defects, you need to apply a patch, wait until the glue dries and begin to carefully apply liquid leather. To make the surface dry faster, you can use a heating hairdryer and then sand it so that the patch is not felt during tactile contact.
For more information about the repair of leather seats and the interior in general, read our material at the link:
Restoring plastic with polish
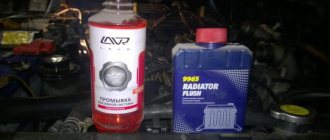
Step 1. Prepare cleaner and polish. In this case, products from are used, but if you wish, you can take another brand.
Preparing cleaner and polish
Step 2. Dilute the concentrate with water in a ratio of 1:10.
Diluting the concentrate with water
Step 3. Pour the finished product into a plastic bottle and install the sprayer.
Installing a sprayer on a bottle
Step 4. Apply a layer of cleaner to the surface to be restored.
Applying a layer of cleaner
Step 5. Wait 20-30 seconds for the product to be absorbed into the interior material.
The product must be absorbed
Step 6. Wipe the plastic thoroughly with a regular dishwashing sponge.
Processing plastic with a sponge
Step 7. Using a wet cloth, carefully remove any remaining product from the surface.
Removing product residues
Step 8: Dry the plastic surface using a clean rag.
Wiping the plastic surface with a rag
Step 9. This is what the plastic looks like after cleaning.
Plastic after the cleaning stage
Step 10. Apply a thin layer of matte polish to the cleaned surface. The right side is polished, while the left side is only cleaned (for comparison).
Applying matte polish
Step 11. Rub the polish with a sponge to distribute the polish evenly. Then wait 5 minutes for the product to be absorbed.
Distribution of polish over the surface
Step 12. Clean the surface with a dry cloth. You need to rub in until the matte effect is completely achieved.
Wiping the surface with a dry cloth
Step 13: Done! The plastic has been restored and is ready for use. It is recommended to repeat this procedure every 2-3 months, and then the salon will always look like new.
The interior plastic panel has been restored
Lint from the repair kit
However, you can tint not only the paint from the basic components, but also the velor coating. The components in this case are tiny fibers of different colors. By mixing them in the right proportions, it is not difficult to obtain a “mix” that is as identical as possible to the original pile. This is exactly what they do when repairing ceilings and other velor panels.
An adhesive composition is applied to the burn or other damage, and then a new coating is applied with a special spray gun - finding the repair site on the panel will not be so easy later. Such an operation will cost no less than 1000 rubles.
Fabric coverings that have a pronounced structure are more difficult to restore; in this case, the repair site will be noticeable upon careful examination. However, seeing a speck slightly different in color and structure is better than seeing a black burn from a cigarette.
The velor coating is restored by spraying a mixture of fibers of the desired color onto the adhesive composition previously applied to the damage.
The updated interior looks much nicer than the shabby one. This applies not only to aesthetic pleasure: if the car is sold, your copy will have a clear superiority over its peers. It is possible that the higher price will offset the cost of interior renovations.
Reanimation of damaged plastic
Step 1. Remove the plastic interior elements that need to be restored. The removed parts will be much easier to process.
Removing plastic interior elements
Step 2: Thoroughly wipe the plastic surface with a dry cloth to remove any layer of accumulated dirt.
Cleaning the plastic surface from dirt
Step 3. This is what the cleaned surface should look like. Now you can begin the restoration.
The part is cleaned and ready for restoration
Step 4: Prepare a can of black spray paint. You will also need a plastic primer.
Preparation of materials for restoration
Step 5. Wear rubber gloves before starting the process, as working with paint without protection is not recommended.
Putting on protective gloves
Step 6. Degrease the surface of the part before applying paint. This is necessary to ensure reliable fixation of paints and varnishes.
Surface degreasing
Step 7. Repeat the degreasing procedure with all dismantled elements.
Degreasing of all dismantled elements
Step 8. After the surface has dried, apply a layer of primer, shaking the can thoroughly before doing this. The product must be applied in accordance with the manufacturer's recommendations (you will find all the necessary information on the can).
Applying a layer of primer
Important! The primer's job is to create adhesion between the surface of the plastic part and the paint layer.
Step 9. Prime other elements as well. After this, the parts should dry well.
Drying the primer layer
Step 10: Shake the spray paint can and paint the first element. To make the paint adhere better, it is advisable to warm up the can (approximately to eating temperature).
Spray painting parts
Step 11. When applying a layer of paint, the can must be held at right angles to the surface to be painted.
Applying paint at right angles
Step 12. Wait for the paint to dry. In sunny weather, the part can be placed outside to speed up the drying process.
Drying the paint layer
Step 13. This is what the plastic element looks like after painting.
The part is painted and looks like new
Step 14. Paint the remaining parts in the same way.
Painting the remaining dismantled elements
Step 15. Interior parts are painted and ready for installation. Now they can breathe new life into the car interior.
Interior plastic restored and ready for installation
Let's sum it up
High-quality car interior repairs can be carried out at specialized or universal service stations. However, in most cases, car owners in our country try to do such work on their own, since they are not very willing to pay a lot of money for the services of specialists. Therefore, there are dozens of methods for solving each problem, from which you will have to choose the most suitable one according to all characteristics.
A high-quality interior is very important for a car owner. In many cases, we stop paying attention to long-standing defects in the interior, but every time we look at problem areas, we remind ourselves of the need to fix them. Therefore, it is better to immediately start updating the interior and carry out this process efficiently. You can install new elements interior, insert used recycled plastic parts, or try refinishing old versions of parts. What interior renovation methods have you used on your car?
Masking plastic defects with carbon paper
Step 1. During use, such scratches appear on the car doors. They are especially active on budget car models, where manufacturers use hard plastic.
Scratches on the door plastic
Step 2. Prepare several sheets of tracing paper and rubber gloves for work. Gloves are necessary because tracing paper can get dirty.
Tracing paper for plastic restoration
On a note! Before work, be sure to clean the surface of the plastic. To do this, you can use a soap or foam solution.
Step 3. Place a sheet of carbon paper on the surface to be treated and begin to intensively press the plastic.
Rubbing plastic with carbon paper
Step 4. Rub surfaces in different directions. As work progresses, small scratches become less noticeable.
Changes after a few seconds of work
Step 5. Treat all problem areas on the plastic surface. If necessary, take a new sheet of carbon paper.
Treatment of problem areas
Step 6. The plastic has been restored and is not much different in appearance from new. One door requires 5 to 10 minutes of time.
Plastic restored using tracing paper
Useful tips
There are several general recommendations that, despite their simplicity, are really useful and important.
- Do not smoke. Very banal, but absolutely correct advice. You need to wean yourself from a bad habit. Will not talk about the harm of smoking to health. At least try not to smoke in the car. This will protect you from possible damage to the interior. After all, when no one lights cigarettes in the cabin, then there can be no problems with the formation of burns.
- Don't shake the ashes out the window as you walk. Some drivers place their hand on the window and shake off a cigarette almost next to the rearview mirror. But if you do this, there is a high probability that the ashes will fly back into the cabin. This happens through an open driver's window or through the rear passenger window. There are two options here. Either you shake it as far away from the window as possible, or use an ashtray. On some machines it is provided by design. Or you can build it yourself.
- Remember that you are driving. The advice is a little strange, but really useful. Many people who drive a car have a habit of actively gesticulating when talking. This happens when communicating with passengers or during telephone conversations. As a result, the hand with the cigarette between the fingers flies in different directions, thereby spreading hot ash throughout the cabin. As a result, the trim on the doors, ceiling, chairs, etc. is burned through.
The car places increased demands not only in terms of safety of movement. You should also be able to behave properly inside the vehicle.
Try to minimize the number of cigarettes you smoke while driving. To do this, you can stop, get out of the car and quietly smoke. In general, it is better to fight this habit with drastic methods. That is, completely give up smoking. It's hard, but extremely beneficial for your health. And, as it turned out, to preserve the upholstery of your car.
Additional recommendations
To create a dense and uniform coating, you must use only high-quality inks. Experts recommend buying products in small bottles with a sprayer. This will reduce the consumption of the substance. Work should be performed with gloves and closed clothing to avoid contact of the product with exposed skin.
Restoration of interior plastic
Important! The optimal distance to the surface during spraying is 25-30 cm. Compliance with this rule will prevent the appearance of streaks.
Results of do-it-yourself interior plastic restoration
It is not difficult to use restorative products, so if you want to improve the condition of your car’s interior, then you don’t have to go to a car service center and overpay. You just need to choose an effective remedy, trying not to save too much, and also allocate some free time. And you're done! The salon looks like new again!
Where should you start restoring the interior?
So, let’s begin the process of restoring the car’s interior with our own hands. First you need to clean the inside of the car, that is, thoroughly wash off the dust and dirt. Next, conduct a thorough inspection of all interior parts for any imperfections. To eliminate all defects, you need to do them one by one. Look around your salon and identify key local points for restoration.
If you have a leather interior , we recommend reading our material on the repair and restoration of a leather car interior
Staff
At the start, many people start a business of reupholstering interiors themselves, but as the volume of work increases, it becomes problematic to cope on their own. The easiest way is to foresee all the nuances in advance and form a team, delegating most of the tasks to hired employees.
- Fitting technicians.
To reupholster the interior, you will need to invite 1-2 fitting technicians who will take on the work associated with the dismantling and subsequent installation of interior elements. It is imperative that technicians have the necessary skills to work specifically with car interiors - ordinary experience in working at a car service center will not help. One careless action and you can damage an expensive airbag. - Seamstress.
To sew door and seat upholstery, you will need a professional seamstress who will be engaged in the manufacture and sewing of products. Wages are usually piecework and depend on the amount of work done.
Machine Ceiling Upgrade
Upgrading the ceiling trim of a car is a very important point in tuning the interior. Most often, the factory ceiling lining is made in light shades, which fade over time, acquiring an unflattering appearance. The situation can be corrected by reupholstering, for which carpet is usually used. This material is very practical and inexpensive.
VAZ ceiling (carpet upholstery)
First you need to dismantle the old upholstery. It is advisable to perform this procedure as carefully as possible in order to make a pattern from the carpet using a factory template. After this, the ceiling surfaces are cleaned and degreased.
For reliability, glue is applied to the ceiling, after which the pattern is secured using standard clamps. All that remains is to wait for the glue to dry, after which the procedure can be considered complete.
Carpet ceiling lining
Removing and disassembling seats
To reupholster the seats, you must first dismantle them, remove them from the interior to the workplace, disassemble them and remove the old upholstery. Each car interior has its own characteristics. Therefore, it is impossible to create one instruction that is universally suitable for all seats. Let's look at the main points that are similar for most cars.
Most front seats are fairly easy to remove from the interior. The front seats slide on the tracks (slides). They are bolted to the floor at the front and back. Typically, the places where the slide is attached to the floor are covered with plastic covers. To get to the bolts, you need to move the chair to its extreme position (forward or backward, in turn).
Front seat mounting- Before removing the seats, you must disconnect all electrical wiring plugs at the bottom. If the seats have side airbags, you need to disconnect the battery and wait 3 minutes before disconnecting the connectors at the bottom of the seats.
- Carefully remove the seat from the interior, do not scratch the plastic trim of the interior with the slide. You can wrap the sharp corners of the seat slide with rags before dismantling. This will protect the interior from accidental scratches. The second front seat is removed in a similar way.
- To remove the rear seat, you usually need to first remove the lower part of the seat. There are two different methods that are used to secure the bottom of the rear seat. These are two bolts or two latches on the front that secure the seat to the floor. You need to unscrew or snap off the bottom of the seat and pull it out. After removing the lower part, the bolts securing the rear seat back become visible. After unscrewing them, you need to move the seat back up and remove it.
- Disassemble the seat. You will need a large area in which to work comfortably with the seats. This can be done either on a large table or on the floor. First you need to disconnect the seat back from the seat itself. You need to fully recline the backrest with the seat mechanism. Remove the skids. To disassemble the front seats, it may be necessary to remove plastic trim parts.
- Before removing the upholstery, the headrest must be removed.
- Remove the old upholstery from the seat and backrest. The upholstery is usually attached to the seat frame and soft base with special staples. There can be quite a lot of such staples (rings). To remove the old upholstery you need to cut off all these rings. They are not easy to cut. You can use a special tool, wire cutters or metal scissors. It is necessary to draw a diagram of the location of the fastening rings so that, when installing new upholstery, you know where to install the new brackets. During disassembly, you can also take photographs of the stages. This way, you will know which bolt was unscrewed and where it came from.
The upholstery can be attached with rings to metal rods built into the upholstered part of the seat structure. In this case, the seat upholstery must be lifted from the edges to see the fastening points, and all fastenings (rings) must be cut off. Instead of rings, there may be textile fasteners (Velcro), then you just need to pull the upholstery to remove it.
Official registration of business
So, we have familiarized ourselves with the list of services for reupholstering salons, let’s move on to registering a business. To officially run a business, it will be enough to register as an individual entrepreneur. Typically, LLCs are opened only by large companies that simultaneously engage in tuning and servicing vehicles.
Suitable codes from the list of business activity classifiers OKVED code:
- 45.20.2. Maintenance and repair of other vehicles;
- 45.20. Maintenance and repair of vehicles;
- 29.32.1 Manufacture of seats for motor vehicles
Preliminary work
First of all, the interior of the machine should be thoroughly cleaned of dirt and dust. Next, the interior needs to be carefully examined for any deficiencies. Quite often, the process of identifying interior defects convinces the car owner that the interior of his vehicle needs a comprehensive repair. That is why a car enthusiast can imagine the full scope of repair work and make an approximate estimate of upcoming costs only after completing these steps.