In the VAZ 2114, as in any other car, the dimensions (another name for side lights or parking lights) are lighting fixtures that are located on the front and rear parts of the car (on the sides). They serve to indicate the dimensions of a particular vehicle in conditions of insufficient visibility. Another purpose of side lights is parking lighting.
Ensuring that the bulbs in the headlights and side lights of the car are in good working order is the direct responsibility of the driver. If the lighting fixtures in the car are faulty, then this is considered a violation for which the traffic police inspector can issue a fine. To prevent this from happening, it is necessary to periodically check the serviceability of the lamps and, if necessary, replace them with new ones.
Which modification is better?
H4 halogen lamps installed on the VAZ-2114 are divided into:
- Standard.
- Enhanced light beam.
- Improved visual overview.
- All-weather.
- Increased power.
They are two filaments for low and high beam lighting. Lamps with a power of 60/55W are considered optimal among them.
Standard H4 lamp
Such lamps are mounted on every car of this VAZ model.
High beam lamp
High light flux lamp +30%
They are designated as +30%, 50% and so on. In addition to consuming “their” 55W and percent, they produce brighter light. But the duration of their operation is not long, although the price is more expensive.
Improved visual overview
Illuminated with white light familiar to the eye. Consuming the usual 55 W, they illuminate brighter, despite the bluish tint of the bulb.
They provide an excellent background light on snowy and dry roads. On a wet road it is better to use yellow fog lights. Doesn't blind oncoming cars. The service life of these does not differ from standard ones, despite the inflated price. Manufacturers prefer lamps with a yellow or bluish tint.
All weather
All-weather yellow lamp
The lamps are specially coated with a yellowish tint, which allows the light to achieve the contrast of the area in bad weather, especially cloudy (foggy). Yellow light has less reflection.
Increased power
They are in demand among owners who do not particularly know the “subject of the dispute.”
The manufacturer does not equip the VAZ-2114 with powerful lamps and does not recommend them, since this is associated with mandatory overheating and melting of wires, contacts, and headlight reflectors.
High-power lamps lead to consequences such as blinding an oncoming car and causing an accident.
Removing and replacing side lamps in the rear light
The replacement process involves sequentially performing the following steps:
- the trunk opens;
- to gain access to the headlight, remove the carpet covering it from the inside;
- the board contacts are disconnected;
- the bar is removed (all the rear light bulbs are on it).
Replaced with a new side light bulb (the side light bulbs on the VAZ 2114 have the smallest size, so it will be difficult to confuse them); The board with the new light bulb is installed in its original place.
If replacing the light bulb in the front/rear marker does not produce results and the side lights still do not work, then you need to check the appropriate fuses or look for other causes of the malfunction.
If all the lights don't light up
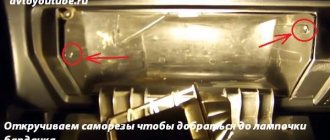
Sometimes on 2114 the dashboard backlight stops turning on completely. Usually, to restore its functionality, you need to change the fuse. In the new type mounting block it is F10 at 7.5 A. The part is green. Its location is shown in the figure below: Replacing the fusible element, as a rule, does not cause difficulties for car enthusiasts. You can change it yourself. Therefore, when the instrument panel stops lighting, you need to remove the fuse and install a working one. If everything works, then the fault has been identified correctly. If in doubt, the part can be checked with a multimeter. But sometimes the tidy may not light up for other reasons. This:
- Burnt out contact board;
- Broken wiring;
- Oxidation of contacts.
They can be diagnosed using a multimeter and visual inspection. You can usually identify and fix these problems yourself. But in some cases, the help of an auto electrician may be required.
Manufacturers of lamps for VAZ 2114
Since lamps with an H4 socket are used in headlights of many models from different manufacturers, all manufacturers of car lamps produce such lamps. Among them are the following companies:
- A world-famous Dutch company, known for its low prices and good quality products;
- A German company with a long history and rich technological experience;
- Narva. This is another manufacturer from Germany, known for the quality and durability of its products;
- Bosh. Another German company that does not need any special introduction;
- Company based in Hong Kong and Germany. Produces a wide range of reliable lighting equipment.
The above list can be continued for a long time. Today, a big name of a manufacturer is not a guarantee of high quality and reliability. There are a lot of fakes on the market, which are not only cheap, but also completely inconsistent with the original. Therefore, it is better to make a choice based not on the name, but on the characteristics of the light bulbs.
Other malfunctions and their elimination (rear and front dimensions of the VAZ 2114)
Quite often the cause of a non-working side light is a blown fuse. You can fix the problem by replacing the fuse that seems suspicious with a new one. If the situation is corrected, then the cause of the breakdown was precisely this element, and if not, then it will be necessary to exclude such a thing as a broken circuit.
Power supply to the side lights of the VAZ 2114 comes together with the headlights. If the headlights (front or rear) do not light up, then most likely there is an open circuit. To identify and eliminate such malfunctions, you will need to contact a specialist who has special equipment and appropriate skills.
It is worthwhile to dwell on how to check the button for turning on the side lights. To understand whether this was the cause of the malfunction, you should remove the button from the panel and then short-circuit the wires. If the lamps light up, it is the button that is causing the breakdown and will need to be replaced.
From the above information it is clear that almost any reason for the breakdown of dimensions on the VAZ 2114 is quite simple to eliminate
It is important to do this in a timely manner, since not only the safety of the driver and passengers, but also the general situation on the road while driving depends on the serviceability of these lights. The lack of clearance may confuse drivers of other vehicles and, as a result, create an emergency situation.
When should the side lights be turned on?
The driver is required to turn on the lights whenever there is poor visibility on the road, as well as when driving through a tunnel.
Conditions for poor visibility include:
- heavy rain/snow;
- fog;
- dusk/predawn.
It is very important to turn on your side lights when driving in fog. At the slightest sign of its appearance (especially in the dark), you need to turn on the dimensions, indicating the boundaries of your own vehicle.
If you are forced to stop on the side of the road in conditions of insufficient visibility, you should definitely turn on the side lights, and in the dark, also turn on the emergency lights. Such actions will protect you and help other road users not to get into a situation where a car suddenly appears out of the fog/darkness in front of them.
- Replacement and diagnostics of the coolant temperature sensor (DTOZH) VAZ 2114
- Checking and replacing the mass air flow sensor (MAF) on a VAZ 2114
- How to check a VAZ 2114 oxygen sensor: necessity and sequence of actions
Changing light bulbs is actually easy, I used to always ask my brother, but now I’ll do everything myself. If you need to change the glass on the headlights, they also say there is nothing complicated, that’s what I want to do one of these days
In addition to the dimensions, my brake lights often burned out. I changed them for a long time (a year), but I still got tired of spending money. The technician rang through all the wires and found a hole that closed the circuit through the body. The repair took five minutes, but the problem lasted a year.
Changing light bulbs is actually easy, I used to always ask my brother, but now I’ll do everything myself. If you need to change the glass on the headlights, they also say there is nothing complicated, that’s exactly what I want to do one of these days.
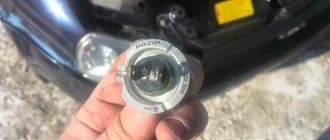
PTF Kirzhach light bulb base
Depending on the year of manufacture, different types of lamp bases were installed on the “luxury” versions of the fourteenth VAZ model. In addition to caps from foreign manufacturers, caps from PTF are often found in the PTF case. The photo above shows the H11 format socket, which is installed in “foglights”. It makes no sense to choose bulbs for VAZ 2114 fog lights without understanding which base is used in the housing, because they are not interchangeable. Only H11 is used, while on modified versions of machines, H3 format sockets are often found. Bulbs for VAZ 2114 fog lights of this format produce a brighter color, but H11 is more common, because do not blind oncoming cars. A car lamp for “four” is available for sale in several versions:
- Halogen (standard with a yellowish tint);
- LED (bright elements with white light). Due to low heating they are more durable;
- Xenon. Effective and bright, but require compliance with installation instructions. If used incorrectly, it blinds oncoming cars. Service life is about three years.
Also, for improper use of xenon, inspectors may issue an order to eliminate the violation.
Process Features
To ensure that the process of dismantling and replacing the lighting component is successful, make sure that there is no condensation in the reflector unit. If you do find moisture in the block, clean the drainage channel, which you can find near the turn signal mount (on the left or right of the car). You can give a few more tips to motorists:
- take into account the interval from the moment the vehicle's lighting system is turned off. Do not start work immediately after turning off the lighting system, as this may cause burns;
- Whatever lamp you replace (xenon or halogen), wear protective gloves;
- Do not replace lighting elements with overly powerful ones, as they can lead to failure of the lighting device.
Which light bulbs are better to choose?
By default, the VAZ 2114 is equipped with lamps that do not give the required effect in conditions of poor visibility. In this regard, car owners often replace lighting elements with better models. The choice is made based on the personal readings of the car owner. Before purchasing, you must study the technical specifications of the part. The following models are most common among motorists:
Osram Cool Blue Boost is a high-quality lamp from a German manufacturer. Emits white light, which has a positive effect on visibility in low visibility conditions. The brightness indicators of the model are at a high level. Lighting element power 100/90 W. The service life ranges from 120 to 400 hours of continuous operation. The price of the product differs depending on the region and averages 1100-1200 Russian rubles.
Philips Blue Vision Ultra. The power of the lighting element is 60/50 W. The model is distinguished by high brightness. Cold white light allows you to see the road situation regardless of the level of illumination. The cost of two lamps in this series is 1400 - 1500 Russian rubles.
IPF Titan White are high-quality models from a Japanese manufacturer. A distinctive feature of the product is its high luminous characteristics and long service life. The lamps provide high-quality illumination of the road surface regardless of weather conditions. Power is 55 W. The cost of a product from a Japanese manufacturer averages 2,200 rubles.
Tail light repair
The most common reason for the failure of a VAZ 2114 rear light is the failure of a flexible printed circuit board or a connector made directly on it with conventional metallization. You can, of course, just buy a new printed circuit board and replace the faulty one with it, but, firstly, for how long?
And secondly, we are not looking for easy ways. So we will try to eliminate this malfunction on our own, at minimal cost and in such a way that it will last forever. Let's start with the connector for connecting the flashlight to the on-board network. It looks something like this:
The connector for connecting the rear light to the on-board network is part of a flexible circuit board and cannot be replaced separately
There are many reasons for this connector to fail. For example, we removed the power supply from the flashlight too often and simply partially erased the traces, which have a very small thickness of copper deposition on the plastic. Another reason is that the conductive paths next to the connector broke due to constant vibration. Well, the most banal thing is that the tracks burned out due to overload or short circuit.
Due to burnout of the conductive tracks of the flexible board, the rear fog lights do not light up
The photo shows a flashlight connector of a different modification, but the meaning of the problem is the same. All these issues can be solved with the help of a soldering iron, mounting wire and a regular six-pin (or more) connector with a mating part.
For repairs you will need this block with a mating part
We clean the connector contacts on the board using a student eraser (not sandpaper - the foil is very thin!) and service them.
We solder the wires from the block onto the tracks, not forgetting to mark them, and fill the soldering area with sealant or a hot glue gun.
Mounting block soldered to the rear light board
We cut off the standard power harness block, and in its place we solder the mating part of the new one. We assemble the flashlight, connect it to the on-board network - and check it. If we haven't messed up the wiring of the pads, then everything will work right away with a bang.
What to do if the tracks are burned out or broken? You can get out of this situation as follows. Immediately after the fracture, we clean the protective varnish from the tracks, tin, and solder the block. It will look like this:
You can solder the header anywhere on the flexible board.
You can, of course, limit yourself to this (until next time), but if you spend a little more time and effort, you can make more serious repairs. Flashlights modified in this way will serve faithfully for many years. Such a repair will save you from the eternal problem of contacts of flimsy standard sockets - this is also a very common malfunction of VAZ 2114 headlights.
To implement this idea, in addition to the six-pin block with a mating part (see above), you will need five cartridges from the VAZ 2106 direction indicators and a dozen terminals for them.
You will need 5 such cartridges and 10 terminals for them
We remove the lamps, standard sockets and flexible printed circuit board from the panel. We place the purchased cartridges in the right places on the panel and mark their centers. Special precision is not required here, the main thing is that each lamp shines into its own “window”. We drill holes according to the diameter of the base parts of the cartridges.
Holes for future cartridges
We insert the cartridges into the holes, mark the mounting holes, drill them, and screw in the screws. Now the cartridges are firmly fixed in the panel.
We secure each cartridge with two self-tapping screws
Using a mounting wire with terminals pressed onto it (you can crimp it with ordinary pliers and solder it to be sure), we assemble a circuit that repeats the layout of a standard flexible printed circuit board. To be sure, the terminals can be insulated with heat-shrinkable tubing, but in principle this is not necessary - the panel on which the cartridges are mounted is plastic. We solder our block to the ends of the wires.
This block will connect the rear light to the on-board network
We solder the mating part of the block to the power supply harness of the lights, having first cut off the old one. We solder it, not twist it together. The twist will oxidize in a week, and problems will begin again - sometimes it burns, sometimes it doesn’t. We insulate the solder joint with heat shrink or cotton (black rag) tape. PVC electrical tape is an extremely bad option. It can unfold over time. This kind of isolation is no good.
Everything is ready, you can connect and check
We admire our work for a couple of minutes, insert the lamps, connect them, check them. Is everything working as expected? We assemble the lantern and connect it.
The lantern is in place, all problems are solved for a long time
LED analog P21W
Reasons for failure of dashboard lights
Replacing a low beam lamp on a viburnum
There may be several reasons why the instrument panel lamps are out of order:
- The incandescent lamps burned out
, or in the case of LED analogues, the tracks stopped working. - A malfunction has occurred
in the circuit (a break has occurred or the contacts have oxidized - approx.). - The fuse box
has failed. - on the
instrument panel contact board. - There is a short circuit to ground
.
In order to understand this problem more closely, it is necessary to dismantle the instrument panel.
Removing the dashboard apron
To get to the instrument panel, you need to carry out some preparatory work, which will allow you to easily access the main device:
- First, remove the negative terminal from the battery.
- Then, unscrew all the screws securing the torpedo trim on the right leg on the driver's side, and then do exactly the same procedure with the trim on the passenger side.
- Next, for ease of dismantling, release the gearshift lever housing from its fixation point.
- Unscrew one screw on each side of the tunnel, and then another one, which is located directly under the ashtray for the rear passengers.
- Now that the tunnel is not holding anything, we move it back a little.
- The next step is to dismantle the “apron” of the torpedo, and to do this, unscrew the 4 bolts that secure it at the steering column and the remaining ones that hold it at the edges of the center console, do not forget to remove the plug on the panel and unscrew the fixing bolt.
- Disconnect the block with the wires of the cigarette lighter, radio, on-board computer (if equipped - approx.) and buttons.
- When nothing else is in the way, dismantle the “apron” and put it aside.
At this point, the work on dismantling the “apron” of the instrument panel can be considered completed and you can begin working directly with the lamps.
Replacing headlight bulbs
- Disconnect the on-board power supply. To do this, you need to disconnect the negative terminal from the battery.
- Open the engine compartment.
- Unscrew the two fasteners from the back of the headlight.
- Remove the protective cover.
- Disconnect the electrical connector.
- Unclip the spring securing the lighting element to the seat.
- Remove the lamp.
After the new part is installed, you need to connect the negative terminal to the battery and check the functionality of the headlight.
How to replace light bulbs
Installing new lamps is a simple process that novice car owners can do.
To replace you will need the following devices:
- Phillips screwdriver;
- a set of new light bulbs.
Replacing the backlight
To improve the quality of dashboard lighting, it is advisable to replace old lamps with new LEDs - they provide brighter and softer light that does not irritate the eyes, have minimal power consumption and allow you to more accurately read data from devices.
Before you begin installing the lighting fixtures, you need to remove the decorative trim from the music system - the instrument panel and radio on the VAZ 2114 are connected to each other, so this step cannot be avoided. Dismantling is carried out by snapping off the fasteners with a flat screwdriver
Remove the cover from the bottom edge and be very careful, as all the latches can be damaged.
How to disassemble the dashboard
Dismantling the VAZ 2114 dashboard is the first step in the process of replacing backlight bulbs. Without removing the plastic cover it is impossible to get to the lighting fixtures themselves.
Scheme for disassembling the VAZ 2114 dashboard
The dashboard on the VAZ 2114 is disassembled according to the following scheme:
- Three self-tapping screws are unscrewed, the lower protrusion and the cover are removed.
- There are five screws on the right console trim that also need to be removed.
- The screen is removed and the negative terminal is disconnected from the battery.
- The wiring harness is disconnected from the cigarette lighter.
- The handle is removed from the gear shift lever.
- The stove fasteners are removed.
- The bolts that secure the steering wheel block are carefully unscrewed.
- Decorative inserts, lamp sockets and LEDs are removed from the panel.
- The hydraulic corrector illumination lamp is removed using a 21 key.
- The upper and lower screws are dismantled.
After completing the dismantling of the instrument panel, the wiring circuit is closed to prevent dust, moisture or dirt from entering it.
Only 8 out of 13 lamps can be replaced in the instrument panel of a VAZ 2114.
Replacing backlight bulbs
After removing the plastic, you can begin the process of replacing the lamps.
- The required number of lamps to replace the backlight of each sensor and panel device is calculated in advance.
- Lamps and resistances are installed in special places - sockets - after removing the block. The cartridges are unscrewed counterclockwise by hand, without the use of tools. New ones are installed in the vacant spaces, then lamps are inserted into them. The LED heads are screwed in with correct polarity.
Video: replacing the dashboard light bulbs of a VAZ 2114
Replacing the dashboard backlight bulbs of a VAZ 2114 is an easy job that can be done by the most inexperienced car owners. You can restore its functionality in a matter of minutes, the main thing is to correctly select and install sensor and instrument lamps.
Types of lighting fixtures
For installation in the headlights of the VAZ 2114, double-filament lamps with an H4 socket are used, the power of which is 60/55 W. They perform simultaneously the functions of high and low beam. This allows you to reduce the size of the headlights and reduce heat. However, such versatility also has negative sides. If one thread burns out, the other can still work. But, since it is impossible to drive without low or high beams, you have to change a partially working lamp. At the same time, headlight bulbs are always installed in pairs to obtain the same glow mode on the left and right sides. It turns out that because of one burnt-out filament, you will have to change two lamps, which is uneconomical.
Halogen lamps are installed at the manufacturer's factory. This is a modification of conventional incandescent lamps, the bulbs of which contain pairs of halogens - iodine and bromine. This makes it possible to increase the heating of the coil and increase the brightness of the glow. However, the temperature of the flask, which has to be made of quartz glass, also increases.
In addition to halogen lamps, the following are installed in the headlights of a VAZ 2114 car:
- incandescent lamps. They are cheap, but dull and short-lived. Currently practically not used;
- xenon lamps. They have increased brightness because the plasma arc glows. They do not have filaments, therefore they are more resistant to stress. The disadvantage of xenon is the need to use an ignition unit, which takes up extra space;
- LEDs. These are relatively new lamps that have managed to win the preference of most car enthusiasts. They are safe, the supply voltage is only 12 V. The service life is up to 50,000 hours (halogen - up to 2000). Practically do not heat up. The disadvantage is the directional emission of the light flux. While halogen or xenon samples shine evenly in all directions, LED lamps emit in one direction, so several crystals mounted on a cylindrical base are used at once. In addition, the LEDs are equipped with diffusion lenses that evenly distribute the flow in all directions.
Despite the clear advantage of LED lamps, it is recommended to choose halogen designs. This is required by regulations that prohibit tampering with the vehicle's structure. Unauthorized replacement of lamps can result in a high fine or deprivation of your driver's license. Bulbs in the VAZ 2114 headlights should be installed only standard ones, which are installed at the manufacturer.
Main conclusions
The VAZ 2114 headlights have halogen lamps with an H4 socket by default. These are two-strand designs in which one thread is responsible for the high beam and the other for the low beam. In addition to halogen, the following can be used:
- incandescent lamps;
- xenon;
- LED bulbs.
Most users prefer LEDs, but according to the rules it is necessary to use standard halogen designs. Express your thoughts about lamps for the VAZ 2114 in the comments.
- Luminous flux: 1500 / 1800 lm
- Power: 15 / 16 W
- Warranty period: 1 year
- Luminous flux: 1800 lm
- Power: 18 W
- Warranty period: 1 year
- Luminous flux: 1600 lm
- Power: 20W
- Warranty period: 1 year
- Luminous flux: 80 lm
- Power: 0.8W
- Warranty period: 1 year
- Luminous flux: 800 lm
- Power: 5W
- Warranty period: 2 years
- Luminous flux: 25 lm
- Power: 0.4W
- Warranty period: 1 year
- Luminous flux: 150 lm
- Power: 1.3W
- Warranty period: 3 years
- Luminous flux: 150 lm
- Power: 1.3W
- Warranty period: 3 years
- Luminous flux: 120 lm
- Power: 0.85W
- Warranty period: 1 year
- Luminous flux: 2000 lm
- Power: 17 W
- Warranty period: 3 years
- Luminous flux: 1100 lm
- Power: 11 W
- Warranty period: 1 year
- Luminous flux: 800 lm
- Power: 21 W
- Warranty period: 1 year
- Luminous flux: 260 lm
- Power: 4.3 W
- Warranty period: 1 year
- Luminous flux: 80 / 400 lm
- Power: 0.6 / 3.6 W
- Warranty period: 1 year
- Luminous flux: 80 / 260 lm
- Power: 1.5 / 4.3 W
- Warranty period: 1 year
- Luminous flux: 150 lm
- Power: 1.3W
- Warranty period: 3 years
Selecting a lamp for a VAZ-2114 by manufacturer and brand
Lamp type - H4. One lamp combines both high and low beam.
Based on the two components of the headlight design, the lamp is selected at the discretion of the driver. The essence of the H4 lamp, consisting of two filaments, has not changed. A halogen incandescent lamp differs in that the bulb is saturated with bromine or iodine vapor.
The flask is made of quartz glass. This increases the service life and the maximum temperature of the filament. At the same time, the brightness of the headlights increases, which is the most attractive factor in the popularity of the product.
The range of halogen H4 lamps is focused on high-quality lighting, among which lamps with increased light output are distinguished.
In accordance with European safety requirements, the following products meet the best performance indicators:
OSRAM COOL BLUE INTENCE, no deviations in electrical energy consumption were noted during testing. Low and high beams comply with GOST. Does not blind drivers of oncoming or passing traffic.
In low beam mode, due to the use of a power of 80 W, superiority remained with IPF SUPERDEAM, but at a long distance the illumination was only 70 meters.
NARVA H4 RANGE POWER left great confidence with excellent results in both modes.
The KOITO WHITE lamp from a Japanese manufacturer, showing high-quality light output, does not affect the technical condition of the wiring or other elements of the headlight. Coupled with excellent luminous flux contours, it provides low and high beam illumination areas. The functionality extends to coverage angle and shadow boundary of the path. The protection factor against glare of oncoming cars is also a significant advantage of the device.
What lamps are in the dimensions of the VAZ 2114
The standard equipment of VAZ 2114 cars includes installation of the following lamps in the dimensions and front/rear headlights:
- Front dimensions – W5W;
- Stop lights/side lights – P21/5W.
Recently, users are increasingly replacing standard light bulbs in the dimensions of the VAZ 2114 with LED ones, since they have a much longer resource, consume less energy and shine with a beautiful color. In order for the diodes to produce spectacular side lights with a bluish tint, weak 1-5 diode lamps are not suitable. It is better to use 12-15 diodes.
They will give a bright white glow in the daytime, and in the dark this glow will be blue-white. It is advisable to replace all side lights, or at least the front or rear lights on both sides, with such lamps at the same time. In this case, the car looks organic, and the difference in the shades of the glow of the dimensions will not mislead other road users.
A few final tips
To avoid injury and replace correctly:
- wait a while after turning off the headlights - halogen headlights get very hot and if you don’t wait, you can get burned;
- do not choose too bright headlights - even burnt-out wiring is not as important as the lives that can be crippled by a driver blinded by you;
- Always carry out work with gloves - temperature, cracked glass, unexpected condensation, all this will not harm you if you protect yourself.
Published February 09, 2018 Sources used:
- https://vaz-2114.info/kakie-lampochki-stoyat-v-farah-vaz-2114-i-drugih-svetovyh-priborah/
- https://svetilnik.info/avtomobilnyj-svet/lampy-vaz-2114.html
- https://carfrance.ru/kakie-luchshe-lampy-postavit-v-fary-vaz/
- https://remontvazov.com/kakie-lampy-luchshe-postavit-v-fary-vaz-2114
Replacing low beam lamps on a VAZ 2114, 2115 car
According to traffic rules, a car driving on a highway must have low-beam headlights on. This, of course, shortens the life of the lamps, which causes their frequent failure. On the VAZ 2114 or VAZ 2115 models, lighting is used both during the day and at night, which requires vigilance and control over the integrity and quality of the lighting system.
In order to diagnose breakdowns of lighting fixtures in a timely manner, you need to regularly inspect your car.
Once you have discovered a breakdown of the high or low beam products, proceed to fix the problem - replacing the element. Contact specialists at a service station or replace it yourself, which will save your money.
The headlight unit on the VAZ 2114 consists of the following components:
- housing (plastic);
- diffuser;
- reflector.
Model 2114 can be equipped with movable and fixed lighting systems with single or double filament bulbs.
Types of headlights
The headlight unit on a VAZ can have two design options:
Outwardly they are very similar. Experts distinguish them by small details - the shape of the blender arches or the rotation diffuser. Kirzhach has a long, narrow reflector with a partition and no top wall. Bosch has walls on all sides, and the reflector is short. For an inexperienced person, it is easier to distinguish these designs by the shape of the plug on the back of the headlamp - Bosch products have one and are made in the form of an oval. These subtleties are not accessible to everyone, but only to experienced car enthusiasts.
Important! They have no fundamental difference in design, but installing one instead of the other will not work. Therefore, you should know which headlights will fit the body of a given car, so as not to find yourself in a difficult situation when purchasing. In addition, Kirzhach headlights are more difficult to disassemble than Bosch.
There are also Chinese analogues of headlight units for the VAZ 2114. They can have any shape, since they are not subject to general standards. Purchasing such products is a big risk. You can, with equal probability, get suitable headlights, or have lighting fixtures that do not match the shape of the sockets.
What bulbs to put in the headlights of VAZ 2109, 2112, 2114, 2115
Owners of domestic cars in most cases are faced with the problem of a lack of lighting from those bulbs in the headlights that are installed by the manufacturer. Typically, the VAZ company equips its models with Philips + 30% bulbs. These lamps are of fairly high quality and provide a clear demarcation line on the road. But if these properties are not enough for the car owner, then there are many options for replacing headlight paws.
What kind of bulbs should I put in the headlights of a VAZ?
Standard light bulbs for cars of the VAZ 2109, 2112, 2114 and 2115 brands can be with increased luminous flux brightness. For example, Philips +50%, +80%, +100% or OSRAM +50, +90%. The special composition of the gas in the bulb of these lamps makes it possible to achieve greater light brightness and work much more efficiently in comparison with the factory version. The disadvantage of this product is the relatively shorter service life of these lamps.
Install LED lamps for car headlights
Today, LED headlight bulbs have become especially popular among owners of VAZ 2109, 2112, 2114 and 2115. Installing such bulbs in the headlights of your car is very profitable and economical. Despite the fact that the cost of this product is several times higher than the usual standard options, the service life of such lamps is quite long. In addition, they consume much less electricity and are able to work efficiently at maximum air temperatures. If you install the LED light bulb correctly, it will be very resistant to vibrations and shocks. Installing an LED in a car's brake light will allow the driver of a car catching up with you to clearly see your dimensions on the road.
Halogen lamps for VAZ 2109, 2112, 2114 and 2115 cars
The chemical composition of the gas from halogen lamps in headlights allows for excellent light output during operation. Which is directly a big advantage of these lamps. High-quality illumination of a huge span of the road and a long service life make halogen lamps a popular product for car enthusiasts.
Today on sale you can find “halogen” lamps with increased brightness, all-weather models, with increased power and temperature. The secret of the popularity of this kind of lamps also lies in their cost. High quality products and affordable prices are what every car driver needs.
Xenon headlight bulbs
The beauty of the appearance of xenon headlights speaks of the prestige of the car and the good taste of its owner. But, besides the fact that xenon looks expensive, it also has a number of undeniable advantages over other models. Xenon bulbs for VAZ 2109, 2112, 2114 and 2115 provide the greatest amount of light during operation and also have an unlimited service life.
The light that these lamps provide is clean and bright, which greatly helps the driver on the road at night. The only drawback of such lighting is that it can blind the driver of an oncoming car. But this can be fixed; you need to switch the headlights in time.
In order to finally decide which bulbs to put in the VAZ headlights, you need to weigh all the advantages of each option. This will make it possible to understand which light will be most suitable for you for safe driving.
Types and features of lamps
The need to change low beam lamps may arise in 2 cases, namely:
- upon failure;
- when replacing lamps that are included in the standard (standard) package with brighter ones.
The following types of light bulbs can be used in the headlights of the VAZ 2114 model:
- Incandescent lights produce quite dim light and often fail. However, their clear advantage is their affordable cost.
Incandescent lamps VAZ 2114
- Xenon - models of such lamps have a glass bulb filled with gas (xenon). Compared to incandescent lamps, they shine much brighter. However, if you do not install special lenses (to adjust the luminous flux of such a light bulb), the light of such headlights will blind car drivers who are moving towards you.
Xenon lamp
- Halogen - presented on the modern market in a very wide range (from all-weather/universal to very bright glow).
Halogen lamp
Universal (all-weather) halogen lamps have a coating on the inner surface of the bulb, which gives the light output a slightly yellow tint. This provides the driver with better visibility in bad weather (during fog, snowfall, etc.).
At the same time, cars equipped with such lamps are better visible in bad weather to drivers of cars moving along the highway in the opposite direction. These points make driving safer, significantly reducing the likelihood of accidents on the road.
The most commonly used products are from manufacturers such as Philips and Osram.
What and how can you change the standard lights?
The easiest way is to change the appearance of your car - replacing the light fixtures with more original ones. The range of flashlights for the VAZ 2114, of course, is not particularly wide, but there is plenty to choose from. And the simple way is because all tuning comes down to “removing the standard ones, installing the purchased ones.” Let's wander around the shops and see what we can find for our VAZ 2114.
Osvar flashlights are the most popular option among car enthusiasts. They are relatively inexpensive and finding them is not a problem. The only thing is that the manufacturer uses ordinary light bulbs in it, but if desired, you can replace them with LED ones yourself. Although for most car owners this is not relevant.
Tail light “Osvar” on VAZ 2114
Skyline style. Also a “lamp” option, but it looks completely different.
Tail light Skyline style for VAZ 2114
ProSport RS-02020. This is already an LED option. True, the light bulbs responsible for the different signals in them are clearly not in their places, which may not please other road users, and the traffic police inspector will definitely not understand you.
Tail light ProSport RS-02020
ProSport RS-02020-T. The same “ProSport” with mixed up signals, but with tinted windows. A real gift to the traffic police!
Tail light ProSport RS-02020 with tinted glass
ProSport RS-07490. Option with light bulbs. Same manufacturer, same misunderstanding - the turn signal is located between the marker and the brake light. You can't make it up on purpose.
Tail light ProSport RS-07490
"Zigzag" 0013L. This LED miracle is offered by manufacturers from Togliatti, the birthplace of the VAZ car. Here at least the signals are more or less in place.
Tail light "Zigzag" 0013L
We'll finish our shopping trip here, although there are still many miracles there. Just watch a short video about a flashlight with red turn signals and move on to the next point.
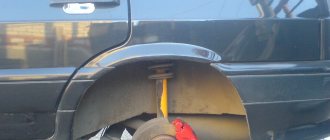
How to remove tail lights
It's time to figure out how to remove the stock lights to install new ones. To work, you will need an 8 socket wrench with an extension and a Phillips screwdriver. We open the trunk door, use a Phillips screwdriver to dismantle part of the upholstery so that, by bending it, you can gain access to the entire rear part of the lamp.
The upholstery is attached to the body using self-tapping screws
We find 4 nuts around the perimeter of the light fixture and unscrew them with a wrench
The lamp is secured with four nuts
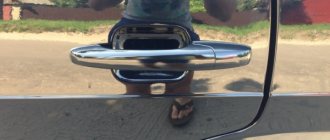
Carefully remove the connector by pulling it towards the central axle of the car. We don’t swing it, we just pull it, trying not to twist it!
Removing the power supply
Pull the light from the outside of the car toward you and remove it.
Now the lamp can be removed
We install the new light fixture in the reverse order.
Why don't FZH work?
There are several reasons why FZHs can fail. Let's try to understand them.
Replace the burnt out bulb with a new one, check the condition of the contacts
Check, replace if necessary. A fuse can lead to loss of functionality of the entire contact circuit
There is no ground on the board
The board is located under the lamp. Simple repair to fix the problem
The contacts have oxidized and become coated
Cleaning contacts is not difficult
You will have to diagnose the condition of the circuit, check the integrity of the wiring using a tester and a visual method
The contact on the headlight film has burned out
You will need to clean the contacts and replace the elements if necessary.
There is a breakdown in the gearbox mechanism
In such a situation, the issue of gearbox malfunction will have to be resolved.
The frog (sensor) has failed
Check the condition of the reverse sensor, replace the device if necessary
There are a lot of reasons for the failure of the FZH, so the driver must know exactly how to eliminate this or that type of breakdown.
Removing the rear light board
To remove the board, you will need to perform a few simple manipulations:
- Open the trunk;
- Remove everything unnecessary from the space so that it does not interfere with your work;
- Remove decorative trim;
- Remove the plastic casing;
- Remove the back panel;
- Having gained access to the socket and the license plate lamp, you can remove the devices;
- Remove the reversing sensor mounting studs and the headlight itself.
Many people confuse the reverse sensor with the speed sensor, since these devices are located in close proximity to each other.
Checking the functionality of the sensor
If the taillights do not turn on, the culprit may be the reverse sensor, that is, a frog in the people.
Remove the contacts from the sensor and clamp them together, then turn on the ignition. If the light appears, the sensor needs to be replaced. If there is still no light, the integrity of the circuit is broken, but everything is fine with the frog itself.
Replacing the sensor is quite simple:
- Place the car on a pit or overpass;
- Apply the handbrake;
- Remove the protection from the bottom, opening access to the gearbox;
- Remove the contacts from the old sensor;
- Place an empty container under the sensor and remove the frog. The container is needed because when the device is removed, oil will leak out of the gearbox;
- Remove the old frog, insert a new one in its place;
- Let the car sit for a while;
- Check the oil level inside the gearbox;
- If necessary, add oil to the required level;
- Reassemble.
Such repairs can be done with your own hands, and the cost will be approximately 250 rubles. This is exactly how much a new sensor for a VAZ 2114 costs now.
Problem with the light bulb
It is not uncommon for taillights to stop functioning normally due to the failure of the bulb itself.
- To replace it, you need to disconnect the block with wires and remove the contact panel from the flashlight. Here you just need to squeeze the side latches to remove the plastic panel;
- Apply a little pressure on the cartridge and unscrew it counterclockwise;
- Check the condition of the contacts and wiring;
- Screw in a new light bulb that matches the previously installed one;
- If necessary, before screwing in the new lamp, clean the contacts and test the wiring with a tester. There may be a break in the circuit, so a new light bulb will not work.
Fuse problems
Quite often, taillights fail to work due to a blown fuse. It is advisable for all VAZ 2114 owners to know where this fuse is located and how to replace it.
The required fuse is located in the corresponding fuse block - on the left under the steering wheel. You can remove it with one movement of your hand; you don’t have to twist or tighten anything.
Make sure by visual inspection that the middle part is intact. But viewing a burnt-out jumper this way is not always convenient. It is better to turn on the side lights without removing the fuse. Arm yourself with a voltage tester. If one end lights up and the other doesn't, then the fuse has actually failed.
If a fuse breaks, you should check the condition of all wiring, as it can lead to more serious problems in the car.
To change the fuse, remove it from the block using tweezers, then install a new device in place of the old device.
In order to avoid problems with rear optics and reversing lights in particular, we recommend that you think about the issue of tuning and improving this unit. Today there are many options for changing the appearance of the car, which at the same time increase the reliability and efficiency of the entire rear headlight system.
Replacing the lamp
So, if the low beam on a VAZ 2114 does not work, then most likely the reason lies in a burnt-out lamp. Most often this happens if the lighting elements have been replaced a long time ago. Although, new lamps often burn out, which is due to the large number of low-quality products on the auto parts market.
Of course, before replacing a light bulb, you will first have to deal with its choice. The VAZ 2114 uses double-thread paws of the H4 standard, which are responsible not only for near but also for high beam lighting.
Lamps on the market may differ in their operating principle, on which many of their characteristics depend. Below we will take a closer look at all their types:
Currently they are the most common.
Among the advantages of halogen bulbs are the following:
- Low price;
- Does not require installation of additional equipment;
- They illuminate the road well in fog, rain and snow.
The disadvantages include fragility, as well as a relatively low luminous flux power - no more than 1550 Lm.
Provide a more powerful luminous flux - up to 3300 lm.
In addition, they have other advantages:
- They are more durable;
- They are distinguished by a white or bluish glow, as close as possible to daylight.
However, along with the advantages, they also have disadvantages, which include:
- High price;
- The need to install ignition units;
- Turn on with a slight delay;
- Poor lighting of the road in wet weather.
They are a new type of lighting elements. Their advantages include durability and low energy consumption. As for the power of the luminous flux, it is somewhat inferior to xenon.
LED lighting elements are also quite expensive and require the installation of ignition units, which is a disadvantage.
Note! It is advisable to change the lamps in pairs, as this will ensure the same luminous flux from the left and right headlights. In addition, they have almost the same durability, so if, for example, the left headlight bulb fails, the right one will probably soon stop burning as well.
Reasons for failure of dashboard lights
The dashboard lighting performs several important functions in parallel:
- control. The lamps light up when failures or malfunctions of individual components occur;
- informational. Notifies the driver in real time about the status of important vehicle systems;
- decorative In a dark interior, beautiful lighting on the instrument panel decorates and enlivens the front part of the cabin.
The main reason for the failure of light bulbs in the instrument panel is difficult operating conditions - heating, vibration, power surges. This significantly reduces the life of the lamps and causes a lot of problems:
- burnout of filaments in halogen devices, burnout of current-carrying paths in LED lamps;
- broken wires or the appearance of an oxide film on the contacts;
- problems with the fuse box or contact board;
- somewhere shorted to ground.
Before you try to change the lamps, you should accurately determine the cause of the problems that have arisen, otherwise you will not be able to get the expected result
It is important to know the condition of the fuses and the condition of the wires. The insulation on them often frays and begins to short to ground.
It is necessary to inspect the wiring and replace problematic connections. In addition, you need to clean the contacts. The terminals oxidize and the ability to conduct current decreases. This applies not only to Ladas; such danger is a common “disease” of most cars.