The manufacturer installs audio systems of various types on Lada Kalina 2 and Lada Granta cars. In this review, we will look at the operation of the audio system (FM, USB, SD card, Bluetooth, Handsfree) with catalog number for Lada Granta: 2190-7900010-20 and Lada Kalina: 2190-7900010-40, the only difference between them is in the fastenings. These standard radios are Kalina 2 and Granta, installed on the “norm” package.
First impressions
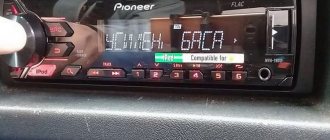
At first glance at the radio, you can say that it fits harmoniously into the interior of the car. There is nothing superfluous that would raise questions from a design point of view. The build quality is pleasing; it is worth noting the smooth, smooth movement of the buttons, the absence of backlash and the plastic of the radio that is pleasant to the touch. The radio backlight is green.
The radio is turned on by pressing a special button in the upper left corner of the radio. Loading occurs within a few seconds, during which the inscription “Lada Kalina” is briefly displayed on the display.
Firmware for Lada Granta Lux radio, do it yourself
For this we need:
- GPS receiver;
- Huawei 3G modem;
- SD card;
- USB – splitter (hub).
The procedure itself for flashing the Lada Granta Lux radio is very simple.
- First of all, you should clear the SD card from the previous information in FAT16.
- The information data (files) of the firmware (Chain.bin, chain.lst, NK.bin, TINYNK.bin) are copied to the root folder of the SD card. The root folder is the memory card itself, without any internal folders. Opens when you turn on a flash drive or any other media.
- The flash card is removed from the USB port.
- The SD card is inserted into the car's multimedia system.
- Car radio Lada Granta Lux, reboots. In this case, hold down the volume button for 15 seconds.
- During the reboot, an update occurs, after which the auto player boots into desktop mode.
- We move to the screen function adjustment mode. Click on the Calibration/Recalibrate icon, and click a second time on the screen itself, while the countdown is happening on the device display.
- We reboot the system again, but with the SD card inserted.
The firmware for the Grant Lux head unit is complete.
Possible problems with the operating system after flashing the firmware
Very often, after the installation of the improved version of the 2015 OS on the multimedia system of the Lada Granta Lux car is completed, the radio tape recorder freezes on the Lada manufacturer's emblem. This may happen due to the fact that some storage medium is inserted into the USB port.
Also check whether an empty operational file has been created in the USB root folder, which after a reboot displays the Windows desktop on the monitor.
Reformat or even replace the CD card and repeat the firmware update from the very beginning according to the proposed scheme.
If the actions we recommended did not help, try turning off the power supply to the radio for at least five minutes.
By the way! All operations related to the reinstallation of programs on the standard radio installed at the factory are performed at your own responsibility. In this case, the manufacturer's factory warranty is void.
Stock (standard standard) firmware for the multimedia system installed in the Granta Lux car, as well as modified, home-made versions of the basic Windows operating system that vary in level of performance and functionality, can be found in large quantities on numerous automotive forums on the Internet.
It should be noted that the official manufacturer AvtoVAZ does not provide any special information on this matter. That is, the information on the firmware itself is present on the official website, but has not been updated since the release of the first model of the car itself.
Due to these circumstances, car enthusiasts are forced to find and share firmware options themselves with others who want to update the OS of their cars, for better use of all the options and functions declared by the manufacturer.
We bring to your attention video instructions on how to download the firmware of the Lada Granta Lux radio on 4 PDA, with subsequent installation on the MMC.
Radio capabilities
On the right side of the radio there is a USB connector, which is designed to connect:
- USB Flash card (USB 2.0 and 3.0 up to 64 GB);
- USB Flash player with a memory capacity of at least 1024 MB;
- USB HDD with FAT32 file system;
- Mobile phone (only in charging mode).
On the left side of the radio there is a slot for SD cards. SD Memory Card Slot: Supports SD, SDHC cards of size 32 X 24 X 2.1 mm. SDHC up to 32 GB, SD up to 32 GB.
The file allocation table (FAT) of the connected device must be version FAT16 (2 GB). The maximum number of primary partitions should be no more than 4. It is advisable that the directory tree of the connected device have no more than eight levels. There should be no more than 1000 files in one directory.
While playing files, the display shows all the necessary information about the track. The playback source is selected using the AUDIO button on the left side of the radio. The radio has equalizer presets (JAZZ, POP, CLASSICAL, VOCAL and USER). The range of timbre adjustments for bass, treble, balance, front/rear balance is from “-7” to “+7” units.
The radio has Bluetooth and Handsfree functions. You can connect your phone by long pressing the handset button. When pairing on the phone, the inscription “MMC12” should appear in the list of found devices, the default password is “0000”. After successful connection, the BT icon will appear on the display of the radio. There is no phone book on the Kalina 2 and Grant radio, but it is possible to save up to 6 numbers in the radio’s memory. The audio system also remembers the last outgoing and incoming calls. The manufacturer does not guarantee operation of a phone in Handsfree mode that uses two or more SIM cards.
The radio allows you to listen to audio files from your mobile phone. To do this, you need to connect your phone to the radio via Bluetooth and launch the player on your phone. The manufacturer states that certain cell phone models may not work correctly with this radio, but this is not a sign of a malfunction.
The Kalina 2 and Granta radio has its own battery, which allows you to save user settings after disconnecting the battery for 10 days.
How to eliminate some shortcomings of the multimedia system
Sometimes, in order to start using new media, you need to purchase it. She will certainly be able to cope with tasks that are standard. But you can’t expect more from it without additional modifications. Without this, you will not be able to configure the navigator or connect a rear view camera.
It must be said that many multimedia that modern foreign cars are equipped with are significantly inferior in their capabilities to the MMC Grant. This system is unique and quite competitive. If there are minor problems in the operation of the MMC, then updating the MMC firmware will eliminate them. Let's look at how to make firmware for 2014.
Video review of the radio
The standard radio for Kalina 2 and Grant has all the necessary functions for a modern car. The audio system works flawlessly, there are no freezes, all operations are performed instantly. The build quality is at a high level. The only disadvantage is the lack of a CD/DVD drive, but nowadays discs are becoming a thing of the past. The standard radio of Lada Kalina 2 and Granta without an LCD display is a good alternative for those who find physical buttons more convenient than a sensor.
Download the manual for operating the radio (from page 173): To download files you need to log in to the website
Let us remind you that AvtoVAZ installs radios with an LCD display on the “Lux” configuration.
In a modern car, not only the engine and chassis are of decisive importance, which allows us to judge the comfort of movement.
At the time of the new era of multimedia technologies, it is becoming extremely important to provide the car with high-quality sound and image, providing the driver and passengers with a level of comfort that will allow them to fully enjoy the journey in the vehicle.
Removing the standard radio in Grant Lux
The difference between grants of the luxury configuration: the MMS (multimedia system) installed from the factory. This is a 2 din device.
To remove standard acoustic grants:
- take a knife or plastic spatula to dismantle the acoustics and disconnect the decorative trims to the right and left of the radio. It is not necessary to take pictures;
- in the gap between the cover and the panel we find the head unit lock. There are two of them on both sides. Press it out with a screwdriver;
- we take out the GU on ourselves.
Everything is described in detail in the video:
Replacing the standard MMC in Grant
The process - after removing the acoustics, we install a new system.
Difficulties: you may have to finish the fastenings of the new system for VAZ ones. Plus you need the right frame. The factory MMC frame may not fit.
Radio on Lada Granta: multimedia happiness
Owners of Lada Granta, having acquired a new car, want to bring everything in it to perfection: they do anti-corrosion treatment, install an alarm system, and tint the car. But there is one more procedure that every car enthusiast does when he acquires a brand new Granta - this is installing a radio on the Granta.
There is probably not a single person who does not like to listen to music, and doing it in your car is doubly pleasant.
This article will help all car enthusiasts who own such an attractive and reliable car to install a radio on a Lada Granta on their own, without resorting to the help of such expensive and sometimes unprofessional craftsmen. Moreover, the result of self-installation will be no worse than installation by a specialized service.
It should be said that the manufacturer significantly eased the fate of the owners of the Lada Granta car, since it took pity and initially installed all the necessary connecting wires to power the radio and the speakers themselves.
Compared to the “ten” and “twelve” families, whose owners were forced to carry out wiring procedures from start to finish, Lada Granta owners are freed from such a tedious and expensive manipulation.
Bottom line
Not every minimum configuration of a car today will please you with the presence of a standard radio. If, nevertheless, such a device is present in the database, it is far from a fact that it can please you with its informative interface and sound quality. If your version of the car has a push-button radio, then, as we found out from the article, installing a more modern radio, as well as the subsequent connection of the radio, is not a difficult matter, the main thing is to approach everything correctly.
The LADA Granta model also did not acquire the role of an exception in this list. After all, the trend of a modern car suggests the owner’s ability to carry out exciting measures to improve and tune his “iron horse,” and you shouldn’t be upset, because a push-button radio is easily replaced with a modern one.
How to connect a radio to a Lada Granta: course of action
The very first manipulation that needs to be performed in order for the installation of the radio on the Granta to be successful with your own hands will be the dismantling of the plastic pocket installed in the place of the future audio system. This procedure is easy to perform by using a screwdriver that has a flat blade.
When removing the pocket, the driver will find that on the reverse side there are slots where ISO connectors are inserted - connectors for connecting a car radio. These connectors are held quite tightly in your pockets, which means you don’t have to look for them on the panel for a long time to connect all the connections.
Next, we remove the metal frame from the car radio and install it in the place where until recently there was a plastic pocket. Reliable fixation can be achieved by unbending the frame antennae.
The next step will be to connect the connectors to the car radio and install it in the frame already installed in the niche. When performing the installation, the installer will only need tools to change the shape of the holes (this could be a saw or a file). It should be taken into account that all sizes are already made in accordance with the housing standards for 1 DIN car radios.
How to install
Installation of the radio on the Grant is carried out in a standard socket located above the climate control controls. Thanks to the use of a factory wiring harness, accelerated connection of acoustic equipment is ensured. Laying additional lines is required when using a low-frequency loudspeaker in the luggage compartment or high-frequency tweeters mounted on the front roof pillars.
All installation work is carried out indoors with artificial lighting; in clear weather, installation in open space is allowed. For safety reasons, it is necessary to disconnect the standard battery from the vehicle's on-board network.
Car radio
Step-by-step instructions for installing a radio in a Lada Granta of the “standard” or “norm” modifications:
- Hook the central pocket-plug by the edges to remove the latches from engagement with the front frame.
- After removing the element from the socket, it is necessary to disconnect the plugs of the factory wiring harness, located in special sockets on the rear part. The car has 2 8-pin connectors for connecting power and speakers.
- Fold the glove box housing down; there are travel stops on the upper part of the rear wall that need to be disengaged from the dashboard frame.
- To expand the working area, it is recommended to remove the cover by pulling it towards you.
- Raise the decorative floor covering of the car along with the soundproofing mat near the passenger seat. Pull out the factory antenna cable equipped with a plug that needs to be extended to the installation location of the player.
- Place standard slides for attaching the radio using special bendable elements.
- Further installation of the radio in Grantu is carried out after switching the loudspeakers.
Installing the stock radio is slightly different from the procedure described above:
- Since the standard frame is designed for 1DIN size equipment, a replacement unit is required. To do this, you will need to carefully pry and remove the plastic climate control controls. The frame itself is fixed with latches, which are removed one by one from the mounting sockets using a plastic spatula.
- For final dismantling, it is necessary to disconnect the connectors connected to the control buttons for the air conditioning, hazard warning lights and heated rear window. It is necessary to make notes that will allow you to correctly connect the plugs on the new panel.
- Remove the keys, climate control parts and ventilation deflectors from the center console, which are transferred to the new unit.
- The “luxury” version of the cladding, designed for mounting a 2DIN radio, consists of 2 sections. The lower part is equipped with additional fastenings with screws, under which it is necessary to install counter elements. The parts are placed in standard places around the perimeter of the instrument panel in the upper and lower parts of the landing window.
- Place a separate adapter frame, which is supplied with the head unit, in the mounting socket of the radio.
- Place the cladding in place, securing the part with latches and screws. The switching cables for acoustic equipment and control buttons are routed through the corresponding holes into the car interior.
- Install a standard player into the guide slides, having previously connected it to the on-board network and antenna. The assembly is secured with side latches; if dismantling is required, the clamps are bent with a screwdriver.
- Install a horseshoe-shaped decorative cladding located around the perimeter of the central part of the decorative panel. Reinstall the plugs for the hazard warning, air conditioning and heated glass buttons, and then place the keys in the standard sockets.
When installing non-original equipment of 2DIN size, the owner is faced with the impossibility of placing the radio in depth. To ensure the fit, trimming of the plastic elements located in the instrument panel is required. The player is fixed in the mounting shaft located in the window of the central cladding; the display is framed from the outside by a transition frame.
Acoustics
Basic versions of cars have standard acoustic wiring installed inside the doors and interior. The plastic door trims do not have holes for speaker diffusers; the owner needs to cut the channels himself. For marking, the standard decorative frame of the speaker is used; you need to cut a hole corresponding to the inner circle. The channel must coincide with the surface of the diffuser; the speaker moving beyond the door panel material leads to a deterioration in the sound picture.
The standard speaker ring is attached to the plastic casing with screws and is covered with a decorative mesh on top. The speaker mounts directly to the factory holes on the inside metal door panel. If the diameter of the column is smaller than the size of the hole, then fastening is carried out through a wooden podium.
The connection point between the cables of the loudspeaker and the on-board network is protected by a special insulator.
The rear speakers are installed through special plastic adapters. On the Lada Granta liftback it is possible to use oversized speakers that cut into the luggage compartment shelf. To protect diffusers, it is possible to use original meshes produced by .
To install the elements, it is necessary to completely cut out the plugged hole in the door panel.
In this case, it is necessary to form grooves intended for installing latches; the contours of the channels are outlined on the rear part of the part.
Installing speakers in the front doors on a Lada Granta
Installation of a multimedia system is not limited to installing a car radio. For normal operation of the entire audio system, it is also necessary to install acoustics and speakers in the doors of the Lada Granta. To cut holes in the plastic door trim, it is better to remove it from the car.
We remove the door handle, then dismantle the plastic casing of the door opening lever and the glass position adjustment lever.
The front door trim already has a hole for the speaker, equal to 16 cm. Next comes connecting the speaker and installing it in its original place using 4 screws, followed by installation of the door trim and installation of the speaker grille
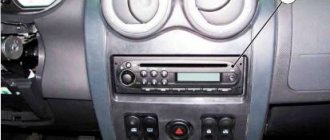
Installing a radio
We pry the plug of the car radio socket from below and take it out. The socket contains plugs for connecting: USB, ISO, AUX, FAKRA (antenna).
To replace the standard audio system, you need to remove the trim and deflectors. To do this, you will need to disconnect the ground (disconnect the minus terminal from the battery). Next, remove the trim, prying it from below, and disconnect the block from the emergency parking button of the car. Remove the deflectors (4 screws for the T20 head).
Behind the air ducts, again unscrew the 4 screws. We drag the car radio towards us, disconnect the connectors with the wires. That's it, they took it off. Installation of an alternative radio takes place in the reverse order. Watch the wires during installation, try not to pinch them. Please note that a 1DIN radio is suitable for Lada Vesta.
Installation of an audio system on Granta of different configurations
In the “standard” configuration in Grant, power wiring harnesses are already pre-installed, which are located in the console opening. The wires are connected exclusively to the car radio, so don’t be surprised if you can’t find them in the doorways.
In the Lada Granta Norma, the power wires coming from the console are already connected to the doorways. You just need to connect the sound system in full accordance with the assembly diagram. It often happens that the pre-installed door wiring does not match with some speaker connectors. Here we get out of the situation by purchasing additional suitable wires.
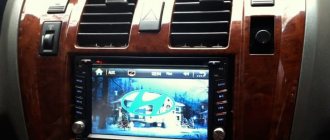
During assembly, the Lada Granta “luxury” is equipped with a special touchscreen multimedia system and already installed speakers. The improved radio is complemented by a Bluetooth system and a 5-inch display with a linear output.
Among other things, the built-in car radio allows you to connect a memory medium – a USB 2.0 flash card, through which you can listen to recorded music.
Removing the standard radio in Grant Lux
The difference between grants of the luxury configuration: the MMS (multimedia system) installed from the factory. This is a 2 din device.
To remove standard acoustic grants:
- take a knife or plastic spatula to dismantle the acoustics and disconnect the decorative trims to the right and left of the radio. It is not necessary to take pictures;
- in the gap between the cover and the panel we find the head unit lock. There are two of them on both sides. Press it out with a screwdriver;
- we take out the GU on ourselves.
Everything is described in detail in the video:
Replacing the standard MMC in Grant
The process - after removing the acoustics, we install a new system.
Difficulties: you may have to finish the fastenings of the new system for VAZ ones. Plus you need the right frame. The factory MMC frame may not fit.
Self-installation of car radio in Granta standard
The people's car Lada Granta will delight you with the presence of an audio system only in the top-end configuration. A radio is not provided for the Standard and Norm options, so the owner will have to buy it separately. The choice of devices is huge and can satisfy any, even the most demanding, requirements. Installing a radio in a car does not require much effort.
The designers of the Lada Granta designed and implemented full audio preparation in the car. This means that the owner of the Grant will not have to disassemble half of the interior, run wires along the floor and in the doors, and then put everything back together. A pocket for a radio is already provided in the console. It has a 1-din standard. If desired, you can install 2-din, but this will require cutting down the upper partition.
To install the radio, you first need to remove the pocket cover. It is removed quite simply - using a flat-head screwdriver. Wires with ISO connectors for connecting the device are hidden in the pocket. These connectors are an international standard and allow you to connect radios from almost all manufacturers. If the owner has chosen a radio with a different connector for his car, a special adapter can be used. Usually it comes with the device.
Also, owners of the Lada Granta Standard should not be surprised if they do not find wires for connecting speakers in the doors. This happens quite often. After the radio is connected to the wires, it needs to be inserted into your pocket. If the device matches the 1-din size, it will fit neatly and accurately. You will have to tinker with installing speakers in the front doors. Primarily due to the fact that the “seats” for the speakers will have to be cut out yourself.
To avoid damaging the casing during the process, it is recommended to remove it first. Lada Granta offers a niche for speakers with a diameter of 16 cm. If the speakers of the selected audio system do not fit into the standard size, you will have to use a grinder and carefully enlarge the niche. After the speaker is connected to the radio with wires, it is screwed with self-tapping screws. A protective plastic casing is mounted on top of the casing.
When choosing speakers, it is important to consider the thickness of the protective casing. The Granta's speaker is located in such a way that, due to the too thick casing, it is impossible to open the glove compartment lid with the door closed: it will rest against the speaker casing.
Common mistakes when installing a standard Granta liftback radio with your own hands
- when connecting additional terminals, manual twisting of wires is used instead of classical soldering;
- regular insulating tape is used on connections instead of heat-resistant sleeves;
- Incorrect connection of a large number of speakers on one branch leads to overload, heating, and short circuit.
Installing a sound amplifier
By liftback radio amplifier we mean:
- crossover installation;
- subwoofer installation.
The choice is up to the owner of the Lada Grant, as different goals are pursued: cleanliness, sound quality. Obviously, the cost of equipment will also increase. Crossovers are installed in the cavity of the glove box, since their dimensions do not exceed 100 x 150 mm and are rectangular in shape. Subwoofers are fixed in the luggage compartment. Equipment requires more space.
Connection of an external device is carried out strictly in accordance with the operating instructions:
- brown wire color: responsible for the operation of the system;
- black: power supply to equipment;
- yellow: audio module activation;
- red: settings and programming.
Related link:
Tuning Grants Liftback
At the very end, do not forget to connect a red wire with a pre-installed fuse to the positive terminal of the battery. It directly connects the amplifier (subwoofer) to the current source.
Installing two speakers in the front doors
- dismantle the door card, handle, control unit;
- We compare the standard cutouts for the speakers with the actual dimensions. If necessary, expand with a file or fine sandpaper. It is strictly forbidden to use cutting objects, as there is a high risk of damage to the plastic of the door card;
- we check for the absence of roughness in the hole, install the speaker, fix it, connect the standard terminals with wiring;
- we check the operation of the speaker, install the door card, and fix the metal grille to protect the speaker from mechanical damage.
Standard audio system for top-end Grants equipment
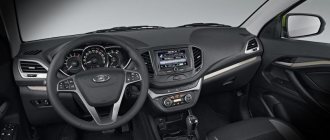
Unlike the Lada Granta in the Standard configuration, its luxury “friend” comes with a 2-din radio. The supplier of devices for AvtoVAZ products is one of the largest manufacturers of components for cars, Itelma. Lada Granta became the first Russian-made car to have such a new product in its standard equipment.
Needless to say, it is of considerable interest to car enthusiasts, because it is not just an advanced radio, but a whole multimedia complex. Of course, you shouldn’t expect much from him, but the very fact that AvtoVAZ has begun to develop a similar direction is already encouraging. The first thing that catches your eye is the large touch screen of the radio.
It is based on resistive technology, which is not as convenient as capacitive technology in terms of control, but allows uninterrupted operation in more severe conditions, for example, in severe frost. Capacitive screens in this regard are significantly inferior to resistive ones. Color rendering leaves much to be desired, especially in comparison with LED panels, but is quite decent. There are no problems with reading inscriptions in sunny weather.
The standard radio of the Lada Granta “Itelma” 2190 is controlled by WinCE 6.0.0.3 OS. The system boots quite quickly. Turning on the radio takes only a few seconds. An intuitive, Russified interface makes it easy to learn the capabilities of the radio even without a user manual (which, by the way, is not included with the equipment). The radio takes files for playback only from flash drives and SD cards.
How to flash the firmware
- Buy an SD card, format it in FAT, exFAT format;
- We download the firmware for free on the manufacturer’s official website;
- We save the data in the root directory of the SD card;
- We insert the SD card into the slot on the radio, start it, wait for the update to finish;
- Turn on and off the module;
- We customize the new interface for ourselves.
If the firmware is installed incorrectly, additional screen calibration using the CAN bus will be required. It is impossible to do this yourself, only in a service station. After successful flashing, the following is available:
- graphic equalizer;
- viewing photos, pictures, videos;
- improved sound quality;
- possibility of installing a navigation system.
Disadvantages of a standard radio
- Outdated firmware from the “box”;
- Not all options are initially available;
- The need for periodic software updates;
- Push-button interface.
Purpose and disadvantages of the radio
The main purpose of a car radio is to play music. Itelma MMC 2190 easily recognizes files with MP3, WAV and WMA extensions. The sound quality is quite decent. It is clean, there is no overkill with the tops or bottoms. During playback, artist and album information is displayed on the screen. The album cover may also be displayed, if there is one on the drive. The built-in equalizer offers preset sound options: rock, jazz, voice. Often, Lada Granta owners note that the 13 cm diameter speakers that come with the radio are weak.
The problem is solved by replacing or installing additional speakers on the rear doors. Sound insulation will also help improve sound quality. In addition to playing music, the multimedia center can display photos and videos. The software allows you to recognize the most popular photo files, such as JPG, BMP, JPE, PNG, JPEG, GIF. Pictures up to 1 MB in size are opened in one second. If the photo weighs, for example, 7 MB, then the radio will “slow down” for ten seconds.
The video player easily accepts the WMV standard with an extension of 320*240. The AVI 720 format turned out to be too complex for the multimedia center. The video plays with freezes, the sound lags significantly behind the picture. Therefore, owners who want to view higher-level videos will have to turn to various converters for help.
Connecting an audio amplifier and subwoofer
The sound provided by the standard Granta 2190 multimedia system does not suit everyone. Some owners are happy with the 2190's display, but not the sound quality, so they find ways to install custom amplifiers and subwoofers to get a more acceptable sound that suits their needs.
In order to independently connect the amplifier and subwoofer to the standard radio, you must first remove the lower part of the central panel. Having removed the console, we see mini iso type connectors and into one of them, the yellow one, we insert the plug of a pre-purchased adapter. Leave the blue and green wires as is. Those who have done this have noted that standard wires can no longer be used here, so mini iso is used.
Firmware for stock radio
In general, the Itelma radio has both strengths and weaknesses. The first generation of devices is disappointing with the lack of ability to connect a rear view camera and navigation, a slow-thinking processor, despite the declared Dual Core, and a purely symbolic amount of built-in memory (only 128 MB). Despite the fact that the presence of a radio with a color touch screen makes the Lada Granta look like a foreign car, its functionality is poor.
While Itelma developers, together with AvtoVAZ designers, are working to eliminate the shortcomings of the device, the owners of luxury Grant cars are independently bringing the radio to perfection. The easiest way to optimize the performance of the multimedia center is to reflash it. Alternative firmware can significantly expand the capabilities of the radio:
- add navigation;
- install a rear view camera, the presence of which greatly facilitates reverse parking;
- optimize the interface;
- connect the radio to the Internet via 3G;
- remove unnecessary options from the menu;
- add a convenient on-screen keyboard, etc.
The flashing operation is quite simple and will not take much time. However, if the owner is determined to change the software of the head unit, he must take into account that the warranty on the device will be lost. Firmware files are easy to find in the public domain. After the firmware is found and downloaded, it is written to an SD card that has been previously formatted in the FAT system.
It is not recommended to use a memory card with a capacity of more than 4 GB. At the time of flashing the firmware, all drives must be removed from the radio. Files from the “FirmWare” directory are copied to the root of the memory card. An SD card with firmware files is inserted into a working radio and rebooted by long (at least 15 seconds) pressing the “volume” icon.
The software flashing will start, the user will be able to monitor its progress using the status bars. After the new firmware is installed, the car radio will reboot by itself and show the desktop. After calibrating the screen (Recalibrate button), the device reboots into a new menu.
Important! If the user does not like the operation of the device after flashing, he has the opportunity to return to the factory software.
Modern radio for Lada Granta FL 2019-2021
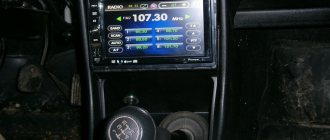
I want to share my joy. Not long ago I had to get rid of my old Lada Kalina 2008. I needed a new car with a large trunk for work. I purchased a new 2022 Lada Granta station wagon. The car is empty as a barrel. Well, at least they installed power steering and power windows. First of all, I took care of the safety and security of the car. For this purpose, an alarm system with auto start was installed.
Next came the question of music in the car. Having visited several car audio stores, I came to the conclusion that I don’t want to pay 1,500 rubles for connecting two connectors, and I don’t want to install the cheapest radio for 4,300 rubles. If you buy music for your car, then buy only a modern radio with a screen. The store “delighted” me by informing me that I would have to fork out for a car frame for the new Granta, because the panel has its own shape, and you can’t just install a standard 2 Din radio in it. They gave me a price tag of 12,800 rubles for the radio with a frame, and another 1,750 for installing all this in the car.
The amount is not small. I decided to hold off on music.
And then I remembered about the well-known Aliexpress. Maybe I’ll be able to find something there for my new Grant.
To be honest, I searched for a long time, but it was worth it.
It turns out that the Chinese quickly jumped in and created a ready-made solution for the Lada Granta FL. They made a car multimedia center with navigation, Internet, speakerphone, and all sorts of other bells and whistles. But what surprised me most was the price of this fancy radio. For only $98. Just imagine, 6500 for such a device!
Ordered on the same day. I understood that I was taking a risk. The product is new, there have been no buyers yet. And there’s no one to even ask. But who doesn't take risks?
Received it in 21 days, intact. They brought it straight to your home and handed it over personally. I open it, and there.
Radio with huge touch screen. On top of the sensor there is very high-quality anti-reflective glass, like on expensive Samsung devices. Everything is in films. I went to install it.
Installed it myself in 10 minutes. It turned out that everything fits perfectly.
I removed the regulators (left and right) on the heater control unit, pryed the unit with a screwdriver around the perimeter, and it snapped off. Next, I unscrewed the 2 screws that hold the radio, also pryed it open with a screwdriver, and it came out.
I disconnected the power connector, the antenna, and removed the radio. Next, I connected all the connectors that came with the radio to the radio, having previously extended the GPS and USB antenna into the glove compartment. I connected the main connector to the car, and that’s it.
The radio tape recorder fit like original, without gaps. The standard connectors for connecting power and speakers fit perfectly. Nothing needs to be redone.
The kit also included a bunch of wires for connecting a camera, an amplifier, an antenna for GPS navigation, USB extension cords, and much more.
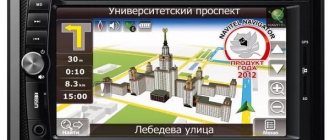
I immediately switched the settings to Russian. Set up the radio and equalizer. The sound of the radio is amazing! Bass and treble are adjustable. And it’s normal to hammer like that! I turned on the video clips, the screen and the image are absolutely amazing! There is enough RAM. The memory is 16 GB, you can put a lot of things into the radio’s memory, and you don’t need to carry any flash drives with you. I installed Yandex navigator with Alice, talked, she understands everything, it works. There is already a microphone built into the radio. I tried calling and talking through the radio. Very comfortably.
Now in one device Radio, Music, Video, Navigation, Bluetooth and speakerphone, Internet via Wi-Fi via smartphone, camera, DVR.
You can watch TV and YouTube via the Internet. The kids can play games, watch cartoons. Later I will install a rear view camera and a front camera with a DVR.
Before I ordered the radio, I found a way to save more than 1,200 rubles when purchasing this radio and two cameras. It turns out that you can get these cameras for free by applying special discount coupons when purchasing.
I cheated a little and registered again on the site, as if I was a new customer. Well, this is to get coupons for purchases.
Then I received coupons for $19 and applied them to the purchase. Link to coupons
I found a radio for 6500 here (I immediately added it to the cart so as not to have to look for it again)
Source
Standard for Grant FL restyled multimedia S185
By choosing to replace a push-button radio, the advantages of a large (9 or 10 inch) screen of the S185 series multimedia line produced by Winca customers receive:
- high-definition display and protective glass – this is on the outside;
- and inside there is a premium FM tuner;
- as well as a 4-channel sound amplifier.
In addition, the multimedia system has:
- lowest possible cost;
- modern design;
- reliability of both electronics and sensor equipment, as well as the element base.
This audio system, by the way, is ideal for those of our garage tribe who value excellent FM radio reception on highways, even at the maximum distance from cities with a population of over a million. And for actual manual installation, the kit includes everything you need, from the adapter frame and antenna to various CAN buses and fasteners.
As for the characteristics of the restyled head unit, these are:
- the display is the most sensitive, namely TouchScreen;
- with good brightness and resolution (1024/600);
- with capacitive and frost-resistant Multi Touch control options;
- with Android 8.1 operating system;
- with the presence of Spreadtrum 8141E as a 4-core processor;
- with 1 GB RAM;
- with 16 GB of internal memory;
- with GPS navigation;
- and with other, both standard and non-standard functions such as multi-steering wheel options, auto ignition and other assistants, the availability of which must be checked with sellers.
Installation of a standard restyled radio in place of the basic push-button MMC Granta FL
First of all, replacing a push-button radio with a restyled touch multimedia begins with disconnecting the battery terminals, and only then with dismantling the ventilation and heating control panel, which is located below the MMC panel. Namely, by removing the handles (see in the photo), simply by pulling them towards you.
The next manipulation should be to pry the panel along the contour of the panel using a plastic card or a plastic spatula so that the panel comes out. After the fasteners are unfastened, the entire control panel should fall out, hanging on the wires. Disconnecting or leaving the wiring in place is at the discretion of the person doing the replacement, as these wires will not interfere in the future.
After the control panel is removed, two self-tapping screws securing the radio will become accessible. Actually, only here the multimedia panel is attached with self-tapping screws, and in other places - only with the help of latches.
Therefore, in order to remove it after the screws are unscrewed, you need to pull it firmly towards yourself.
When the radio comes out of its seat, all that remains is to disconnect the power and antenna connectors.
The next manipulations are connecting all the connectors of the new multimedia that are included in the kit and installing the restyled MMC. And before that, you should extend the GPS antenna inside the dashboard into the glove compartment of the Granta FL.