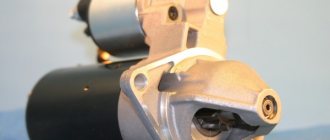
It's no secret that the starter for the VAZ 2114 is one of the most important parts, because it is it that allows you to start the car from the passenger compartment by turning the key. Without it, it is simply impossible to start the engine (except “from the pusher”). In today's article we will talk about the design of the starter, the principle of its operation, as well as how to replace it with your own hands.
Starter VAZ 2114
The principle of the device and its operation
Structurally, the starter 2114 is an electric motor powered by 12 volt direct current (on-board power supply). When the key is turned, its rotor begins to move, after which, with the help of a retractor relay, which brings the Bendix starter into engagement with the crankshaft flywheel, the latter begins to unwind.
After the combustion of the working mixture is initiated during rotation of the crankshaft and the engine starts, the retractor relay will move the bendix to the rear position and the starter will disengage with the flywheel.
Due to the fact that the starter has a fairly high load, its rated power is 1.55 kW.
In this case, the current strength in its circuit can reach:
- 80 A at idle;
- 375 A at maximum load;
- 700 A when in a braked state.
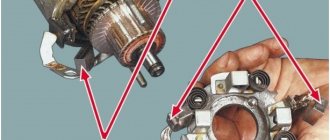
Starter design
As for the internal structure, the starter includes such components as:
- stator (fixed winding);
- rotor;
- bendix;
- brushes and their holders;
- solenoid relay;
- frame.
Also, sliding bushings, of which there are 3, are used as supporting elements for the rotor shaft in the starter. Two of them - front and rear - are pressed inside the body of the device, and the third is located at the point of contact between the bendix and the rotor.
When might a starter need to be repaired or replaced?
The mechanism under consideration is a short-term motor. In cases where the starter of the VAZ 2108 car is in fully working order, and the car battery produces high-quality current, starting the device lasts a few seconds at most. It should not function for a long time, so those who like to “drive” the starter should give up their habit and use it only as recommended by the manufacturers.
As the practice of operating the starter shows, its replacement and repair are most often required precisely in those cases when the owner of a VAZ 2108 excessively overloads the described mechanism, and also starts it with a weak battery. In addition, the breakdown of the starting device may be associated with certain problems caused by malfunctions of the car engine.
Most often, the starter fails in winter. At negative temperatures, very high loads are placed on it. If the mechanism is old, it simply “refuses” to function, which is not surprising, because it takes a huge current load of 450 amperes. This amount of current causes some common starter breakdowns, in particular, the phenomenon of burning contacts on the device relay. In this case, we are talking about melting the wires connected to the stator motor and to the “plus” of the battery.
Burning of contacts during vehicle operation cannot be avoided, since a large current regularly passes through the power circuits. Therefore, there is only one way out - to repair the relay according to the diagram below, clean the contacts, thereby restoring the functionality of the starter.
Main malfunctions and their symptoms
The most common breakdowns that occur in the starter are as follows:
- The electric motor of the device does not rotate. A short circuit has occurred on the stator windings, the rotor has become soured in the support bushings, or the contacts have oxidized;
- The electric motor spins, but at insufficient speed and low power. Either the graphite brushes are worn out or a short circuit has occurred on one of the windings;
- The starter works as it should, but rotation is not transmitted to the crankshaft. Bendix wear or breakdown;
- The starter starts the engine, but does not turn itself off. The retractor relay mechanism has oxidized or the return spring has burst.
Disassembled starter
If you notice one of the above signs on the starter, you should dismantle it and carry out detailed diagnostics in the removed state.
VAZ 2109 starter malfunctions, which are most common
We repair the starter in Samara 2
Considering that the overall design of the starter has not undergone any changes at all, the developers still tried to make certain adjustments and modernized some parts. The main difference is the shaft sleeve, which now does not belong to the starter, but is installed in the clutch system housing. This detail is often forgotten during diagnostics and repairs.
When repairing the 2109 starter, inexperienced drivers are perplexed to discover signs of breakdown when everything that can be replaced in the starter itself has been replaced. Replacing the VAZ 2109 starter bushing also has its own characteristics. It's not that easy to remove if you don't know how to do it correctly. This is very easy to do if you screw in a tap of suitable diameter. By cutting a thread inside the worn bushing, he will carefully remove it from the socket. Otherwise, the faults of the VAZ 21099 starter (and all other modifications of the 9), which are most often encountered, can be as follows:
the starter shaft does not rotate or rotates very slowly; the shaft rotates, but the gear does not get good engagement with the flywheel crown; the solenoid relay operates repeatedly in vain, but does not keep the gear in engagement; the starter makes an unusual noise when operating.
You can read about how to check the VAZ 2109 starter in specialized literature, but if you have a problem starting the engine, you should immediately begin repairs.
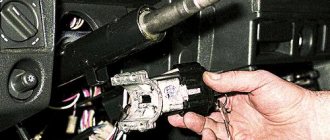
Removing the starter
A complete replacement of the VAZ 2114 starter is performed in the following order:
- Remove the terminals from the battery.
- Unscrew the 3 mounting bolts securing the device body to the box (if they are heavily oxidized and do not give in, you should first fill them with kerosene or “Vedeshka”).
- Disconnect the negative terminal from the solenoid relay (the red wire that goes to the device ends with it).
- Remove the positive terminal from the solenoid relay, having first unscrewed its fastening nut using a 13mm wrench.
- Slide the starter to the right and remove it from the mounting studs.
- Install the new device and fix it in the same order, but in reverse order.
Before installing a new starter, it is recommended to treat all 3 mounting studs with graphite grease - it will protect them from corrosion and will help dismantle the device during the next repair without any problems.
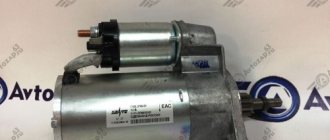
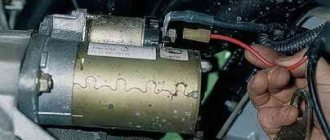
Removing the starter
It should be remembered that a new starter installed to replace a worn one must be exactly the same type, namely 5712.3708. Most often, owners of the 14th model recommend purchasing devices from manufacturers such as PRAMO, Eldix and KATEK.
Replacing starter bushings for VAZ 2109
On a VAZ 2109 car, the starter device is not the same as on classic VAZ models and one of the starter bushings is located in the gearbox housing, and the second is in the rear cover of the starter; to replace the front starter bushing, the starter must be removed (see information on how to remove a VAZ 2109 starter above). Bushing starter located in the VAZ 2109 gearbox housing replacement. Inspect the bushing pressed into the gearbox housing. If the bushing is worn or has burrs, holes, etc., replace the bushing. Replacing the VAZ 2109 starter bushing in the cover. Inspect the manifold side starter cover and intermediate support.
Was the material useful?
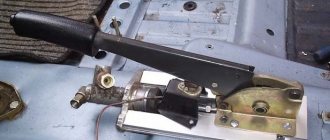
Starter repair
It should be noted that complete replacement of the device is an extreme measure, necessary only in case of very serious damage (for example, short circuit of the stator windings or mechanical failure of the housing). In all other cases, the most correct solution would be to repair the VAZ 2114 starter, which is also performed after removing the device.
In order to do this, you will need to unscrew the tightening screws of the device and halve the starter.
Starter repair
If you cannot divide the starter housing into two parts even with the screws removed, you should use a rubber or copper hammer and carefully apply several blows to the joint.
After the starter is halved, you should carefully examine the condition of its parts, namely the stator windings, rotor, graphite brushes and bendix.
Worn brushes should simply be replaced with ones of similar size, but to dismantle the bendix, you will need to perform a number of additional operations:
- use a slotted screwdriver to bend the flat fork at the point of its connection with the Bendix body;
- remove the protective ring;
- Using a flat screwdriver, remove the retaining ring;
- pull the bendix out of its body.
Installing a new bendix is done in the reverse order.
Installing a VAZ 2114 starter
At the end of the conversation, it is worth noting that you should not wait for serious starter malfunctions. Even minor problems with this device can be detected by a number of indirect signs - louder than usual clicks of the solenoid relay, the engine taking too long to start, loud sound during operation, and many others. Having noticed them, you should immediately dismantle the starter, disassemble it and diagnose the condition of its parts.
Scheme for checking the mechanism and replacing its relay
Repairing the starting device and replacing it is never carried out by experienced motorists without first testing it. The scheme for carrying out this operation is very simple, we place the starter with the windings up (that is, at the end), and then perform the following actions: connect one end of the wire to the bolts of the mechanism being tested, the other to the positive terminal; we start the device.
If after starting the mechanism does not turn well or does not turn at all, you can safely begin to repair it. In those cases when the device works normally, there is no need to disassemble it; most likely, the reason for the poor start lies in another element of the car. It would also be useful to check the mechanism relay directly. The verification scheme in this situation is elementary:
- “minus” is applied to the relay body;
- 12-volt voltage is supplied to the output;
- An ohmmeter is connected to the contact bolts.
The appearance of sparks on the contact bolts and the movement of the coupling into the hole tell us about the serviceability of the relay. But the absence of these phenomena, as well as voltage surges on the device, indicates that the relay requires replacement, since the starter does not turn because of it. To install a new relay element, you need to disassemble the starting mechanism - remove the shield from it, remove the hose from the air collector, and then very carefully remove the starter itself.
We carry out all these procedures in neutral, and lift the vehicle itself on a jack or place it in a pit.
Then you should unscrew the bolts that connect the starter to the relay, and install a new mechanism. In this case, it is important to ensure that the drive lever engages with the tip of the device being installed. We install the starter in its place and connect the previously removed wires.
Types of starter relays
On domestic cars, depending on the model, different types of parts . Each of them has its own design and application.
- For the “classics” (models from “kopek” to “seven” - 2101, 2106, 2107, etc.) - non-reductive. starter;
- For models from “eight” to 21099 – non-reductive. starter;
- Universal (for any model with a gearbox starter);
- For models from “eight” to 2109 and 21099, 21013 – 21015 – with AZD starter.
You should know that there are collapsible and non-dismountable models of solenoid relays. Collapsible ones, as a rule, belong to the old-style category and are found on VAZ 2101 - 2107 .
Non-removable structures are usually not repaired, replacing them with a new part.
Why did it happen so?
Perhaps the automatic requests do not belong to you, but to another user accessing the network from the same IP address as you. You need to enter the characters into the form once, after which we will remember you and be able to distinguish you from other users exiting from this IP. In this case, the page with the captcha will not bother you for quite a long time.
You may have add-ons installed in your browser that can make automatic search requests. In this case, we recommend that you disable them.
It is also possible that your computer is infected with a virus program that is using it to collect information. Maybe you should check your system for viruses.
If you have any problems or would like our support team, please use the feedback form.
Repair kit for retractor relay 2110 KZATE is a set of new elements and parts that are included in a specific unit or mechanism and are used instead of old, worn parts. After installing a new set of parts, the performance characteristics of the mechanism are completely restored and, perhaps, its replacement is not required.
Repair and maintenance of modern equipment is difficult to carry out without the use of spare parts. Often, expensive components in cars fail and require replacement. It’s just not always wise to purchase new parts. You can use a repair kit that is made of high-quality materials.
Delivery to regions
- Delivery of an order worth over 5,000 rubles is free if the delivery cost does not exceed 500 rubles; in other cases, delivery of goods is paid upon receipt of the goods.
- Delivery to the transport company is FREE.
- The timing, cost and method of delivery depend on the weight, dimensions and cost of the ordered product.
- Delivery options can be selected by the online store manager.
Orders are processed daily from 07:00 to 19:00 (Moscow time).
Order of shipment to regions of the Russian Federation:
- Place an order in the online store (on the website or by calling 8-800-234-96-34).
- Pay for the cost of the goods in any convenient way (card, Yandex.Money, QIWI, Webmoney, by bank receipt).
- After receiving the money (usually money arrives instantly), we will almost immediately deliver the order to the transport station.
Online store managers will help you choose the cheapest and fastest method of order delivery; you can trust our specialists who have studied all the nuances of pricing of transport companies.
Starter circuit for VAZ 2101, 2102, 2103, 2104, 2105, 2106, 2107
First, let's take a closer look at the VAZ 2101, 2102, 2103, 2104, 2105, 2106, 2107 starter circuit.
VAZ "classics" starter circuit
Deciphering the starter circuit for VAZ 2101, 2102, 2103, 2104, 2105, 2106, 2107:
- — drive side cover;
- — retaining ring;
- — restrictive ring;
- — drive gear;
- — overrunning clutch;
- - drive ring;
- — rubber plug;
- — drive lever;
- — relay anchor;
- — holding winding of the traction relay;
- — pull-in winding of the traction relay;
- — relay coupling bolt;
- — contact plate;
- — relay cover;
- — contact bolts;
- — collector;
- - brush;
- - armature shaft bushing;
- - cover on the collector side;
- — casing;
- — shunt coil of the stator winding;
- - frame;
- — stator pole fastening screw;
- - anchor;
- — armature winding;
- - intermediate ring.
Starter connection diagram for VAZ 2101, 2102, 2103, 2104, 2105, 2106, 2107
Deciphering the starter connection diagram for VAZ 2101, 2102, 2103, 2104, 2105, 2106, 2107:
- — generator;
- - accumulator battery;
- — starter;
- ignition switch;
P1 - pull-in winding of the traction relay;
P2 - holding winding of the traction relay.
Starter relay VAZ 2101, 2102, 2103, 2104, 2105, 2106, 2107
The structural structure, which has a VAZ 2106 starter solenoid relay, has a complex structure. At the same time, many drivers who more or less understand the details of the “six” can disassemble it with their own hands.
As for subsequent assembly, not every motorist can cope with this task. In this case, it is best to trust the professionals.
If you think the relay needs to be replaced but are not sure, it needs to be thoroughly inspected. It is noteworthy that the relay in the six functions similarly to other elements installed in various vehicle models. That is, it performs the functions of an electromagnet.
To check its condition, it is closed with a metal object. For example, you can use a screwdriver. If the starter begins to make rotational movements, then the starter relay will indeed need to be repaired. When clicks are heard from the retractor-type relay, but the starter rotates, then it is the latter that is broken.
Why does the starter relay stop working? There are several answers to this question. The problem may be due to outdated parts (the material deteriorates over time). The winding also . In this case, the reason may lie in the combustion of nickels , which are located in the internal part of the relay itself.
However, for a novice driver who has not previously done repairs, it is necessary to find out where the VAZ starter relay is located. If he does not want to waste his time and think about how to disassemble this part (by the way, there is a visual diagram of the relay, and you can buy all the spare parts yourself), then he can turn to professionals. They will not only disassemble this part, but will also connect the relay. In this case the price will be minimal.
Starter solenoid relay
If the starter is safely removed from under the hood, it must be cleaned. Contaminants are removed from it. As for oxidized contacts, they are processed using sandpaper.
Diagnostics of the starter solenoid relay:
- The starter is located near the battery. In this case, 2 electrical wires are prepared, which must be of sufficient length. Wires intended for “lighting” are ideal. They are equipped with so-called “crocodiles”.
- Initially, the positive terminal is connected to the battery (the corresponding output of the solenoid relay) via one electrical wire.
- Then the other wire is connected to the battery terminal, which has a negative value.
- Finally, you need to touch the free unoccupied end of the electrical wire with a negative value. This contact must take place with the starter housing. Further actions will depend on the results obtained.
If during the connection process the solenoid relay makes a quick and distinct click, then it is operating normally. When the part does not show any signs of “life,” the solenoid relay must be repaired or completely replaced.