Starter operating principle
Before you start troubleshooting, it is advisable to know how the starter works and how it works. Only with this knowledge will you be able to most accurately determine possible problems with the device.
The starter on the VAZ-2109 consists of the following elements:
- A motor supplied with direct current through four brushes.
- A clutch that provides free play with a gear that is designed to run the engine flywheel.
- A traction relay responsible for extending the clutch and gear when the device is turned on.
As a motorist, you need to remember that the starter has bushings that ensure free rotation of the rotor, gear and clutch.
One of these bushings is located inside the device, and the second is located in the clutch housing.
The starter performs its functions by converting an electrical signal into the rotational movement of a drive gear. The brushes transmit electricity to the motor. At the same time, the clutch extends and the gear is connected to the flywheel.
To start the engine, a short rotation of the starter is necessary. As soon as the internal combustion engine has been started, the device’s clutch returns to its place.
Scheme for checking the mechanism and replacing its relay
Repairing the starting device and replacing it is never carried out by experienced motorists without first testing it. The scheme for carrying out this operation is very simple, we place the starter with the windings up (that is, at the end), and then perform the following actions: connect one end of the wire to the bolts of the mechanism being tested, the other to the positive terminal; we start the device.
If after starting the mechanism does not turn well or does not turn at all, you can safely begin to repair it. In those cases when the device works normally, there is no need to disassemble it; most likely, the reason for the poor start lies in another element of the car. It would also be useful to check the mechanism relay directly. The verification scheme in this situation is elementary:
- “minus” is applied to the relay body;
- 12-volt voltage is supplied to the output;
- An ohmmeter is connected to the contact bolts.
The appearance of sparks on the contact bolts and the movement of the coupling into the hole tell us about the serviceability of the relay. But the absence of these phenomena, as well as voltage surges on the device, indicates that the relay requires replacement, since the starter does not turn because of it. To install a new relay element, you need to disassemble the starting mechanism - remove the shield from it, remove the hose from the air collector, and then very carefully remove the starter itself.
We carry out all these procedures in neutral, and lift the vehicle itself on a jack or place it in a pit.
Then you should unscrew the bolts that connect the starter to the relay, install a new mechanism
In this case, it is important to ensure that the drive lever engages with the tip of the device being installed. We install the starter in its place and connect the previously removed wires.
The most common starter failures
It is recommended to carry out troubleshooting while it is running on the car, because after dismantling the starter, it will be quite difficult to identify some breakdowns. The main symptoms are expressed in the following situations:
- Uncharacteristic noise when starting the engine.
- slow rotation or no rotation at all.
- The device rotates, but the gear does not engage with the flywheel.
- The starter rotates with the flywheel, but subsequently there is a gap in the engagement.
- When you turn the key, there is no sign of the device being “working.”
In each of the above cases, it is necessary to look at the engine compartment. It is likely that the problem may be hidden in poor contact connections and electrical connectors. Additionally, check the condition of the battery; it may be discharged.
Original parts and their analogues: which is better?
If, in the event of a breakdown, it was decided to purchase a new starter, then there is always a choice between two types: original or analogue? In the first case, the cost will be much higher. As a result, purchase and installation costs will be higher. But the original parts are distinguished by their quality. By installing a starter from AvtoVAZ, you can forget about problems with it for 40-50 thousand km. Cost of the original starter:
| Manufacturer's name | vendor code | Parameter | Cost, rubles |
| AvtoVAZ | 21214-3708010-81 | 12 V; 1.5 kWt | From 4 thousand rubles |
Before you go and purchase an analogue in a store or market, you should carefully study the original packaging. For example, counterfeits are often sold in boxes with low quality printing. There are no special holograms or other important parts and components. Therefore, you should carefully read the details before paying.
The following manufacturers have proven themselves to be good:
| Manufacturer's name | vendor code | Parameter | Cost, rubles |
| Bosch | 1362059 | 12 V; 1.5 kWt | 2 thousand rubles |
| Valeo | 1367008 | 12 V; 1.5 kWt | 1.7 thousand rubles |
| Delco | 986016200 | 12 V; 1.5 kWt | 2.9 thousand rubles |
Starter diagnostics
You can check the functionality of the starter without dismantling the device using a multimeter. As practice shows, it is most convenient to use a digital device.
- The battery terminals are connected to the poles of the measuring instrument. Ask an assistant to follow the readings, and get into the car yourself. For safety, set the gearbox to neutral and tighten the handbrake.
- Once the tester has been connected, the voltmeter should show voltage. If everything is in order with the battery, the values will be in the range from 11 to 13 V.
- Turn the ignition key, turn on the starter. At this moment, measure the voltage. If the system loses 1-2 V, then the starter provides no resistance. If the readings decrease by half, then we can conclude that “the starter is taking over.” In this situation, the brushes or bushings may have worn out.
- After dismantling the device, you can check the condition of the traction relay. Apply 12 volts from the battery to the terminals on the case. If the overrunning clutch moves towards the front cover, then everything is fine with this unit. Otherwise, you will need to buy a new element and replace it.
Solution
- First you need to put your “nine” in neutral gear, and also turn on the parking brake.
- After this, the hood opens, you need to find the red cable on the retractor.
- Using a thick screwdriver, you need to short-circuit the terminals on this component. When a short circuit occurs, sparks may fly in different directions - there is no need to worry, this is a normal situation.
- Then you need to try to start the engine. If you notice that the starter starts to work normally when screwing in, then the problem is not with it. If the device does not turn, then most likely it will need to be changed.
- If the mechanism is working properly, the red wire from the solenoid relay must be removed, and voltage from the battery must be applied to this terminal. If there is a pop, the relay will be fully operational. If there was no clap, then most likely the reason lies precisely in the relay.
- Check the contacts on the starter, it happens that due to oxidation it stops turning.
Removing the starter
There are situations when the starter can be repaired only after it is dismantled. Everything here is quite simple, and no difficulties should arise. You can remove it in a matter of minutes. To do this, you will need an inspection hole, an overpass or a lift, as well as a set of keys.
- Put the car on the handbrake and the gearbox in first gear.
- Remove the negative terminal from the battery.
- The connector with the wire is disconnected from the starter traction relay output.
- Unscrew the nut that secures the relay contact bolt and remove the wire.
- If there is engine crankcase protection, then remove it by unscrewing the fixing bolts one by one.
- Remove the two nuts that hold the starter in place. It is better to do this from below the engine compartment. It is better to unscrew the third nut from the top.
- The starter can now be removed.
Clean the device from any dirt before disassembling it.
Individual situations
If the VAZ 21099 injector stops starting, you can try to close the contacts of the mechanism in a straight line.
But sometimes there are emergency situations when the device stops functioning, let’s consider a few of them:
- The injection engine does not start in cold weather, but all devices work normally, the battery is charged. If there is no click, you should first diagnose the safety components, electrical circuit, and also the solenoid relay. If the device clicks, the relay must be replaced.
- The starter turns all day, there is a spark, but in the evening the engine stops starting. Before checking the starter, it is necessary to fully charge the battery, and then clean the contacts on both the battery and the mechanism itself. If these steps did not help solve the problem, you need to check the battery itself more carefully - try closing the contacts with a wire, which may cause a spark to melt. If this does not help, try applying a positive charge from the battery directly to the relay. If there are no changes, the unit will have to be replaced.
- If the car was operated normally all day, but after parking for five minutes it stopped starting, you can try to close the mechanism. You need to directly close two bolts on the relay; if this helps, but later the problem reappears, then disassemble the unit completely. Most likely, the problem lies directly in the erasing of the brushes. In this case, they will need to be changed.
- The unit does not turn at all, but the car can be started from the pushrod. If the problem is not with the starter, then check the fuse box and ignition switch. But before this, you should check the wiring - the reason may lie in the oxidation of the contacts.
Sequential disassembly of the starter
The whole process occurs in several stages, and at each stage a potential malfunction can be identified.
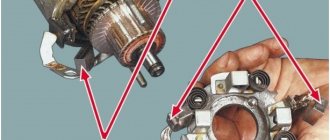
The first stage involves inspecting the brushes after removing them. This is generally the most common problem that prevents the starter from working properly. To do this, do the following:
- Unscrew the two screws that secure the protection cover. It comes off very easily.
- Using a screwdriver, remove the retaining ring and adjusting washers from the shaft.
- The next step is to remove the two tie rod nuts and the cover can be removed from the manifold side.
- Now, using a screwdriver, you can press the springs and pull the brushes out of their seats.
To measure the height of the brushes, use a ruler or caliper. If the element height is less than 12 mm, then they should be replaced. If there are chips and cracks on the surface, this is also a reason to update them with new parts.
Do-it-yourself VAZ 2109 starter repair - an opportunity to save a lot of money
As you know, the starter is one of the most important parts of a car. The malfunction of this element is easily detected, even by inexperienced drivers. Such repairs can be done on your own, you just have to have the instructions at hand, which will be given below. In this article, we will look at the starter of the popular car of the golden youth of the 90s, VAZ 2109.
This car became the ancestor of a large number of cars.
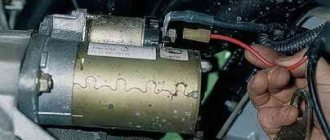
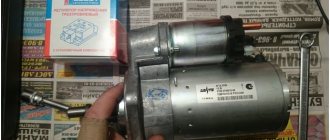
VAZ 2109 starter before repair
But as a result of use, this model began to crumble just like the previous Lada. Parts began to fail again, just like on the previous Zhiguli. The starter, which was the main part of the starting system, suffered especially, and was often subjected to heavy loads, especially in the winter.
Checking the overrunning clutch with gear
In order to get to the overrunning clutch with the gear, you will need to pull the armature out of the front cover. Sequencing:
- Remove the retaining ring next to the overrunning clutch, and then remove the restrictor ring.
- The next step is to remove the plastic lever stop and remove the anchor.
- Now remove the intermediate support from the shaft.
- Visually assess the condition of the gear teeth. If obvious defects are noticed, then this element must be replaced.